摘要:
Android上的第三方开源DrawableView支持手写,类似于写字板。DrawableView支持更改画笔颜色、画笔线条粗细以及画布的部分手势缩放和拖动显示区域。最后,它支持将手绘图纸保存到本地。
Android上的第三方开源DrawableView支持手写,类似于写字板。DrawableView支持改变画笔颜色,画笔线条粗细,画布的手势缩放和拖曳显示部分区域。并最终支持将手绘的图保存到本地。
在github上的项目主页:https://github.com/PaNaVTEC/DrawableView
先把布局文件中写一个DrawableView:
 1 <LinearLayout xmlns:android="http://schemas.android.com/apk/res/android"
 2     xmlns:tools="http://schemas.android.com/tools"
 3     android:padding="5dp"
 4     android:layout_width="match_parent"
 5     android:layout_height="match_parent"
 6     android:orientation="vertical"
 7     tools:context="com.zzw.testdrawableview.MainActivity" >
 8
 9     <RelativeLayout
10         android:layout_width="match_parent"
11         android:layout_height="wrap_content" >
12
13         <Button
14             android:id="@+id/subWidth"
15             android:layout_width="36dp"
16             android:layout_height="36dp"
17             android:layout_alignParentRight="true"
18             android:layout_alignParentTop="true"
19             android:background="@drawable/sub" />
20
21         <Button
22             android:id="@+id/addWidth"
23             android:layout_width="36dp"
24             android:layout_height="36dp"
25             android:layout_alignParentLeft="true"
26             android:layout_alignParentTop="true"
27             android:background="@drawable/add" />
28
29         <Button
30             android:id="@+id/sava"
31             android:layout_width="36dp"
32             android:layout_height="36dp"
33             android:layout_alignParentTop="true"
34             android:layout_centerHorizontal="true"
35             android:background="@drawable/sava" />
36
37         <Button
38             android:id="@+id/PaintColor"
39             android:layout_width="36dp"
40             android:layout_height="36dp"
41             android:layout_alignParentTop="true"
42             android:layout_marginRight="50dp"
43             android:layout_toLeftOf="@+id/sava"
44             android:background="@drawable/rand" />
45
46         <Button
47             android:id="@+id/undo"
48             android:layout_width="36dp"
49             android:layout_height="36dp"
50             android:layout_alignParentTop="true"
51             android:layout_marginLeft="50dp"
52             android:layout_toRightOf="@+id/sava"
53             android:background="@drawable/ret" />
54
55     </RelativeLayout>
56
57     <me.panavtec.drawableview.DrawableView
58         android:id="@+id/paintView"
59         android:layout_width="match_parent"
60         android:layout_height="wrap_content"
61         android:layout_alignParentBottom="true"
62         android:layout_weight="1" />
63
64 </LinearLayout>
JAVA代码:
  1 package com.zzw.testdrawableview;
  2
  3 import java.io.File;
  4 import java.io.FileOutputStream;
  5 import java.io.IOException;
  6
  7 import android.app.Activity;
  8 import android.graphics.Bitmap;
  9 import android.graphics.Color;
 10 import android.os.Bundle;
 11 import android.os.Environment;
 12 import android.util.Log;
 13 import android.view.View;
 14 import android.view.View.OnClickListener;
 15 import android.widget.Button;
 16 import android.widget.Toast;
 17 import me.panavtec.drawableview.DrawableView;
 18 import me.panavtec.drawableview.DrawableViewConfig;
 19
 20 public class MainActivity extends Activity implements OnClickListener {
 21
 22     private DrawableView drawableView;
 23     private DrawableViewConfig config;
 24
 25     @Override
 26     protected void onCreate(Bundle savedInstanceState) {
 27         super.onCreate(savedInstanceState);
 28         setContentView(R.layout.activity_main);
 29
 30         config = new DrawableViewConfig();
 31
 32         drawableView = (DrawableView) findViewById(R.id.paintView);
 33
 34         Button addWidth = (Button) findViewById(R.id.addWidth);
 35         Button subWidth = (Button) findViewById(R.id.subWidth);
 36         Button PaintColor = (Button) findViewById(R.id.PaintColor);
 37         Button undo = (Button) findViewById(R.id.undo);
 38         Button sava = (Button) findViewById(R.id.sava);
 39
 40         addWidth.setOnClickListener(this);
 41         subWidth.setOnClickListener(this);
 42         PaintColor.setOnClickListener(this);
 43         undo.setOnClickListener(this);
 44         sava.setOnClickListener(this);
 45
 46         // 画笔颜色
 47         config.setStrokeColor(Color.RED);
 48
 49         // 画布边界
 50         config.setShowCanvasBounds(true);
 51
 52         // 设置画笔宽度
 53         config.setStrokeWidth(10.0f);
 54
 55         // 缩放
 56         config.setMinZoom(1.0f);
 57         config.setMaxZoom(3.0f);
 58
 59         // 画布宽和高
 60         config.setCanvasHeight(3000);
 61         config.setCanvasWidth(2000);
 62
 63         drawableView.setConfig(config);
 64     }
 65
 66     @Override
 67     public void onClick(View v) {
 68         switch (v.getId()) {
 69         case R.id.addWidth:
 70             // 设置每次增加10.0的宽度
 71             config.setStrokeWidth(config.getStrokeWidth() + 10);
 72             Toast.makeText(getApplicationContext(),
 73                     "当前画笔宽度:" + config.getStrokeWidth(), 0).show();
 74             break;
 75
 76         case R.id.subWidth:
 77             // 设置每次减少10.0的宽度
 78             if (config.getStrokeWidth() > 10) {
 79                 config.setStrokeWidth(config.getStrokeWidth() - 10);
 80                 Toast.makeText(getApplicationContext(),
 81                         "当前画笔宽度:" + config.getStrokeWidth(), 0).show();
 82             }
 83             break;
 84
 85         case R.id.PaintColor:
 86             // 测试期间,随机生成一种颜色
 87             int r1 = (int) (Math.random() * 256);
 88             int r2 = (int) (Math.random() * 256);
 89             int r3 = (int) (Math.random() * 256);
 90             config.setStrokeColor(Color.argb(255, r1, r2, r3));
 91             Toast.makeText(getApplicationContext(), "颜色生成成功", 0).show();
 92             break;
 93
 94         case R.id.undo:
 95             drawableView.undo();
 96             break;
 97
 98         case R.id.sava:
 99             try {
100                 savaBitmapToSDCard();
101             } catch (IOException e) {
102                 e.printStackTrace();
103             }
104             break;
105         }
106     }
107
108     // 将用户手绘的DrawableView转化为图片保存到本地系统默认的图片库中。
109     private void savaBitmapToSDCard() throws IOException {
110
111         // 从DrawableView获得Bitmap
112         Bitmap bmp = drawableView.obtainBitmap();
113
114         // 获取保存的路径
115         File parent_path = Environment
116                 .getExternalStoragePublicDirectory(Environment.DIRECTORY_PICTURES);
117         File f = new File(parent_path.getAbsoluteFile(), "myDrawableView.png");
118         f.createNewFile();
119         Log.d("保存路径", f.getAbsolutePath());
120
121         FileOutputStream fos = new FileOutputStream(f);
122         bmp.compress(Bitmap.CompressFormat.PNG, 100, fos);
123         fos.flush();
124         fos.close();
125
126         Toast.makeText(getApplicationContext(),
127                 "保存成功,保存路径" + f.getAbsolutePath(), 1).show();
128     }
129
130 }
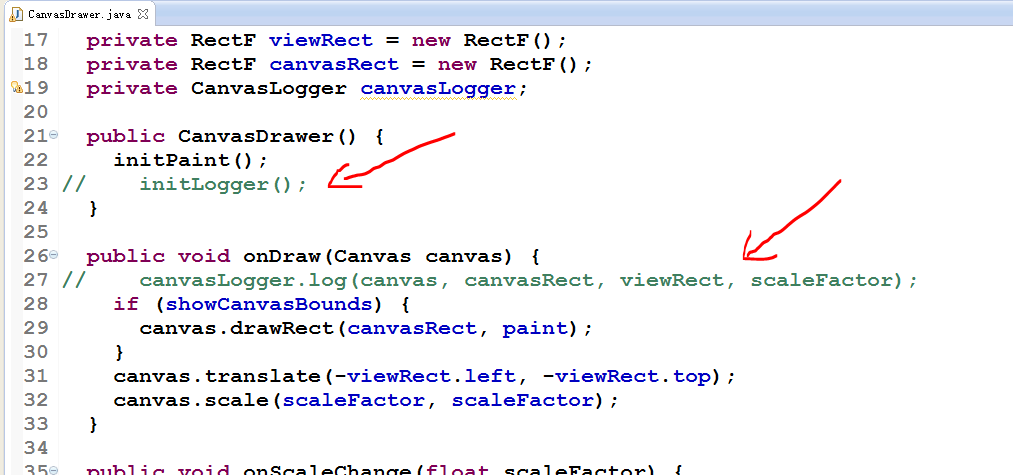
默认的,在未发布的debug阶段,DrawableView会在画布上添加一些log日志输出。如果不打算在画布中显示log,可以修改DrawableView的源代码去掉DrawableView默认的log日志。关键代码有两行,在CanvasDrawer的库文件源代码中:
1 initLogger();
2
3 ...
4
5 canvasLogger.log(canvas, canvasRect, viewRect, scaleFactor);
将这两行注释掉即可,如图: