什么是PXE
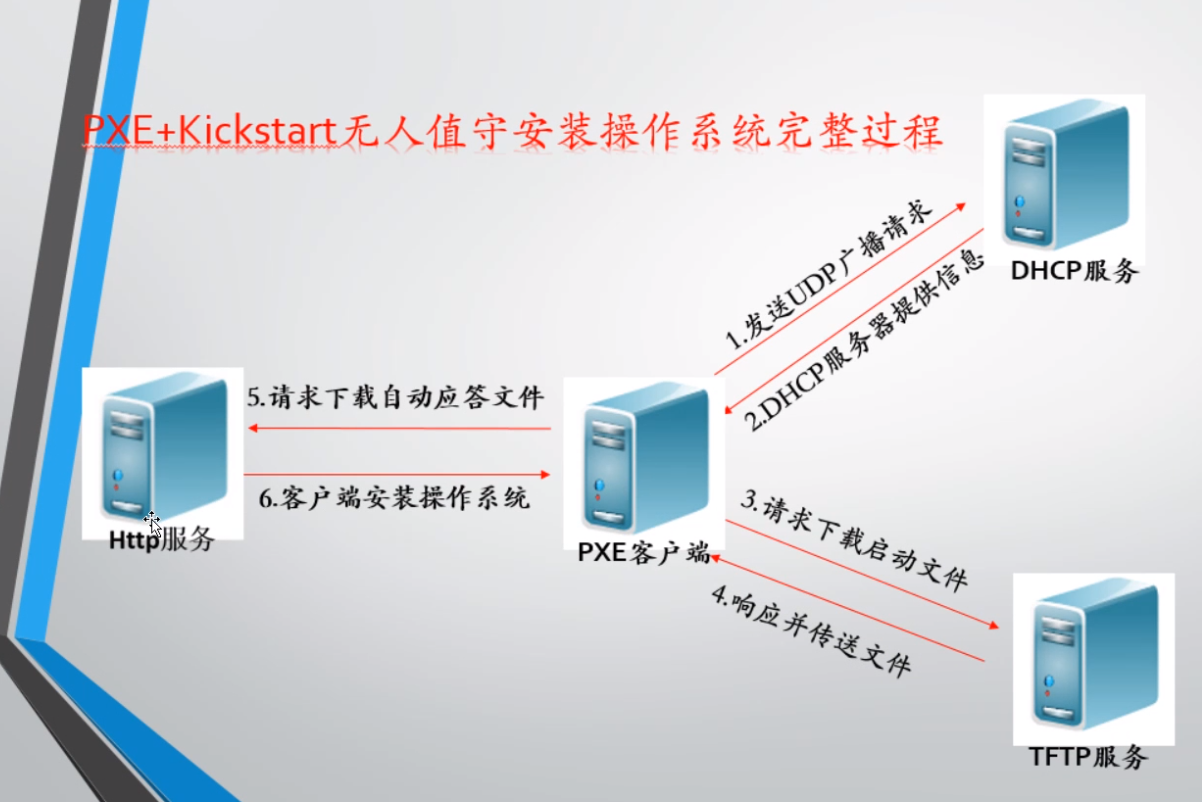
1. PXE,全名Pre-boot Execution Environment,预启动执行环境
2. 通过网络接口启动计算机,不依赖本地存储设备或本地已安装的操作系统
3. 由intel和systemsoft公司于1999年9月20日公布的技术
4. client/server的工作模式
5. PXE客户端会调用网际协议(ip),用户数据报协议(udp),动态主机设定协议(dhcp),小型文件传输协议(TFTP)等网络协议
6.PXE客户端(client)这个术语是指机器在PXE启动过程中的角色。一个PXE客户端可以是一台服务器,笔记本电脑或者其他装有PXE启动代码的机器
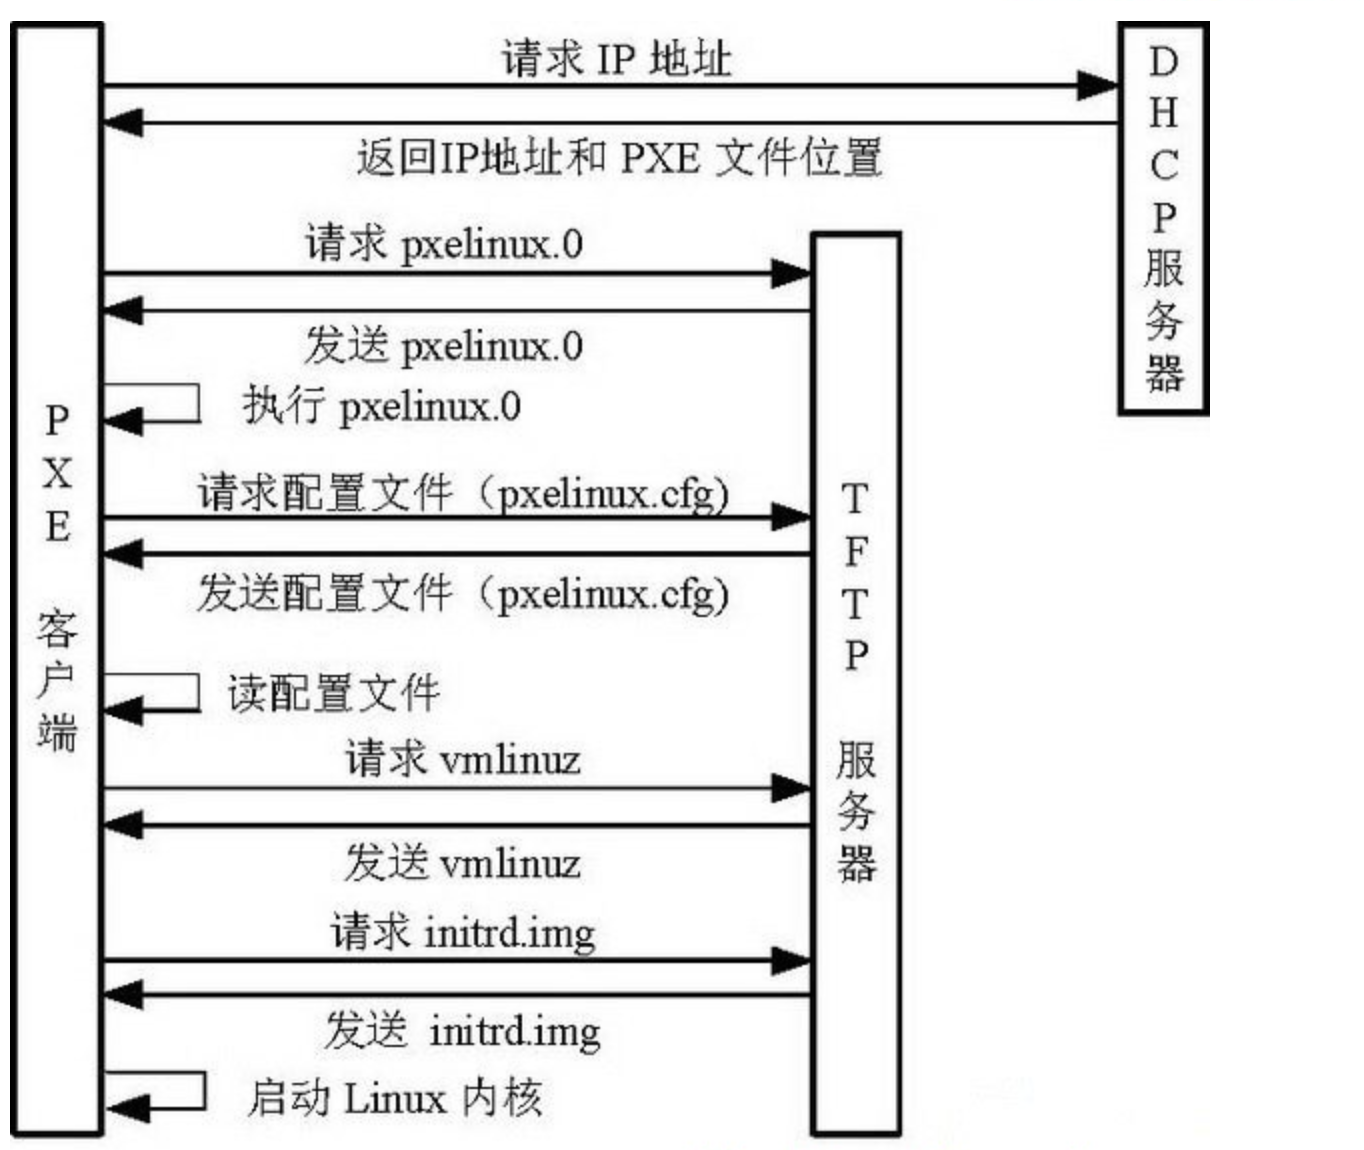
PXE的工作流程
,
环境准备
1.安装基础软件,如果是最小化安装的话
yum install -y bash-completion vim lrzsz wget expect net-tools nc nmap tree dos2unix htop iftop iotop unzip telnet sl psmisc nethogs glances bc ntpdate

2.配置yum源
wget -O /etc/yum.repos.d/CentOS-Base.repo http://mirrors.aliyun.com/repo/Centos-7.repo
wget -O /etc/yum.repos.d/epel.repo http://mirrors.aliyun.com/repo/epel-7.repo
yum clean all
yum makecache

3.关闭防火墙
[root@kickstart yum.repos.d]# systemctl stop firewalld
[root@kickstart yum.repos.d]# systemctl disable firewalld
Removed symlink /etc/systemd/system/multi-user.target.wants/firewalld.service.
Removed symlink /etc/systemd/system/dbus-org.fedoraproject.FirewallD1.service.

[root@client01 ~]# sed -i  's/enforcing/disabled/g' /etc/selinux/config
[root@kickstart ~]# getenforce
Disabled

4.关闭vmware的dhcp服务,设置linux静态ip
[root@kickstart ~]# cat /etc/sysconfig/network-scripts/ifcfg-ens33
TYPE="Ethernet"
PROXY_METHOD="none"
BROWSER_ONLY="no"
BOOTPROTO="static"
DEFROUTE="yes"
IPV4_FAILURE_FATAL="no"
IPV6INIT="yes"
IPV6_AUTOCONF="yes"
IPV6_DEFROUTE="yes"
IPV6_FAILURE_FATAL="no"
IPV6_ADDR_GEN_MODE="stable-privacy"
NAME="ens33"
UUID="b4c06569-fc94-4e94-9c63-0391c7a35432"
DEVICE="ens33"
ONBOOT="yes"
IPADDR=172.18.41.133
NETMASK=255.255.255.0
DNS1=1.2.4.8
GATEWAY=172.18.41.2

5.系统检查
[root@kickstart ~]#  cat /etc/redhat-release
CentOS Linux release 7.5.1804 (Core)

[root@kickstart ~]# uname -r
3.10.0-862.el7.x86_64

[root@kickstart ~]# ifconfig  ens33 |awk  'NR==2 {print $2}'
172.18.41.133

[root@kickstart ~]# iptables -L
Chain INPUT (policy ACCEPT)
target     prot opt source               destination

Chain FORWARD (policy ACCEPT)
target     prot opt source               destination

Chain OUTPUT (policy ACCEPT)
target     prot opt source               destination

6.时间同步更新
[root@kickstart ~]# ntpdate -u ntp.aliyun.com
修改时区
[root@kickstart ~]# ln -sf /usr/share/zoneinfo/Asia/Shanghai /etc/localtime
[root@kickstart ~]# date
Tue Jul 21 19:05:06 CST 2020
DHCP报文
DHCP协议中的报文

DHCP报文共有一下几种:

DHCP DISCOVER :客户端开始DHCP过程发送的包,是DHCP协议的开始

DHCP OFFER :服务器接收到DHCP DISCOVER之后做出的响应,它包括了给予客户端的IP(yiaddr)、客户端的MAC地址、租约过期时间、服务器的识别符以及其他信息

DHCP REQUEST :客户端对于服务器发出的DHCP OFFER所做出的响应。在续约租期的时候同样会使用。

DHCP ACK :服务器在接收到客户端发来的DHCP REQUEST之后发出的成功确认的报文。在建立连接的时候,客户端在接收到这个报文之后才会确认分配给它的IP和其他信息可以被允许使用。

DHCP NAK :DHCP ACK的相反的报文,表示服务器拒绝了客户端的请求。

DHCP RELEASE :一般出现在客户端关机、下线等状况。这个报文将会使DHCP服务器释放发出此报文的客户端的IP地址

DHCP INFORM :客户端发出的向服务器请求一些信息的报文

DHCP DECLINE :当客户端发现服务器分配的IP地址无法使用(如IP地址冲突时),将发出此报文,通知服务器禁止使用该IP地址。
DHCP作用域
作用域是指DHCP服务器可分配租用给DHCP客户机的IP地址范围。DHCP服务器应该至少配置一个作用域,各作用域的IP地址范围(IP地址池)不能出现重叠。
保留IP
保留IP用于有特定服务的客户机,需要将保留的IP与客户机的MAC地址绑定。
IP租约的跟新
当客户机重新启动或租期达50%时,就需要重新更新租约,客户机直接向提供租约的服务器发送请求DHCPREQUEST消息,要求更新现有的地址租约。如果DHCP服务器接收到请求,它将发送DHCP确认信息给客户机,更新客户机租约。如果客户机无法与提供租约的服务器取得联系,则客户机一直等到租期到达87.5%时,进入到一种重新申请的状态,它向网络上所有的服务器广播DHCPDISCOVER请求更新现有的IP租约。
IP租约的释放
使用ipconfig/release使DHCP客户机向DHCP服务器发送DHCPRELEASE消息并释放其租约。
如果客户机在租约时间内保持关闭并且不更新租约,在租约到期后DHCP服务器可能将客户机的IP地址分配给其他的客户机。如果客户机不发送DHCPRELEASE消息,那么它在重启后,将试图尝试继续使用上一次使用过的IP地址。
部署DHCP服务器
# 机器1 dhcp服务端
[root@kickstart ~]# ifconfig ens33 |awk 'NR==2 {print $2}'
172.18.41.133
[root@kickstart ~]# hostname
kickstart
[root@kickstart ~]# yum install dhcp -y
# 查询软件包信息
[root@kickstart ~]# rpm -qa dhcp
dhcp-4.2.5-79.el7.centos.x86_64
# 查看dhcp配置文件
[root@kickstart ~]# cat /etc/dhcp/dhcpd.conf
#
# DHCP Server Configuration file.
# see /usr/share/doc/dhcp*/dhcpd.conf.example
# see dhcpd.conf(5) man page
#
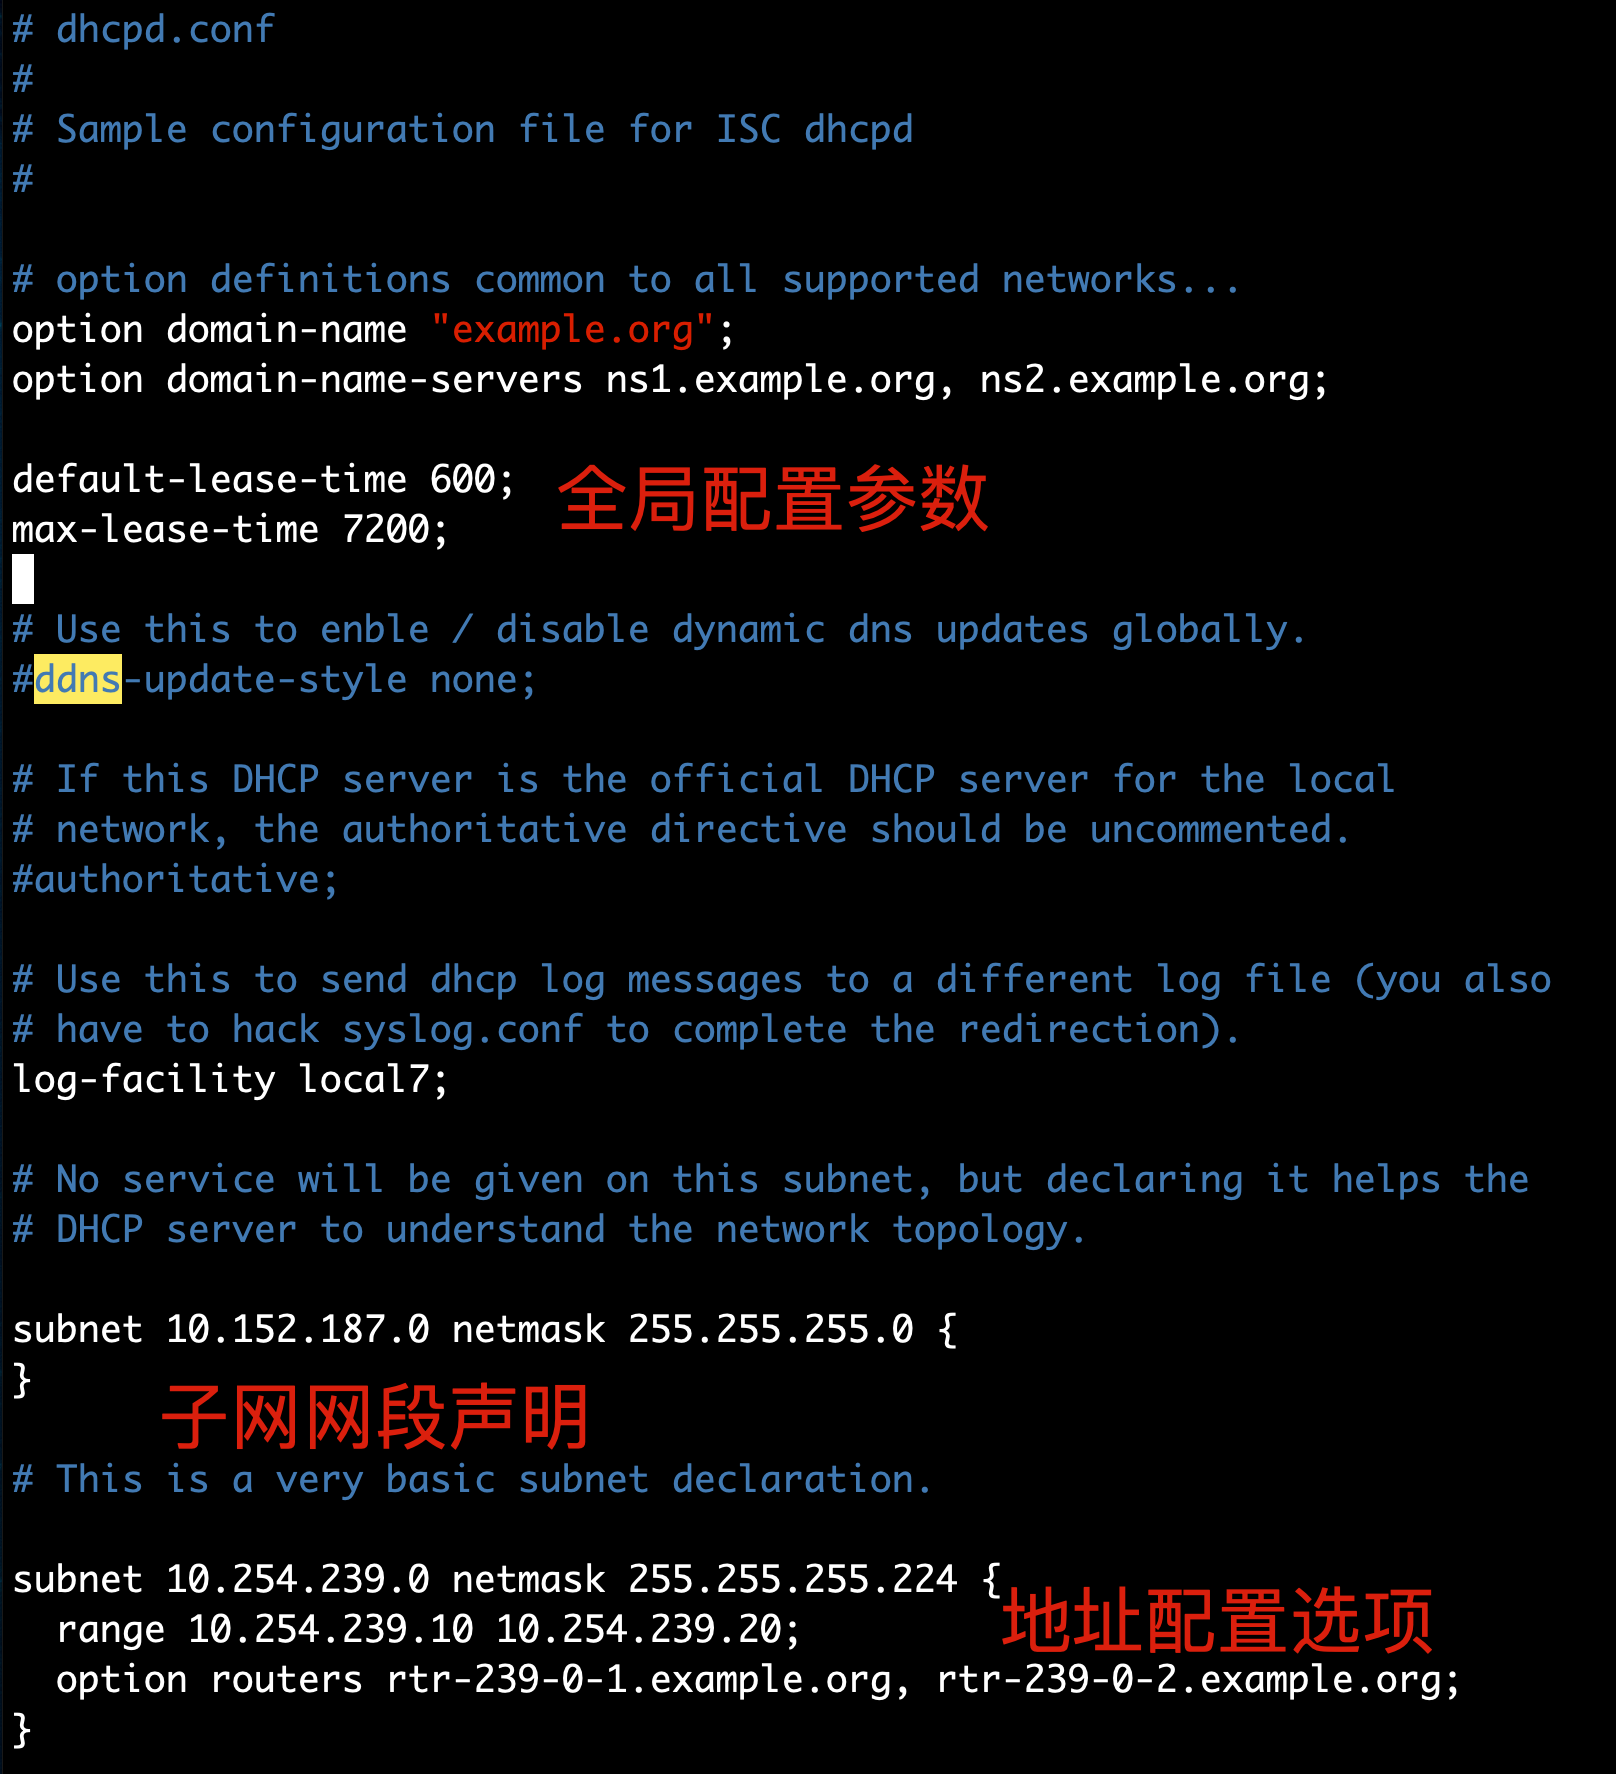
# 查看DHCP示例配置文件
#
# DHCP Server Configuration file.
# see /usr/share/doc/dhcp*/dhcpd.conf.example
# see dhcpd.conf(5) man page
#
# dhcpd.conf
#
# Sample configuration file for ISC dhcpd
#
# option定义选项
# option definitions common to all supported networks...
option domain-name "example.org";
option domain-name-servers ns1.example.org, ns2.example.org;
default-lease-time 600; #默认租约时间单位秒
max-lease-time 7200; #最大租约时间单位秒
# Use this to enble / disable dynamic dns updates globally.
#ddns-update-style none;
# If this DHCP server is the official DHCP server for the local
# network, the authoritative directive should be uncommented.
#authoritative;
# Use this to send dhcp log messages to a different log file (you also
# have to hack syslog.conf to complete the redirection).
log-facility local7;
# No service will be given on this subnet, but declaring it helps the
# DHCP server to understand the network topology.
subnet 10.152.187.0 netmask 255.255.255.0 { #定义子网
}
# This is a very basic subnet declaration.
subnet 10.254.239.0 netmask 255.255.255.224 {
range 10.254.239.10 10.254.239.20; #指定IP地址池
# # 定义其他参数,如 dns,gateway
option routers rtr-239-0-1.example.org, rtr-239-0-2.example.org;
}
# This declaration allows BOOTP clients to get dynamic addresses,
# which we don't really recommend.
subnet 10.254.239.32 netmask 255.255.255.224 {
range dynamic-bootp 10.254.239.40 10.254.239.60;
option broadcast-address 10.254.239.31;
option routers rtr-239-32-1.example.org;
}
# A slightly different configuration for an internal subnet.
# 选项可以写在子网内,优先级更高,全局优先级低
subnet 10.5.5.0 netmask 255.255.255.224 {
range 10.5.5.26 10.5.5.30;
option domain-name-servers ns1.internal.example.org; #DNS服务器,最多三个
option domain-name "internal.example.org"; #可选 设置默认搜索域
option routers 10.5.5.1; #网关
option broadcast-address 10.5.5.31; #可选 备选广播地址
default-lease-time 600;
max-lease-time 7200;
}
# Hosts which require special configuration options can be listed in
# host statements. If no address is specified, the address will be
# allocated dynamically (if possible), but the host-specific information
# will still come from the host declaration.
# host 用于区别不同的主机名
host passacaglia {
hardware ethernet 0:0:c0:5d:bd:95;
filename "vmunix.passacaglia";
server-name "toccata.fugue.com";
}
# Fixed IP addresses can also be specified for hosts. These addresses
# should not also be listed as being available for dynamic assignment.
# Hosts for which fixed IP addresses have been specified can boot using
# BOOTP or DHCP. Hosts for which no fixed address is specified can only
# be booted with DHCP, unless there is an address range on the subnet
# to which a BOOTP client is connected which has the dynamic-bootp flag
# set.
# host 用于区别不同的主机名,例如针对该MAC地址,设置固定IP,主机名
host fantasia { #主机
hardware ethernet 08:00:07:26:c0:a5; #指定文件服务器MAC地址
fixed-address fantasia.fugue.com; #指定固定IP地址
}
# You can declare a class of clients and then do address allocation
# based on that. The example below shows a case where all clients
# in a certain class get addresses on the 10.17.224/24 subnet, and all
# other clients get addresses on the 10.0.29/24 subnet.
class "foo" {
match if substring (option vendor-class-identifier, 0, 4) = "SUNW";
}
shared-network 224-29 {
subnet 10.17.224.0 netmask 255.255.255.0 {
option routers rtr-224.example.org;
}
subnet 10.0.29.0 netmask 255.255.255.0 {
option routers rtr-29.example.org;
}
pool {
allow members of "foo";
range 10.17.224.10 10.17.224.250;
}
pool {
deny members of "foo";
range 10.0.29.10 10.0.29.230;
}
}
编写DHCP配置文件
[root@kickstart ~]# cat /etc/dhcp/dhcpd.conf
#
# DHCP Server Configuration file.
#   see /usr/share/doc/dhcp*/dhcpd.conf.example
#   see dhcpd.conf(5) man page
#

subnet 172.18.41.0 netmask 255.255.255.0 {
range 172.18.41.100 172.18.41.199;                # range设置起始,结束ip范围
option subnet-mask 255.255.255.0;                # 选项,设置掩码
option routers 172.18.41.2;                        # dhcp服务的网关设置,这里不写,客户端则无法上网
option domain-name-servers 1.2.4.8;               # 保证dhcp客户端可以域名解析
default-lease-time 21600;                        # 默认的IP租用期限
max-lease-time 43200;                                # 最大的IP租用期限
next-server 172.18.41.133;                        # 告知客户端tftp服务器的ip
filename "/pxelinux.0";                            # 指明引导文件,用于指定PXE的运行程序文件,放在TFTP服务器的目录下
}
【配置文件解释】
filename:指明引导文件名称,用于指定PXE的运行程序文件,一般是在TFTP服务器的工作目录下,这个是关于PXE启动的配置。流程如下:

        客户机通过网络启动,一般采用的就是intel的PXE来启动;

        PXE首先指定DHCP,获取自身IP地址、TFTP服务器或者NFS服务器的IP地址、PXE程序等内容;

        执行获取的PXE程序,获得详细配置内容,再获取linux虚拟系统和intrid等内容;

        最后加载整个linux系统到内核。

next-server server-name(一般是IP):客户端启动后,获得了IP地址,会加载引导文件,这里就定义提供引导文件的服务器IP地址
【启动DHCP服务,检查日志】
[root@kickstart ~]# systemctl start dhcpd
[root@kickstart ~]# systemctl is-enabled dhcpd
disabled
[root@kickstart ~]# systemctl is-active  dhcpd
active


# 部分日志如下
[root@kickstart ~]# tail -f /var/log/messages
Jul 21 06:23:06 kickstart systemd: Starting DHCPv4 Server Daemon...
Jul 21 06:23:06 kickstart dhcpd: Internet Systems Consortium DHCP Server 4.2.5
Jul 21 06:23:06 kickstart dhcpd: Copyright 2004-2013 Internet Systems Consortium.
Jul 21 06:23:06 kickstart dhcpd: All rights reserved.
Jul 21 06:23:06 kickstart dhcpd: For info, please visit https://www.isc.org/software/dhcp/
Jul 21 06:23:06 kickstart dhcpd: Not searching LDAP since ldap-server, ldap-port and ldap-base-dn were not specified in the config file
Jul 21 06:23:06 kickstart dhcpd: Wrote 0 leases to leases file.
Jul 21 06:23:06 kickstart dhcpd: Listening on LPF/ens33/00:0c:29:e9:ed:77/172.18.41.0/24
Jul 21 06:23:06 kickstart dhcpd: Sending on   LPF/ens33/00:0c:29:e9:ed:77/172.18.41.0/24
Jul 21 06:23:06 kickstart dhcpd: Sending on   Socket/fallback/fallback-net
Jul 21 06:23:06 kickstart systemd: Started DHCPv4 Server Daemon.
PXE和TFTP

TFTP服务器
TFTP(Trivial File Transfer Protocol,简单文件传输协议)是TCP/IP协议族中的一个用来在客户机与服务器之间进行简单文件传输的协议,提供不复杂、开销不大的文件传输服务。端口号为69。
xinetd
inux服务器端TFTP-server的配置
tftp服务器端需要安装xinetd(守护tftp),tftp和tftp-server3个软件
[root@kickstart ~]# yum install tftp-server tftp xinetd -y
修改xinetd配置文件,管理tftp
[root@kickstart ~]# cat /etc/xinetd.d/tftp
# default: off
# description: The tftp server serves files using the trivial file transfer
#    protocol.  The tftp protocol is often used to boot diskless
#    workstations, download configuration files to network-aware printers,
#    and to start the installation process for some operating systems.
service tftp
{
    socket_type        = dgram
    protocol        = udp
    wait            = yes
    user            = root
    server            = /usr/sbin/in.tftpd
    server_args        = -s /var/lib/tftpboot
    disable            = no
    per_source        = 11
    cps            = 100 2
    flags            = IPv4
}
启动xinetd服务
[root@kickstart ~]# systemctl start xinetd
[root@kickstart ~]# netstat -a | grep tftp
udp        0      0 0.0.0.0:tftp            0.0.0.0:*

[root@kickstart ~]# lsof -i:69
COMMAND   PID USER   FD   TYPE DEVICE SIZE/OFF NODE NAME
xinetd  15519 root    5u  IPv4  67791      0t0  UDP *:tftp

# 连接tftp
[root@kickstart ~]# tftp 172.18.41.133
默认tftp工作目录
[root@kickstart ~]# cd /var/lib/tftpboot/
[root@kickstart tftpboot]# ls
[root@kickstart tftpboot]# touch test.cc
[root@kickstart tftpboot]# ls
test.cc
进入任意目录,测试下载tftp目录内容
[root@kickstart tftpboot]# cd /tmp/
[root@kickstart tmp]# tftp 172.18.41.133
tftp> ?
tftp-hpa 5.2
Commands may be abbreviated.  Commands are:

connect     connect to remote tftp
mode        set file transfer mode
put         send file
get         receive file
quit        exit tftp
verbose     toggle verbose mode
trace       toggle packet tracing
literal     toggle literal mode, ignore ':' in file name
status      show current status
binary      set mode to octet
ascii       set mode to netascii
rexmt       set per-packet transmission timeout
timeout     set total retransmission timeout
?           print help information
help        print help information
tftp> get test.cc
tftp> quit
[root@kickstart tmp]# ls
test.cc
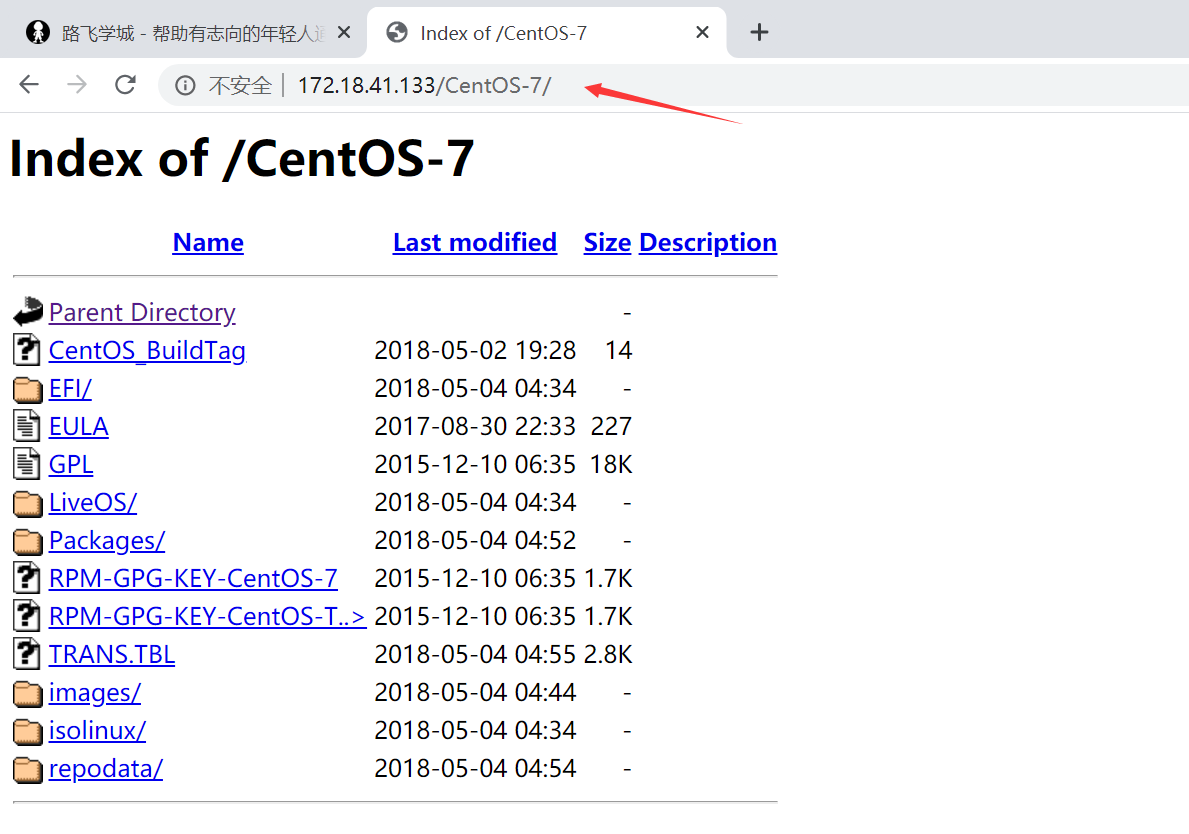
HTTP服务器部署网络镜像
# 安装
[root@kickstart syslinux]# yum install httpd -y


# 插入一行配置
[root@kickstart syslinux]# sed -i "277i ServerName 127.0.0.1:80" /etc/httpd/conf/httpd.conf

# 启动
[root@kickstart syslinux]# systemctl start httpd


# 建立站点目录
mkdir /var/www/html/CentOS-7/

# 通过vmware挂上centos7镜像文件,该步骤重要,如下的图片

# 挂载目录
[root@kickstart syslinux]# mount /dev/cdrom /var/www/html/CentOS-7/
mount: /dev/sr0 is write-protected, mounting read-only


# 查看挂载情况
[root@kickstart syslinux]# df -h |grep www
/dev/sr0                 4.2G  4.2G     0 100% /var/www/html/CentOS-7


# 访问站点,访问IOS镜像的内容,注意大小写,内容如下图
http://172.18.41.133/CentOS-7/
部署PXE
syslinux是一个功能强大的引导加载程序,而且兼容各种介质。SYSLINUX是一个小型的Linux操作系统,它的目的是简化首次安装Linux的时间,并建立修护或其它特殊用途的启动盘。
如果没有找到pxelinux.0这个文件,可以安装一下。
[root@kickstart syslinux]# yum install syslinux -y
拷贝pxelinux.0该文件,放入tfpt目录,便于提供给客户端下载
# 把pxelinux.0文件 发给tftp目录,用于发给客户端
cp /usr/share/syslinux/pxelinux.0 /var/lib/tftpboot/

# 拷贝启动菜单程序文件
[root@kickstart syslinux]# cp -a /var/www/html/CentOS-7/isolinux/* /var/lib/tftpboot/

# 拷贝自动重启文件
[root@kickstart ~]# cp /usr/share/syslinux/reboot.c32 /var/lib/tftpboot/


# 检查tftp目录下的启动菜单文件
[root@kickstart syslinux]# tree -F /var/lib/tftpboot/
/var/lib/tftpboot/
├── boot.cat
├── boot.msg
├── grub.conf
├── initrd.img   # 驱动文件
├── isolinux.bin
├── isolinux.cfg
├── memtest
├── pxelinux.0   # 启动代码
├── pxelinux.cfg/
│   └── default # 配置文件
├── reboot.c32  # 重启系统
├── splash.png
├── TRANS.TBL
├── vesamenu.c32  # 界面框架
└── vmlinuz*      # 内核文件


# 新建一个pxelinux.cfg目录,用于存放客户端的配置文件
[root@kickstart syslinux]#  mkdir -p /var/lib/tftpboot/pxelinux.cfg


# 拷贝PXE配置文件,且改名
[root@kickstart syslinux]# cp /var/www/html/CentOS-7/isolinux/isolinux.cfg /var/lib/tftpboot/pxelinux.cfg/default

# 提升tftp目录权限
[root@kickstart tftpboot]# chmod 777 -R /var/lib/tftpboot/
这些文件内的参数,就是你开机安装系统看见的画面
[root@kickstart tftpboot]# cat /var/lib/tftpboot/pxelinux.cfg/default
default vesamenu.c32  # 默认加载一个菜单
#prompt 1             # 开启会显示命令行'boot: '提示符。prompt值为0时则不提示,将会直接启动'default'参数中指定的内容。
timeout 600           # timeout时间是引导时等待用户手动选择的时间,设为1可直接引导,单位为1/10秒。
display boot.msg
# 菜单背景图片、标题、颜色。
menu background splash.jpg
menu title Welcome to CentOS 6.7!
menu color border 0 #ffffffff #00000000
menu color sel 7 #ffffffff #ff000000
menu color title 0 #ffffffff #00000000
menu color tabmsg 0 #ffffffff #00000000
menu color unsel 0 #ffffffff #00000000
menu color hotsel 0 #ff000000 #ffffffff
menu color hotkey 7 #ffffffff #ff000000
menu color scrollbar 0 #ffffffff #00000000
# label指定在boot:提示符下输入的关键字,比如boot:linux[ENTER],这个会启动label linux下标记的kernel和initrd.img文件。
label linux       # 一个标签就是前面图片的一行选项。
  menu label ^Install or upgrade an existing system
  menu default
  kernel vmlinuz  # 指定要启动的内核。同样要注意路径,默认是/tftpboot目录。
  append initrd=initrd.img # 指定追加给内核的参数,initrd.img是一个最小的linux系统
label vesa
  menu label Install system with ^basic video driver
  kernel vmlinuz
  append initrd=initrd.img nomodeset
label rescue
  menu label ^Rescue installed system
  kernel vmlinuz
  append initrd=initrd.img rescue
label local
  menu label Boot from ^local drive
  localboot 0xffff
label memtest86
  menu label ^Memory test
  kernel memtest
  append -
定制PXE网络安装文件
1.修改第一行,让centos直接默认安装linux,不去手动再选择
default linux

2.制定apache的系统iso下载地址
 61 label linux
 62   menu label ^Install CentOS 7
 63   kernel vmlinuz
 64 # append initrd=initrd.img inst.stage2=hd:LABEL=CentOSx207x20x86_64 quiet
 65   append initrd=initrd.img inst.repo=http://172.18.41.133/CentOS-7/ net.ifnames=0 biosdevname=0
DHCP客户端配置
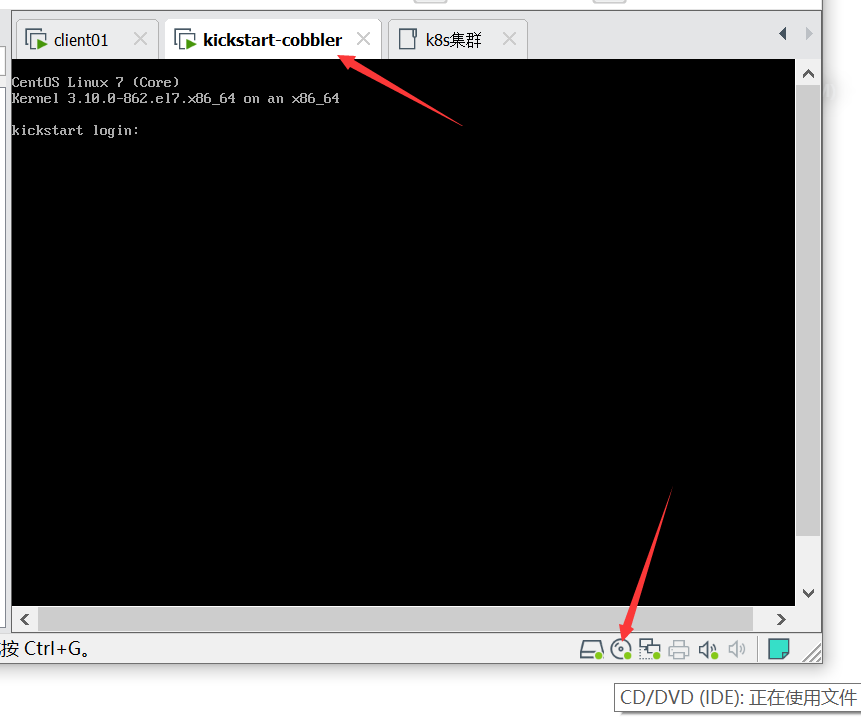
kickstart自动应答装机
查看系统自动生成的anaconda-ks.cfg
[root@kickstart ~]# cat anaconda-ks.cfg
#version=DEVEL
# System authorization information
auth --enableshadow --passalgo=sha512
# Use CDROM installation media
cdrom
# Use graphical install
graphical
# Run the Setup Agent on first boot
firstboot --enable
ignoredisk --only-use=sda
# Keyboard layouts
keyboard --vckeymap=us --xlayouts='us'
# System language
lang en_US.UTF-8

# Network information
network  --bootproto=dhcp --device=ens33 --ipv6=auto --no-activate
network  --hostname=localhost.localdomain

# Root password
rootpw --iscrypted $6$ZKWLL9mzgiTsIKeR$UJkJsUmfX6REEv2v98NQ7F41.c9qbLaWilCo9MGN50dMmPNGu76cQM5AOIXl82ynnVVG6/UIou07Y0b2L6SsV1
# System services
services --enabled="chronyd"
# System timezone
timezone America/New_York --isUtc
# System bootloader configuration
bootloader --append=" crashkernel=auto" --location=mbr --boot-drive=sda
autopart --type=lvm
# Partition clearing information
clearpart --none --initlabel

%packages
@^minimal
@core
chrony
kexec-tools

%end

%addon com_redhat_kdump --enable --reserve-mb='auto'

%end

%anaconda
pwpolicy root --minlen=6 --minquality=1 --notstrict --nochanges --notempty
pwpolicy user --minlen=6 --minquality=1 --notstrict --nochanges --emptyok
pwpolicy luks --minlen=6 --minquality=1 --notstrict --nochanges --notempty
%end
ks文件语法
命令段
包组段  %packages开头,以%end结束
脚本段  以%post开头,以%end结束,在安装完系统之后,执行的linux命令,脚本
       以%pre开头,以%end结束,在安装完系统之前执行的linux命令,脚本
通过工具检查ks文件语法
yum install pykickstart
ksvalidator /var/www/html/ks_config/CentOS-7-ks.cfg

该工具只是基本的对文件语法进行简单检测,并不能保证完全正确,还需人为检查

用python脚本对文件加密
python -c 'import crypt;print(crypt.crypt("chaoge666"))'
得到如下结果
在apache站点目录下创建ks配置文件
[root@kickstart-cobbler ~]# cat /var/www/html/ks_config/CentOS7-ks.cfg
#platform=x86, AMD64, 或 Intel EM64T
#version=DEVEL
# Install OS instead of upgrade
install
# Keyboard layouts
# old format: keyboard us
# new format:
keyboard --vckeymap=us --xlayouts='us'
# Root password
rootpw --iscrypted  $6$BXiyUYZp4WQGfOa.$xeIY8eabVJbsrZ2HEEoTt4E70QBzuNrEHo.Mkab7qjzEEUeHxyouqWyMV9TnkCWJbM4TCf08rfMRttmm6Ji1A1


# Use network installation
url --url="http://192.168.207.144/centos-7"
# System language
lang en_US
# yum configuation
repo --name="Red Hat Enterprise Linux" --baseurl="http://192.168.207.144/centos-7" --cost=100
# System authorization information
auth  --useshadow  --passalgo=sha512
# Use text mode install
text
firstboot --disable
# SELinux configuration
selinux --disabled

# System services
services --enabled="chronyd"
ignoredisk --only-use=sda
# Firewall configuration
firewall --disabled
# Network information
network  --bootproto=dhcp --device=ens33

# 关闭kdump
%addon com_redhat_kdump --disable
%end

# Reboot after installation
reboot
# System timezone
timezone America/New_York
# System bootloader configuration
bootloader --append="crashkernel=auto" --location=mbr --boot-drive=sda
#autopart --type=lvm
# Clear the Master Boot Record,清空分区,重新分区
zerombr
# Partition clearing information
clearpart --all --initlabel
# Disk partitioning information
part /boot --fstype="xfs" --size=500
part swap --fstype="swap" --size=2048
part / --fstype="xfs" --grow --size=1
# 安装系统软件包
%packages
@core
@base
@compat-libraries
@debugging
@development
tree
nmap
sysstat
lrzsz
dos2unix
telnet
wget
vim
bash-completion
%end
官网
https://access.redhat.com/documentation/zh-cn/red_hat_enterprise_linux/7/html-single/installation_guide/index#chap-kickstart-installations
请看红帽官网
修改PXE配置文件
备份原有的配置文件
[root@kickstart pxelinux.cfg]# cp default{,.bak}
[root@kickstart pxelinux.cfg]# ls
default  default.bak
写入新的
[root@kickstart pxelinux.cfg]# >default
[root@kickstart pxelinux.cfg]# cat /var/lib/tftpboot/pxelinux.cfg/default
# 使用欢迎界面
default vesamenu.c32
#default menu.c32
#prompt 1
# 倒计时600毫秒
timeout 600

# 欢迎词
MENU TITLE welcome to centos.

# 如下三个驱动
# 启动本地设备
label local
  menu label Boot from ^local drive
  localboot 0xffff

# 启动来自于ks配置文件
MENU SEPARATOR
label linux
  menu label ^Install or upgrade an existing system for ks
  # 系统默认选ks
  menu default
  kernel vmlinuz
  append initrd=initrd.img ks=http://172.18.41.133/ks_config/CentOS7-ks.cfg

# 安装基本驱动
MENU SEPARATOR
label vesa
  menu label Install system with ^basic video driver
  kernel vmlinuz
  append initrd=initrd.img xdriver=vesa nomodeset
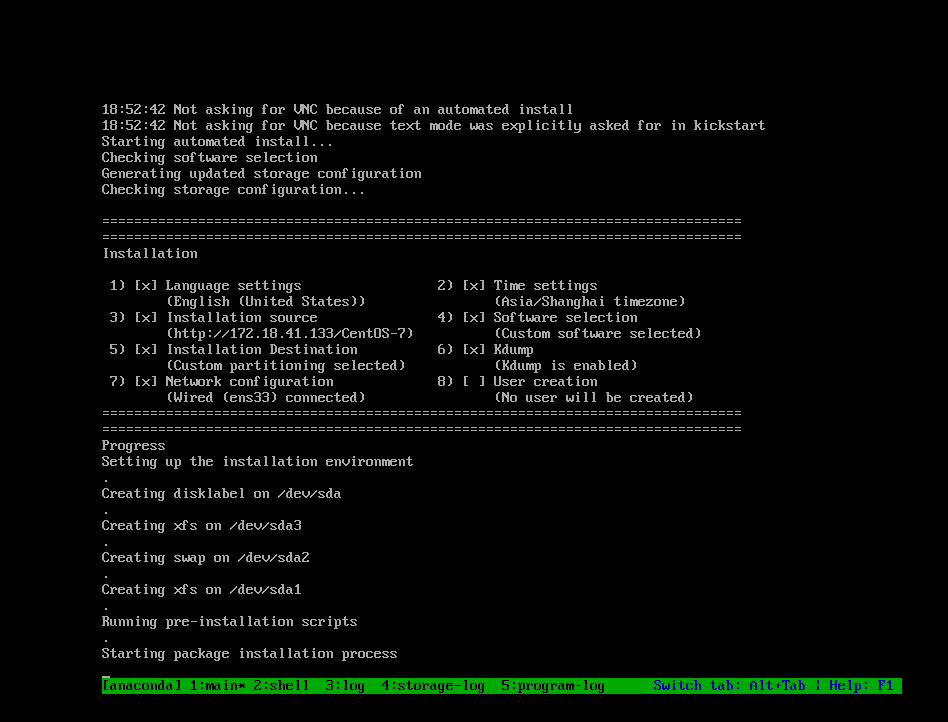
自动化安装界面

cobbler
Cobbler是一个Linux系统安装的服务,可以通过网络启动(PXE)的方式来快速安装、重装物理服务器和虚拟机,同时还可以管理DHCP,DNS等。
Cobbler可以使用命令行方式管理,也提供了基于Web的界面管理工具(cobbler-web),还提供了API接口,可以方便二次开发使用。
Cobbler是较早前的kickstart的升级版,优点是比较容易配置,还自带web界面比较易于管理。
通过点点点就可以创建系统以及ks文件。
准备环境
1.准备好linux机器,使用kickstart那台机器即可
[root@ks-cobbler ~]# hostname
ks-cobbler


[root@ks-cobbler ~]# ifconfig |awk 'NR==2{print $2}'
172.18.41.133

加上一个本地hosts解析
[root@ks-cobbler ~]# tail -1 /etc/hosts
172.18.41.133 ks-cobbler
安装cobbler
1.yum自动化安装即可,提前配置好yum源
yum install cobbler cobbler-web dhcp tftp-server pykickstart httpd python-django -y

2.检查软件包
[root@ks-cobbler ~]# rpm -qa cobbler cobbler-web dhcp tftp-server pykickstart httpd python-djangotftp-server-5.2-22.el7.x86_64
pykickstart-1.99.66.21-1.el7.noarch
cobbler-2.8.5-0.3.el7.x86_64
dhcp-4.2.5-79.el7.centos.x86_64
httpd-2.4.6-93.el7.centos.x86_64
cobbler-web-2.8.5-0.3.el7.noarch

3.启动cobbler,与http
systemctl start cobblerd
systemctl start httpd

4.检查cobbler配置
[root@ks-cobbler ~]# cobbler check
修改cobbler配置文件
1.修改配置文件/etc/cobbler/settings ,修改如下参数
# 备份配置文件
[root@ks-cobbler ~]# cp /etc/cobbler/settings{,.bak}

# 防止误重装
sed -i 's/pxe_just_once: 0/pxe_just_once: 1/' /etc/cobbler/settings

# 配置Cobbler统一管理DHCP
sed -i 's/manage_dhcp: 0/manage_dhcp: 1/' /etc/cobbler/settings

# 配置DHCP Cobbler模版,这里sed提供了备份功能
sed -i.ori 's#192.168.1#172.18.41#g;22d;23d' /etc/cobbler/dhcp.template


2.根据cobbler check依次修改配置文件,修改如下配置,注意改了之后要重启cobblerd服务,才可以生效
# 请注意,填写ip地址
# 修改/etc/cobbler/settings
server: 172.18.41.113
next_server: 172.18.41.113

# 修改xinetd配置文件, /etc/xinetd.d/tftp ,因为xinetd是管理tftp的,我们用cobbler去管理了
disable                 = yes

# 需要安装驱动,cobbler要控制其他机器
cobbler get-loaders
[root@ks-cobbler ~]# cobbler get-loaders
task started: 2020-07-29_153446_get_loaders
task started (id=Download Bootloader Content, time=Wed Jul 29 15:34:46 2020)
downloading https://cobbler.github.io/loaders/README to /var/lib/cobbler/loaders/README
downloading https://cobbler.github.io/loaders/COPYING.elilo to /var/lib/cobbler/loaders/COPYING.elilo
downloading https://cobbler.github.io/loaders/COPYING.yaboot to /var/lib/cobbler/loaders/COPYING.yaboot
downloading https://cobbler.github.io/loaders/COPYING.syslinux to /var/lib/cobbler/loaders/COPYING.syslinux
downloading https://cobbler.github.io/loaders/elilo-3.8-ia64.efi to /var/lib/cobbler/loaders/elilo-ia64.efi
downloading https://cobbler.github.io/loaders/yaboot-1.3.17 to /var/lib/cobbler/loaders/yaboot
downloading https://cobbler.github.io/loaders/pxelinux.0-3.86 to /var/lib/cobbler/loaders/pxelinux.0
downloading https://cobbler.github.io/loaders/menu.c32-3.86 to /var/lib/cobbler/loaders/menu.c32
downloading https://cobbler.github.io/loaders/grub-0.97-x86.efi to /var/lib/cobbler/loaders/grub-x86.efi
downloading https://cobbler.github.io/loaders/grub-0.97-x86_64.efi to /var/lib/cobbler/loaders/grub-x86_64.efi
*** TASK COMPLETE ***


# 还需要用到rsync服务,开启该服务
systemctl restart  rsyncd
systemctl enable rsyncd

# 修改cobbler安装的系统,默认的密码是"cobbler",可以改下
[root@ks-cobbler ~]# openssl passwd -1
Password:
Verifying - Password:
$1$7QqeCcrC$WwDO644o8wUumCUBuxw6S.

# 修改默认root密码为,chaoge666
default_password_crypted: "$1$7QqeCcrC$WwDO644o8wUumCUBuxw6S."

# 修改有关cobbler脑裂配置,可以使用fencing tools


# 改完如上配置,重启cooblerd
systemctl restart cobblerd

# 再次检查,吧修改的配置,让其生效
cobbler sync
cobbler check

# 剩下的两条无所谓
[root@ks-cobbler ~]# cobbler check
The following are potential configuration items that you may want to fix:

1 : debmirror package is not installed, it will be required to manage debian deployments and repositories
2 : fencing tools were not found, and are required to use the (optional) power management features. install cman or fence-agents to use them

Restart cobblerd and then run 'cobbler sync' to apply changes.
重启核心服务
systemctl restart cobblerd httpd tftp.socket rsyncd.service
[root@ks-cobbler ~]# systemctl is-active cobblerd httpd tftp.socket rsyncd.service
active
active
active
active
访问cobbler web
# 必须用https协议
https://172.18.41.133/cobbler_web

账户密码都是cobbler
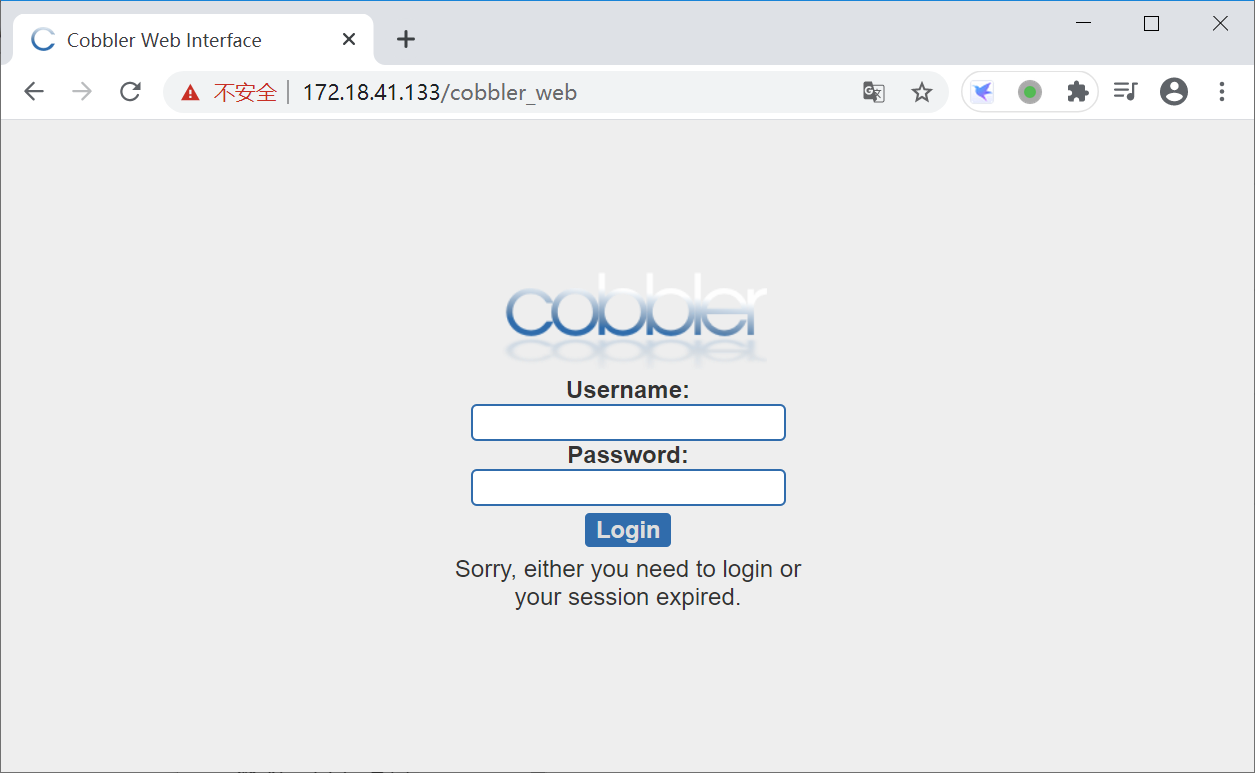
进入首页

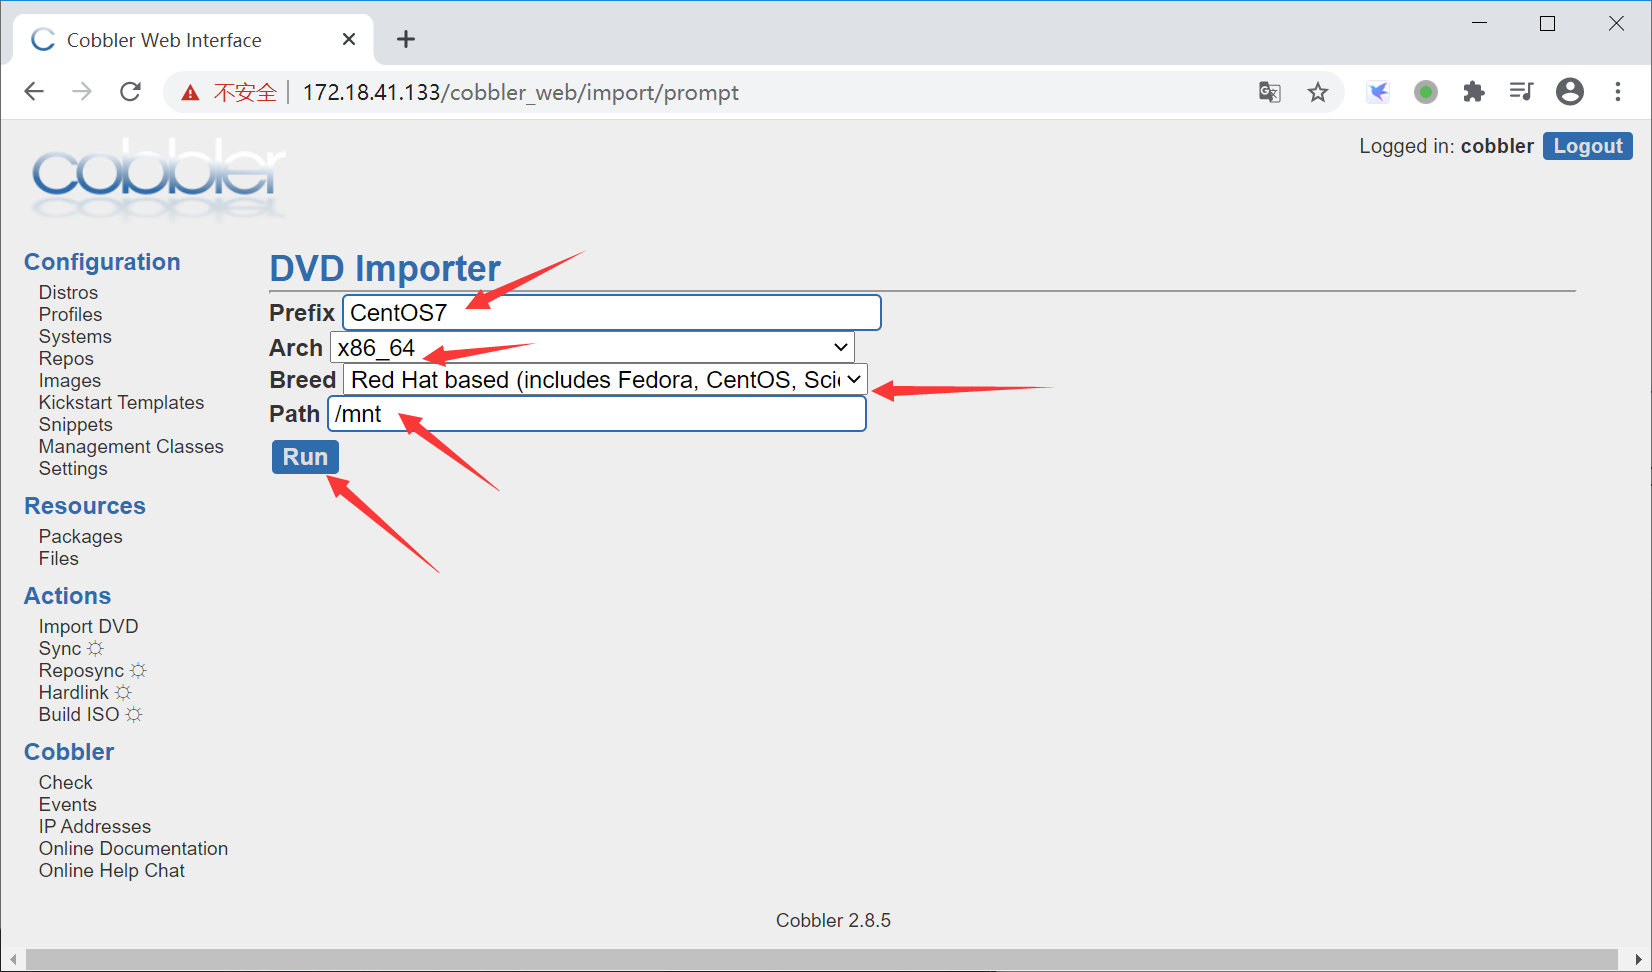
导入系统镜像
cobbler web镜像存放点
[root@ks-cobbler ks_mirror]# pwd
/var/www/cobbler/ks_mirror
[root@ks-cobbler ks_mirror]# mount /dev/cdrom /mnt
mount: /dev/sr0 is write-protected, mounting read-only
[root@ks-cobbler ks_mirror]# df -h
Filesystem               Size  Used Avail Use% Mounted on
/dev/mapper/centos-root   17G  1.6G   16G   9% /
devtmpfs                 899M     0  899M   0% /dev
tmpfs                    911M     0  911M   0% /dev/shm
tmpfs                    911M  9.6M  902M   2% /run
tmpfs                    911M     0  911M   0% /sys/fs/cgroup
/dev/sda1               1014M  142M  873M  14% /boot
tmpfs                    183M     0  183M   0% /run/user/0
/dev/sr0                 4.2G  4.2G     0 100% /mnt

在linux中检查cobbler导入操作
[root@ks-cobbler ks_mirror]# cd /var/www/cobbler/
[root@ks-cobbler cobbler]# ls
images  ks_mirror  links  localmirror  misc  pub  rendered  repo_mirror  svc
[root@ks-cobbler cobbler]# du -sh .
4.2G    .

# cobbler默认是调用rsync进行同步数据
导入结束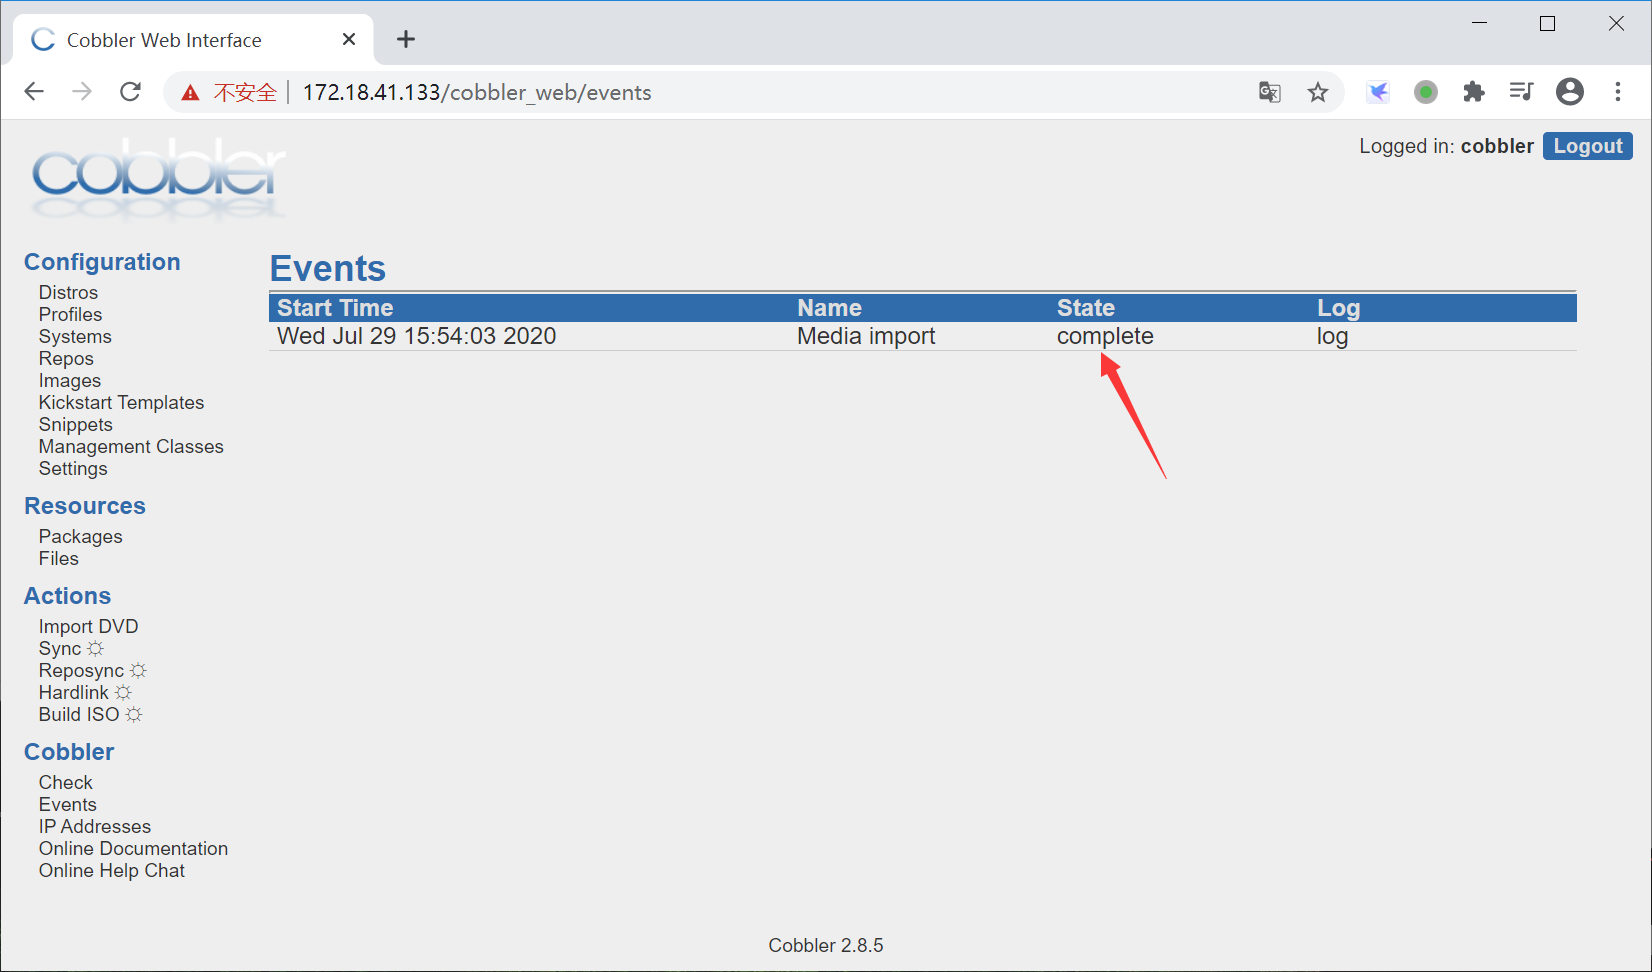
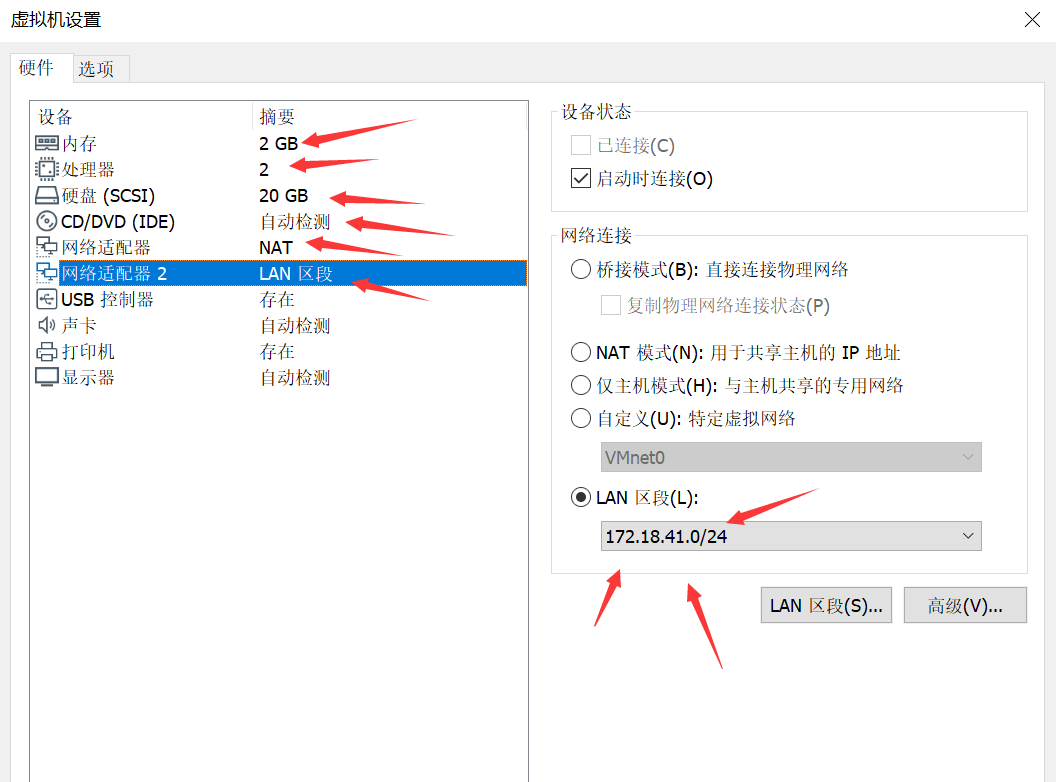
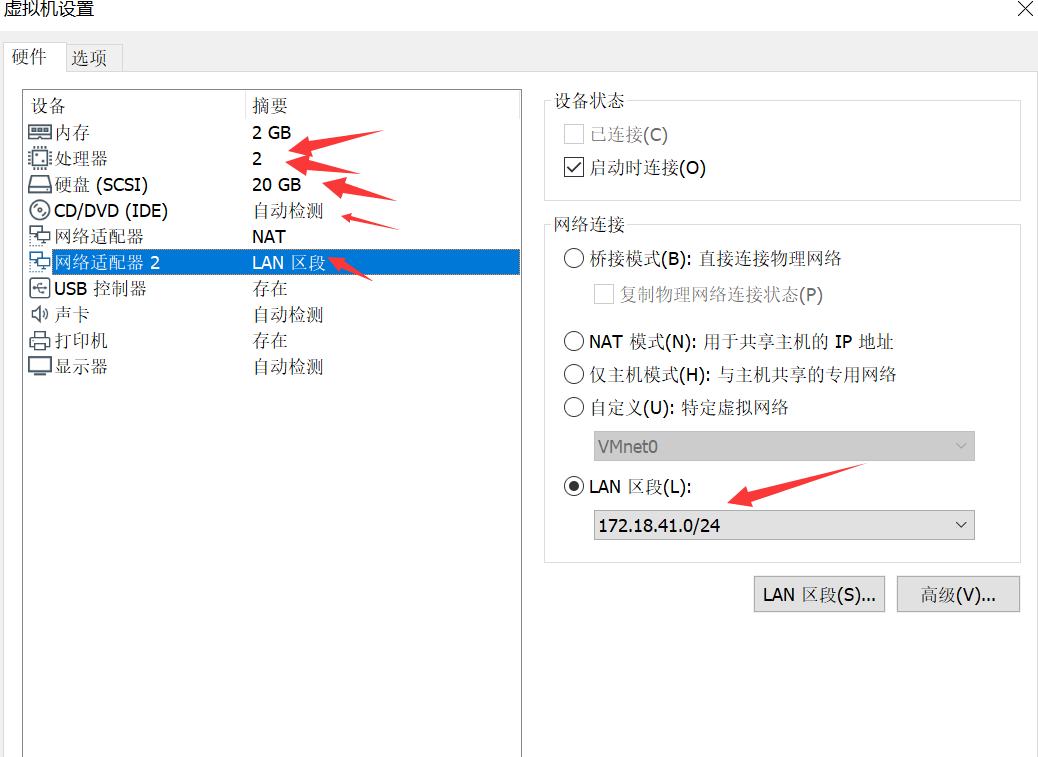
新建vmware虚拟机
测试用cobbler自动装机,创建方式和手动安装方式一样,注意:
1. 内存大小
2. 添加网络适配器
3. 删除usp
4. 关闭dvd开机链接
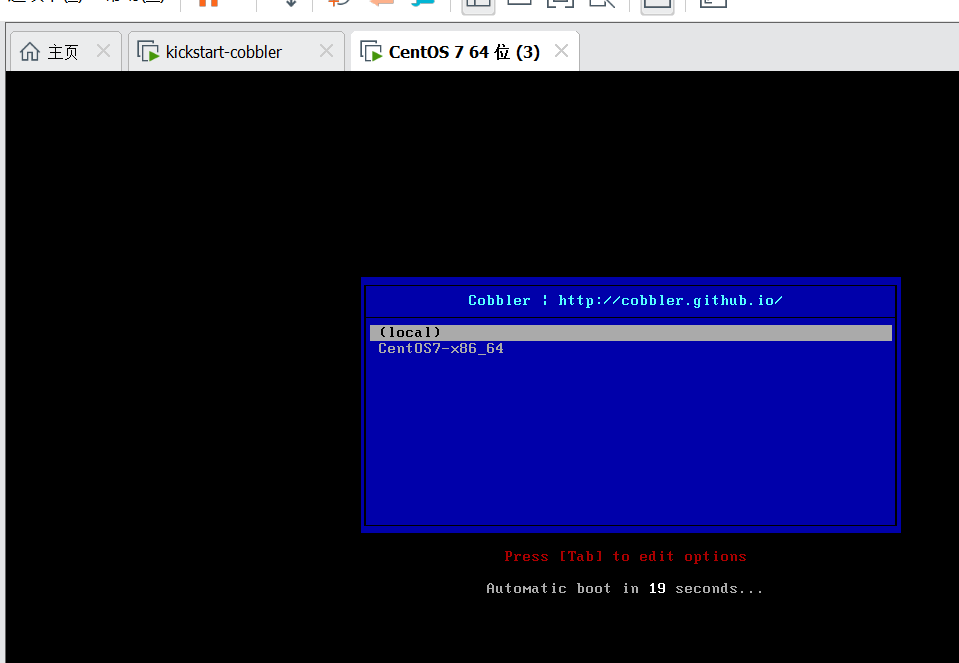
该见面由pxe启动文件控制
[root@ks-cobbler cobbler]# cat /var/lib/tftpboot/pxelinux.cfg/default
DEFAULT menu
PROMPT 0
MENU TITLE Cobbler | http://cobbler.github.io/
TIMEOUT 200
TOTALTIMEOUT 6000
ONTIMEOUT local

LABEL local
        MENU LABEL (local)
        MENU DEFAULT
        LOCALBOOT -1

LABEL CentOS7-x86_64
        kernel /images/CentOS7-x86_64/vmlinuz
        MENU LABEL CentOS7-x86_64
        append initrd=/images/CentOS7-x86_64/initrd.img ksdevice=bootif lang=  kssendmac text  ks=http://172.18.41.133/cblr/svc/op/ks/profile/CentOS7-x86_64
        ipappend 2


MENU end
装机使用的ks文件在这里,cobbler生成的

创建自定义系统ks文件
# Kickstart Configurator for CentOS 7 by chaoge
install
# $tree 是在cobbler-web中Distros配置中Kickstart Metadata定义的变量,在超哥这个电脑上,地址就是 http://172.18.41.133/cblr/links/CentOS7-x86_64/
url --url=$tree
text
lang en_US.UTF-8
keyboard us
zerombr
bootloader --location=mbr --driveorder=sda --append="crashkernel=auto rhgb quiet"
# 有关自定义的网络配置,设置静态ip
# network  --bootproto=static --device=eth0 --gateway=10.0.0.254 --ip=10.0.0.202 --nameserver=223.5.5.5 --netmask=255.255.255.0 --activate
# network  --bootproto=static --device=eth1 --ip=172.16.1.202 --netmask=255.255.255.0 --activate
# network  --hostname=Cobbler
# network --bootproto=dhcp --device=eth1 --onboot=yes --noipv6 --hostname=CentOS7
# cobbler网络配置,这里的配置目录在
$SNIPPET('networl_config')
timezone --utc Asia/Shanghai
authconfig --enableshadow --passalgo=sha512

# 设置root密码,用变量替换,该变量在cobbler-web的setting中
rootpw  --iscrypted $default_password_crypted
clearpart --all --initlabel
part /boot --fstype xfs --size 1024
part swap --size 1024
part / --fstype xfs --size 1 --grow

# 服务配置
firstboot --disable
selinux --disabled
firewall --disabled
logging --level=info
reboot

#定义安装前的工作
%pre
$SNIPPET('log_ks_pre')
$SNIPPET('kickstart_start')
$SNIPPET('pre_install_network_config')
# 监控系统安装过程
$SNIPPET('pre_anamon')
%end

# 安装软件包
%packages
@base
@compat-libraries
@debugging
@development
tree
nmap
sysstat
lrzsz
dos2unix
telnet
wget
vim
bash-completion
%end

%post
systemctl disable postfix.service
%end
此时可以去cobbler-web添加我们定义的ks文件模板
注意,不支持中文,删掉注释
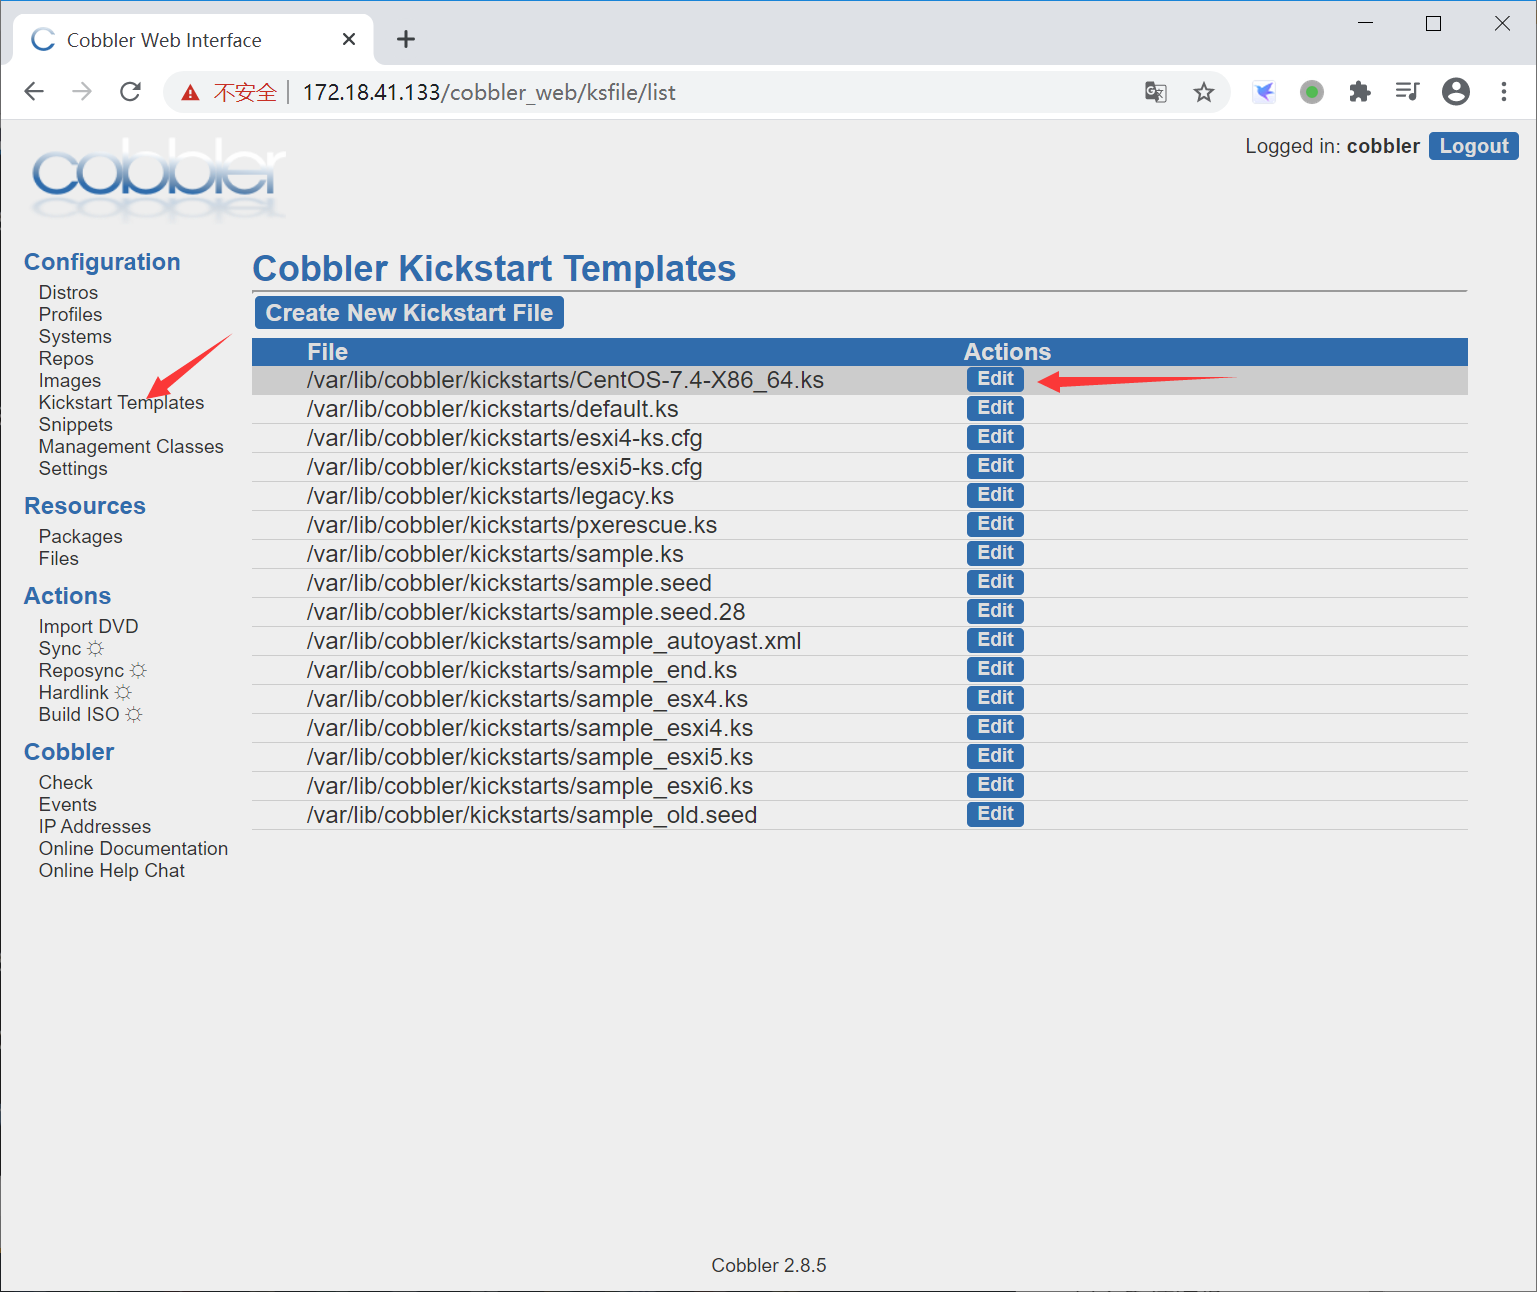
该文件放在linux上
[root@ks-cobbler kickstarts]# ll
total 68
-rw-r--r-- 1 root root 1211 Jul 29 16:54 CentOS-7.4-X86_64.ks
-rw-r--r-- 1 root root  115 Aug 30  2019 default.ks
-rw-r--r-- 1 root root   22 Aug 30  2019 esxi4-ks.cfg
-rw-r--r-- 1 root root   22 Aug 30  2019 esxi5-ks.cfg
drwxr-xr-x 2 root root   56 Jul 29 14:04 install_profiles
-rw-r--r-- 1 root root 1424 Aug 30  2019 legacy.ks
-rw-r--r-- 1 root root  292 Aug 30  2019 pxerescue.ks
-rw-r--r-- 1 root root 2825 Aug 30  2019 sample_autoyast.xml
-rw-r--r-- 1 root root 1856 Aug 30  2019 sample_end.ks
-rw-r--r-- 1 root root    0 Aug 30  2019 sample_esx4.ks
-rw-r--r-- 1 root root  324 Aug 30  2019 sample_esxi4.ks
-rw-r--r-- 1 root root  386 Aug 30  2019 sample_esxi5.ks
-rw-r--r-- 1 root root  386 Aug 30  2019 sample_esxi6.ks
-rw-r--r-- 1 root root 1913 Aug 30  2019 sample.ks
-rw-r--r-- 1 root root 3419 Aug 30  2019 sample_old.seed
-rw-r--r-- 1 root root 6694 Aug 30  2019 sample.seed
-rw-r--r-- 1 root root 6706 Jun 18  2019 sample.seed.28
[root@ks-cobbler kickstarts]#
sample_end.ks
改为
CentOS-7.4-X86_64.ks

点击create创建系统模板

自定义虚拟机网络
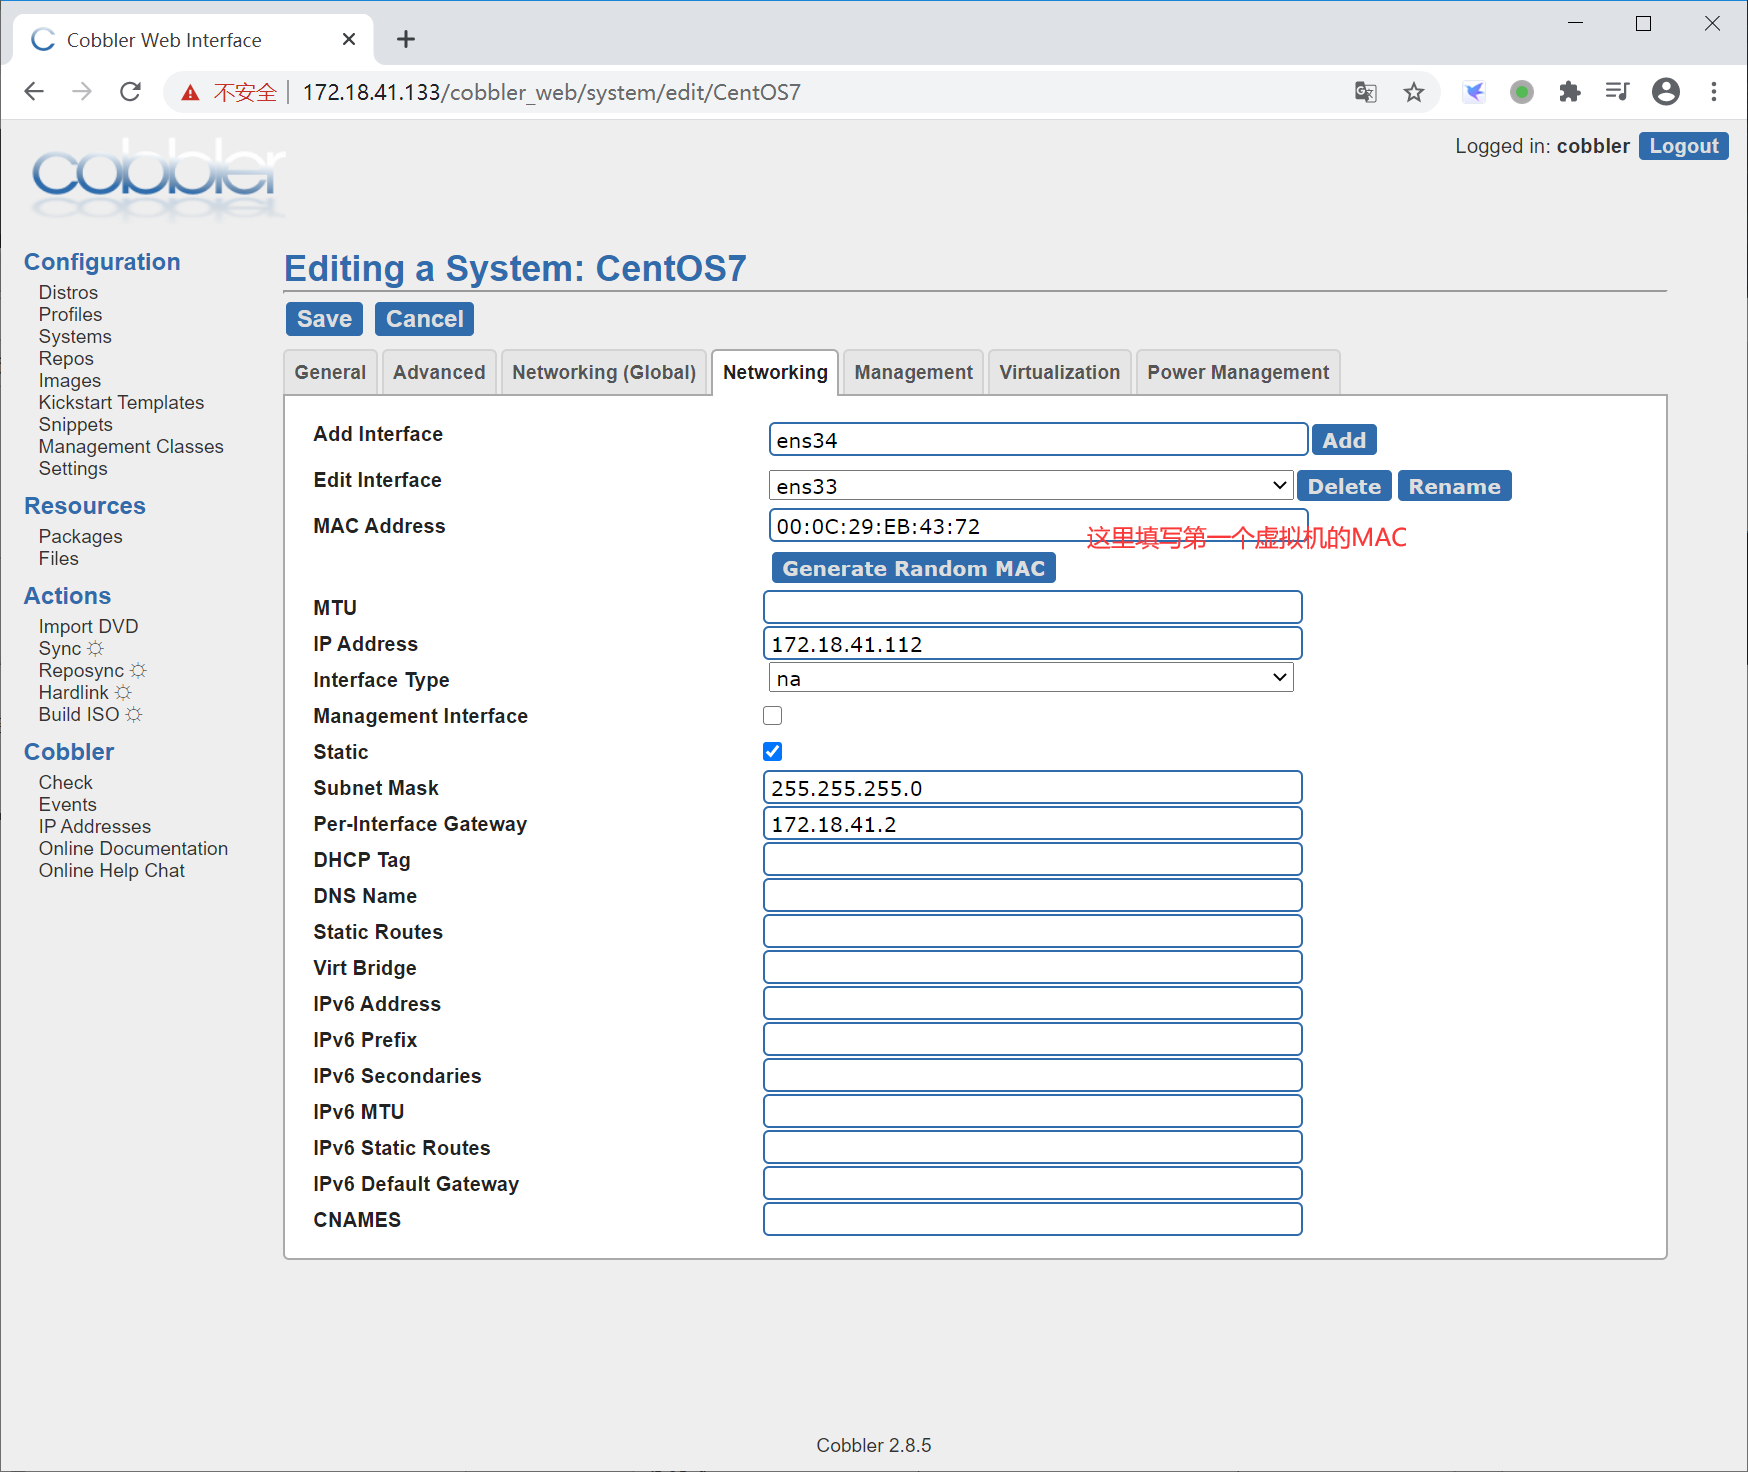
可以再创建个ens34
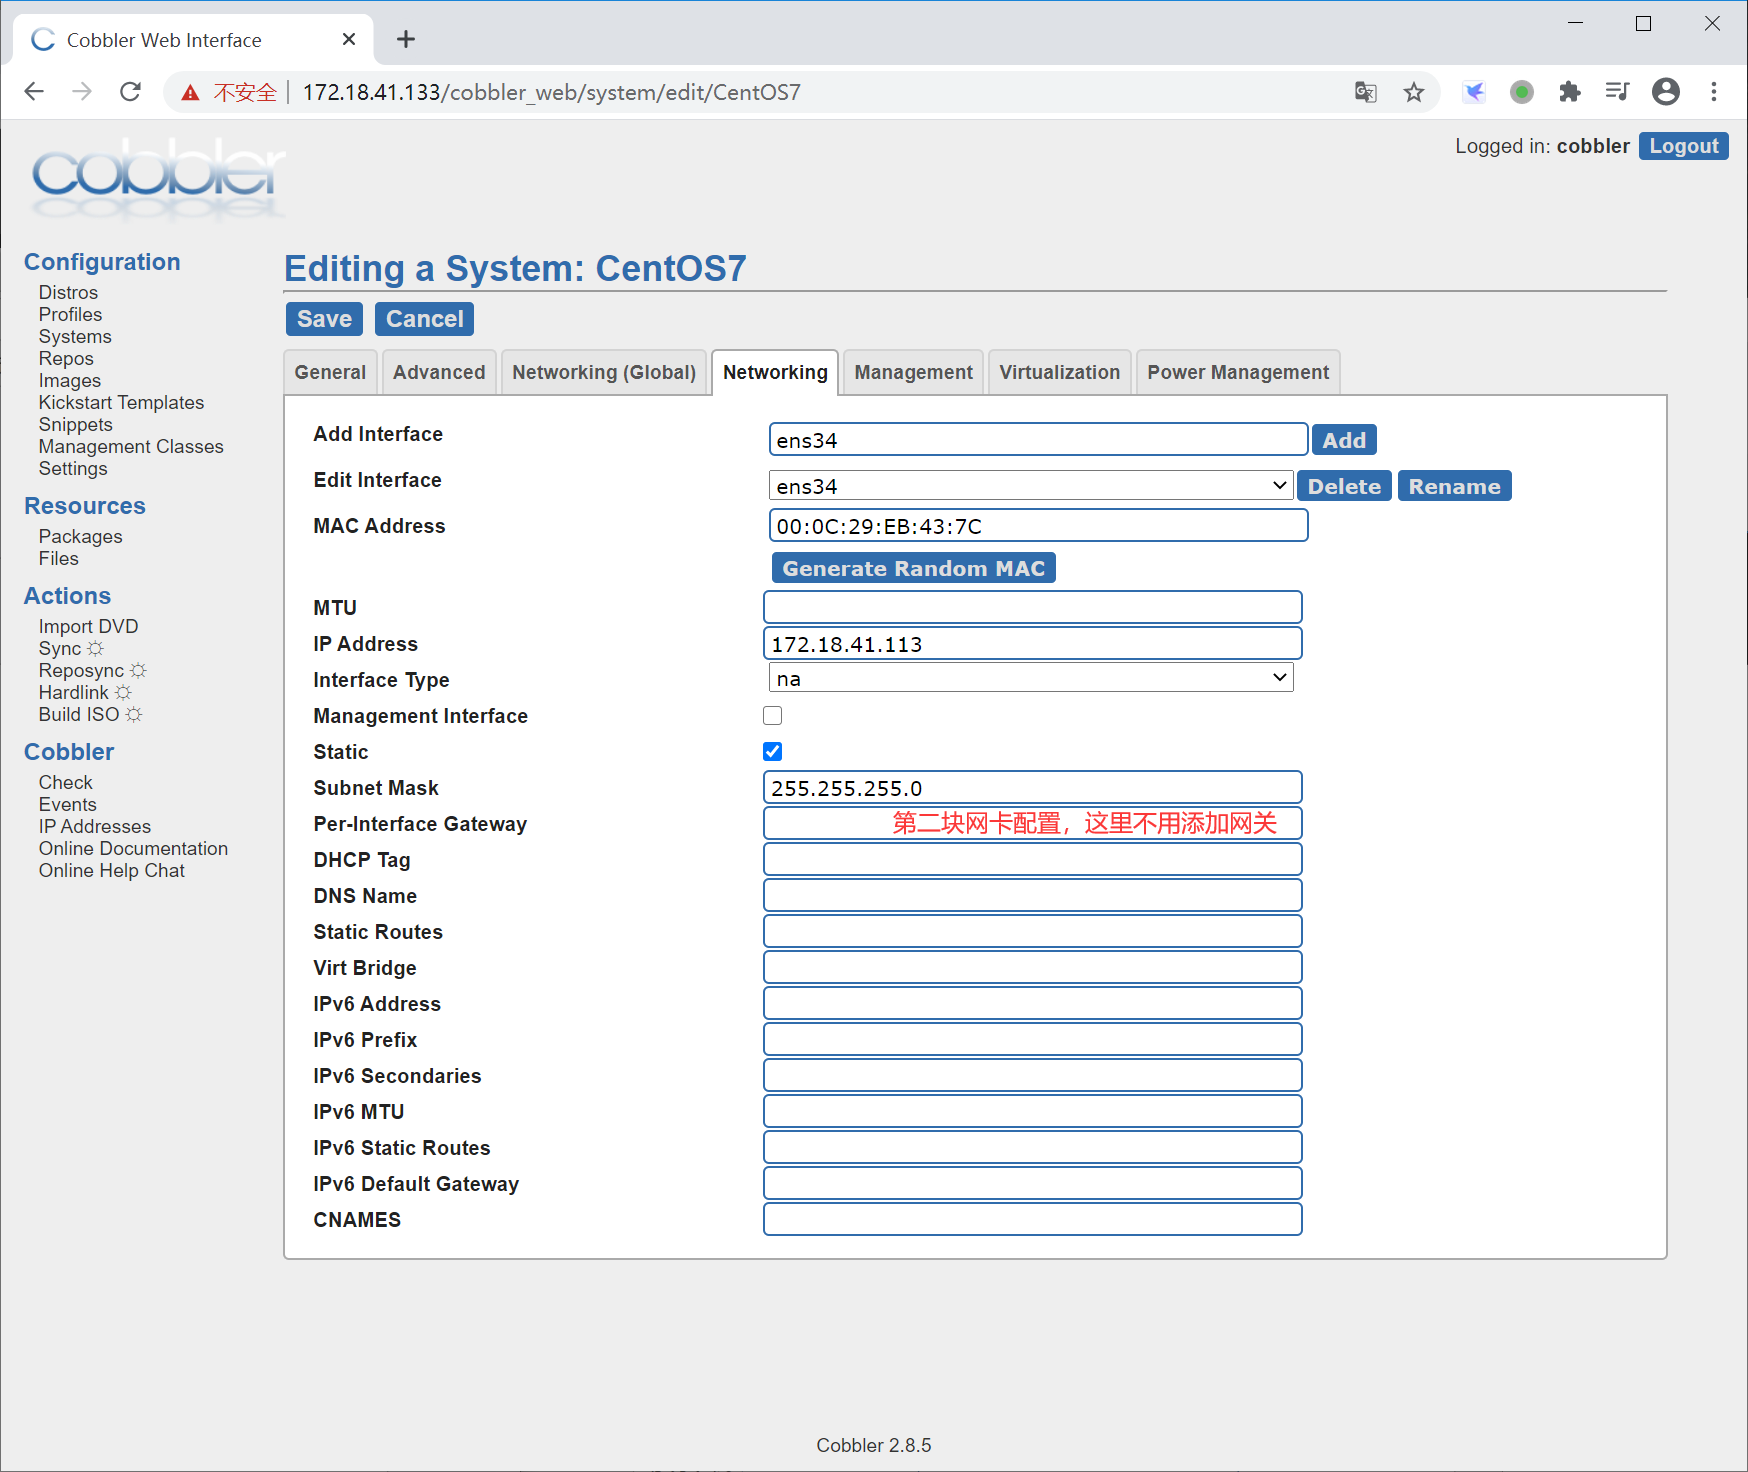
最后点击sync按钮,等同于命令执行cobbler sync
