摘要:
行<;线条X1=“10”Y1=“100”X2=“260”Y2=“100“Stroke=“黑色”StrokeDashArray=“5”StrokeThickness=“2”>;线冲程>;矩形<;矩形边距=“5”笔划=“黑色”高度=“100”宽度=“100“>;<;&书信电报,
WPF基础图形:
Line:直线,可设置笔触(Stroke)
Rectangle:矩形,既有笔触(Stroke),又有填充(Fill)
Ellipse:椭圆,有笔触和填充(包含正圆)
Polygon:多边形(闭合),由多条直线段围成的闭合区域,有笔触和填充
Polyline:折线(不闭合),由多条首尾相接的直线段组成
Path:路径,基本图形中功能最强大的,可由若干直线、圆弧、贝塞尔曲线组成
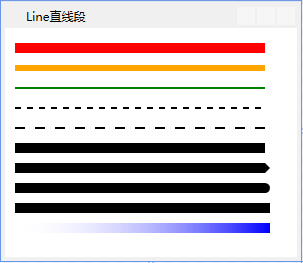
Line:直线


<Grid>
        <Line X1="10" Y1="20" X2="260" Y2="20" Stroke="Red" StrokeThickness="10"></Line>
        <Line X1="10" Y1="40" X2="260" Y2="40" Stroke="Orange" StrokeThickness="6"></Line>
        <Line X1="10" Y1="60" X2="260" Y2="60" Stroke="Green" StrokeThickness="2"></Line>
        <Line X1="10" Y1="80" X2="260" Y2="80" Stroke="Black" StrokeDashArray="3" StrokeThickness="2"></Line>
        <Line X1="10" Y1="100" X2="260" Y2="100" Stroke="Black" StrokeDashArray="5" StrokeThickness="2"></Line>
        <Line X1="10" Y1="120" X2="260" Y2="120" Stroke="Black" StrokeEndLineCap="Flat" StrokeThickness="10"></Line>
        <Line X1="10" Y1="140" X2="260" Y2="140" Stroke="Black" StrokeEndLineCap="Triangle" StrokeThickness="10"></Line>
        <Line X1="10" Y1="160" X2="260" Y2="160" Stroke="Black" StrokeEndLineCap="Round" StrokeThickness="10"></Line>
        <Line X1="10" Y1="180" X2="260" Y2="180" Stroke="Black" StrokeEndLineCap="Square" StrokeThickness="10"></Line>
        <Line X1="10" Y1="200" X2="260" Y2="200"  StrokeEndLineCap="Square" StrokeThickness="10">
            <Line.Stroke>
                <LinearGradientBrush StartPoint="1,0.5" EndPoint="0,0.5">
                    <GradientStop Color="Blue"></GradientStop>
                    <GradientStop Offset="1"></GradientStop>
                </LinearGradientBrush>
            </Line.Stroke>
        </Line>
    </Grid>
Rectangle:矩形
 <WrapPanel>
        <!--实心填充-->
        <Rectangle Margin="5" Stroke="Black" Fill="LightBlue" Height="100" Width="100"></Rectangle>
        <!--线性渐变-->
        <Rectangle Margin="5" Stroke="Black" Height="100" Width="100">
            <Rectangle.Fill>
                <LinearGradientBrush StartPoint="0,0" EndPoint="1,1">
                    <GradientStop Color="#B6F8F1" Offset="0"></GradientStop>
                    <GradientStop Color="#0082BD" Offset="0.25"></GradientStop>
                    <GradientStop Color="#95DEFF" Offset=".9"></GradientStop>
                    <GradientStop Color="#004F72" Offset="1"></GradientStop>
                </LinearGradientBrush>
            </Rectangle.Fill>
        </Rectangle>
        <!--径向渐变-->
        <Rectangle Margin="5" Stroke="Black" Height="100" Width="100">
            <Rectangle.Fill>
                <RadialGradientBrush>
                    <GradientStop Color="#B6F8F1" Offset="0"></GradientStop>
                    <GradientStop Color="#0082BD" Offset="0.25"></GradientStop>
                    <GradientStop Color="#95DEFF" Offset=".9"></GradientStop>
                    <GradientStop Color="#004F72" Offset="1"></GradientStop>
                </RadialGradientBrush>
            </Rectangle.Fill>
        </Rectangle>
        <!--图片填充-->
        <Rectangle Margin="5" Stroke="Black" Height="100" Width="100">
            <Rectangle.Fill>
                <ImageBrush ImageSource="https://www.baidu.com/img/PCtm_d9c8750bed0b3c7d089fa7d55720d6cf.png" Viewport="0,0,0.3,0.15" TileMode="Tile"></ImageBrush>
            </Rectangle.Fill>
        </Rectangle>
        <!--矢量图填充-->
        <Rectangle Margin="5" Stroke="Black" Height="100" Width="100">
            <Rectangle.Fill>
                <DrawingBrush Viewport="0,0,0.2,0.2" TileMode="Tile">
                    <DrawingBrush.Drawing>
                        <GeometryDrawing Brush="LightBlue">
                            <GeometryDrawing.Geometry>
                                <EllipseGeometry RadiusX="10" RadiusY="10"> </EllipseGeometry>
                            </GeometryDrawing.Geometry>
                        </GeometryDrawing>
                    </DrawingBrush.Drawing>
                </DrawingBrush>
            </Rectangle.Fill>
        </Rectangle>
        <!--边框渐变-->
        <Rectangle Margin="5" Height="100" Width="100" StrokeThickness="10">
            <Rectangle.Stroke>
                <LinearGradientBrush StartPoint="0,0" EndPoint="1,1">
                    <GradientStop Color="White" Offset=".3"></GradientStop>
                    <GradientStop Color="Blue" Offset="1"></GradientStop>
                </LinearGradientBrush>
            </Rectangle.Stroke>
        </Rectangle>
    </WrapPanel>

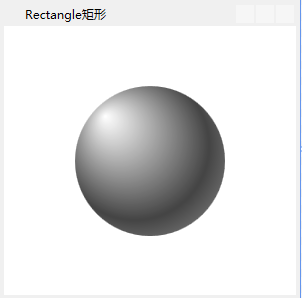
Ellipse:椭圆
<Grid>
        <Ellipse Height="150" Width="150" Cursor="Hand">
            <Ellipse.Fill>
                <RadialGradientBrush GradientOrigin="0.2,0.8" RadiusX="0.75" RadiusY="0.75">
                    <RadialGradientBrush.RelativeTransform>
                        <TransformGroup>
                            <RotateTransform Angle="90" CenterX="0.5" CenterY="0.5"></RotateTransform>
                        </TransformGroup>
                    </RadialGradientBrush.RelativeTransform>
                    <GradientStop Color="#FFFFFF" Offset="0"></GradientStop>
                    <GradientStop Color="#444444" Offset="0.66"></GradientStop>
                    <GradientStop Color="#999999" Offset="1"></GradientStop>
                </RadialGradientBrush>
            </Ellipse.Fill>
        </Ellipse>
    </Grid>
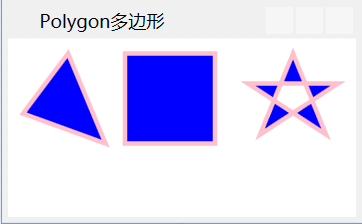
Polygon:多边形
 <WrapPanel >
            <!--Polygon总是自动闭合-->
            <Polygon Fill="Blue" StrokeThickness="3" Stroke="Pink" Points="40,10 65,70 10,50"/>
            <Polygon Fill="Blue" StrokeThickness="3" Stroke="Pink" Points="10,10 70,10 70,70 10,70"/>
            <Polygon Fill="Blue" StrokeThickness="3" Stroke="Pink" Points="20,30 80,30 28,64 50,10 72,64" />
        </WrapPanel>
绘制多边形:https://www.codeproject.com/Articles/128705/WPF-rounded-corners-polygon
Polyline:折线
<WrapPanel >
            <!--Polyline不会自动闭合-->
            <Polyline  Points="10,10 40,40 10,90 300,50" Stroke="Red" StrokeThickness="20" StrokeLineJoin="Round"/>
            <Polyline  Points="0,50 20,20 40,100 100,0" Stroke="Pink" StrokeThickness="10" StrokeEndLineCap="Round" StrokeLineJoin="Round"/>
        </WrapPanel>

Path:路径
<WrapPanel >
            <!--直线-->
            <Path Stroke="Blue" StrokeThickness="2">
                <Path.Data>
                    <LineGeometry StartPoint="20,20" EndPoint="140,140"></LineGeometry>
                </Path.Data>
            </Path>
            <!--矩形-->
            <Path Stroke="Orange" Fill="Yellow" StrokeThickness="2">
                <Path.Data>
                    <RectangleGeometry Rect="20,20,120,120" RadiusX="10" RadiusY="10" ></RectangleGeometry>
                </Path.Data>
            </Path>
            <!--自定义路径(直线)-->
            <Path Stroke="Yellow" StrokeThickness="2">
                <Path.Data>
                    <PathGeometry>
                        <PathGeometry.Figures>
                            <PathFigure StartPoint="25,140" IsClosed="True">
                                <PathFigure.Segments>
                                    <LineSegment Point="20,40"></LineSegment>
                                    <LineSegment Point="40,110"></LineSegment>
                                    <LineSegment Point="50,20"></LineSegment>
                                    <LineSegment Point="80,110"></LineSegment>
                                    <LineSegment Point="110,20"></LineSegment>
                                    <LineSegment Point="120,110"></LineSegment>
                                    <LineSegment Point="140,40"></LineSegment>
                                    <LineSegment Point="135,140"></LineSegment>
                                </PathFigure.Segments>
                            </PathFigure>
                        </PathGeometry.Figures>
                    </PathGeometry>
                </Path.Data>
            </Path>
            <!--自定义路径(直线)-->
            <Path Stroke="SeaGreen" StrokeThickness="2" Data="M 20,140 20,40 40,110 50,20 80,110 110,20 120,110 140,40 135,140Z"></Path>
            <!--椭圆-->
            <Path Stroke="Green" Fill="LawnGreen" StrokeThickness="2">
                <Path.Data>
                    <EllipseGeometry Center="80,80" RadiusX="60" RadiusY="60" ></EllipseGeometry>
                </Path.Data>
            </Path>
            <!--自定义路径(二次方程式贝塞尔曲线)-->
            <Path Stroke="Red" StrokeThickness="2">
                <Path.Data>
                    <PathGeometry>
                        <PathFigure StartPoint="20,150">
                            <QuadraticBezierSegment Point1="100,0" Point2="180,150"></QuadraticBezierSegment>
                        </PathFigure>
                    </PathGeometry>
                </Path.Data>
            </Path>
            <!--自定义路径(二次方程式贝塞尔曲线)-->
            <Path Stroke="Blue" StrokeThickness="2" Data="M 20,150 Q100,0 180,150"></Path>
            <!--平滑二次方程式贝塞尔曲线-->
            <Path Stroke="Black" StrokeThickness="2" Data="M 20,150 T100,0 180,150"></Path>
            <!--自定义路径(三次方贝塞尔曲线)-->
            <Path Stroke="Red" StrokeThickness="2">
                <Path.Data>
                    <PathGeometry>
                        <PathGeometry.Figures>
                            <PathFigureCollection>
                                <PathFigure StartPoint="10,100">
                                    <PathFigure.Segments>
                                        <PathSegmentCollection>
                                            <BezierSegment Point1="100,0" Point2="200,200" Point3="300,100" />
                                        </PathSegmentCollection>
                                    </PathFigure.Segments>
                                </PathFigure>
                            </PathFigureCollection>
                        </PathGeometry.Figures>
                    </PathGeometry>
                </Path.Data>
            </Path>
            <!--自定义路径(三次方贝塞尔曲线)-->
            <Path Stroke="Blue" StrokeThickness="2"  Data="M 10,100 C100,0 200,200 300,100" />
            <!--平滑三次方程式贝塞尔曲线-->
            <Path Stroke="Black" StrokeThickness="2"  Data="M 10,100 S100,0 200,200" />
            <!--自定义路径(扇形)-->
            <Path Stroke="Blue" StrokeThickness="5">
                <Path.Data>
                    <PathGeometry>
                        <PathFigure StartPoint="0,100"   >
                            <LineSegment Point="100,50"/>
                            <ArcSegment Point="100,150" Size="300,200" SweepDirection="Clockwise" />
                            <LineSegment Point="0,100"/>
                        </PathFigure>
                    </PathGeometry>
                </Path.Data>
            </Path>
            <!--自定义路径(圆弧)-->
            <Path Stroke="Red" Fill="Aqua" Data="M 100,100 A 50,50 0 0 0 200,100 A 50 50 0 0 1 300,100">
            </Path>
        </WrapPanel>

Path命令介绍请参考:https://www.cnblogs.com/hehexiaoxia/p/5316098.html
更多内容请参考:https://www.cnblogs.com/lzhp/archive/2012/10/04/2710907.html
WPF知识点全攻略目录:https://www.cnblogs.com/kuangxiangnice/p/11040070.html