打包程序为BOOT.BIN
注意,做好备份是一个好习惯。
Vivado
Vivado 添加QSPI Flash的IP,重新编译;
Launch SDK(推荐方法);或者用SDK指定一个workspace,根据hdf建立BSP。
SDK
新建fsbl-1
这个fsbl用于启动程序。
File - New - Application Project
Project name : fsbl
其他默认,注意不要选错BSP平台。
Next,选择 Zynq FSBL
添加代码(可选)
Project Explorer 展开 fsbl - src,打开 fsbl_debug.h,添加调试宏
#define FSBL_DEBUG_INFO
创建 boot 文件
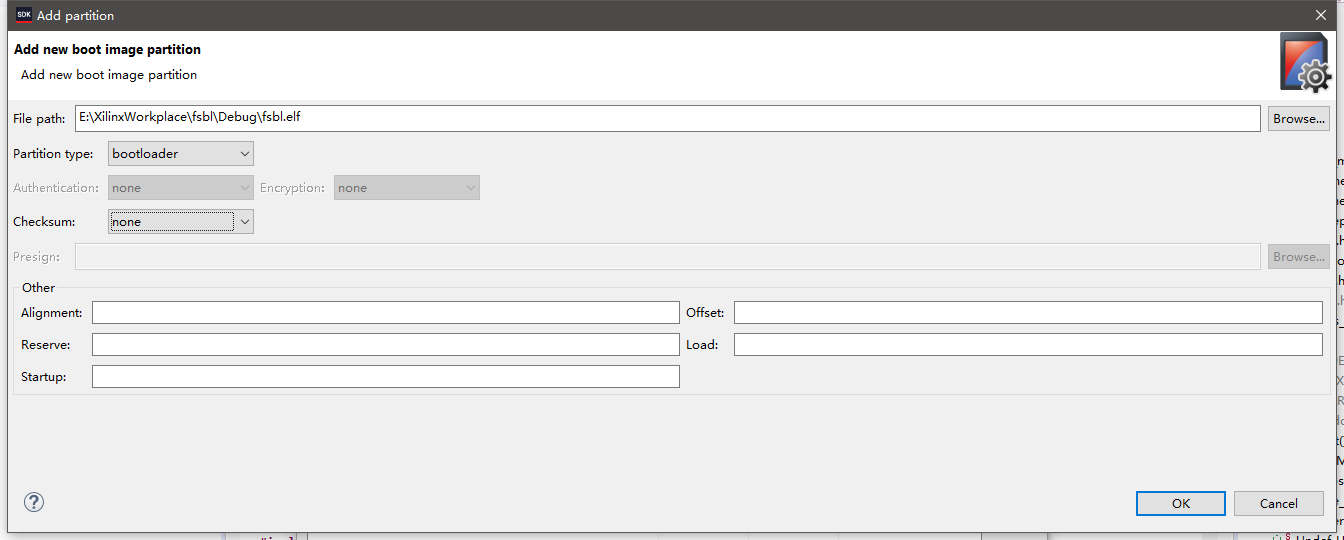
选择 fsb 工程,右键选择 Create Boot Image
弹出的窗口中可以看到生成的BIF 文件路径,BIF 文件是生成BOO丁文件的配置文件,
还有生成的BOOT.bin文件路径,BOOT.bin文件是我们需要的启动文件,可以放到SD卡启动,也可以烧写到QSPI FLASH.
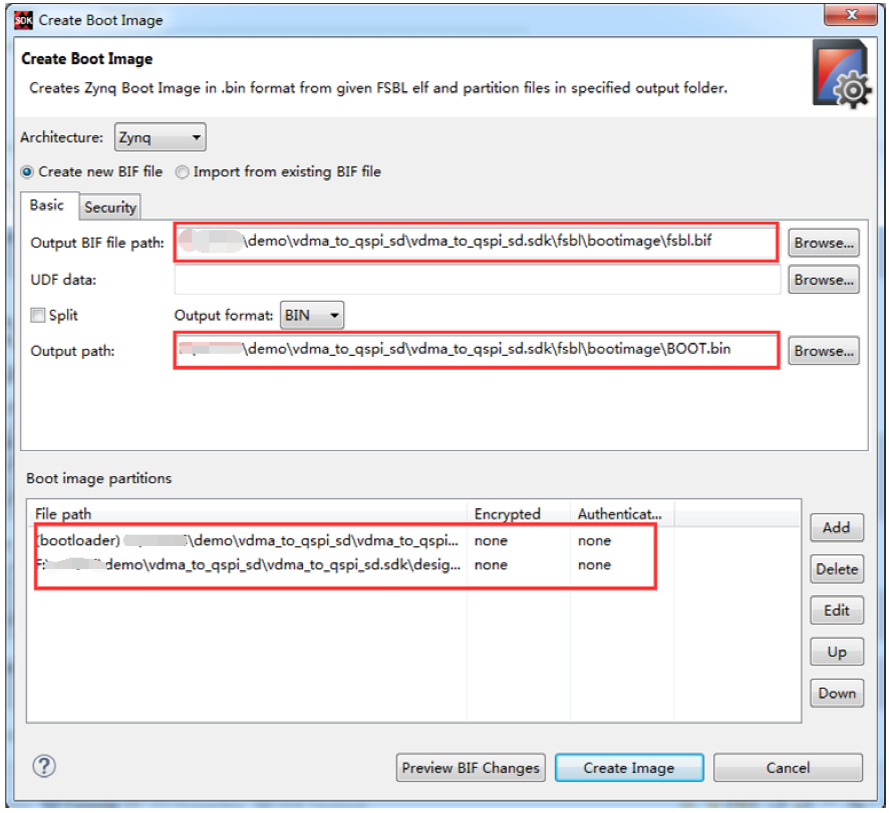
- 在Boot image partitions 列表中是要合成的文件,
- 第一个文件一定是bootloader文件,就是上面生成的fsbl.elf文件
- 第二个文件是FPGA配置文件,
- 点击Add添加我们的测试程序
原文链接,转载注意出处:https://www.cnblogs.com/schips/p/package-boot_bin-and-download-to-qspi-flash.html
烧录BOOT.BIN到QSPI-FLASH
说明
Xilinx VIVADO 软件版本更新到2017以后,为了对ZYNQ和MPSOC平台进行统一,对 QSPI FLASH 下载方式进行了改动,因此,下载需要额外做一点小工作,大致步骤如下:
有关步骤说明可以参考:Program Flash
0、Vivado配置QSPI-FLASH的IP(略)
1、制作BOOT.BIN(略)
2、新增一个FSBL工程(这里名为“fsbl-for-download”),并做如下改动:
注意:为了下载QSPI FLASH 的“指定的fsbl”与生成boot.bin文件的fsbl文件不同,这里不能混淆。
- 新增FSBL调试信息(添加
#define FSBL_DEBUG_INFO到fsbl_debug.h有效代码行第7行左右的位置) - 适配FSBL为QSPI下载可用的:在
MarkFSBLIn();之后2行代码之后,添加1行代码:
QSPI编程要求器件以JTAG模式启动。因为在QSPI引导模式下启动,则“指定的fsbl”将尝试从flash加载分区,从而导致flash编程的错误行为。导致不能下载flash或下载flash后不能启动。
这是为了防止FSBL在编程运行时从Flash设备加载任何现有分区。
/*
 * Read bootmode register
 */

BootModeRegister = Xil_In32(BOOT_MODE_REG);
BootModeRegister &= BOOT_MODES_MASK;

/* add this line to trick boot mode to JTAG */
BootModeRegister = JTAG_MODE; // 添加这行
3、设置启动模式为:QSPI启动模式(设置以后,需要复位生效)
4(根据系统不同的可选项):
- VIVADO 2017.3,VIVADO 2017.4版本下载QSPI FLASH需要设置环境变量到系统中,以强制mini-uBoot将QSPI器件时钟设置为10 MHz(根据您的FSBL设计,您可能会在硬件上看到不同的QSPI时钟)。
添加位置:计算机→属性→高级系统设置→高级→环境变量→新建系统变量
变量名:XIL_CSE_ZYNQ_UBOOT_QSPI_FREQ_HZ
变量值:10000000
5、烧写
- 选择事先做好的
BOOT.BIN、上文特制的fsbl-for-download.elf - 选择自己的FLASH TYPE
- 勾选
Verify after flash - 进行download。
附录: AR70148
[AR# 70148](https://www.xilinx.com/support/answers/70148.html(Xilinx Answer 70148))
Since 2017.3 Zynq-7000 SoC: QSPI flash programming now requires that you specify an FSBL.
Description
Starting with the 2017.3 release, Vivado Hardware Manager and XSDK require that you specify an FSBL in order to program a QSPI flash.
This has been done in order to have a common flow between Zynq-7000 and Zynq UltraScale+.
Solution
With this change there are a number of implications:
1、The user needs a working FSBL.
If this FSBL is initializing DDR, then DDR needs to be functioning even if the QSPI flash programming does not really use it.
A suggestion is to use
#define FSBL_DEBUG_INFOin the FSBL, to check if the UART of the FSBL is fully executed without hangs during QSPI flash programming.
2、 If you have issues programming the FLASH in Vivado 2017.3 or 2017.4, add the following environment variable.
(The ENV variable is not required for 2018.1):
XIL_CSE_ZYNQ_UBOOT_QSPI_FREQ_HZ = 10000000
This will force the mini-uBoot to set the QSPI device clock to 10 MHz.
Note: depending on your FSBL design, you might see a different QSPI clock on your hardware.
3、The device clocking is now configured by the FSBL rather than the tool.
The configuration which was previously used by the tool is listed below.
If you have issues programming the flash, you should check the FSBL configuration against this table.
| Register Name | Register Address | Register Value | |
|---|---|---|---|
| ARM_PLL_CFG | 0xF8000110 | 0x00177EA0 | (default values) |
| ARM_PLL_CTRL | 0xF8000100 | 0x0001A000 | ARM_PLL = 866 MHz (not bypassed) |
| ARM_CLK_CTRL | 0xF8000120 | 0x1F000400 | CPU_6x4x = 866 / 4 = 216 MHz |
| IO_PLL_CFG | 0xF8000118 | 0x00177EA0 | (default values) |
| IO_PLL_CTRL | 0xF8000108 | 0x0001A000 | IO_PLL = 866 MHz (not bypassed) |
| PLL_STATUS | 0xF800010C | 0x0000003F | ARM_PLL and IO_PLL are LOCKED and STABLE. |
Assuming PS_REF_CLK = 33.33 MHz
4、 In case of XIP (Execute in place from QSPI), a custom FSBL that executes from OCM needs to be created to be specified during QSPI flash programming.
对于XIP(从QSPI执行),需要在QSPI闪存编程期间,指定从OCM执行的自定义FSBL。
附录:AR70548
Zynq-7000 - QSPI programming in QSPI-boot mode
Description
QSPI programming requires the device to boot in JTAG mode, as mentioned by the program_flash output log.
Initialization done, programming the memory
BOOT_MODE REG = 0x00000001
WARNING: [Xicom 50-100] The current boot mode is QSPI.
Although JTAG boot mode is highly recommended, there is a work-around for devices booting in QSPI-boot mode.
Solution
Starting in 2017.3, programming flash for Zynq-7000 requires that you specify an FSBL. See (Xilinx Answer 70148).
This FSBL is required to initialize the system (mainly to run the ps7_init() function).
If booting in QSPI boot mode, this FSBL will try to load partitions from the flash causing misbehavior of the flash programming.
With the following modification we limit this FSBL (used only for flash programming) to basically only run the initialization (ps7_init()).
Create a new FSBL project and add the following change (main.c) to use it for Flash programming in SDK.
/*
 * Read bootmode register
 */

BootModeRegister = Xil_In32(BOOT_MODE_REG);
BootModeRegister &= BOOT_MODES_MASK;

//add this line to trick boot mode to JTAG
BootModeRegister = JTAG_MODE;
This should prevent the FSBL from loading any existing partition from the Flash device while programming is in operation.
附录:烧写日志
cmd /C program_flash -f D:BOOT.BIN -offset 0 -flash_type qspi-x4-single
-fsbl
E:dowload-to-qspi.sdkfor_flash_downloadDebugfor_flash_download.elf
-verify -cable type xilinx_tcf url TCP:127.0.0.1:3121

****** Xilinx Program Flash
****** Program Flash v2018.3 (64-bit)
  **** SW Build 2405991 on Thu Dec  6 23:38:27 MST 2018
    ** Copyright 1986-2018 Xilinx, Inc. All Rights Reserved.


WARNING: Failed to connect to hw_server at TCP:127.0.0.1:3121
Attempting to launch hw_server at TCP:127.0.0.1:3121

Connected to hw_server @ TCP:127.0.0.1:3121
Available targets and devices:
Target 0 : jsn-JTAG-HS1-210512180081
	Device 0: jsn-JTAG-HS1-210512180081-4ba00477-0

Retrieving Flash info...

Initialization done, programming the memory
===== mrd->addr=0xF800025C, data=0x00000001 =====
BOOT_MODE REG = 0x00000001
WARNING: [Xicom 50-100] The current boot mode is QSPI.
If flash programming fails, configure device for JTAG boot mode and try again.
===== mrd->addr=0xF8007080, data=0x30800100 =====
===== mrd->addr=0xF8000B18, data=0x80000000 =====
Downloading FSBL...
Running FSBL...
Finished running FSBL.
===== mrd->addr=0xF8000110, data=0x000FA220 =====
READ: ARM_PLL_CFG (0xF8000110) = 0x000FA220
===== mrd->addr=0xF8000100, data=0x00028008 =====
READ: ARM_PLL_CTRL (0xF8000100) = 0x00028008
===== mrd->addr=0xF8000120, data=0x1F000200 =====
READ: ARM_CLK_CTRL (0xF8000120) = 0x1F000200
===== mrd->addr=0xF8000118, data=0x000FA240 =====
READ: IO_PLL_CFG (0xF8000118) = 0x000FA240
===== mrd->addr=0xF8000108, data=0x00036008 =====
READ: IO_PLL_CTRL (0xF8000108) = 0x00036008
Info:  Remapping 256KB of on-chip-memory RAM memory to 0xFFFC0000.
===== mrd->addr=0xF8000008, data=0x00000000 =====
===== mwr->addr=0xF8000008, data=0x0000DF0D =====
MASKWRITE: addr=0xF8000008, mask=0x0000FFFF, newData=0x0000DF0D
===== mwr->addr=0xF8000910, data=0x000001FF =====
===== mrd->addr=0xF8000004, data=0x00000000 =====
===== mwr->addr=0xF8000004, data=0x0000767B =====
MASKWRITE: addr=0xF8000004, mask=0x0000FFFF, newData=0x0000767B


U-Boot 2018.01-00073-g63efa8c-dirty (Oct 04 2018 - 08:22:22 -0600)


Model: Zynq CSE QSPI Board

Board: Xilinx Zynq

Silicon: v3.1

DRAM:  256 KiB

WARNING: Caches not enabled

Using default environment


In:    dcc

Out:   dcc

Err:   dcc

Zynq> sf probe 0 10000000 0


SF: Detected w25q256 with page size 256 Bytes, erase size 4 KiB, total 32 MiB

Zynq> Sector size = 4096.
f probe 0 10000000 0


Performing Erase Operation...
sf erase 0 6A2000


SF: 6955008 bytes @ 0x0 Erased: OK

Zynq> Erase Operation successful.
INFO: [Xicom 50-44] Elapsed time = 56 sec.
Performing Program Operation...
0%...sf write FFFC0000 0 20000


device 0 offset 0x0, size 0x20000

SF: 131072 bytes @ 0x0 Written: OK

Zynq> sf write FFFC0000 20000 20000


Total of 65536 byte(s) were the same

Zynq> sf read FFFC0000 3F0000 10000


device 0 offset 0x3f0000, size 0x10000

SF: 65536 bytes @ 0x3f0000 Read: OK

Zynq> cmp.b FFFC0000 FFFD0000 10000


Total of 65536 byte(s) were the same

Zynq> 60%...sf read FFFC0000 400000 10000


device 0 offset 0x400000, size 0x10000

SF: 65536 bytes @ 0x400000 Read: OK

Zynq> cmp.b FFFC0000 FFFD0000 10000


Total of 65536 byte(s) were the same


......(省略)


Zynq> 100%
sf read FFFC0000 6A0000 1D98

device 0 offset 0x6a0000, size 0x1d98

SF: 7576 bytes @ 0x6a0000 Read: OK

Zynq> cmp.b FFFC0000 FFFD0000 1D98


Total of 7576 byte(s) were the same

Zynq> INFO: [Xicom 50-44] Elapsed time = 33 sec.
Verify Operation successful.

Flash Operation Successful