SELinux(Security-Enhanced Linux) 是美国国家安全局(NSA)对于强制访问控制的实现, 是Linux历史上最杰出的新安全子系统; 对于目前可用的 Linux安全模块来说, SELinux 是功能最全面, 而且测试最充分的, 它是在20年的MAC研究基础上建立的; SELinux 在类型强制服务器中合并了多级安全性或一种可选的多类策略, 并采用了基于角色的访问控制概念
SELinux机制:
DAC(Discretionary Access Control, 自主访问控制): 依据程序运行时的身份决定权限,是大部分操作系统的权限存取控制方式,即依据文件的own、 group、 other, r、w、x权限进行控制; 系统中UID为0的用户(默认为root用户),拥有最高权限,对其所有的限制都不是限制; rwx权限划分太粗糙,无法针对不同 的进程实现较为有效的控制
MAC(Mandatory Access Control, 强制访问控制): 依据条件决定是否有访问权限,可以规范个别细致的项目进行访问控制,提供完整的彻底化规范限制; 可以对文件, 目录, 网络, 套接字等进行规范, 所有动作必须先得到DAC授权, 然后得到MAC授权才可以访问
SELinux中主体和客体的定义:
在MAC的安全上下文中有两个重要概念,主体和客体。MAC(或非自由访问控制)框架允许你规定所有进程(称为主体)与系统其它部分如文件、设备、套接字、端口以及其它进程(称为客体)进行交互的权限。它通过对所有进程和对象定义安全策略来实现。这些进程和对象都由内核控制,安全的决定基于所有可用的信息,而不仅仅是用户的身份。在此模型中,一个进程可被授予的权限只是它需要且能发挥作用的权限。这遵循了最小权限原则,不同于DAC完全权限的概念
SELinux安全策略:严格和定向:
SELinux遵循最小特权模式。默认情况下,所有的行为都遭到拒绝,然后我们会针对系统的每个单元(服务、程序、用户、进程)单独增加策略以允许它们执行特定的功能。如果一个服务,程序或用户试图访问或修改一个不是它们所必须的的文件或资源,访问就会被拒绝且系统会将其记录到日志中。因为SELinux在内核中运行,每个应用程序并不需要针对它进行特别的修改。如果SELinux阻止了某个操作,应用程序只是会收到一个普通的“拒绝访问”的报错
策略是SELinux最重要的概念之一。最小特权模式就很能说明“严格”策略。SELinux可以允许很多不同的策略,在CentOS5和RHEL中默认的策略是“定向”,它主要针对的范围是关键的系统进程。在RHEL中,有超过200个这样的客体存在(包括httpd,named,dhcpd,mysqld)。除此之外,系统中其它的进程都在一个非限制域中运行,不受SELinux影响。定向策略的目标是让每一个启动时就默认安装和运行的进程都在限制域中运行。“定向”策略目的是在不严重影响终端用户体验的情况下尽可能保护最多的重要进程,大多数用户甚至完全感觉不到SELinux在运行
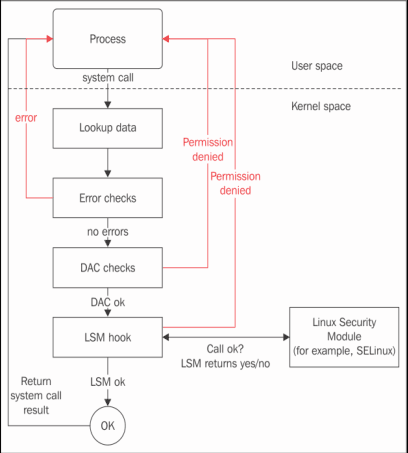
Linux Security Modules:
SELinux (Security-Enhanced Linux)的操作和配置:
SELinux操作模式:
确认SELinux的当前状态如下,默认模式为“Enforcing”,强制执行
获取当前运行模式:
[root@node0 ~]# getenforce
Enforcing
# enforcing ⇒ SELinux 为强制执行状态 (默认)
# permissive ⇒ MAC未启用,但仅根据策略记录审核日志
# disabled ⇒ SELinux 为关闭状态
或者也可以使用sestatus命令来获取当前SELinux状态:
[root@node0 ~]# sestatus
SELinux status: enabled
SELinuxfs mount: /sys/fs/selinux
SELinux root directory: /etc/selinux
Loaded policy name: targeted
Current mode: enforcing
Mode from config file: permissive
Policy MLS status: enabled
Policy deny_unknown status: allowed
Max kernel policy version: 31
可以使用setenforce命令在permissive⇐⇒enforcing之间切换当前模式,但是系统重新启动后,模式将返回默认值
[root@node0 ~]# getenforce
Enforcing
# 用“setenforce 0”切换到“Permissive”
[root@node0 ~]# setenforce 0
[root@node0 ~]# getenforce
Permissive
# 用“setenforce 1”切换到“Enforcing”
[root@node0 ~]# setenforce 1
[root@node0 ~]# getenforce
Enforcing
如果想永久更改操作模式,那么久更改配置文件中的值
[root@node0 ~]# vim /etc/sysconfig/selinux
# This file controls the state of SELinux on the system.
# SELINUX= can take one of these three values:
# enforcing - SELinux security policy is enforced.
# permissive - SELinux prints warnings instead of enforcing.
# disabled - No SELinux policy is loaded.
# 将SELINUX=设置为需要设置的值
SELINUX=enforcing
# SELINUXTYPE= can take one of three two values:
# targeted - Targeted processes are protected,
# minimum - Modification of targeted policy. Only selected processes are protected.
# mls - Multi Level Security protection.
SELINUXTYPE=targeted
# 重启并应用更改
[root@node0 ~]# systemctl reboot
如果将操作模式从“disabled”更改为“enforcing/permissive”,则需要使用SELinux上下文重新标记文件系统
因为当某些文件或目录在“disabled”模式下创建时,它们没有标记SELinux上下文,它们也需要被标记
# 重新设置标记如下,然后将在下一次系统重启时完成
# touch /.autorelabel
# systemctl reboot
SELinux策略类型:
如果SELinux处于“Enforcing / Permissive”状态,则可以选择Policy Type,如果需要,可以为自己的环境修改所选策略
可以在/etc/selinux/config文件或/etc/sysconfig/selinux文件中设置策略类型
CentOS 7默认策略是“targeted”策略
然而,如果更改策略类型,则需要安装策略文件。 对于CentOS 7 Minimal,默认情况下仅安装“targeted”策略
如果在未安装策略文件的情况下更改为与之对应的策略,则系统将无法启动,谨慎操作
在“SELINUXTYPE = ***”部分设置策略类型
# 默认策略是 "targeted"
[root@node0 ~]# cat /etc/sysconfig/selinux
# This file controls the state of SELinux on the system.
# SELINUX= can take one of these three values:
# enforcing - SELinux security policy is enforced.
# permissive - SELinux prints warnings instead of enforcing.
# disabled - No SELinux policy is loaded.
SELINUX=enforcing
# SELINUXTYPE= can take one of three two values:
# targeted - Targeted processes are protected,
# minimum - Modification of targeted policy. Only selected processes are protected.
# mls - Multi Level Security protection.
SELINUXTYPE=targeted
例如,将策略更改为“minimum”策略,首先需要装策略文件
[root@node0 ~]# yum -y install selinux-policy-minimum
策略文件安装在“minimum”目录下
[root@node0 ~]# ll /etc/selinux/
total 28
-rw-r--r--. 1 root root 547 Jul 10 10:15 config
-rw-r--r--. 1 root root 546 Jul 10 10:01 config.bak
drwx------. 2 root root 4096 Aug 13 15:23 final
drwxr-xr-x. 7 root root 4096 Aug 13 15:23 minimum
-rw-r--r--. 1 root root 2321 Apr 11 16:01 semanage.conf
drwxr-xr-x. 7 root root 4096 Aug 13 15:23 targeted
drwxr-xr-x. 2 root root 4096 Apr 11 16:01 tmp
[root@node0 ~]# vim /etc/selinux/config
# 更改“SELINUXTYPE”部分
# This file controls the state of SELinux on the system.
# SELINUX= can take one of these three values:
# enforcing - SELinux security policy is enforced.
# permissive - SELinux prints warnings instead of enforcing.
# disabled - No SELinux policy is loaded.
SELINUX=enforcing
# SELINUXTYPE= can take one of three two values:
# targeted - Targeted processes are protected,
# minimum - Modification of targeted policy. Only selected processes are protected.
# mls - Multi Level Security protection.
SELINUXTYPE=minimum
重启并应用更改:
# systemctl reboot
重启后查看SELinux的状态:
[root@node0 ~]# sestatus
SELinux status: enabled
SELinuxfs mount: /sys/fs/selinux
SELinux root directory: /etc/selinux
Loaded policy name: minimum
Current mode: enforcing
Mode from config file: enforcing
Policy MLS status: enabled
Policy deny_unknown status: allowed
Max kernel policy version: 31
RPM 包提供了3种策略:
Targeted 此策略将访问控制应用于它们通常是容易遭受攻击的进程,默认即为此
Minimum 此策略的包含设置文件与“Targeted”策略相同,但访问控制的最小进程数比“Targeted”策略更多
MLS 多级安全策略,它实现了Bell-LaPadula(BLP)模型,可以应用更复杂的控件
SELinux 上下文(Context):
访问控制文件或目录由附加信息控制,称为SELinux Context,SELinux Context具有以下语法:
[SELinux User]:[Role]:[Type]:[Level]
SELinux User: SELinux用户属性,而非操作系统user
每个Linux用户都通过SELinux Policy映射到SELinux用户
Role: RBAC(基于角色的访问控制)属性
定义了SELinux用户的角色
控制定义角色可以通过SELinux策略访问域的访问
Type: TE(类型实施)属性
为进程定义域,还定义文件类型
Level: MLS(多级安全性)和MCS(多类别安全性)属性
级别具有[sensitivity]:[category]
RHEL/CentOS默认策略的“Targeted”政策强制MCS,它仅对政策使用“s0”敏感性,但是对于Category,它支持c0-c1023
MLS强制使用Bell-La Padula强制访问模型
如果想要使用它,则需要在RHEL/CentOS上安装MLS Policy包,但它不支持X Window System,因此无法在桌面环境中使用它
要显示文件或进程的SELinux上下文,在命令中添加“Z”选项即可:
# 文件或者目录
[root@node0 ~]# ls -Z /home/
drwx------. eser eser unconfined_u:object_r:user_home_dir_t:s0 eser
drwx------. python python unconfined_u:object_r:user_home_dir_t:s0 python
drwx------. sqlmap sqlmap unconfined_u:object_r:user_home_dir_t:s0 sqlmap
------------------:-----------:-----------------------:------
User : Role : Type : Level
# 进程
[root@node0 ~]# ps -axZ
LABEL PID TTY STAT TIME COMMAND
system_u:system_r:init_t:s0 1 ? Ss 0:00 /usr/lib/systemd/systemd --switched-
system_u:system_r:kernel_t:s0 2 ? S 0:00 [kthreadd]
...
unconfined_u:unconfined_r:unconfined_t:s0-s0:c0.c 1023 2684 pts/0 R+ 0:00 ps -axZ
# 自己的ID
[root@node0 ~]# id -Z
unconfined_u:unconfined_r:unconfined_t:s0-s0:c0.c1023
每个Linux用户被映射到SELinux策略的SELinux的用户,如下图中的映射列表:
[root@node0 ~]# semanage login -l
Login Name SELinux User MLS/MCS Range Service
__default__ unconfined_u s0-s0:c0.c1023 *
root unconfined_u s0-s0:c0.c1023 *
system_u system_u s0-s0:c0.c1023 *
# 如果semanage命令不存在,请使用yum provides *bin/semanage命令查找semanage命令属于哪个安装包的,并安装上
# yum install -y policycoreutils-python
对于上面的示例(RHEL/CentOS 默认),“root”映射到“unconfined_u”,像“bin”或“daemon”等系统用户被映射到“system_u”,其他常见用户被映射到“__default__”一次,最后映射到“unconfined_u”
“unconfined_u”用户被分配“unconfined_r”角色,由“unconfined_u”用户启动的进程作为“unconfined_t”域运行
分配“unconfined_t”域的进程不受SELinux控制
[root@node0 ~]# ps -axZ | grep unconfined_t
unconfined_u:unconfined_r:unconfined_t:s0-s0:c0.c1023 1650 ? S 0:00 sshd: python@pts/0
unconfined_u:unconfined_r:unconfined_t:s0-s0:c0.c1023 1658 pts/0 Ss 0:00 -bash
unconfined_u:unconfined_r:unconfined_t:s0-s0:c0.c1023 1855 pts/0 S 0:00 su - root
unconfined_u:unconfined_r:unconfined_t:s0-s0:c0.c1023 1882 pts/0 S 0:00 -bash
unconfined_u:unconfined_r:unconfined_t:s0-s0:c0.c1023 2962 pts/0 R+ 0:00 ps -axZ
unconfined_u:unconfined_r:unconfined_t:s0-s0:c0.c1023 2963 pts/0 R+ 0:00 grep --color=auto unconfined_t
修改布尔值:
在像“Targeted”这样的RPM软件包提供的SELinux策略中,可以轻松更改SELinux设置以切换布尔值
以下示例为“Targeted”策略环境
布尔值如下所示:
# 显示列表和当前设置
[root@node0 ~]# getsebool -a
auditadm_exec_content --> on
authlogin_nsswitch_use_ldap --> off
authlogin_radius --> off
...
xdm_write_home --> off
xserver_clients_write_xshm --> off
xserver_execmem --> off
xserver_object_manager --> off
# 查看布尔值描述
[root@node0 ~]# semanage boolean -l
SELinux boolean State Default Description
ssh_chroot_rw_homedirs (off , off) Allow ssh with chroot env to read and write files in the user home directories
mount_anyfile (off , off) Allow the mount commands to mount any directory or file.
xserver_execmem (off , off) Allows XServer to execute writable memory
...
sysadm_exec_content (on , on) Allow sysadm to exec content
例如,配置“samba_enable_home_dirs”布尔值:
“samba_enable_home_dirs”默认设置为“off”,表示SELinux的访问控制已启用。
# 默认是"off"
[root@node0 ~]# semanage boolean -l | grep samba
samba_enable_home_dirs (off , off) Support SAMBA home directories
# 设置完全访问的共享文件夹后,创建一些测试文件
# SELinux Context继承自/home/python目录
[root@node0 ~]# ll -Z /home/python/
-rw-rw-r--. python python unconfined_u:object_r:home_root_t:s0 1.py
-rw-rw-r--. python python unconfined_u:object_r:home_root_t:s0 1.sh
此时,即使文件具有读取权限且父目录具有777权限,也会拒绝访问
将“samba_enable_home_dirs”的布尔值更改为“on”,以便能够正常访问该文件夹
# 打开"samba_enable_home_dirs"
[root@node0 ~]# setsebool -P samba_enable_home_dirs on
[root@node0 ~]# getsebool samba_enable_home_dirs
samba_enable_home_dirs --> on
# 当samba_enable_home_dirs关闭时,将添加当前SELinux上下文
[root@node0 ~]# ll -Z /home/python/
-rw-rw-r--. python python unconfined_u:object_r:home_root_t:s0 1.py
-rw-rw-r--. python python unconfined_u:object_r:home_root_t:s0 1.sh
# 重置samba_enable_home_dirs的默认SELinux上下文
[root@node0 ~]# restorecon -R /home/python
# 查看SELinux Context
[root@node0 ~]# ll -Z /home/python/
-rw-rw-r--. python python unconfined_u:object_r:user_home_t:s0 1.py
-rw-rw-r--. python python unconfined_u:object_r:user_home_t:s0 1.sh
更改文件类型:
可以修改访问控制设置以更改文件类型而不更改布尔值,以下示例为“Targeted”策略环境
默认SELinux上下文的设置位于[policy directory]/contexts/files下,如下所示
[root@node0 ~]# ll /etc/selinux/targeted/contexts/files
total 1844
-rw-r--r--. 1 root root 385161 Aug 13 15:23 file_contexts
-rw-r--r--. 1 root root 1417489 Aug 13 15:23 file_contexts.bin
-rw-r--r--. 1 root root 13169 Aug 13 15:23 file_contexts.homedirs
-rw-r--r--. 1 root root 44725 Aug 13 15:23 file_contexts.homedirs.bin
-rw-r--r--. 1 root root 153 Aug 13 15:23 file_contexts.local
-rw-r--r--. 1 root root 396 Aug 13 15:23 file_contexts.local.bin
-rw-r--r--. 1 root root 0 Jun 28 00:52 file_contexts.subs
-rw-r--r--. 1 root root 453 Jun 28 00:52 file_contexts.subs_dist
-rw-r--r--. 1 root root 139 Jun 28 00:22 media
[root@node0 ~]# head /etc/selinux/targeted/contexts/files/file_contexts
/.* system_u:object_r:default_t:s0
/[^/]+ -- system_u:object_r:etc_runtime_t:s0
/a?quota.(user|group) -- system_u:object_r:quota_db_t:s0
/nsr(/.*)? system_u:object_r:var_t:s0
/sys(/.*)? system_u:object_r:sysfs_t:s0
/xen(/.*)? system_u:object_r:xen_image_t:s0
/mnt(/[^/]*)? -d system_u:object_r:mnt_t:s0
/mnt(/[^/]*)? -l system_u:object_r:mnt_t:s0
/bin/.* system_u:object_r:bin_t:s0
/dev/.* system_u:object_r:device_t:s0
例如,修改文件类型以便在httpd上使用CGI
在httpd上使用CGI的布尔值默认设置为“on”,因此可以使用默认的SELinux设置在httpd设置下的默认目录“/var/www/cgi-bin /”下运行CGI
[root@node0 ~]# semanage boolean -l | grep httpd_enable_cgi
httpd_enable_cgi (on , on) Allow httpd cgi support
[root@node0 ~]# semanage boolean -l | grep httpd_enable_cgi
httpd_enable_cgi (on , on) Allow httpd cgi support
[root@node0 ~]# grep "cgi" /etc/selinux/targeted/contexts/files/file_contexts | grep "httpd"
/usr/.*.cgi -- system_u:object_r:httpd_sys_script_exec_t:s0
/opt/.*.cgi -- system_u:object_r:httpd_sys_script_exec_t:s0
/var/www/[^/]*/cgi-bin(/.*)? system_u:object_r:httpd_sys_script_exec_t:s0
/var/www/html/[^/]*/cgi-bin(/.*)? system_u:object_r:httpd_sys_script_exec_t:s0
/usr/lib/cgi-bin(/.*)? system_u:object_r:httpd_sys_script_exec_t:s0
/var/www/cgi-bin(/.*)? system_u:object_r:httpd_sys_script_exec_t:s0
/usr/lib/cgi-bin/(nph-)?cgiwrap(d)? -- system_u:object_r:httpd_suexec_exec_t:s0
/var/log/cgiwrap.log.* -- system_u:object_r:httpd_log_t:s0
创建一个测试脚本,并访问它,如果不出意外,应该是可以正常访问
[root@node0 ~]# curl http://localhost/cgi-bin/index.py
hello world
但是,如果在此示例之外的另一个目录上使用CGI,即使httpd设置正确,也会拒绝访问
# curl http://localhost/cgi-enabled/index.py
<!DOCTYPE HTML PUBLIC "-//IETF//DTD HTML 2.0//EN">
<html><head>
<title>500 Internal Server Error</title>
</head><body>
<h1>Internal Server Error</h1>
<p>The server encountered an internal error or
misconfiguration and was unable to complete
your request.</p>
...
# 分配了“httpd_sys_content_t”
[root@node0 ~]# ls -Z /var/www/html/cgi-enabled
-rwxr-xr-x. root root unconfined_u:object_r:httpd_sys_content_t:s0 index.py
在这种情况下,它需要将文件类型更改为SELinux允许CGI的文件类型
更改文件类型如下,但是,当使用restorecon命令或重新标记到文件系统时,使用chcon命令进行的更改将会恢复
[root@node0 ~]# chcon -t httpd_sys_script_exec_t /var/www/html/cgi-enabled/index.py
[root@node0 ~]# ls -Z /var/www/html/cgi-enabled
-rwxr-xr-x. root root unconfined_u:object_r:httpd_sys_script_exec_t:s0 index.py
[root@node0 ~]# curl http://localhost/cgi-enabled/index.py
hello world
如果要永久更改类型,使用以下方法:
[root@node0 ~]# semanage fcontext -a -t httpd_sys_script_exec_t /var/www/html/cgi-enabled/index.py
[root@node0 ~]# grep "cgi-enabled" /etc/selinux/targeted/contexts/files/file_contexts.local
/var/www/html/cgi-enabled/index.py system_u:object_r:httpd_sys_script_exec_t:s0
# 还是默认的上下文
[root@node0 ~]# ls -Z /var/www/html/cgi-enabled
-rwxr-xr-x. root root unconfined_u:object_r:httpd_sys_content_t:s0 index.py
# 使用restotecon进行重置
[root@node0 ~]# restorecon -RFvv /var/www/html/cgi-enabled/
[root@node0 ~]# ls -Z /var/www/html/cgi-enabled
-rwxr-xr-x. root root unconfined_u:object_r:httpd_sys_script_exec_t:s0 index.py
# 已经重置了上下文
[root@node0 ~]# curl http://localhost/cgi-enabled/index.py
hello world
更改端口类型:
SELinux标记类型到网络端口,因此无法使用未配置类型的端口启动服务
显示网络端口的类型列表,如下:
[root@node0 ~]# semanage port -l
SELinux Port Type Proto Port Number
afs3_callback_port_t tcp 7001
afs3_callback_port_t udp 7001
afs_bos_port_t udp 7007
...
zookeeper_election_port_t tcp 3888
zookeeper_leader_port_t tcp 2888
zope_port_t tcp 8021
例如,为httpd设置82端口:
http的默认端口80,https的端口443标有“http_port_t”,如下所示,但当然没有设置82。 因此,如果您使用“listen 82”正确配置httpd.conf,则httpd将无法启动,因为SELinux拒绝了它。 如果使用82,将其添加到“http_port_t”
# 查看当前端口设置
[root@node0 ~]# semanage port -l | grep -E -w "80|443"
http_port_t tcp 80, 81, 443, 488, 8008, 8009, 8443, 9000
# 添加82端口
[root@node0 ~]# semanage port -a -t http_port_t -p tcp 82
[root@node0 ~]# semanage port -l | grep -E -w "80|443"
http_port_t tcp 82, 80, 81, 443, 488, 8008, 8009, 8443, 9000
此时,82端口就可以被监听
日志查找:
SELinux的Access OK或Deny决策被缓存一次,Denial Accesses被发送到Log文件
SELinux的缓存称为AVC(访问矢量缓存),拒绝访问称为“AVC拒绝”
AVC拒绝日志是通过Rsyslog服务或审计服务生成的,因此它需要任何一个服务正在运行
通过Rsyslog发送的消息是使用“kern”工具生成的
CentOS默认Rsyslog设置写为“* .info; xxx/var/log/messages”,因此AVC拒绝日志记录到/var/log/messages
[root@node0 ~]# grep "avc: .denied" /var/log/messages
ug 13 15:28:54 node0 kernel: type=1107 audit(1534145334.126:3): pid=1 uid=0 auid=4294967295 ses=4294967295 subj=system_u:system_r:init_t:s0 msg='avc: denied { start } for auid=n/a uid=0 gid=0 path="/usr/lib/systemd/system/kdump.service" cmdline="/bin/systemctl try-restart kdump.service" scontext=system_u:system_r:udev_t:s0-s0:c0.c1023 tcontext=system_u:object_r:kdump_unit_file_t:s0 tclass=service#012 exe="/usr/lib/systemd/systemd" sauid=0 hostname=? addr=? terminal=?'
通过Auditd的消息生成到/var/log/audit/audit.log
[root@node0 ~]# grep "avc: .denied" /var/log/audit/audit.log
type=AVC msg=audit(1533883685.825:23109): avc: denied { read } for pid=26696 comm="ebtables" name="ebtables.lock" dev="tmpfs" ino=13827 scontext=system_u:system_r:iptables_t:s0 tcontext=system_u:object_r:var_run_t:s0 tclass=file
对于通过审核的消息,可以使用ausearch命令搜索它们
[root@node0 ~]# ausearch -m AVC
----
time->Sat Jun 23 18:03:41 2018
type=PROCTITLE msg=audit(1529748221.320:28): proctitle=2F62696E2F62617368002F7573722F7362696E2F6468636C69656E742D736372697074
type=SYSCALL msg=audit(1529748221.320:28): arch=c000003e syscall=2 success=no exit=-13 a0=1702d50 a1=441 a2=1b6 a3=fffffff0 items=0 ppid=624 pid=625 auid=4294967295 uid=0 gid=0 euid=0 suid=0 fsuid=0 egid=0 sgid=0 fsgid=0 tty=(none) ses=4294967295 comm="dhclient-script" exe="/usr/bin/bash" subj=system_u:system_r:dhcpc_t:s0 key=(null)
type=AVC msg=audit(1529748221.320:28): avc: denied { open } for pid=625 comm="dhclient-script" path="/var/log/multi-nic-util/20180623.log" dev="vda1" ino=1180388 scontext=system_u:system_r:dhcpc_t:s0 tcontext=system_u:object_r:var_log_t:s0 tclass=file
----
对于通过Auditd的消息,可以使用aureport命令显示摘要报告
[root@node0 ~]# aureport --avc
AVC Report
========================================================
# date time comm subj syscall class permission obj event
========================================================
1. 06/23/2018 18:02:46 ? system_u:system_r:kernel_t:s0 0 (null) (null) (null) unset 9
2. 06/23/2018 18:03:41 dhclient-script system_u:system_r:dhcpc_t:s0 2 file open system_u:object_r:var_log_t:s0 denied 28
3. 06/23/2018 18:03:41 dhclient-script system_u:system_r:dhcpc_t:s0 2 file open system_u:object_r:var_log_t:s0 denied 29
4. 06/23/2018 18:03:41 dhclient-script system_u:system_r:dhcpc_t:s0 2 file open system_u:object_r:var_log_t:s0 denied 30
...
[root@node0 ~]# aureport --avc --summary
Avc Object Summary Report
=================================
total obj
=================================
493 system_u:object_r:home_root_t:s0
316 system_u:object_r:unlabeled_t:s0
67 system_u:object_r:var_run_t:s0
51 unconfined_u:object_r:semanage_store_t:s0
51 system_u:object_r:ldconfig_exec_t:s0