以下教程是写给已经熟练操作KVM+LVM的人看的。并且也安装过不少次Ubuntu系统,所以很多内容都跳过了。
个人感觉如果自己用的话LVM是最好的。
首先通过lvm的lvcreate在宿主机上面创建一个逻辑卷
lvcreate -L 8000M -n sys_ubuntu_cn2009 /dev/vg_samsungssd840pro
然后直接把这个逻辑卷格式化成ext4
mkfs.ext4 /dev/mapper/vg_samsungssd840pro-sys_ubuntu_cn2009
接着编辑一个ubuntu-cn2009.xml文件
<domain type='kvm'>
  <name>ubuntu-cn2009</name>
  <uuid>3b026891-325a-44c7-82ce-bb531cea816c</uuid>
  <memory unit='KiB'>2097152</memory>
  <currentMemory unit='KiB'>2097152</currentMemory>
  <vcpu placement='static'>4</vcpu>
  <os>
    <type arch='x86_64'machine='pc-i440fx-xenial'>hvm</type>
    <boot dev='hd'/>
    <boot dev='cdrom'/>
  </os>
  <features>
    <acpi/>
    <apic/>
    <pae/>
  </features>
  <clock offset='localtime'>
    <timer name='rtc'tickpolicy='catchup'/>
  </clock>
  <on_poweroff>destroy</on_poweroff>
  <on_reboot>restart</on_reboot>
  <on_crash>restart</on_crash>
  <devices>
    <emulator>/usr/bin/kvm-spice</emulator>
    <disk type='block'device='disk'>
      <driver name='qemu'type='raw'cache='writeback'/>
      <source dev='/dev/mapper/vg_samsungssd840pro-sys_ubuntu_cn2009'/>
      <target dev='hda'bus='ide'/>
      <address type='drive'controller='0'bus='0'target='0'unit='0'/>
    </disk>
    <disk type='file'device='cdrom'>
      <driver name='qemu'type='raw'/>
      <source file='/mnt/iso/linux/ubuntu/ubuntu-16.04.1-server-amd64.iso'/>
      <target dev='hdc'bus='ide'/>
      <readonly/>
      <address type='drive'controller='0'bus='1'target='0'unit='0'/>
    </disk>
    <controller type='usb'index='0'>
      <address type='pci'domain='0x0000'bus='0x00'slot='0x01'function='0x2'/>
    </controller>
    <controller type='pci'index='0'model='pci-root'/>
    <controller type='ide'index='0'>
      <address type='pci'domain='0x0000'bus='0x00'slot='0x01'function='0x1'/>
    </controller>
    <interface type='bridge'>
      <mac address='52:54:00:ba:93:4f'/>
      <source bridge='br1'/>
      <virtualport type='openvswitch'>
        <parameters interfaceid='9555e13b-3f29-4d1b-9777-4f2b2c08930b'/>
      </virtualport>
      <model type='e1000'/>
      <address type='pci'domain='0x0000'bus='0x00'slot='0x03'function='0x0'/>
    </interface>
    <input type='tablet'bus='usb'/>
    <input type='mouse'bus='ps2'/>
    <input type='keyboard'bus='ps2'/>
    <graphics type='vnc'port='52009'autoport='no'listen='0.0.0.0'passwd='123'>
      <listen type='address'address='0.0.0.0'/>
    </graphics>
    <video>
      <model type='cirrus'vram='16384'heads='1'/>
      <address type='pci'domain='0x0000'bus='0x00'slot='0x02'function='0x0'/>
    </video>
    <memballoon model='virtio'>
      <address type='pci'domain='0x0000'bus='0x00'slot='0x05'function='0x0'/>
    </memballoon>
  </devices>
</domain>
然后用virsh define ubuntu-cn2009.xml
就开机安装了。
值得注意的是安装过程中会提示你是否卸载(umount)掉/dev/sda,我把他的原版提示抄下来了。
The installer has detected that the fallowing disks have mounted partitions:
/dev/sda
Do you want the installer to try to unmount the partitions on these disks before
continuing? If you leave them mounted, you will not be able to create, delete, or resize
partitions on these disks, but you may be able to install to existing partitions there.
Unmount partitions that are in use?
<Go Back> <Yes> <No>
我就选择了<No>, 因为我确实要把系统直接安装到这个挂载好的/dev/sda分区里面,
所以后面提示我们要分区或者格式化什么都不需要了。就连GRUB引导都不用安装了啊。
但是我们在分区的时候要选择“手动”,然后把#1的假分区(实际就是/dev/sda)挂载(Mount point)到“/”,不用格式化。
当然他肯定会提示我们说没有swap可能会影响性能什么的,还问要不要回去菜单重新来搞过,
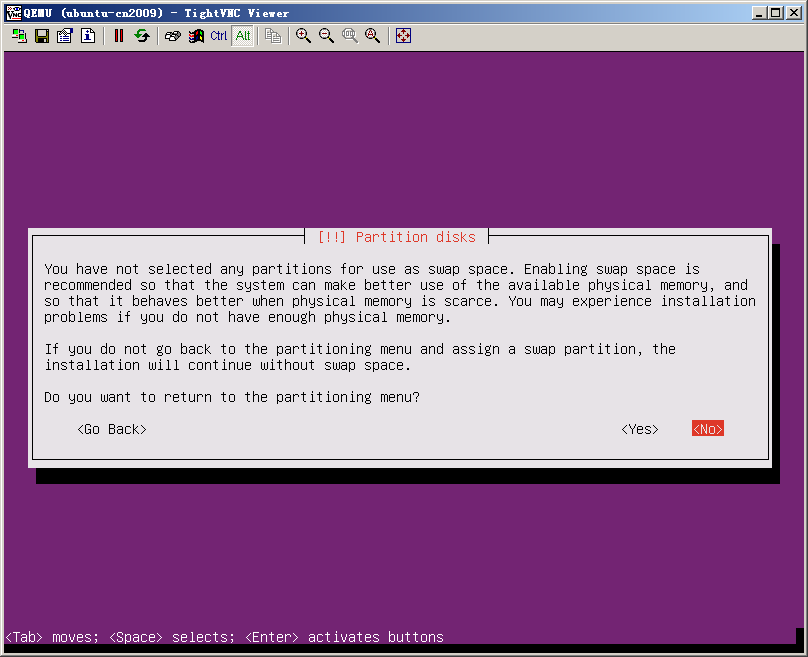
直接选择<No>就好。
真是麻烦,我都已经选择不要格式化了,还问。。
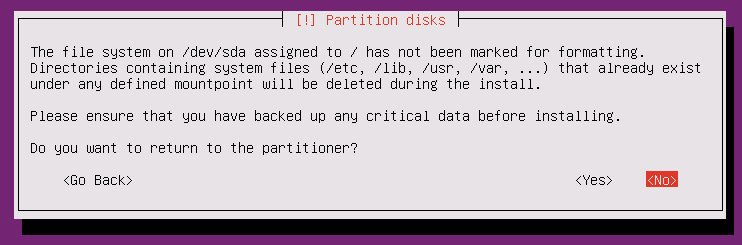
继续选<No>
最后还是会提示我们确认一下的。
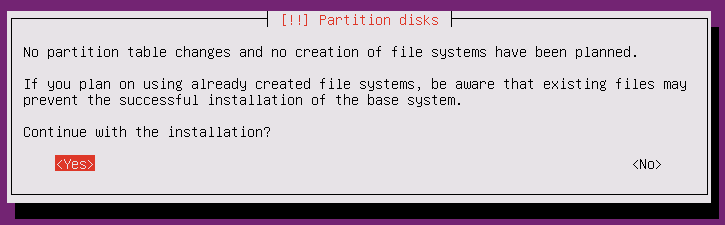
这里要选择<Yes>的。
到了提示你是否要安装GRUB了,这里选<Yes>
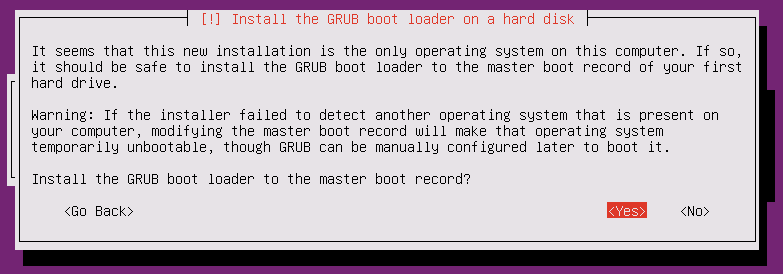
但是他会说安装出错,
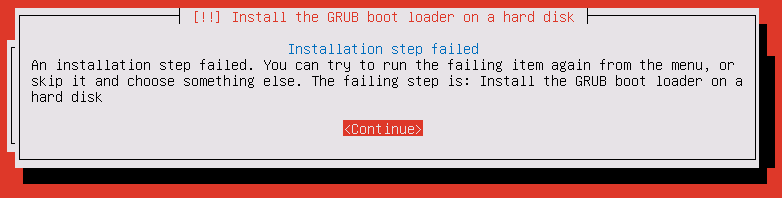
多试2次,第3次的时候会让你选择安装到/dev/sda里面,就可以成功了。