1.介绍:http://www.xiangwangfeng.com/
2.安装:行之有效的方法
2.手动:http://gaobusi.iteye.com/
3.这个app参考了samples里的TTCatalog、TTNavigatorDemo,实现3个页面,功能:
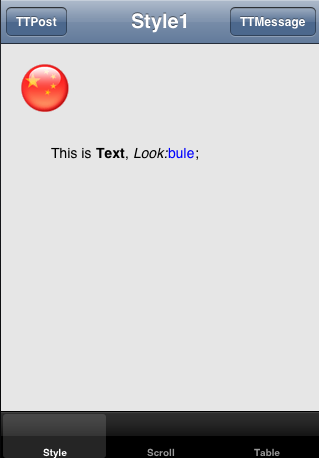
1.Navigator的左右分别添加TTMessage和TTPost,View显示一个经过TTDefaultStyleSheet修改的text和一个image;
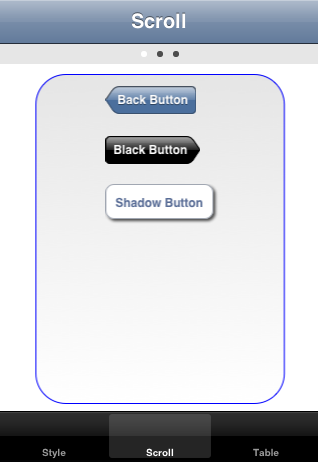
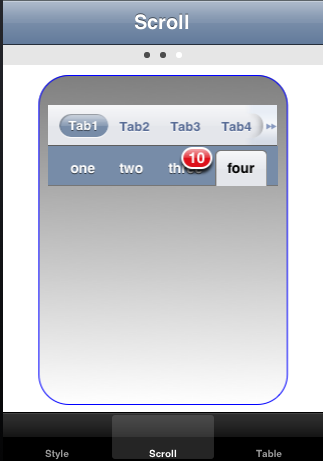
2.3个Scroll分别包含各种样式的Button、各种样式的TextField、2款Tabbar;
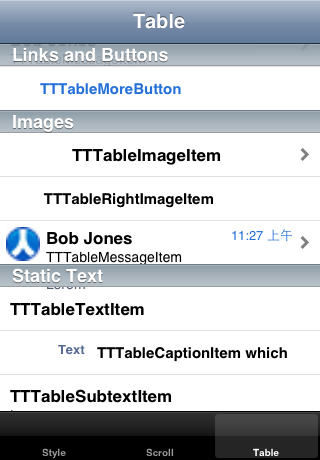
3.Table的展示(使用TTCatalog的TableItemTestController);
分别展示:


4.代码
①.从AppDelegate applicationDidFinishLaunching开始:
- (void)applicationDidFinishLaunching:(UIApplication *)application
{
    TTNavigator *navigator = [TTNavigator navigator];
    navigator.persistenceMode = TTNavigatorPersistenceModeAll;
    navigator.window = [[[UIWindow alloc] initWithFrame:TTScreenBounds()] autorelease];

    TTURLMap *map = navigator.URLMap;
    [map from:@"*" toViewController:[TTWebController class]];

    [map from:@"tt://rootView" toSharedViewController:[RootViewController class]];
    [map from:@"tt://style" toViewController:[StyleController class]];
    [map from:@"tt://scroll" toViewController:[ScrollController class]];
    [map from:@"tt://table" toViewController:[TableController class]];

    if (![navigator restoreViewControllers]) {
        [navigator openURLAction:[TTURLAction actionWithURLPath:@"tt://rootView"]];
    }
}

- (BOOL)application:(UIApplication *)application handleOpenURL:(NSURL *)url
{
    [[TTNavigator navigator] openURLAction:[TTURLAction actionWithURLPath:url.absoluteString]];
    return YES;
}
在applicationDidFinishLaunching中定义好了路径及路径初始化类,只需要提交路径,就可以跳转到该Controller。
常用的方法还可以添加参数,像:
[map from:@"tt://menu/(initWithMenu:)" toSharedViewController:[MenuController class]];
initWithMenu:为MenuController的方法,使用时,需要使用时,如:tt://menu/1。
具体查看TTNavigatorDemo.xcodeproj,很详细。
②.页面加载进入rootView,也就是RootViewController,此类继承至UITabBarController,并设置3个bar,分别指向前面定义好的链接:
@"tt://style",@"tt://scroll",@"tt://table"
页面加载第一个,也就是StyleController。
③.页面使用initWithNibName定义2个新的路径:
[[TTNavigator navigator].URLMap from:@"tt://compose" toModalViewController:self selector:@selector(composeTo:)];//以模态形式打开
[[TTNavigator navigator].URLMap from:@"tt://post" toViewController:self selector:@selector(post:)];//打开
分别指向2个方法。
loadView方法,在Navigator中添加左、右按钮,并打开链接:
target:@"tt://compose" action:@selector(openURLFromButton:)//openURLFromButton为预定义方法,打开target指定的链接
//预定义了好多方法
2个action://只是单纯的创建
- (UIViewController *)composeTo:(NSString *)str
{
    TTMessageController *controller = [[[TTMessageController alloc] init] autorelease];
    return controller;
}
- (UIViewController *)post:(NSDictionary *)query
{
    TTPostController *controller = [[[TTPostController alloc] init] autorelease];
    return controller;
}
Three20的样式很厉害,通过TTDefaultStyleSheet直接定义样式:
    NSString *Text = @"This is <b>Text</b>, <i>Look:</i><span class=\"blueText\">bule</span>;";
    TTStyledTextLabel *label = [[[TTStyledTextLabel alloc] initWithFrame:CGRectMake(50.0, 100.0, 200.0, 100.0)] autorelease];
    label.text = [TTStyledText textFromXHTML:Text lineBreaks:YES URLs:YES];//text
    label.backgroundColor = [UIColor colorWithWhite:0.9 alpha:1];//背景
    [self.view addSubview:label];
定义的Text中,span包含class属性,这个属性的值在TTDefaultStyleSheet继承类实现:
- (TTStyle *)blueText{
    return [TTTextStyle styleWithColor:[UIColor blueColor] next:nil];//字符颜色为蓝色 next相当于点表达式
  //样式很丰富,详细看TTStyleCatalog.xcodeproj
}
在实现此样式前,在initWithNib中,需要定义:
[TTStyleSheet setGlobalStyleSheet:[[[Styles alloc] init] autorelease]];//方法都写在了styles中这样,包含class为blueText的文本,字体颜色就为蓝色。
在viewDidLoad方法,添加一个图片:
- (void)viewDidLoad
{
    UIImageView *imageView = [[UIImageView alloc] initWithFrame:CGRectMake(20.0, 20.0, 48.0, 48.0)];
    UIImage *image = [UIImage imageNamed:@"China.gif"];
    imageView.image = image;
    [self.view addSubview:imageView];
}
在init中初始化2个链接,释放:
- (void)dealloc
{
    [[TTNavigator navigator].URLMap removeURL:@"tt://compose"];
    [[TTNavigator navigator].URLMap removeURL:@"tt://post"];
    [super dealloc];
}
④.ScrollController简单介绍:
初始化initWithNibName方法中,必不可少的样式(TTStyleSheet)和一个颜色数组定义。
[TTStyleSheet setGlobalStyleSheet:[[[Styles alloc] init] autorelease]];
        colors = [[NSArray arrayWithObjects:[UIColor colorWithWhite:0.9 alpha:1],
                  [UIColor blueColor],
                  [UIColor grayColor], nil] retain];
此颜色就是Scroll的背景颜色。
loadView方法中,定义页面控制器和添加一个Scroll:
    CGRect appFrame = [UIScreen mainScreen].applicationFrame;
    CGRect frame = CGRectMake(0, 0, appFrame.size.width, appFrame.size.height -44);
    self.view = [[[UIView alloc] initWithFrame:frame] autorelease];

    pageControl = [[TTPageControl alloc] initWithFrame:CGRectMake(0, 0, self.view.width, 20)];
    //...
    [self.view addSubview:pageControl];

    scrollView = [[TTScrollView alloc] initWithFrame:CGRectMake(0, pageControl.bottom, self.view.bounds.size.width, 350)];
    //...
    [self.view addSubview:scrollView];
控制当前页码的方法分别页面控制器的changePage和Scroll的delegate方法:didMoveToPageAtIndex
- (void)changePage:(id)sender
{
    int page = pageControl.currentPage;
    [scrollView setCenterPageIndex:page];
}
改变pageControl的pageIndex,则改变ScrollView的pageIndex,显示不同的内容。而每当ScrollView改变,也需要修改pageControl的pageIndex。
- (void)scrollView:(TTScrollView *)scrollView didMoveToPageAtIndex:(NSInteger)pageIndex
{
    pageControl.currentPage = pageIndex;
}
在ScrollView dataSource中,根据传入的pageIndex值,添加页面的显示内容:
pageIndex==0时,执行:
NSArray* buttons = [NSArray arrayWithObjects:
                            [TTButton buttonWithStyle:@"toolbarBackButton:" title:@"Back Button"],//toolbarBackButton预定义样式
                            [TTButton buttonWithStyle:@"blackForwardButton:" title:@"Black Button"],
                            [TTButton buttonWithStyle:@"dropButton:" title:@"Shadow Button"],
                            nil];
        for (TTButton* button in buttons) {
            button.font = [UIFont boldSystemFontOfSize:12];
            button.frame = CGRectMake(80, height, 100, 30);
            [button sizeToFit];
            [pageView addSubview:button];
            height += 50;
        }
blackForwardButton和dropButton都为自己定义,在Styles文件中。
pageIndex==1时,显示各种各样的view。//从此处看,样式类很丰富。
当pageIndex==2时,即第3个页面,显示各种TTTabBar。
TTTabStrip、TTTabBar、TTTabGrid
//定义不同,样式表现不
⑤.最后一个标签为TableController,表操作在Three20中,变的很简便,像这样:
self.dataSource = [TTSectionedDataSource dataSourceWithObjects:
                           @"Links and Buttons",
                           [TTTableTextItem itemWithText:@"TTTableTextItem"],
                           [TTTableButton itemWithText:@"TTTableButton"],@"Images",
                           [TTTableImageItem itemWithText:@"TTTableImageItem" imageURL:localImage URL:@"tt://tableItemTest"],
使用dataSource,就能完成页面布置。
设置分组模式:
self.tableViewStyle = UITableViewStyleGrouped;
在这个app中,直接拷贝了TTCatalog.xcodeproj的TableItemTestController代码,其主要介绍以TTTable开头的各种预表样式定义,简单的设置就能达到好看的展示。
详细部分看TTCatalog.xcodeproj demo。
@end