这篇文章主要是想使用torch学习并理解如何构建siamese network。
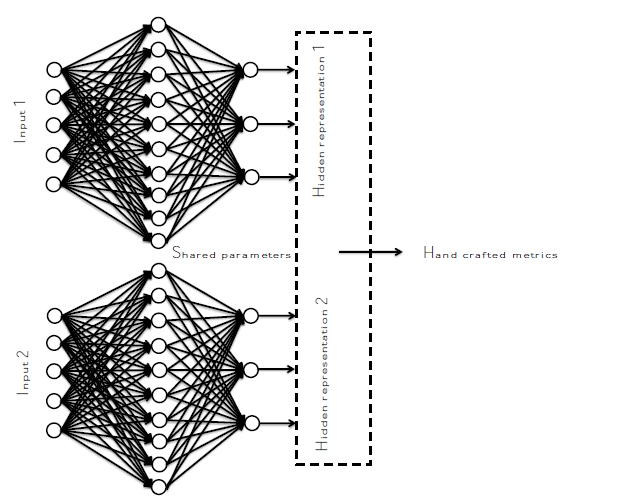
siamese network的结构如下:

使用的数据集:mnist 手写数据集
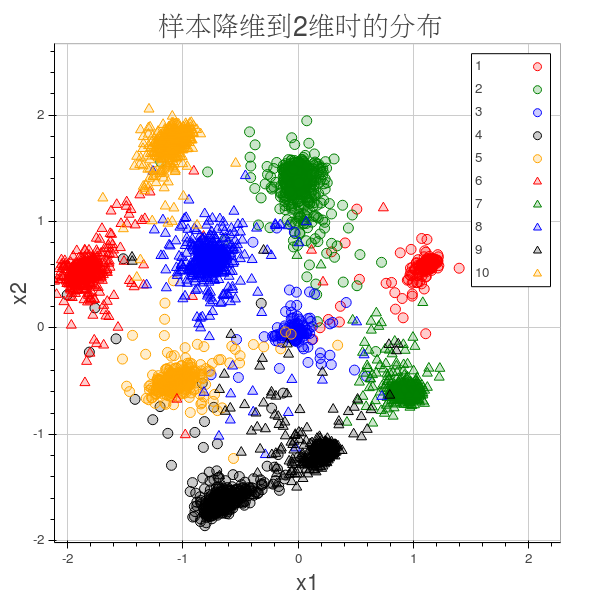
实验目的:通过孪生网络使得同一类的尽可能的靠近,不同类的尽可能不同。
命令行:
sudo luarocks install mnist
主要涉及的torch/nn中Container包括Sequential和ParallelTable,具体参见Docs » Modules » Containers
OK,现在来看代码
1_data 数据预处理
主要在于数据的加载和中心化以及归一化处理
require 'torch'
mnist = require('mnist')
-- the size of mnist is 28*28

-- initialize the dataset

train={
data = mnist.traindataset().data:type('torch.FloatTensor'),  -- traindata
label = mnist.traindataset().label, -- train label
size=function()
return mnist.traindataset().data:size(1) end
}
test={
data = mnist.testdataset().data:type('torch.FloatTensor'),
label = mnist.testdataset().label,
size=function()
return mnist.testdataset().data:size(1) end
}

local meanV = train.data:mean()
local stdV = train.data:std()

train.data = train.data:csub(meanV)
train.data = train.data:div(stdV)

test.data = test.data:add(-meanV)
test.data = test.data:mul(1.0/stdV)
mnist数据集中图像的大小是$28 imes 28$的,训练样本有60000张,测试样本有10000张
2_model 构建模型
首先孪生网络包括两个子网络,这两个子网络包含在ParallelTable中,而每一个单独的子网络又是在一个Sequential容器内,所以
require 'nn'

cnn=nn.Sequential()
-- stage 1
cnn:add(nn.SpatialConvolution(1,8,3,3,1,1,1)) -- 28*28
-- nn.SpationConvolution(nInputPlane,nOutputPlane,kW,kH,dW,dH,padW,padH)
cnn:add(nn.ReLU())
cnn:add(nn.SpatialMaxPooling(2,2)) -- 14*14
-- stage 2
cnn:add(nn.SpatialConvolution(8,16,3,3,1,1,1)) -- 14*14
cnn:add(nn.ReLU())
cnn:add(nn.SpatialMaxPooling(2,2)) -- 7*7
-- stage 3
cnn:add(nn.SpatialConvolution(16,32,3,3,1,1,1))
cnn:add(nn.ReLU())
cnn:add(nn.SpatialMaxPooling(2,2)) -- 3*3
-- stage 4
cnn:add(nn.Reshape(32*3*3))
cnn:add(nn.Linear(32*3*3,256))
cnn:add(nn.ReLU())
-- stage 5
cnn:add(nn.Linear(256,2))

parallel_model = nn.ParallelTable()
parallel_model:add(cnn)
parallel_model:add(cnn:clone('weight','bias','gradWeight','gradBias'))
--这里,孪生网络要求两个子网络共享参数,所以要分享权重和梯度变化

model = nn.Sequential()
model:add(nn.SplitTable(1))
model:add(parallel_model)
model:add(nn.PairwiseDistance(2)) -- L2距离
--print(model)
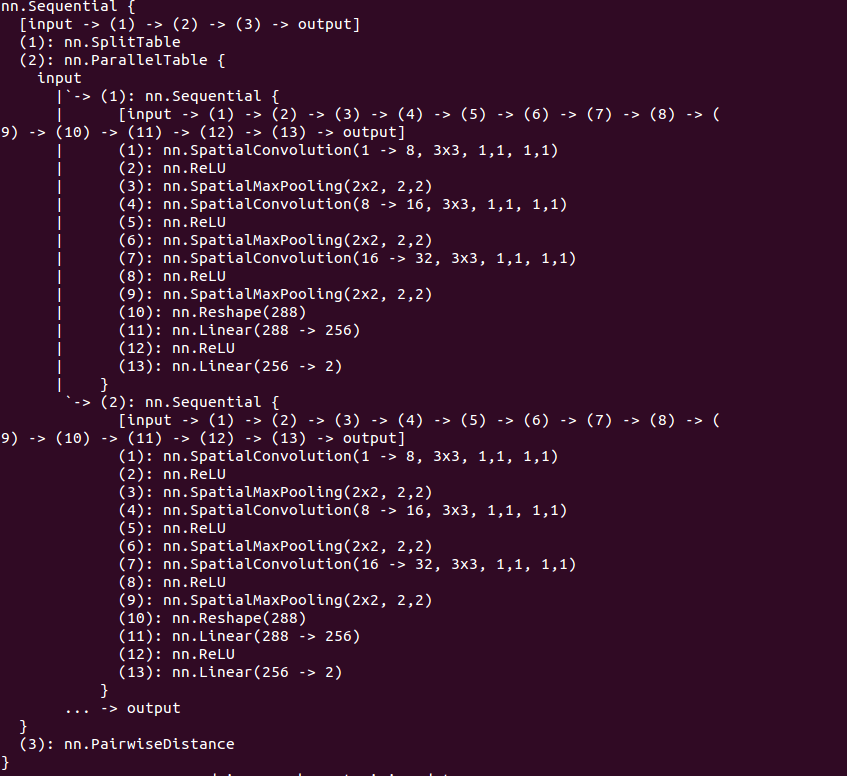
构造的模型如下:

为什么最终每一个子网络输出维度为2?这是因为我们希望之后能够在二维上显示的观察结果
nn.SplitTable(ndim): 将该层输入在第ndim上划分成table,在代码中就是将model的输入样本沿着第1维保存成table,table每一个元素对应这ParallelTable中的一个子网络,
所以model的输入应该是$2 imes 1 imes 28 imes 28$的torch.Tensor
3_loss 损失函数
这里使用的损失函数为 HingeEmbeddingCriterion,具体定义参见HingeEmbeddingCriterion
其形式:loss(x,y) = forward(x,y) = x, if y=1 = max(0,margin - x), if y=-1
$$
loss(x,y)=egin{cases}
x,	ext{ if}quad  y=1\
max(0,margin-x), if y=-1
end{cases}
$$
criterion=nn.HingeEmbeddingCriterion()
4_train 模型训练
在所有的步骤中,我觉得训练这一步相对来说是比较复杂的。
首先要定义数据的batch处理方式,然后定义优化方法调用的函数feval,这个函数使用BP算法更新了模型的参数,所以在整个文件之前要通过model.getPatameters()获得模型参数的引用。
最后就是调用optim中的优化方法对模型进行不断的优化了。
require 'nn'
require 'optim'
require 'xlua'

if model then
	parameters,gradParameters=model:getParameters()
end
batchSize = 100
learningRate = 0.01
function training()
	epoch=epoch or 1
	time = sys.clock()
	shuffer = torch.randperm(train:size())
	print ">>>>>>>>>>>>>>>>>>>>>> doing epoch on training data: >>>>>>>>>>>>>>>>>>>>>"
	print("=======> online epoch # " .. epoch .. '[batchSize = ' .. batchSize .. ']')
	for t=1,train:size(),batchSize do
		xlua.progress(t,train:size())

		batchData = {}
		batchLabel = {}

		for i=t,math.min(t+batchSize-1,train:size()) do
			local input=torch.Tensor(2,1,28,28) --注意这里,每个样本是28*28的tensor,但是模型中cnn的输入要求是1*28*28的所以应该存成2*1*28*28的tensor
			input[1]=train.data[i]
			input[2]=train.data[shuffer[i]]
			if train.label[i] == train.label[shuffer[i]] then
				target = 1
			else
				target = -1
			end
			table.insert(batchData,input)
			table.insert(batchLabel,target)
		end
		local feval = function(x)
			if x~= parameters then
				parameters:copy(x)
			end

			model:zeroGradParameters()

			local f=0
			for i=1,#batchData do
			--print(#batchData[i])
				local output = model:forward(batchData[i])
				local err = criterion:forward(output,batchLabel[i])
				f=f+err

				local df_do = criterion:backward(output,batchLabel[i])
				model:backward(batchData[i],df_do)
			end

			gradParameters:div(#batchData)
			f=f/#batchData
			return f, gradParameters
		end
		optimState = {leraningRate=learningRate}
		optim.adam(feval,parameters,optimState)
	end

	time = sys.clock()-time
	time=time/train:size()

	print('=================> time to learn one smaple = ' .. (time*1000) .. 'ms')
	epoch =epoch+1
end
5_Test 模型测试
这里我只是测试了模型了输出误差,其实评价该模型可以通过confusion矩阵实现,偷了个懒,后面可视化的时候也可以看到分类结果
require 'xlua'
function testing()
	print '======> testing:'
	local time=sys.clock()
	local shuffer = torch.randperm(test:size())
	err=0
	for t=1,test:size() do
		xlua.progress(t,test:size())
		local input=torch.Tensor(2,1,28,28)
		input[1]=test.data[t]
		input[2]=test.data[shuffer[t]]
		if test.label[t]==test.label[shuffer[t]] then
			target = 1
		else
			target = -1
		end

		output=model:forward(input)
		f=criterion(output,target)

		err=err+f
	end

	time=sys.clock()-time
	time = time/test:size()
	print('=======> time to test each sample = ' .. (time*1000) .. 'ms')
	print('=======> average error is ' .. err/test:size())
end
6_visualization 结果可视化
这里我使用了itorch:Plot()的功能,折腾了很久ipython-notebook还是没装好,只是装好的itorch,参见官网
results={}
for i=1,10 do
	table.insert(results,{x={},y={}})
end

for t=1,5000 do   -- 这里我们验证了5000个样本,如果绘制10000个样本的话实在太密集了
	local idx=test.label[t]
	local data=torch.Tensor(1,28,28)
	data[1]=test.data[t]
	local pos = cnn:forward(data)
	if idx==0 then
		idx=10
	end

	table.insert(results[idx].x,pos[1])
	table.insert(results[idx].y,pos[2])
end

Plot =require'itorch.Plot'
plot=Plot():circle(results[1].x,results[1].y,'red','1'):draw()
plot:circle(results[2].x,results[2].y,'green','2'):redraw()
plot:circle(results[3].x,results[3].y,'blue','3'):redraw()
plot:circle(results[4].x,results[4].y,'black','4'):redraw()
plot:circle(results[5].x,results[5].y,'orange','5'):redraw()
plot:triangle(results[6].x,results[6].y,'red','6'):redraw()
plot:triangle(results[7].x,results[7].y,'green','7'):redraw()
plot:triangle(results[8].x,results[8].y,'blue','8'):redraw()
plot:triangle(results[9].x,results[9].y,'black','9'):redraw()
plot:triangle(results[10].x,results[10].y,'orange','10'):redraw()
plot:title('样本降维到2维时的分布'):redraw()
plot:xaxis('x1'):yaxis('x2'):redraw()
plot:legend(true)
plot:redraw()
plot:save('out.html') --只能保存成html之后再人工保存成png图像
这个模型有点类似于使用FDA找到两个主方向
7_doall 统一执行文件
dofile '1_data.lua'
dofile '2_model.lua'
dofile '3_loss.lua'
dofile '4_train.lua'
dofile '5_test.lua'

k=1
while k<30 do
	training()
	k=k+1
end
testing()
dofile '6_visualization.lua'
结果

参考资料:
Teaonly/easylearning.io/siamese_network
深度学习实验: Siamese network
facebook/iTorch