摘要:
ESRGAN是在SRGAN基础上进行增强的网络,在2018年的比赛中获得了冠军Introduction介绍了基于PSNR指标获得的超分辨图像其结果会较为平滑,且与人们的主观有较大的差别作者针对SRGAN提出了3个改进的点第一点:使用了RDDB网络结构,这种层叠式的网络结构更容易表达效果第二点:使用RaGAN对抗网络,这种网络在优化生成器的时候,将判别真实图片的概率值考虑了进来第三点:对于VGG生成
ESRGAN是在SRGAN基础上进行增强的网络, 在2018年的比赛中获得了冠军
Introduction 介绍了基于PSNR指标获得的超分辨图像其结果会较为平滑,且与人们的主观有较大的差别
作者针对SRGAN提出了3个改进的点
第一点: 使用了RDDB网络结构, 这种层叠式的网络结构更容易表达效果
第二点: 使用RaGAN对抗网络, 这种网络在优化生成器的时候,将判别真实图片的概率值考虑了进来
第三点:对于VGG生成的语义纹理损失值,使用了relu之前的输出结果,进行比较
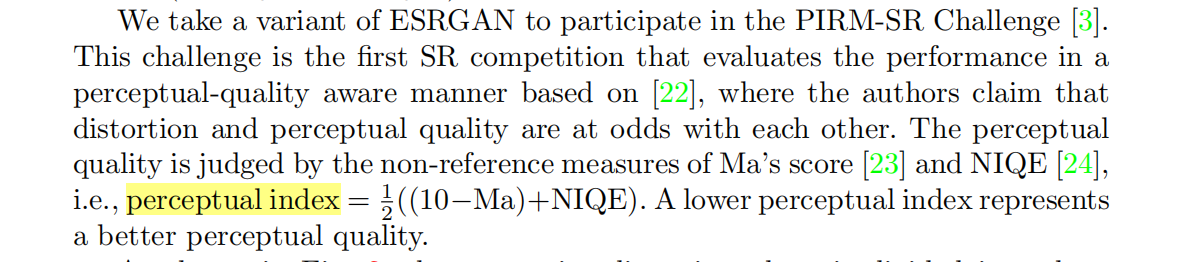
因为PSNR和SSIM的指标与人眼的视觉指标存在差异,因此作者使用了竞赛中的指标perceptual index
作者进行改进的点: 第一个在网络结构上的改进,使用了RRDB层
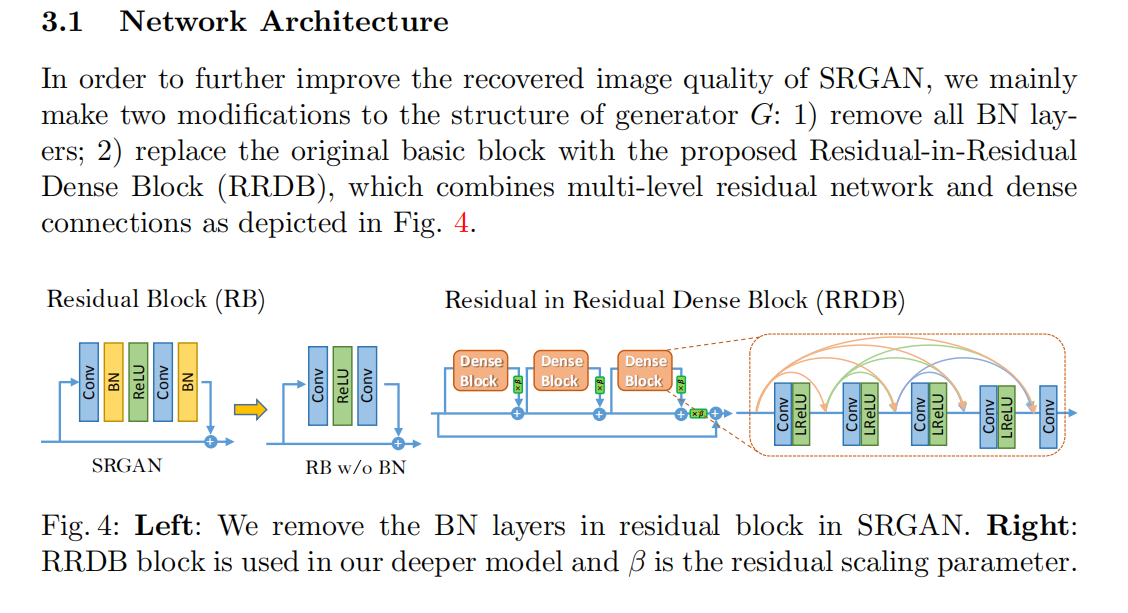
RRDB代码: 先进入class RRDBNet,然后调转到class RRDB,最后跳转到class ResidualDenseBlock
importfunctools
importtorch
importtorch.nn as nn
importtorch.nn.functional as F
importmodels.modules.module_util as mutil


classResidualDenseBlock_5C(nn.Module):
    def __init__(self, nf=64, gc=32, bias=True):
        super(ResidualDenseBlock_5C, self).__init__()
        #gc: growth channel, i.e. intermediate channels
        self.conv1 = nn.Conv2d(nf, gc, 3, 1, 1, bias=bias)
        self.conv2 = nn.Conv2d(nf + gc, gc, 3, 1, 1, bias=bias)
        self.conv3 = nn.Conv2d(nf + 2 * gc, gc, 3, 1, 1, bias=bias)
        self.conv4 = nn.Conv2d(nf + 3 * gc, gc, 3, 1, 1, bias=bias)
        self.conv5 = nn.Conv2d(nf + 4 * gc, nf, 3, 1, 1, bias=bias)
        self.lrelu = nn.LeakyReLU(negative_slope=0.2, inplace=True)

        #initialization
        mutil.initialize_weights([self.conv1, self.conv2, self.conv3, self.conv4, self.conv5], 0.1)

    defforward(self, x):
        x1 =self.lrelu(self.conv1(x))
        x2 = self.lrelu(self.conv2(torch.cat((x, x1), 1)))
        x3 = self.lrelu(self.conv3(torch.cat((x, x1, x2), 1)))
        x4 = self.lrelu(self.conv4(torch.cat((x, x1, x2, x3), 1)))
        x5 = self.conv5(torch.cat((x, x1, x2, x3, x4), 1))
        return x5 * 0.2 +x


classRRDB(nn.Module):
    '''Residual in Residual Dense Block'''

    def __init__(self, nf, gc=32):
        super(RRDB, self).__init__()
        self.RDB1 =ResidualDenseBlock_5C(nf, gc)
        self.RDB2 =ResidualDenseBlock_5C(nf, gc)
        self.RDB3 =ResidualDenseBlock_5C(nf, gc)

    defforward(self, x):
        out =self.RDB1(x)
        out =self.RDB2(out)
        out =self.RDB3(out)
        return out * 0.2 +x


classRRDBNet(nn.Module):
    def __init__(self, in_nc, out_nc, nf, nb, gc=32):
        super(RRDBNet, self).__init__()
        RRDB_block_f = functools.partial(RRDB, nf=nf, gc=gc)

        self.conv_first = nn.Conv2d(in_nc, nf, 3, 1, 1, bias=True) #进行第一次的卷积
        self.RRDB_trunk = mutil.make_layer(RRDB_block_f, nb) #添加RRDB残差块
        self.trunk_conv = nn.Conv2d(nf, nf, 3, 1, 1, bias=True) #再次进行卷积操作
        #### upsampling
        self.upconv1 = nn.Conv2d(nf, nf, 3, 1, 1, bias=True)
        self.upconv2 = nn.Conv2d(nf, nf, 3, 1, 1, bias=True)
        self.HRconv = nn.Conv2d(nf, nf, 3, 1, 1, bias=True)
        self.conv_last = nn.Conv2d(nf, out_nc, 3, 1, 1, bias=True)

        self.lrelu = nn.LeakyReLU(negative_slope=0.2, inplace=True)

    defforward(self, x):
        fea =self.conv_first(x)
        trunk =self.trunk_conv(self.RRDB_trunk(fea))
        fea = fea +trunk

        fea = self.lrelu(self.upconv1(F.interpolate(fea, scale_factor=2, mode='nearest')))
        fea = self.lrelu(self.upconv2(F.interpolate(fea, scale_factor=2, mode='nearest')))
        out =self.conv_last(self.lrelu(self.HRconv(fea)))

        return out
作者进行改进的点: 第二个在使用了RaGan对抗生成网络,对于判别器和生成器使用相对概率
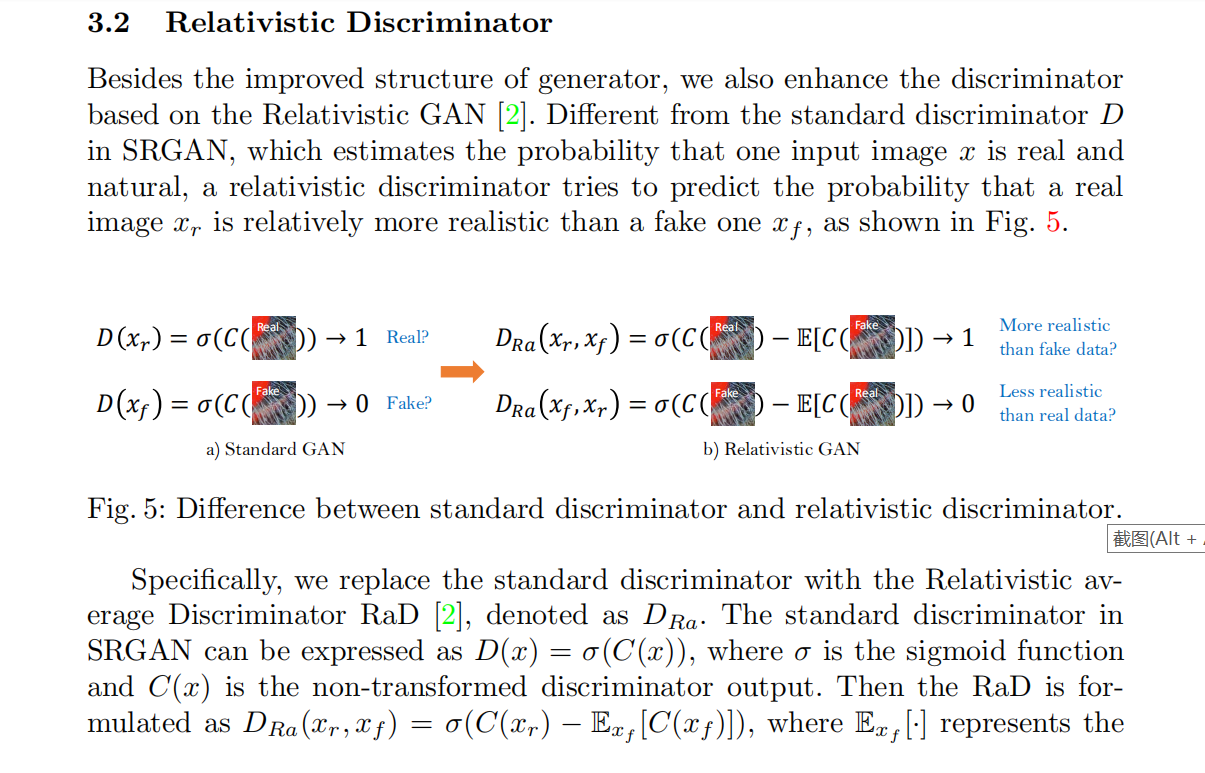
对于生成器的ragan损失值,即
真实图片相对于虚假图片判断为假的损失值
虚假图片相对于真实图片判别为真的损失值
pred_g_fake = self.netD(self.fake_H) #判别生成的图片
if self.opt['train']['gan_type'] == 'gan':
   l_g_gan = self.l_gan_w *self.cri_gan(pred_g_fake, True)
elif self.opt['train']['gan_type'] == 'ragan':
   pred_d_real = self.netD(self.var_ref).detach() #判别真实的图片的概率值
   l_g_gan = self.l_gan_w *(
              self.cri_gan(pred_d_real - torch.mean(pred_g_fake), False) + #
              self.cri_gan(pred_g_fake - torch.mean(pred_d_real), True)) / 2 #生成的图片比真实图片更加的真实
l_g_total += l_g_gan
对于判别器的ragan损失值,即
真实图片相对于虚假图片判别为真的损失值
虚假图片相对于真实图片判别为假的损失值
   pred_d_real =self.netD(self.var_ref)
   pred_d_real =self.netD(self.var_ref)
   pred_d_fake = self.netD(self.fake_H.detach())  #detach to avoid BP to G
   if self.opt['train']['gan_type'] == 'gan':
            l_d_real =self.cri_gan(pred_d_real, True)
            l_d_fake =self.cri_gan(pred_d_fake, False)
            l_d_total = l_d_real +l_d_fake
   elif self.opt['train']['gan_type'] == 'ragan':
            l_d_real = self.cri_gan(pred_d_real -torch.mean(pred_d_fake), True)
            l_d_fake = self.cri_gan(pred_d_fake -torch.mean(pred_d_real), False)
            l_d_total = (l_d_real + l_d_fake) / 2
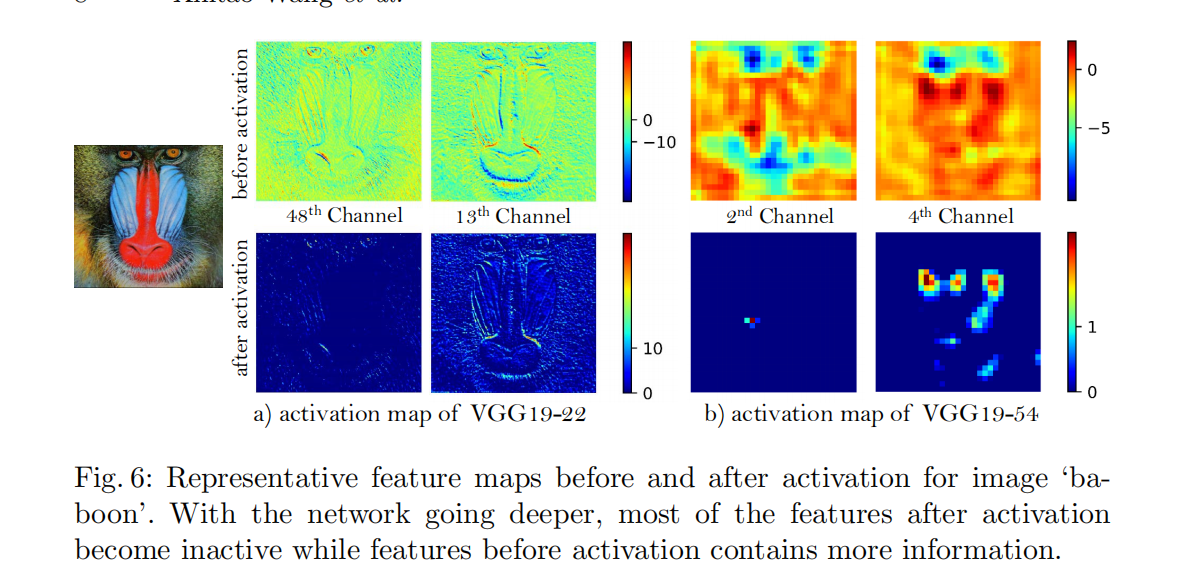
作者进行改进的点: 第二个使用vgg进行纹理细节提取时,使用最后一层conv的relu之前的输出结果

作者对最后一层的conv输出和relu输出做了可视化结果比对
将vgg损失值进行添加
 if self.cri_fea:  #feature loss
        real_fea = self.netF(self.var_H).detach() #表示真实图片的VGG损失值
        fake_fea = self.netF(self.fake_H) #
        l_g_fea = self.l_fea_w * self.cri_fea(fake_fea, real_fea) #构建L1损失值
        l_g_total += l_g_fea
这里使用的是vgg19的不带bn的输出
classVGGFeatureExtractor(nn.Module):
    def __init__(self, feature_layer=34, use_bn=False, use_input_norm=True,
                 device=torch.device('cpu')):
        super(VGGFeatureExtractor, self).__init__()
        self.use_input_norm =use_input_norm
        ifuse_bn:
            model = torchvision.models.vgg19_bn(pretrained=True)
        else:
            model = torchvision.models.vgg19(pretrained=False)
        ifself.use_input_norm:
            mean = torch.Tensor([0.485, 0.456, 0.406]).view(1, 3, 1, 1).to(device)
            #[0.485 - 1, 0.456 - 1, 0.406 - 1] if input in range [-1, 1]
            std = torch.Tensor([0.229, 0.224, 0.225]).view(1, 3, 1, 1).to(device)
            #[0.229 * 2, 0.224 * 2, 0.225 * 2] if input in range [-1, 1]
            self.register_buffer('mean', mean) #构建处理步骤的名字
            self.register_buffer('std', std)
        self.features = nn.Sequential(*list(model.features.children())[:(feature_layer + 1)])
        #No need to BP to variable
        for k, v inself.features.named_parameters():
            v.requires_grad = False #为了防止梯度进行更新

    defforward(self, x):
        #Assume input range is [0, 1]
        ifself.use_input_norm:
            x = (x - self.mean) /self.std
        output =self.features(x)
        return output
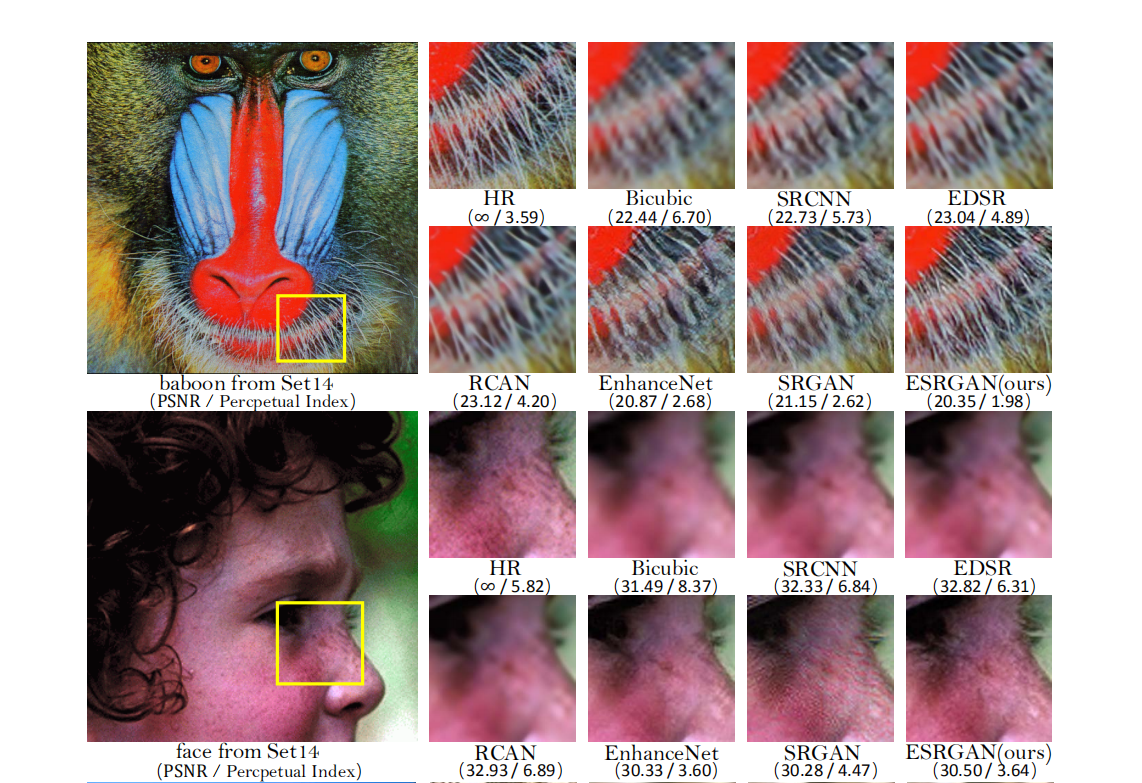
结果展示
ESRGAN网络在PSNR指标上表现的不是很好,但是在perceptual index上相当于其他方法有突出的表现