摘要:
前言:要求创建OA系统的组织权限结构的流程图。它支持单击以添加串行并行节点。图表应该看起来很直观,因此dagre-d3库是合适且漂亮的。以下是我在早期研究中编写的演示;1.首先从“dagre-d3”安装依赖项importdagreD3;从“d3”导入*asd3;2.源代码描述(复制到vue项目运行。我使用了ts)
前言:需求是要做一个oa系统的组织权限架构流程图,支持点击添加串行&并行节点,图要看上去直观,故找到dagre-d3这个库比较适合也好看,以下是我前期调研写的demo;
1.首先安装依赖
import dagreD3 from "dagre-d3";
import * as d3 from "d3";
2.源码说明(复制到vue项目即可运行,我是用了ts)
<template>
<div class="flow-chart">
<svg
width="2400"
height="1600"
>
<g />
<rect />
</svg>
<div class="btn-position">
<button @click="isStrand = 1">串行</button>
<button @click="isStrand = 2">并行</button>
<button @click="isStrand = 3">会签</button>
</div>
</div>
</template>
<script>
import dagreD3 from "dagre-d3";
import * as d3 from "d3";
export default {
data () {
return {
isStrand: 1, // 1为串行 2位并行 3为会签
list: {
nodeInfos: [ // 节点数组
{
id: "node1",
label: "节点1",
shape: "circle", // rect,circle,ellipse,diamond,默认值为rect
},
{
id: "node2",
label: "节点2",
},
{
id: "node3",
label: "节点3",
rank: 2
},
{
id: "node4",
label: "节点4",
// rank: 2,
// shape: "ellipse",
// class:'empty'
},
{
id: "node5",
label: "节点5",
},
{
id: "node6",
label: "节点6",
},
{
id: "node7",
label: "节点7",
},
{
id: "node8",
label: "节点8",
},
{
id: "node9",
label: "节点9",
shape: "circle",
},
],
edges: [ //节点之间关系数组
{
source: "node1",
target: "node2",
},
{
source: "node2",
target: "node3",
},
{
source: "node3",
target: "node4",
},
{
source: "node4",
target: "node5",
},
{
source: "node5",
target: "node6",
},
{
source: "node6",
target: "node7",
},
{
source: "node7",
target: "node8",
},
{
source: "node8",
target: "node9",
}
]
},
nextNode: '',
gGraph: new dagreD3.graphlib.Graph().setGraph({ // 初始画布板式
rankdir: 'LR', //默认'TB'
// align: 'DL',
nodesep: 40,
edgesep: 80,
ranksep: 60,
marginx: 140,
marginy: 140,
})
};
},
methods: {
// 删除节点
removeNode (item) {
this.gGraph.removeNode(item.id,);
},
// 生成节点
setNodeFun () {
this.list.nodeInfos && this.list.nodeInfos.forEach((item, index) => {
item.rx = item.ry = 5;//圆角
if (item.class === 'empty') {
this.gGraph.setNode(item.id, {
style: "stroke: #ccc; ;stroke-0.2px",
-19, //线条颜色
...item,
});
} else {
this.gGraph.setNode(item.id, {
// style: "stroke: #ccc; fill: #666;stroke-2px",
...item,
});
}
})
},
// 生成链接线
setEdgeFun () {
this.list.edges.forEach(item => {
this.gGraph.setEdge(item.source, item.target, {
style: "stroke: #ccc; fill: none;stroke-2px", //线条颜色
arrowheadStyle: "fill: #ccc;stroke: #ccc", //箭头颜色
arrowhead: 'undirected', // normal,vee,undirected 三种样式
labelType: '',//可以设置文本以及 html 格式,默认为文本格式
});
});
},
//绘制图形
renderFun () {
var svgAb = d3.select("svg"),
innerAb = svgAb.select("g");
//缩放
// var zoom = d3.zoom().on("zoom", function () {
// inner.attr("transform", d3.event.transform);
// });
// svg.call(zoom);
var render = new dagreD3.render();
render(innerAb, this.gGraph);
},
selectEvent () {
var svg = d3.select("svg"),
inner = svg.select("g");
let code;
// 鼠标右击
inner.selectAll("g.node").on("mousedown", e => {
// e.preventDefault();
console.log(e, '鼠标右键点击了')
})
// 点击节点
inner.selectAll("g.node").on("click", (e, k, n) => {
// isStrand 1为串行 2为并行 3为会签(给当并行叠加并行)
if (this.isStrand == 1) {
//串行
// 添加串行节点
this.list.nodeInfos = this.list.nodeInfos.concat({
id: e + '11',
label: "节点" + e + '11',
})
// 添加串行节点链接关系
this.list.edges = this.list.edges.map(q => {
if (q.source == e) {
this.nextNode = q.target
q.target = e + '11'
}
return q
})
this.list.edges = this.list.edges && this.list.edges.concat({
source: e + '11',
target: this.nextNode,
})
// 存储并重新渲染
localStorage.setItem('list', JSON.stringify(this.list))
window.location.reload()
} else if (this.isStrand == 2) {
// 并行
// 添加空节点(创建空节点视觉优化链接线汇交点)
this.list.nodeInfos = this.list.nodeInfos.concat({
id: e + '0',
label: '',
shape: "ellipse",
class: 'empty'
})
// 添加并行节点
this.list.nodeInfos = this.list.nodeInfos.concat({
id: e + '21',
label: "节点" + e + '21',
}, {
id: e + '22',
label: "节点" + e + '22',
})
//添加并行节点链接关系1
this.list.edges = this.list.edges.map(q => {
if (q.source == e) {
this.nextNode = q.target
q.target = e + '21'
}
return q
})
// 添加空节点链接关系
this.list.edges = this.list.edges && this.list.edges.concat({
source: e + '0',
target: this.nextNode,
})
// 添加并行节点链接关系2
this.list.edges = this.list.edges && this.list.edges.concat({
source: e,
target: e + '22',
}, {
source: e + '21',
// target: this.nextNode,
target: e + '0',
}, {
source: e + '22',
// target: this.nextNode,
target: e + '0',
})
// 存储并重新渲染
localStorage.setItem('list', JSON.stringify(this.list))
window.location.reload()
} else {
// 会签
const hqStartObj = this.list.edges.filter(q => {
return q.target == e
})
const hqStartId = hqStartObj[0].source
const hqEndObj = this.list.edges.filter(q => {
return q.source == e
})
const hqEndId = hqEndObj[0].target
// 添加会签节点
this.list.nodeInfos = this.list.nodeInfos.concat({
id: e + '31',
label: "节点" + e + '31',
})
// 添加会签链接关系
this.list.edges = this.list.edges && this.list.edges.concat({
source: hqStartId,
target: e + '31',
}, {
source: e + '31',
target: hqEndId,
})
// 存储并重新渲染
localStorage.setItem('list', JSON.stringify(this.list))
window.location.reload()
}
code = this.list.nodeInfos.filter(item => {
return item.id == e;
});
console.log(code, '12212121');
this.setNodeFun()
this.setEdgeFun()
setTimeout(() => {
this.renderFun()
}, 1000)
});
},
// 缩放
scale () {
var initialScale = 0.75;
svg.call(
zoom.transform,
d3.zoomIdentity
.translate(
(svg.attr("width") - g.graph().width * initialScale) / 2,
20
)
.scale(initialScale)
);
svg.attr("height", g.graph().height * initialScale + 40);
},
rightEvent () {
var svgCanvas = document.getElementById('svg-canvas'); //svg
var myMenu = document.getElementById("myMenu"); //右键菜单
svgCanvas.addEventListener('mouseover', function (e) {//监听鼠标右键
e.preventDefault();
if (e.target.tagName === 'rect') {
myMenu.style.top = event.clientY + "px"; //获取鼠标位置
myMenu.style.left = event.clientX + "px";
myMenu.style.display = 'block'; //显示相应右键内容
}
})
document.addEventListener("click", (event) => {
myMenu.style.display = 'none';
});
}
},
created () {
this.list = JSON.parse(localStorage.getItem('list')) || this.list
},
mounted () {
this.setNodeFun()
this.setEdgeFun()
this.renderFun()
this.selectEvent()
// g.nodes().forEach(function (v) {
// console.log("Node " + v + ": " + JSON.stringify(g.node(v)));
// });
// g.edges().forEach(function (e) {
// console.log("Edge " + e.v + " -> " + e.w + ": " + JSON.stringify(g.edge(e)));
// });
}
};
</script>
<style lang="less">
.flow-chart {
2400px;
height: 800px;
border: solid 1px #666;
}
svg {
font-size: 14px;
}
.node rect {
stroke: #606266;
fill: #fff;
}
.edgePath path {
stroke: #606266;
fill: #333;
stroke- 1.5px;
}
.node circle {
stroke: #606266;
fill: #fff;
stroke- 0.5px;
}
.node ellipse {
fill: #606266;
opacity: 0.2;
stroke- 1px;
}
.btn-position {
position: fixed;
top: 20px;
left: 20px;
button {
margin-left: 16px;
}
}
</style>
3.效果图
a.串行效果图

b.并行效果图

4.注意
我把操作生成的流程图数据存在了缓存中,若想刷新初始化删掉缓存即可

还有一个重要问题,做出demo后还是不够美观,所以我改了dagre-d3库源码让线条链接更美观了(主要是让线条90度折线) ,修改node_modules中如下位置代码
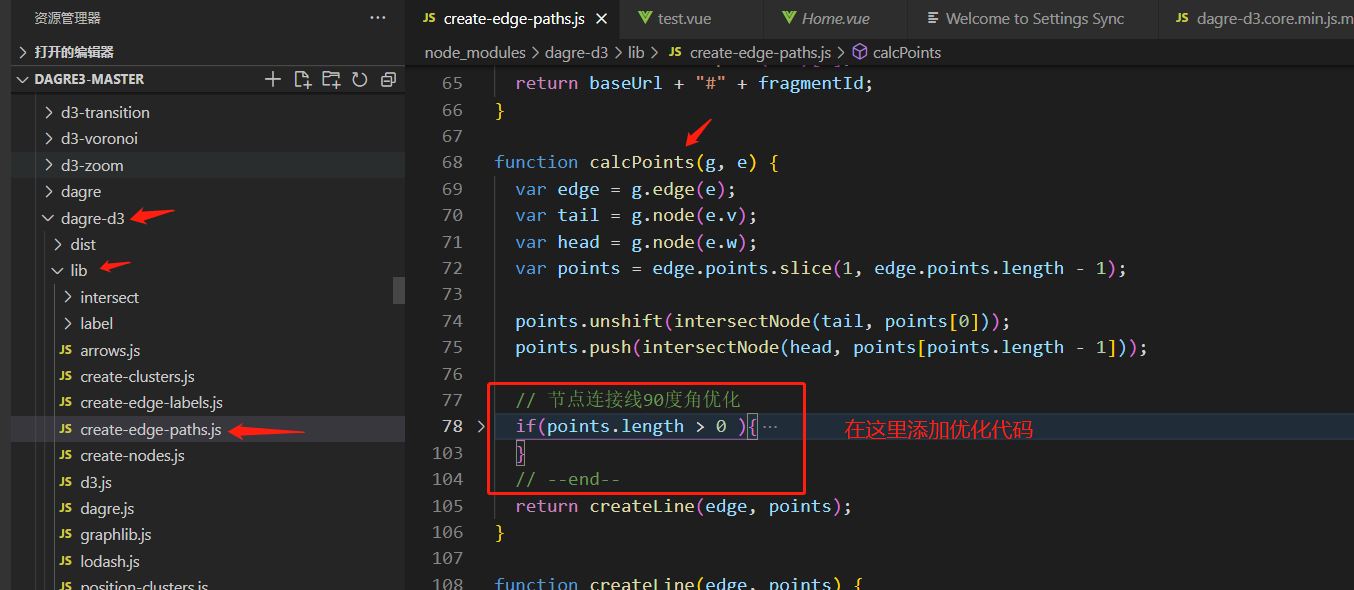
添加红色框中的优化代码即可
 // 节点连接线90度角优化
  if(points.length > 0 ){
    var point1 = points[0];
    var point2 = points[1];
    var point3 = points[2];
    var stepX = point3.x - point1.x;
    var stepY = point3.y - point1.y;
    if(stepX > 0 && stepY > 0){
      // point a to c && b to d
      if(point3.y - point2.y > 0){
        point2.x = point3.x
        point2.y = point1.y
      } else {
        point2.x = point1.x
        point2.y = point3.y
      }
    }else if(stepX > 0 && stepY < 0){
      // point a to b
      if(point3.y - point2.y == 0){
        point2.x = point1.x
        point2.y = point3.y
      } else{
      point2.x = point3.x
      point2.y = point1.y
      }
    }
  }
  // --end--
tips:还有不懂的可以加微信交流:844271163