摘要:
"#Simplestpossibleanswer:Yes,alwaysreturnTrue@propertydefis_staff(self):"Istheuseramemberofstaff?
自定义用户认证
目的:实现Django自定义的认证系统,在生产环境都是根据此代码进行定制的
步骤:
1.在settings文件中配置要使用的类
                 #命名规则 app名称.类名
AUTH_USER_MODEL = 'crm.UserProfile'
2.在crm app下的models文件中加入Django官方的用户认证
from django.contrib.auth.models import(
    BaseUserManager, AbstractBaseUser,PermissionsMixin
)
from django.utils.safestring importmark_safe
from django.utils.translation importugettext_lazy as _
classUserProfileManager(BaseUserManager):
    def create_user(self, email, name, password=None):
    #创建用户根据UserProfile中的字段,输入
        if notemail:
            raise ValueError('Users must have an email address')

        user =self.model(
            email=self.normalize_email(email),
            name=name,
        )

        user.set_password(password)
        user.save(using=self._db)
        returnuser

    defcreate_superuser(self, email, name, password):
    #创建超级用户根据UserProfile中的字段,输入
        user =self.create_user(
            email,
            password=password,
            name=name,
        )
        user.is_admin =True
        user.save(using=self._db)
        returnuser

classUserProfile(AbstractBaseUser,PermissionsMixin):
#使用Django自带的登录系统,可以自定义一些字段,例如邮箱,密码,用户名
    email =models.EmailField(
        verbose_name='email address',
        max_length=255,
        unique=True,
    )
    password = models.CharField(_('password'), max_length=128,help_text = mark_safe('<a href="http://t.zoukankan.com/password/">修改密码</a>'))

    name = models.CharField(max_length=32)
    is_active = models.BooleanField(default=True)
    is_admin = models.BooleanField(default=False)

#在创建用户的时候调用该方法进行用户的创建
    objects =UserProfileManager()

    USERNAME_FIELD = 'email'REQUIRED_FIELDS = ['name']

    defget_full_name(self):
        #The user is identified by their email address
        returnself.email

    defget_short_name(self):
        #The user is identified by their email address
        returnself.email

    def __str__(self):              #__unicode__ on Python 2
        returnself.email

    def has_perm(self, perm, obj=None):
        "Does the user have a specific permission?"
        #Simplest possible answer: Yes, always
        returnTrue

    defhas_module_perms(self, app_label):
        "Does the user have permissions to view the app `app_label`?"
        #Simplest possible answer: Yes, always
        returnTrue

    @property
    defis_staff(self):
        "Is the user a member of staff?"
        #Simplest possible answer: active users are staff
        returnself.is_active

    classMeta:
        verbose_name_plural = '用户'
3.在crm app下的admin中
from django importforms
from django.contrib.auth.models importGroup
from django.contrib.auth.admin importUserAdmin as BaseUserAdmin
from django.contrib.auth.forms importReadOnlyPasswordHashField
from crm.modelsimport UserProfile

classUserCreationForm(forms.ModelForm):
#在Django Admin页面中用户创建的表单展示
    """A form for creating new users. Includes all the required
    fields, plus a repeated password."""password1 = forms.CharField(label='Password', widget=forms.PasswordInput)
    password2 = forms.CharField(label='Password confirmation', widget=forms.PasswordInput)

    classMeta:
#展示的model对象和字段
        model =UserProfile
        fields = ('email', 'name')

    defclean_password2(self):
#判断两次输入的密码是否一致
        #Check that the two password entries match
        password1 = self.cleaned_data.get("password1")
        password2 = self.cleaned_data.get("password2")
        if password1 and password2 and password1 !=password2:
            raise forms.ValidationError("Passwords don't match")
        returnpassword2

    def save(self, commit=True):
#保存用户到数据库
        #Save the provided password in hashed format
        user = super(UserCreationForm, self).save(commit=False)
        user.set_password(self.cleaned_data["password1"])
        ifcommit:
            user.save()
        returnuser


classUserChangeForm(forms.ModelForm):
#在Django Admin页面中用户修改的表单展示
    """A form for updating users. Includes all the fields on
    the user, but replaces the password field with admin's
    password hash display field.
    """password =ReadOnlyPasswordHashField()

    classMeta:
#展示的model对象和字段
        model =UserProfile
        fields = ('email', 'password', 'name', 'is_active', 'is_admin')

    defclean_password(self):
        #Regardless of what the user provides, return the initial value.
        #This is done here, rather than on the field, because the
        #field does not have access to the initial value
        return self.initial["password"]


classUserProfileAdmin(BaseUserAdmin):
#在在Django Admin页面中配置的admin_class
    #The forms to add and change user instances
    form =UserChangeForm #调用修改用户的表单
    add_form =UserCreationForm #调用创建用户的表单

    #The fields to be used in displaying the User model.
    #These override the definitions on the base UserAdmin
    #that reference specific fields on auth.User.
    list_display = ('email', 'name', 'is_admin')
    list_filter = ('is_admin',)
    fieldsets =(
        (None, {'fields': ('email', 'password')}),
        ('Personal info', {'fields': ('name',)}),
        ('Permissions', {'fields': ('is_admin','is_active','user_permissions',)}),
    )
    #add_fieldsets is not a standard ModelAdmin attribute. UserAdmin
    #overrides get_fieldsets to use this attribute when creating a user.
    add_fieldsets =(
        (None, {
            'classes': ('wide',),
            'fields': ('email', 'name', 'password1', 'password2')}
        ),
    )
    search_fields = ('email',)
    ordering = ('email',)
    filter_horizontal = ('groups','user_permissions')

admin.site.unregister(Group)
#把models对象中的model对象和admin_class对象组合起来
admin.site.register(models.UserProfile,UserProfileAdmin)
4.在king_admin中实现修改密码的功能
在king_admin的urls.py中配置
url(r'^(w+)/(w+)/(d+)/change/password/$',views.password_reset,name='password_reset'),
在king_admin中的king_admin.py中配置
classUserAdmin(BaseAdmin):
    list_display = ['email','name']   #首页展示的字段
    readonly_fields = ['password',]   #只读字段
    modelfrom_exclude_fields = ['last_login','is_superuser','groups','user_permissions']   #不展示的字段
在views函数中开发该模块
defpassword_reset(request,app_name,table_name,obj_id):
    '''动态修改密码'''
#获取admin_class类和要修改密码的对象admin_class =king_admin.enabled_admins[app_name][table_name]
    model_obj = admin_class.model.objects.get(id=obj_id)
    errors ={}
    if request.method == 'POST':
#获取前端页面的两个值,密码和新密码
        _password1 = request.POST.get('password1')
        _password2 = request.POST.get('password2')
#如果两次密码相同,并且长度大于5位,则调用父类的方法保存密码,同时入库,最后返回到展示页面
        if _password1 ==_password2:
            if len(_password2) > 5:
                model_obj.set_password(_password1)
                model_obj.save()
#保存成功则跳转到展示页面进行展示
                return redirect(request.path.rstrip('password/'))
            else:
                errors['invalid_password'] = '密码长度不足6位'
        else:
            errors['invalid_password'] = '两次密码不一致'
    return render(request,'king_admin/password_reset.html',{'model_obj':model_obj})
5.在forms.py中将不需要展示的字段写到exclude上
classMeta:
    model =admin_class.model
    fields = '__all__'exclude = admin_class.modelfrom_exclude_fields     #排除的字段
6.前端页面
本质上是一个form表达,展示用户的用户名,然后用户填写密码和新密码之后提交到views的方法中进行修改密码的操作
{% extends 'king_admin/table_index.html' %}

{% block container %}
    <div class="row">
        <div class="panel panel-info">
            <div class="panel-heading">
                <h3 class="panel-title">重置用户{{ model_obj.name }}密码</h3>
            </div>
            <div class="panel-body">
                <form method="post" class="form-horizontal">{% csrf_token %}
                    <div class="form-group">
                        <label class="col-sm-1" style="font-weight:normal">用户名:
                        </label>
                        <div class="col-sm-3">
                            <input class="form-control" type="text" value="{{ model_obj.email }}" disabled>
                        </div>
                    </div>
                    <div class="form-group">
                        <label class="col-sm-1" style="font-weight:normal">密码:
                        </label>
                        <div class="col-sm-3">
                            <input class="form-control" type="password" name="password1">
                        </div>
                    </div>
                    <div class="form-group">
                        <label class="col-sm-1" style="font-weight:normal">重复密码:
                        </label>
                        <div class="col-sm-3">
                            <input class="form-control" type="password" name="password2">
                        </div>
                    </div>
                    <div>
                        <ul style="color:red">{% for k,v in errors.items %}
                                <li>{{ k }}-{{ v }}</li>{% endfor %}
                        </ul>
                    </div>
                    <input type="submit" class="btn btn-info" style="margin-left:110px" value="提交">
                    <input type="reset" class="btn btn-danger" style="margin-left:30px" value="重置">
                </form>
            </div>
        </div>
    </div>{% endblock %}
自定义用户登录
目的:利用Django提供的组件,实现自己的用户认证系统,包括登录,登出和利用装饰器实现方法的登录校验
1.在settings文件中配置登录url的路径
LOGIN_URL = '/'
2.在入口的app中配置url
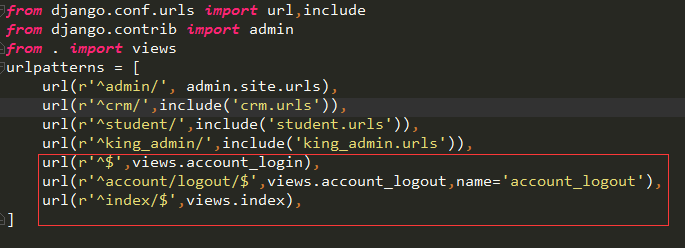
3.在views中开发登录,登出和首页的模块
from django.shortcuts importrender,redirect
from django.contrib.auth importlogin,authenticate,logout
#Create your views here.

defaccount_login(request):
    errors ={}
    if request.method == 'POST':
#获取前端表单的值
        _email = request.POST.get('email')
        _password = request.POST.get('password')
        #使用Django自带的用户认证
        user = authenticate(username=_email,password=_password)
        ifuser:
#登录成功则进行跳转,如果有next_url则跳转到下一个页面,否则跳转到首页
            login(request,user)
            next_url = request.GET.get('next','')
            ifnext_url:
                returnredirect(next_url)
            else:
                return redirect('/index/')
        else:
            errors['error'] = '用户名密码不正确'
    return render(request,'login.html',{'errors':errors})

defaccount_logout(request):
#用户登出
    logout(request)
    return redirect('/account/login/')

defindex(request):
    return render(request,'index.html')
4.在需要登录校验的方法上,加上@login_required装饰器
from django.contrib.auth.decorators importlogin_required

@login_required
defindex(request):
    return render(request, 'king_admin/table_index.html',{'table_list':king_admin.enabled_admins})
5.前端页面,form表单以post的方式向后台发送用户名和密码,后端的views中相应的方法进行校验
{% extends 'base.html' %}

  {% block body %}
      <div class="row">
        <div class="panel panel-info">
            <div class="panel-heading">
                <h3 class="panel-title">登录CRM系统</h3>
            </div>
            <div class="panel-body ">
              <form class="form-horizontal"method="post">{% csrf_token %}
                <div class="form-group">
                        <label class="col-sm-1"style="font-weight:normal">邮箱:
                        </label>
                        <div class="col-sm-3">
                            <input type="email"name="email"id="inputEmail"class="form-control"placeholder="Email address"required autofocus>
                        </div>
                </div>
                <div class="form-group">
                        <label class="col-sm-1"style="font-weight:normal">密码:
                        </label>
                        <div class="col-sm-3">
                            <input type="password"name="password"id="inputPassword"class="form-control"placeholder="Password"required>
                        </div>
                </div>{% if errors %}
                      <span style="color: red">{{ errors.error }}</span>{% endif %}
                <button class="btn btn-info"style="margin-left:113px"type="submit">登陆</button>
                <button class="btn btn-danger"type="reset">清空</button>
              </form>
            </div>
        </div>
      </div>
{% endblock %}
6.在index首页集成用户登出同时生成动态的菜单链接,点击跳转到相应的页面
登出
<li class="dropdown">
        <a href="#" class="dropdown-toggle" data-toggle="dropdown" aria-expanded="false">{{ request.user.name }}</a>
        <ul class="dropdown-menu" role="menu">
            <li><a href="{% url 'account_logout' %}">注销</a></li>
        </ul>
</li>
动态菜单生成
<div class="container-fluid">
      <div class="row">
        <div class="col-sm-3 col-md-2 sidebar">
          <ul class="nav nav-sidebar">
              {% for role in request.user.roles.all %}
                {% for menu in role.menus.all %}
                    <li>
{# 如果是绝对路径的url type=1,直接显示url的名称,如果是相对路径的url type=0,则动态根据url的别名来获取url  #}
                        <a href="{% if menu.url_type == 0 %}{% url menu.url_name %}{% else %}{{ menu.url_name }}{% endif %}">{{ menu.name }}</a>
                    </li>{% endfor %}
              {% endfor %}
          </ul>

        </div>
        <div class="col-sm-9 col-sm-offset-3 col-md-10 col-md-offset-2 main">{% block page-content %}

            {% endblock %}
        </div>
      </div>
</div>