在vue中使用tinymce富文本编辑器,解决tinymce在dialog对话框中层级太低的问题

摘要:
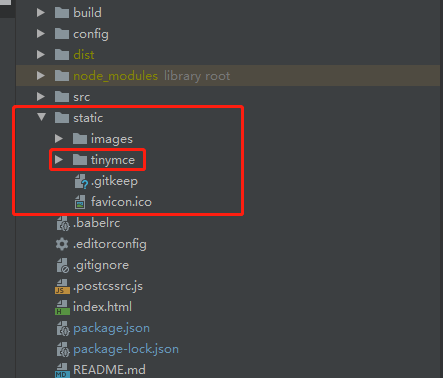
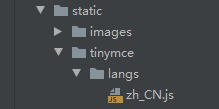
1.安装npminstalltinymce-S2并安装node_modulesiymce中的文件,包括tinymce文件夹,都被复制到静态文件夹中,如图3所示。tinymce默认为英语界面,需要下载一个中文包zh_CN。jshttps://www.tiny.cloud/get-tiny/language-packages/在tinymce文件夹下创建一个新的langs文件夹,并放置下载的语言包

1、安装

npm install tinymce -S

2、把node_modules inymce里面的文件 包括tinymce文件夹 全部复制到static文件夹下面,如下图

在vue中使用tinymce富文本编辑器,解决tinymce在dialog对话框中层级太低的问题第1张

3、tinymce默认是英文界面,还需要下载一个中文语言包zh_CN.js

https://www.tiny.cloud/get-tiny/language-packages/

在tinymce文件夹下新建langs文件夹,将下载好的语言包放到langs文件夹下面如图

在vue中使用tinymce富文本编辑器,解决tinymce在dialog对话框中层级太低的问题第2张

 4、在main.js中引入tinymce

在vue中使用tinymce富文本编辑器,解决tinymce在dialog对话框中层级太低的问题第3张

 在vue中使用tinymce富文本编辑器,解决tinymce在dialog对话框中层级太低的问题第4张

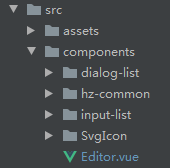
 5、在components文件夹下新建Editor.vue文件

在vue中使用tinymce富文本编辑器,解决tinymce在dialog对话框中层级太低的问题第5张

 Editor.vue:

<template>
  <div class="SEditor">
    <textarea class="my_editor" id="Editor" v-model="Editortext"></textarea>
  </div>
</template>

<script>
    export default {
        props: {
            EditorTexts: ''
        },
        data() {
            return {
                Editortext:'',
            }
        },
        computed: {

        },
        watch: {
            EditorTexts: function (newVal, oldVal) {
                console.log(newVal)
                this.Editortext= newVal
                tinyMCE.activeEditor.setContent(newVal)
            }
        },
        mounted() {
            this.tinymce();
        },
        beforeDestroy() {
            this.$tinymce.remove()
        },
        methods: {
            tinymce() {
                let _this = this;
                _this.$tinymce.baseURL = '/static/tinymce'
                _this.$tinymce.init({
                    selector: "#Editor",
                    language_url: '../../../../static/tinymce/langs/zh_CN.js',//设置中文
                    language: 'zh_CN',
                    plugins: [ //配置插件:可自己随意选择,但如果是上传本地图片image和imagetools是必要的
                        'advlist autolink link image lists charmap  preview hr anchor pagebreak ',
                    ],
                    //工具框,也可自己随意配置
                    toolbar: 'insertfile undo redo | styleselect | bold italic | alignleft aligncenter alignright alignjustify | bullist numlist outdent indent | link image | forecolor backcolor',
                    image_advtab: true,
                    image_dimensions: true,
                    '97%',
                    height: 380,
                    table_default_styles: {
                         '100%',
                        borderCollapse: 'collapse'
                    },
                    image_title: false, // 是否开启图片标题设置的选择,这里设置否
                    automatic_uploads: true,
                    // 图片异步上传处理函数
                    images_upload_handler: (blobInfo, success, failure) => {
                        var formData;
                        formData = new FormData();
                        formData.append('file',blobInfo.blob());
                        // formData.append('group','editor');
                        // _this.$requestPost这个是我调用后台图片上传接口
                        const img_file = blobInfo.blob()
                        console.log(blobInfo.blob())
                        _this.$requestPost({
                            url: "/baseapi/files?group=editor",
                            params: formData,
                        }, data => {
                            success('api'+data.url)
                            //url地址一定要拼接正确,否则图片将不会显示在富文本框中
                        }, err => {
                            failure('上传失败')
                        })
                    },
                    init_instance_callback: function(editor) {
                        editor.on('keyup', () => {
                            // 获取富文本编辑器里面的内容
                            _this.Editortext = editor.getContent();
                            // editor.setContent(_this.Editortext)

                        });
                    },
                    setup: (editor) => {
                        // 抛出 'on-ready' 事件钩子
                        editor.on(
                            'init', () => {
                                // console.log(_this.Editortext)
                                // console.log(_this.EditorTexts)
                                //将props中监测到的值赋给data中的Editortext
                                _this.Editortext = _this.EditorTexts
                                editor.setContent(_this.Editortext)
                            }
                        )
                        // 抛出 'input' 事件钩子,同步value数据
                        editor.on(
                            'input change undo redo', () => {
                                _this.$emit('input', editor.getContent())
                            }
                        )
                    }
                    }).then(resolve => {
                    // 初始化富文本编辑器里面的内容
                    resolve[0].setContent(_this.Editortext)

                });
            },

        }
    }
</script>

<style>

</style>

6、在需要的地方引入组件

在vue中使用tinymce富文本编辑器,解决tinymce在dialog对话框中层级太低的问题第6张

 在vue中使用tinymce富文本编辑器,解决tinymce在dialog对话框中层级太低的问题第7张

 在vue中使用tinymce富文本编辑器,解决tinymce在dialog对话框中层级太低的问题第8张

 7、解决tinymce在dialog对话框中层级太低的问题???

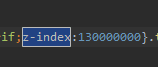
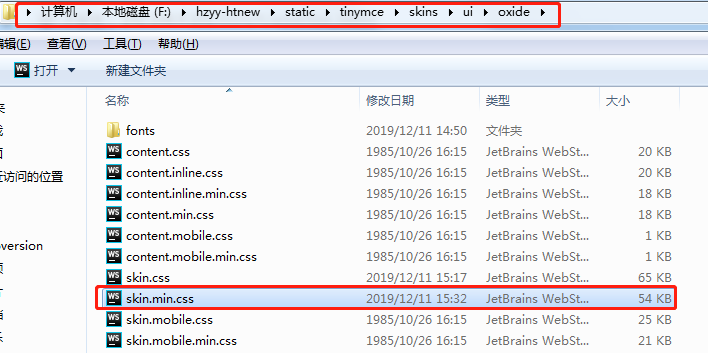
方法很简单,找到F:hzyy-htnewstatic inymceskinsuioxide下面的skin.min.css文件,将里面的z-index统一后面加五个零

在vue中使用tinymce富文本编辑器,解决tinymce在dialog对话框中层级太低的问题第9张

在vue中使用tinymce富文本编辑器,解决tinymce在dialog对话框中层级太低的问题第10张

参考链接:tinymce中文文档 https://www.cnblogs.com/jvziking/p/12028275.html

富文本编辑器tinymce获取文本内容和设置文本内容:https://blog.csdn.net/u012679583/article/details/50505842

初始化:https://segmentfault.com/a/1190000012791569

主要参考:https://blog.csdn.net/vipsongtaohong/article/details/89553271

免责声明:文章转载自《在vue中使用tinymce富文本编辑器,解决tinymce在dialog对话框中层级太低的问题》仅用于学习参考。如对内容有疑问,请及时联系本站处理。

上篇Jupyter 安装并配置工作路径[转]微信支付:回调地址notify_url不能带参数下篇

宿迁高防,2C2G15M,22元/月;香港BGP,2C5G5M,25元/月 雨云优惠码:MjYwNzM=

相关文章

Vue.js 教程

1.vue.js主题结构如下: <!--Create by syd on 2018/9/4 17:07.--> <html len="en"> <header> <meta http-equiv="Content-Type" content="text/html; charset=utf-8" />...

vue前端工程化

今日目标 1.能够了解模块化的相关规范 2.了解webpack3.了解使用Vue单文件组件4.能够搭建Vue脚手架5.掌握Element-UI的使用 1.模块化的分类 A.浏览器端的模块化 1).AMD(Asynchronous Module Definition,异步模块定义)代表产品为:Require.js2).CMD(Common Module D...

Vuex进阶使用之modules模块化划分、mapState、mapActions辅助函数的使用

注解:vuex是一个很简单、很方便的技术,入门很简单,这里给大家详细介绍下vuex的进阶使用。 一、vuex模块化modules 1、项目根目录新建一个sotre文件夹,在store文件夹内,新建两个文件(一个文件,一个文件夹),一个index.js文件,一个modules文件夹。 目录结构: store   index.js    --文件   modu...

vite vue插件打包配置

import { defineConfig, UserConfigExport, ConfigEnv } from "vite"; import externalGlobals from "rollup-plugin-external-globals"; import vue from "@vitejs/plugin-vue"; import dts f...

python+requests接口自动化--请求方法封装

1 import requests 2 from common.logger import Log 3 from common import cof 4 from common import base 5 6 7 class MyHttpservice(object): 8 9 def __init__(self): 10...

Mac中如何搭建Vue项目并利用VSCode开发

(一)部署Node环境 (1)下载适合Mac环境的Node包,点击进入下载页面 (2)安装Node环境:找到下载好的Node包,这里是node-v12.14.1.pkg,我们双击它,会进入Node.js安装器界面,如下图所示: 我们只要一直点击继续按钮即可,采用默认设置,安装成功后最终的效果图如下图所示: 默认是安装了npm,我们可以在终端中输入nod...