一、imguag简介
备选参考的图片扩大框架:kears Imagedatagenerator
参考文档
https://imgaug.readthedocs.io/en/latest/
https://github.com/aleju/imgaug
python3.7
numpy1.17.0
参数选择:
- 如果可能,应使用最近邻插值或线性插值,因为它们比其他选项要快得多。使用插值的大多数增强器提供
order参数(0 =最近邻,1 =线性)或interpolation参数(“最近邻”,“线性”)。 keep_size=True在所有更改图像尺寸的增强器中,默认设置为使用。这很方便,因为它可以确保图像尺寸不会因扩展而改变。但是,它的确会导致明显的性能下降,通常不仅仅使带宽减半。keep_size=False尽可能尝试 。您仍然可以在扩充后或使用来手动调整图像的大小KeepSizeByResize(Sequential(<augmenters>))。- 当增强器提供以用户定义的方式填充新创建的像素的模式(例如
pad_mode=constant,Pad以指定的恒定颜色填充所有填充的像素)时,使用edge代替constant通常不会带来明显的性能损失。
具体的增强器建议:
- 对于存在元素级同级的增强器(例如
Multiply和MultiplyElementwise),元素级增强器通常比非元素级的显着慢。 - 如果需要模糊处理,
AverageBlur是最快的选择,其次是GaussianBlur。 - 在较粗糙的图像(例如
CoarseDropoutvsDropout)上运行的增强器可能比其非粗略的兄弟姐妹快得多。 - 对比度归一化增强器在性能上均具有可比性,但基于直方图的增强器明显较慢。
PiecewiseAffine是一个非常慢的增幅器,通常应由ElasticTransformation代替,ElasticTransformation可以实现类似的输出,并且速度要快得多。Superpixels是一个相当缓慢的增强器,通常应该包装起来,例如Sometimes不要经常使用它并降低其性能影响。- 除天气
FastSnowyLandscape增速器外,其他增速器都相当缓慢,仅在合理时才使用。
图片
以下数字代表小图像(64x64x3)和大图像(224x224x3)。B=1表示的批量大小1,B=128其中一个128。
https://imgaug.readthedocs.io/en/latest/source/performance.html
二、安装imguag
官网文档:https://imgaug.readthedocs.io/en/latest/source/installation.html
在anaconda上安装
conda config --add channels conda-forge
conda install imgaug
三、imguag使用方法
https://blog.csdn.net/limiyudianzi/article/details/86497305
https://blog.csdn.net/qq_38451119/article/details/82417412
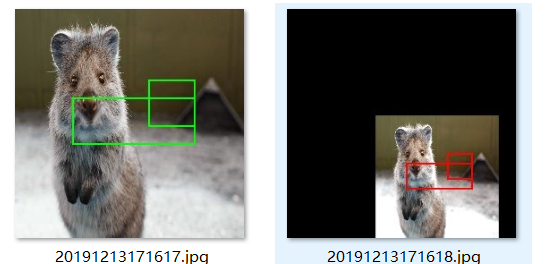
例一:边界框编#边界框
import imgaug as ia
import imgaug.augmenters as iaa
from imgaug.augmentables.bbs import BoundingBox, BoundingBoxesOnImage


ia.seed(1)
image = ia.quokka(size=(256, 256))
bbs = BoundingBoxesOnImage([
    BoundingBox(x1=65, y1=100, x2=200, y2=150),
    BoundingBox(x1=150, y1=80, x2=200, y2=130)
], shape=image.shape)

seq = iaa.Sequential([
    iaa.Multiply((1.2, 1.5)), # change brightness, doesn't affect BBs
    iaa.Affine(
        translate_px={"x": 40, "y": 60},
        scale=(1.2, 1.2)
    ) # 在x / y轴上平移40 / 60px,缩放到50-70%,影响BB
])

# Augment BBs and images.
image_aug, bbs_aug = seq(image=image, bounding_boxes=bbs)

# print coordinates before/after augmentation (see below)
# use .x1_int, .y_int, ... to get integer coordinates
for i in range(len(bbs.bounding_boxes)):
    before = bbs.bounding_boxes[i]
    after = bbs_aug.bounding_boxes[i]
    print("BB %d: (%.4f, %.4f, %.4f, %.4f) -> (%.4f, %.4f, %.4f, %.4f)" % (
        i,
        before.x1, before.y1, before.x2, before.y2,
        after.x1, after.y1, after.x2, after.y2)
    )

# image with BBs before/after augmentation (shown below)
image_before = bbs.draw_on_image(image, size=2)
image_after = bbs_aug.draw_on_image(image_aug, size=2, color=[0, 0, 255])

path_name='F:/esint/smoking_Recognition/test/starzhai'  #设置自己的保存路径
img_name = '%s/%s.jpg'%(path_name,time.strftime("%Y%m%d%H%M%S",time.localtime())) cv2.imwrite(img_name,image_before) time.sleep(1)  #以当前时间命名,每隔一秒保存一次图片 img_name = '%s/%s.jpg'%(path_name,time.strftime("%Y%m%d%H%M%S",time.localtime())) cv2.imwrite(img_name,image_after) #能够进行的操作 平移,放缩,旋转(?怎么整?)
实现效果:
例二:热力图变换
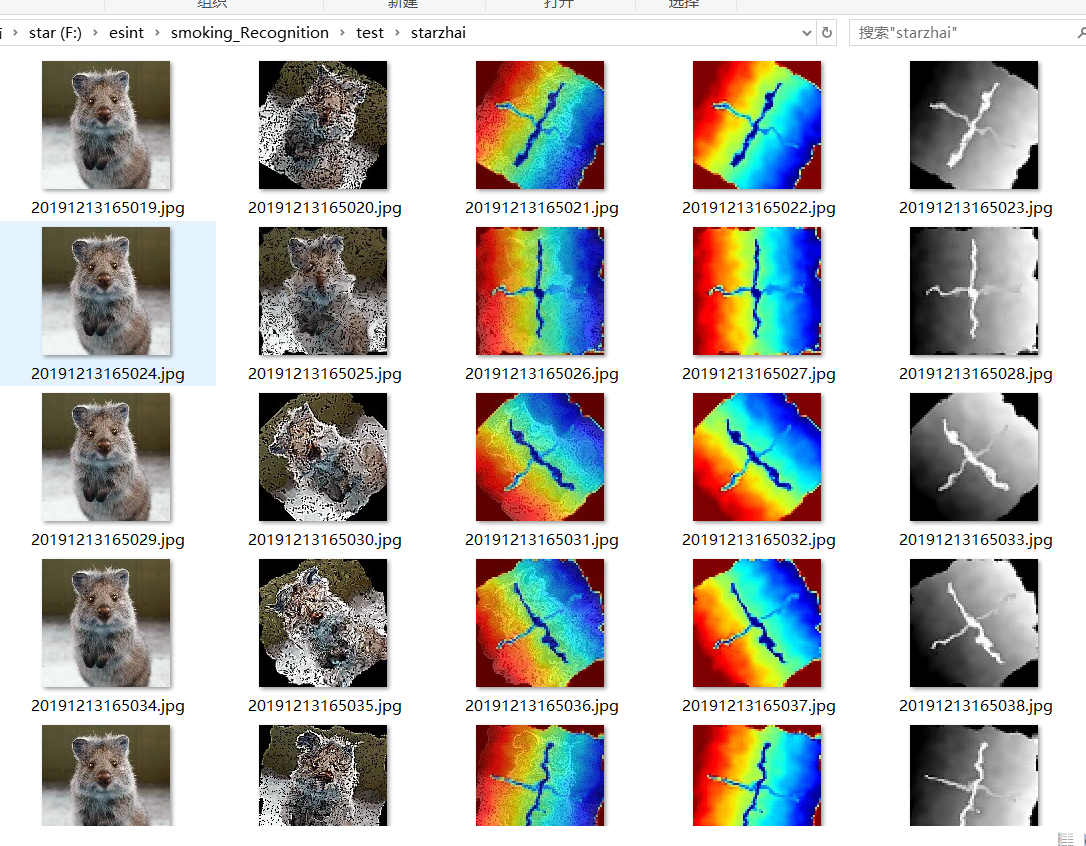
#热力图
import imageio
import numpy as np
import imgaug as ia
import imgaug.augmenters as iaa
from imgaug.augmentables.heatmaps import HeatmapsOnImage
ia.seed(1)
# Load an example image (uint8, 128x128x3).
image = ia.quokka(size=(128, 128), extract="square")
depth = np.linspace(0, 50, 128).astype(np.float32)  # 128 values from 0.0 to 50.0
depth = np.tile(depth.reshape(1, 128), (128, 1))    # change to a horizontal gradient
depth[64-2:64+2, 16:128-16] = 0.75 * 50.0  # line from left to right
depth[16:128-16, 64-2:64+2] = 1.0 * 50.0   # line from top to bottom
depth = HeatmapsOnImage(depth, shape=image.shape, min_value=0.0, max_value=50.0)
depth = depth.avg_pool(2)
# Define our augmentation pipeline.
seq = iaa.Sequential([
    iaa.Dropout([0.05, 0.2]),      # drop 5% or 20% of all pixels
    iaa.Sharpen((0.0, 1.0)),       # sharpen the image
    iaa.Affine(rotate=(-45, 45)),  # rotate by -45 to 45 degrees (affects heatmaps)
    iaa.ElasticTransformation(alpha=50, sigma=5)  # apply water effect (affects heatmaps)
], random_order=True)
# Augment images and heatmaps.
images_aug = []
heatmaps_aug = []
for _ in range(5):
    images_aug_i, heatmaps_aug_i = seq(image=image, heatmaps=depth)
    images_aug.append(images_aug_i)
    heatmaps_aug.append(heatmaps_aug_i)
cells = []
for image_aug, heatmap_aug in zip(images_aug, heatmaps_aug):
    cells.append(image)                                                     # column 1
    cells.append(image_aug)                                                 # column 2
    cells.append(heatmap_aug.draw_on_image(image_aug)[0])                   # column 3
    cells.append(heatmap_aug.draw(size=image_aug.shape[:2])[0])             # column 4
    cells.append(heatmap_aug.draw(size=image_aug.shape[:2], cmap=None)[0])  # column 5
    path_name='F:/esint/smoking_Recognition/test/starzhai'
    img_name = '%s/%s.jpg'%(path_name,time.strftime("%Y%m%d%H%M%S",time.localtime()))
    cv2.imwrite(img_name,image)
    time.sleep(1)
    img_name = '%s/%s.jpg'%(path_name,time.strftime("%Y%m%d%H%M%S",time.localtime()))
    cv2.imwrite(img_name,image_aug)
    time.sleep(1)
    img_name = '%s/%s.jpg'%(path_name,time.strftime("%Y%m%d%H%M%S",time.localtime()))
    cv2.imwrite(img_name,heatmap_aug.draw_on_image(image_aug)[0])
    time.sleep(1)
    img_name = '%s/%s.jpg'%(path_name,time.strftime("%Y%m%d%H%M%S",time.localtime()))
    cv2.imwrite(img_name,heatmap_aug.draw(size=image_aug.shape[:2])[0])
    time.sleep(1)
    img_name = '%s/%s.jpg'%(path_name,time.strftime("%Y%m%d%H%M%S",time.localtime()))
    cv2.imwrite(img_name,heatmap_aug.draw(size=image_aug.shape[:2], cmap=None)[0])
    time.sleep(1)
voc数据集的扩增方法
https://blog.csdn.net/coooo0l/article/details/84492916
2.数据变换类别
iaa.AdditiveGaussianNoise(scale=0.2*255)1#加噪声
iaa.GaussianBlur(sigma=(0.0, 3.0)1#变模糊
iaa.AllChannelsCLAHE(clip_limit=(1, 10))#图像增强
iaa.Affine(rotate=-45)#左旋转45度
iaa.Affine(rotate=45)#右旋转45度
iaa.Affine(scale=(0.4, 0.7))#Scale images to a value of 50 to 150% of their original size变大
iaa.Affine(scale=(1.3, 1.6))#Scale images to a value of 50 to 150% of their original size#缩小
iaa.GammaContrast((0.5, 2.0), per_channel=True)#色相变暗
iaa.Grayscale(alpha=(0.0, 1.0))#色相变灰
iaa.PiecewiseAffine(scale=(0.01, 0.05))#扭曲图像
四、批量处理图片生成对应xml文件详细实现过程
①默认老鼠图片以及标注框坐标,输出10张图片及其标注框坐标
#边界框
import imgaug as ia
import imgaug.augmenters as iaa
from imgaug.augmentables.bbs import BoundingBox, BoundingBoxesOnImage
import time
import cv2

#图像归一化
ia.seed(1)
image = ia.quokka(size=(256, 256))
bbs = BoundingBoxesOnImage([
    BoundingBox(x1=65, y1=100, x2=200, y2=150),
    BoundingBox(x1=150, y1=80, x2=200, y2=130)
], shape=image.shape)

#aug1=iaa.Affine(rotate=45)#右旋转45度
#seq = iaa.Sequential([
aug1=iaa.AdditiveGaussianNoise(scale=0.2*255)#加噪声
aug2=iaa.GaussianBlur(sigma=(0.0, 3.0)) #变模糊
aug3=iaa.AllChannelsCLAHE(clip_limit=(1,10))#图像增强
aug4=iaa.Affine(rotate=-45)#左旋转45度
aug5=iaa.Affine(rotate=45)#右旋转45度
aug6=iaa.Affine(scale=(0.4, 0.7))#Scale images to a value of 50 to 150% of their original size变大
aug7=iaa.Affine(scale=(1.3, 1.6))#Scale images to a value of 50 to 150% of their original size#缩小
aug8=iaa.GammaContrast((2.5, 2.5), per_channel=True)#色相变暗
aug9=iaa.Grayscale(alpha=(0.9))#色相变灰
aug10=iaa.PiecewiseAffine(scale=(0.08))#扭曲图像
#])

#image_aug, bbs_aug = aug1(image=image, bounding_boxes=bbs)
image1,bbs1=aug1(image=image, bounding_boxes=bbs)
image2,bbs2=aug2(image=image, bounding_boxes=bbs)
image3,bbs3=aug3(image=image, bounding_boxes=bbs)
image4,bbs4=aug4(image=image, bounding_boxes=bbs)
image5,bbs5=aug5(image=image, bounding_boxes=bbs)
image6,bbs6=aug6(image=image, bounding_boxes=bbs)
image7,bbs7=aug7(image=image, bounding_boxes=bbs)
image8,bbs8=aug8(image=image, bounding_boxes=bbs)
image9,bbs9=aug9(image=image, bounding_boxes=bbs)
image10,bbs10=aug10(image=image, bounding_boxes=bbs)

for i in range(len(bbs.bounding_boxes)):
    before = bbs.bounding_boxes[i]
    after = bbs_aug.bounding_boxes[i]
    print("BB %d: (%.4f, %.4f, %.4f, %.4f) -> (%.4f, %.4f, %.4f, %.4f)" % (
        i,
        before.x1, before.y1, before.x2, before.y2,
        after.x1, after.y1, after.x2, after.y2)
    )

#画标注框
#image_before = bbs.draw_on_image(image, size=2)
#image_after = bbs_aug.draw_on_image(image_aug, size=2, color=[0, 0, 255])
image1 = bbs1.draw_on_image(image1, size=2)
image2 = bbs2.draw_on_image(image2, size=2)
image3 = bbs3.draw_on_image(image3, size=2)
image4 = bbs4.draw_on_image(image4, size=2)
image5 = bbs5.draw_on_image(image5, size=2)
image6 = bbs6.draw_on_image(image6, size=2)
image7 = bbs7.draw_on_image(image7, size=2)
image8 = bbs8.draw_on_image(image8, size=2)
image9 = bbs9.draw_on_image(image9, size=2)
image10 = bbs10.draw_on_image(image10, size=2)

path_name='F:/esint/smoking_Recognition/test/imgaug'

img_name = '%s/%s.jpg'%(path_name,time.strftime("%Y%m%d%H%M%S",time.localtime()))
cv2.imwrite(img_name,image1)
time.sleep(1)
img_name = '%s/%s.jpg'%(path_name,time.strftime("%Y%m%d%H%M%S",time.localtime()))
cv2.imwrite(img_name,image2)
time.sleep(1)
img_name = '%s/%s.jpg'%(path_name,time.strftime("%Y%m%d%H%M%S",time.localtime()))
cv2.imwrite(img_name,image3)
time.sleep(1)
img_name = '%s/%s.jpg'%(path_name,time.strftime("%Y%m%d%H%M%S",time.localtime()))
cv2.imwrite(img_name,image4)
time.sleep(1)
img_name = '%s/%s.jpg'%(path_name,time.strftime("%Y%m%d%H%M%S",time.localtime()))
cv2.imwrite(img_name,image5)
time.sleep(1)
img_name = '%s/%s.jpg'%(path_name,time.strftime("%Y%m%d%H%M%S",time.localtime()))
cv2.imwrite(img_name,image6)
time.sleep(1)
img_name = '%s/%s.jpg'%(path_name,time.strftime("%Y%m%d%H%M%S",time.localtime()))
cv2.imwrite(img_name,image7)
time.sleep(1)
img_name = '%s/%s.jpg'%(path_name,time.strftime("%Y%m%d%H%M%S",time.localtime()))
cv2.imwrite(img_name,image8)
time.sleep(1)
img_name = '%s/%s.jpg'%(path_name,time.strftime("%Y%m%d%H%M%S",time.localtime()))
cv2.imwrite(img_name,image9)
time.sleep(1)
img_name = '%s/%s.jpg'%(path_name,time.strftime("%Y%m%d%H%M%S",time.localtime()))
cv2.imwrite(img_name,image10)
②更改输入图片,更改色阶(不要发紫的颜色)
③通过xml文件中的矩形框信息在图片上画框
④生成图片和对应的xml文件
⑤检测xml文件中的信息是否准确的落在原图合适的位置上
⑥批量生成图片及其对应的xml文件(使xml文件名与图片名一一对应)