摘要:
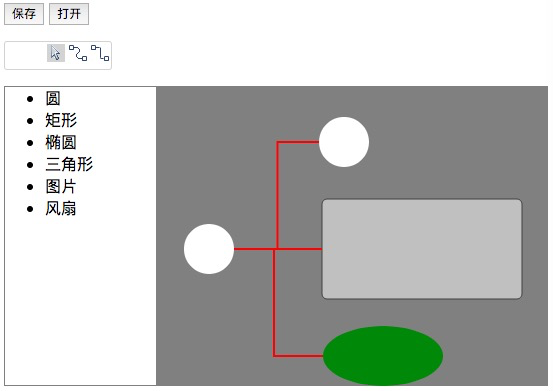
上一章描述了如何通过曲线(Bezier曲线)连接两个组件。通常,在实际应用中,Bezier曲线被广泛应用于数据流图和思维导图中,许多如组织图都是通过虚线连接的。本文描述了如何在上一个组件的基础上快速连接两个组件之间的虚线:上一个示例使用复选框来指示是否绘制线。现在添加了一条线,因此您需要修改它以将三种状态之一标识为选择/曲线/多段线。index.html中的代码片段如下:˂ul class=“lineTyp
前面章节已讲到如何在两个组件间通过曲线(贝塞尔曲线)进行连接,一般在实际应用中,贝塞尔曲线在数据流图、思维导图中应用比较多,许多如组织架构图等通过折线连接,本文在之前的基础上如何快速实现两个组件间的折线连接:
之前示例是用checkbox来指示是否画线状态,现在增加了一种线条所以需要修改一下用三种状态来识别是选择/曲线/折线之一,index.html中代码片断如下:
<ul class="lineTypeUL"><li class="arrowli active"></li><li class="lineCurve"></li><li class="linePoly"></li></ul>
//样式定义如下:
    <style>
        .lineTypeUL{
            display:inline-block;
            text-align:center;
            border:1px solid lightgray;
            border-radius: 3px;
        }
        .lineTypeUL li{
            display:inline-block;
            background-image: url("icons.png");
            18px;
            height:18px;
            margin:2px;
        }
        .lineTypeUL li:hover{
            background-color:lightgray;
        }
        .lineTypeUL .active{
            background-color:lightgray;
        }
        .arrowli{
            background-position:0 0px;
        }
        .lineCurve{
            background-position: -18px 0px;
        }
        .linePoly{
            background-position:-36px 0px;
        }
    </style>
//事件代码:
        $(".lineTypeUL li").each(
            function(){
                $(this).on("click", function () {
                    $(".lineTypeUL li").removeClass("active");
                    view.setLineStatus(this.className);
                    $(this).addClass("active");
                })
            }
        )
对于前端开发来说必须掌握的一个技能就是spirit图标,一个网站用到的图标通过合并在一个文件中,能够减少网站资源请求的次数(虽然是异步并行请求),提高效率,注意background的用法。
在visualDesigner.js中,增加一个PolyLine类,同BezierLine的写法:
function PolyLine() {
        this.properties={};
        this.properties.typeName = "折线";
        this.properties.strokeWidth = 2;
        this.properties.strokeColor = 'red';
    }
    PolyLine.prototype = $.extend({}, Component.prototype);
    PolyLine.prototype = $.extend(PolyLine.prototype, {
        render: function (options) {

            this.properties=$.extend(this.properties,options)
            this.properties.x = Math.min(this.properties.sxy.x, this.properties.txy.x);
            this.properties.y = Math.min(this.properties.sxy.y, this.properties.txy.y);
            this.properties.width = Math.abs(this.properties.txy.x - this.properties.sxy.x);
            this.properties.height = Math.abs(this.properties.txy.y - this.properties.sxy.y);

            this.group=new paper.Group();
            this.properties.x=Math.min(this.properties.sxy.x,this.properties.txy.x);
            this.properties.y=Math.min(this.properties.sxy.y,this.properties.txy.y);
            this.properties.width = Math.abs(this.properties.txy.x - this.properties.sxy.x);
            this.properties.height = Math.abs(this.properties.txy.y - this.properties.sxy.y);

            if (this.properties.targetType=="left" || this.properties.targetType=="right")
            {
                if (this.properties.mxy1==undefined && this.properties.mxy2==undefined){
                    this.properties.mxy1=[this.properties.sxy.x+(this.properties.txy.x-this.properties.sxy.x)/2,this.properties.sxy.y];
                    this.properties.mxy2=[this.properties.sxy.x+(this.properties.txy.x-this.properties.sxy.x)/2,this.properties.txy.y];
                }
                else
                {
                    this.properties.mxy1[1]=this.properties.sxy.y;
                    this.properties.mxy2[1]=this.properties.txy.y;
                }
            }
            else
            {
                if (this.properties.mxy1==undefined && this.properties.mxy2==undefined){
                    this.properties.mxy1=[this.properties.sxy.x,(this.properties.txy.y-this.properties.sxy.y)/2+this.properties.sxy.y];
                    this.properties.mxy2=[this.properties.txy.x,(this.properties.txy.y-this.properties.sxy.y)/2+this.properties.sxy.y];
                }
                else
                {
                    this.properties.mxy1[0]=this.properties.sxy.x;
                    this.properties.mxy2[0]=this.properties.txy.x;
                }
            }

            this.group=new paper.Group();
            var me = this;
            var drag = false;
            var line = new paper.Path();
            line.strokeWidth = 2;

            line.strokeColor = this.properties.strokeColor;
            line.add(this.properties.sxy);
            line.add(this.properties.mxy1);
            line.add(this.properties.mxy2);
            line.add(this.properties.txy);
            //BezierArrow(line,targetType,this.properties.txy.x, this.properties.txy.y);
            this.group.addChild(line);

            //this.group.translate(this.properties.x, this.properties.y);
            return this;
        }
    });
同时修改createLine方法
    VisualDesigner.prototype.createLine= function (typeName, options) {
        if (!options.id)
            options.id = this.createId(); //为元素增加id属性
        var element = null;
        switch (typeName) {
            case "曲线":
                element = new BezierLine().init().render(options);
                break;
            case "折线":
                element=new PolyLine().init().render(options);
                break;
        }
        this.lines[element.properties.id] = element;
        element.designer = this;

    }
增加一创建线条的分支,当然还需要修改当前画线类型和画线结束的代码
    VisualDesigner.prototype.setLineStatus = function (status) {
        if (status=="arrowli")
            this.lining = false;
            else
            {
                this.lining=true;
                if (status=="lineCurve")
                    this.lineType="曲线";
                else if (status="linePoly")
                    this.lineType="折线";
            }
    }
。。。。
        dragEnd:function(co,pos)
        {
            var xy = co.node.getConnectorCenterByPos(pos); //获取当前鼠标位置处连接点的中央坐标
            if (this.line !== null  ) {
                if (this.start.node.properties.id!=co.node.properties.id){
                    this.designer.createLine(this.designer.lineType,{sourceType:this.start.node.getConnectorDirection(this.startPos),targetType:co.node.getConnectorDirection(pos),source:this.start.node.properties.id,target:co.node.properties.id,sxy:this.startPos,txy:xy});
                }
                this.line.remove();

            }
            this.start=null; //清除画线状态,等待重新画线
            this.startPos=null;

        },
至此就大功告成了,得益于之前我们以OOP的思路构建的框架,在扩展新的组件或连线时,代码变得如些精简。
同学们快动手试试增加更多的连线方式吧。
源代码:sample.1.8.rar
(本文为原创,在引用代码和文字时请注明出处)