在网络应用开发的过程中,直接使用JDK提供的NIO的API,比较繁琐,而且想要进行性能提升,还需要结合多线程技术。
由于网络编程本身的复杂性,以及JDK API开发的使用难度较高,所以在开源社区中,涌现出来了很多对JDK NIO进行封装、增强的网络编程框架,比如Netty、Mina等。
一、Netty简介
Netty是一个高性能、高可扩展性的异步事件驱动的网络应用程序框架,它极大简化了TCP和UDP客户端和服务器开发等网络编程。
Netty重要的四个内容:
- Reactor线程模型:一种高性能的多线程程序设计思路
- Netty中自己定义的Channel概念:增强版的通道概念
- ChannelPipeline职责链设计模式:事件处理机制
- 内存管理:增强的ByteBuf缓冲区
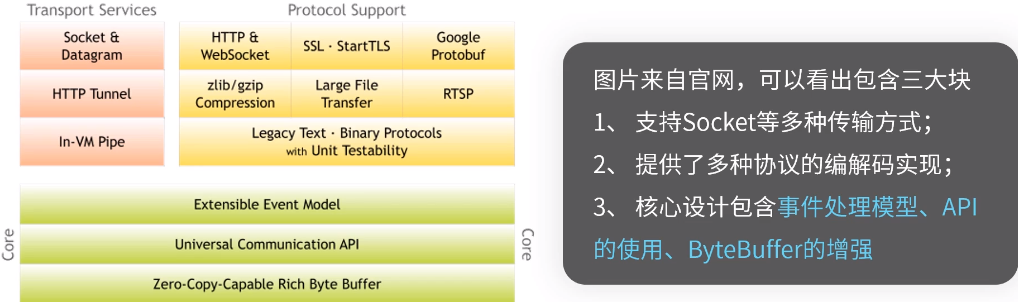
整体结构图
二、Netty线程模型
为了让NIO处理更好的利用多线程特性,Netty实现了Reactor线程模型。
Reactor模型中有四个核心概念:
- Resources资源(请求/任务)
- Synchronous Event Demultiplexer同步事件复用器
- Dispatcher分配器
- Request Handler请求处理器
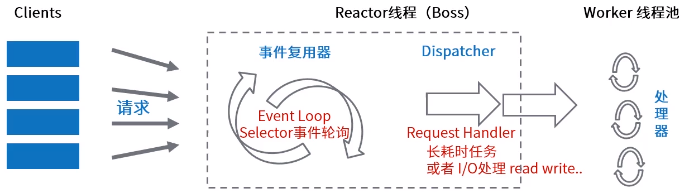
Netty启动时会构建多个Reactor
EventLoopGroup初始化过程

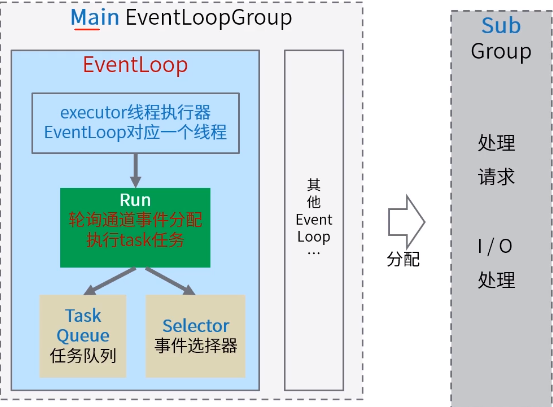
两组EventLoopGroup(Main&Sub)处理不同通道不同的事件
public final classEchoServer {
static final int PORT = Integer.parseInt(System.getProperty("port", "8007"));

    public static void main(String[] args) throwsException {
     //Configure the server.
// 创建EventLoopGroup accept线程组 NioEventLoop

        EventLoopGroup bossGroup = new NioEventLoopGroup(1);
// 创建EventLoopGroup I/O线程组
        EventLoopGroup workerGroup = newNioEventLoopGroup();
        final EchoServerHandler serverHandler = newEchoServerHandler();
        try{
// 服务端启动引导工具类
            ServerBootstrap b = newServerBootstrap();
// 配置服务端处理的reactor线程组以及服务端的其他配置
            b.group(bossGroup, workerGroup2)
             .channel(NioServerSocketChannel.class)
             .option(ChannelOption.SO_BACKLOG, 100)
             .handler(newLoggingHandler(LogLevel.DEBUG))
             .childHandler((ChannelInitializer)(ch)-> {
              ChannelPipeline p = ch.pipeline();
p.addLast(new EchoServerHandler);
             });

            //通过bind启动服务器
            ChannelFuture f =b.bind(PORT).sync();

            //阻塞主线程,直到网络服务被关闭
f.channel().closeFuture().sync();
        } finally{
            //关闭线程组
bossGroup.shutdownGracefully();
            workerGroup.shutdownGracefully();
        }
    }
}
EventLoopGroup bossGroup = new NioEventLoopGroup(1);
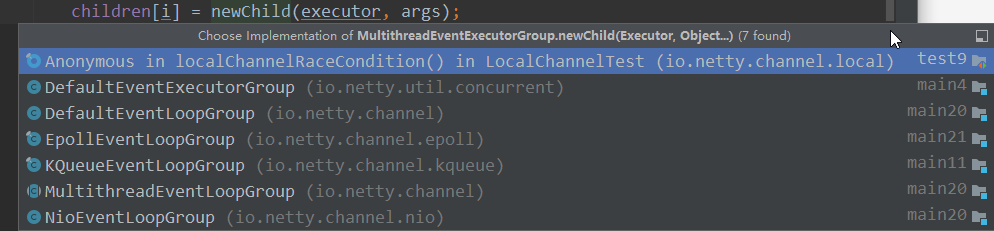
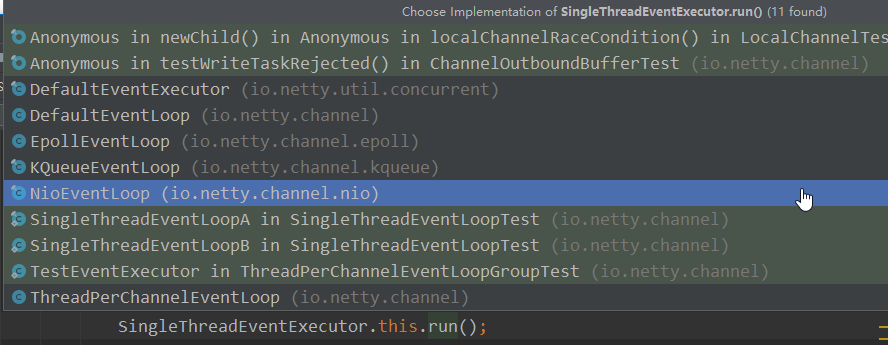
追踪NioEventLoopGroup源码,会发现是创造很多NioEventLoop
public class NioEventLoopGroup extendsMultithreadEventLoopGroup {
    ...
    public NioEventLoopGroup(intnThreads) {
            this(nThreads, (Executor) null);
     }
    ...
追踪到父类
public abstract class MultithreadEventLoopGroup extends MultithreadEventExecutorGroup implementsEventLoopGroup {

    private static final InternalLogger logger = InternalLoggerFactory.getInstance(MultithreadEventLoopGroup.class);

    private static final intDEFAULT_EVENT_LOOP_THREADS;

    static{
        DEFAULT_EVENT_LOOP_THREADS = Math.max(1, SystemPropertyUtil.getInt(
                "io.netty.eventLoopThreads", NettyRuntime.availableProcessors() * 2));

        if(logger.isDebugEnabled()) {
            logger.debug("-Dio.netty.eventLoopThreads: {}", DEFAULT_EVENT_LOOP_THREADS);
        }
    }

    /*** @seeMultithreadEventExecutorGroup#MultithreadEventExecutorGroup(int, Executor, Object...)
     */
    protected MultithreadEventLoopGroup(intnThreads, Executor executor, Object... args) {
        super(nThreads == 0 ?DEFAULT_EVENT_LOOP_THREADS : nThreads, executor, args); // 默认是cpu核数*2
    }
...
追踪父类
public abstract class MultithreadEventExecutorGroup extendsAbstractEventExecutorGroup {
// 代码省略

    //多线程的事件执行器
    protected MultithreadEventExecutorGroup(intnThreads, Executor executor,
                                            EventExecutorChooserFactory chooserFactory, Object... args) {
        if (nThreads <= 0) {
            throw new IllegalArgumentException(String.format("nThreads: %d (expected: > 0)", nThreads));
        }

        if (executor == null) {//Tony: 如果执行器为空,则创建一个
            // EventLoop都是通过executor创建线程并执行它的
            executor = newThreadPerTaskExecutor(newDefaultThreadFactory()); // 线程创建器,源码见下面
        }
        // EventLoop是EventExecutor接口的具体实现
        children = newEventExecutor[nThreads];

        for (int i = 0; i < nThreads; i ++) {
            boolean success = false;
            try{
// 有多个实现方法,见下面 返回NioEventLoop
                children[i] =newChild(executor, args);
                success = true;
            } catch(Exception e) {
                //TODO: Think about if this is a good exception type
                throw new IllegalStateException("failed to create a child event loop", e);
            } finally{
                if (!success) {
                    for (int j = 0; j < i; j ++) {
                        children[j].shutdownGracefully();
                    }

                    for (int j = 0; j < i; j ++) {
                        EventExecutor e =children[j];
                        try{
                            while (!e.isTerminated()) {
                                e.awaitTermination(Integer.MAX_VALUE, TimeUnit.SECONDS);
                            }
                        } catch(InterruptedException interrupted) {
                            //Let the caller handle the interruption.
Thread.currentThread().interrupt();
                            break;
                        }
                    }
                }
            }
        }

        chooser =chooserFactory.newChooser(children);

        final FutureListener<Object> terminationListener = new FutureListener<Object>() {
            @Override
            public void operationComplete(Future<Object> future) throwsException {
                if (terminatedChildren.incrementAndGet() ==children.length) {
                    terminationFuture.setSuccess(null);
                }
            }
        };

        for(EventExecutor e: children) {
            e.terminationFuture().addListener(terminationListener);
        }

        Set<EventExecutor> childrenSet = new LinkedHashSet<EventExecutor>(children.length);
        Collections.addAll(childrenSet, children);
        readonlyChildren =Collections.unmodifiableSet(childrenSet);
    }
ThreadPerTaskExecutor创建线程
public final class ThreadPerTaskExecutor implementsExecutor {
    private finalThreadFactory threadFactory;

    publicThreadPerTaskExecutor(ThreadFactory threadFactory) {
        if (threadFactory == null) {
            throw new NullPointerException("threadFactory");
        }
        this.threadFactory =threadFactory;
    }

    @Override
    public voidexecute(Runnable command) {
        threadFactory.newThread(command).start();
    }
}
NioEventLoopGroup
public class NioEventLoopGroup extendsMultithreadEventLoopGroup {
  //省略代码
@Override
    protected EventLoop newChild(Executor executor, Object... args) throwsException {
        return new NioEventLoop(this, executor, (SelectorProvider) args[0],
            ((SelectStrategyFactory) args[1]).newSelectStrategy(), (RejectedExecutionHandler) args[2]);
    }
}
返回NioEventLoop,也传入了executor,用来帮助创建线程执行任务
看NioEventLoop的具体实现
public final class NioEventLoop extendsSingleThreadEventLoop {
    //代码省略
NioEventLoop(NioEventLoopGroup parent, Executor executor, SelectorProvider selectorProvider,
                 SelectStrategy strategy, RejectedExecutionHandler rejectedExecutionHandler) {
        super(parent, executor, false, DEFAULT_MAX_PENDING_TASKS, rejectedExecutionHandler);
        if (selectorProvider == null) {
            throw new NullPointerException("selectorProvider");
        }
        if (strategy == null) {
            throw new NullPointerException("selectStrategy");
        }
        provider =selectorProvider;
        final SelectorTuple selectorTuple =openSelector();
        selector =selectorTuple.selector;
        unwrappedSelector =selectorTuple.unwrappedSelector;
        selectStrategy =strategy;
    }
// 代码省略
selector是NIO的selector
NioEventLoop将通道注册到EventLoop的selector上,进行事件轮询
不断追踪NioEventLoop
最顶层是
public interfaceExecutor {

    /*** Executes the given command at some time in the future.  The command
     * may execute in a new thread, in a pooled thread, or in the calling
     * thread, at the discretion of the {@codeExecutor} implementation.
     *
     * @paramcommand the runnable task
     * @throwsRejectedExecutionException if this task cannot be
     * accepted for execution
     * @throwsNullPointerException if command is null
     */
    voidexecute(Runnable command);
}
execute由SingleThreadEventExecutor实现
提交任务
 public abstract class SingleThreadEventExecutor extends AbstractScheduledEventExecutor implementsOrderedEventExecutor {
    //省略代码
@Override
    public voidexecute(Runnable task) {
        if (task == null) {
            throw new NullPointerException("task");
        }
        //判断execute方法的调用者是不是EventLoop同一个线程
        boolean inEventLoop =inEventLoop();
        addTask(task);//增加到任务队列
        if (!inEventLoop) {//不是同一个线程,则调用启动方法
startThread();
            if(isShutdown()) {
                boolean reject = false;
                try{
                    if(removeTask(task)) {
                        reject = true;
                    }
                } catch(UnsupportedOperationException e) {
                    //The task queue does not support removal so the best thing we can do is to just move on and
                    //hope we will be able to pick-up the task before its completely terminated.
                    //In worst case we will log on termination.
}
                if(reject) {
                    reject();
                }
            }
        }

        if (!addTaskWakesUp &&wakesUpForTask(task)) {
            wakeup(inEventLoop);
        }
    }
startThread
    private voidstartThread() {
        if (state ==ST_NOT_STARTED) {
            if (STATE_UPDATER.compareAndSet(this, ST_NOT_STARTED, ST_STARTED)) {
                try{
                    doStartThread();//Tony: 未启动,则触发启动
                } catch(Throwable cause) {
                    STATE_UPDATER.set(this, ST_NOT_STARTED);
                    PlatformDependent.throwException(cause);
                }
            }
        }
    }

    private voiddoStartThread() {
        assert thread == null;
        executor.execute(new Runnable() {//这里的executor是初始化EventLoop的时候传进来的
@Override
            public voidrun() {
                thread =Thread.currentThread();
                if(interrupted) {
                    thread.interrupt();
                }

                boolean success = false;
                updateLastExecutionTime();
                try {//创建线程开始执行run方法,所以,每个EventLoop都是执行run
                    SingleThreadEventExecutor.this.run();
                    success = true;
                } catch(Throwable t) {
                    logger.warn("Unexpected exception from an event executor: ", t);
                } finally{
                    for(;;) {
                        int oldState =state;
                        if (oldState >= ST_SHUTTING_DOWN ||STATE_UPDATER.compareAndSet(
                                SingleThreadEventExecutor.this, oldState, ST_SHUTTING_DOWN)) {
                            break;
                        }
                    }

                    //Check if confirmShutdown() was called at the end of the loop.
                    if (success && gracefulShutdownStartTime == 0) {
                        if(logger.isErrorEnabled()) {
                            logger.error("Buggy " + EventExecutor.class.getSimpleName() + " implementation; " +SingleThreadEventExecutor.class.getSimpleName() + ".confirmShutdown() must " +
                                    "be called before run() implementation terminates.");
                        }
                    }

                    try{
                        //Run all remaining tasks and shutdown hooks.
                        for(;;) {
                            if(confirmShutdown()) {
                                break;
                            }
                        }
                    } finally{
                        try{
                            cleanup();
                        } finally{
                            STATE_UPDATER.set(SingleThreadEventExecutor.this, ST_TERMINATED);
                            threadLock.release();
                            if (!taskQueue.isEmpty()) {
                                if(logger.isWarnEnabled()) {
                                    logger.warn("An event executor terminated with " +
                                            "non-empty task queue (" + taskQueue.size() + ')');
                                }
                            }

                            terminationFuture.setSuccess(null);
                        }
                    }
                }
            }
        });
    }
@Override
    protected void run() {//有任务提交后,被触发执行
        for (;;) {//执行两件事selector,select的事件 和 taskQueue里面的内容
            try{
                try{
                    switch(selectStrategy.calculateStrategy(selectNowSupplier, hasTasks())) {
                    caseSelectStrategy.CONTINUE:
                        continue;

                    caseSelectStrategy.BUSY_WAIT:
                        //fall-through to SELECT since the busy-wait is not supported with NIO

                    caseSelectStrategy.SELECT:
                        select(wakenUp.getAndSet(false));

                        //'wakenUp.compareAndSet(false, true)' is always evaluated
                        //before calling 'selector.wakeup()' to reduce the wake-up
                        //overhead. (Selector.wakeup() is an expensive operation.)
                        //
                        //However, there is a race condition in this approach.
                        //The race condition is triggered when 'wakenUp' is set to
                        //true too early.
                        //
                        //'wakenUp' is set to true too early if:
                        //1) Selector is waken up between 'wakenUp.set(false)' and
                        //'selector.select(...)'. (BAD)
                        //2) Selector is waken up between 'selector.select(...)' and
                        //'if (wakenUp.get()) { ... }'. (OK)
                        //
                        //In the first case, 'wakenUp' is set to true and the
                        //following 'selector.select(...)' will wake up immediately.
                        //Until 'wakenUp' is set to false again in the next round,
                        //'wakenUp.compareAndSet(false, true)' will fail, and therefore
                        //any attempt to wake up the Selector will fail, too, causing
                        //the following 'selector.select(...)' call to block
                        //unnecessarily.
                        //
                        //To fix this problem, we wake up the selector again if wakenUp
                        //is true immediately after selector.select(...).
                        //It is inefficient in that it wakes up the selector for both
                        //the first case (BAD - wake-up required) and the second case
                        //(OK - no wake-up required).

                        if(wakenUp.get()) {
                            selector.wakeup();
                        }
                        //fall through
                    default:
                    }
                } catch(IOException e) {
                    //If we receive an IOException here its because the Selector is messed up. Let's rebuild
                    //the selector and retry. https://github.com/netty/netty/issues/8566
rebuildSelector0();
                    handleLoopException(e);
                    continue;
                }

                cancelledKeys = 0;
                needsToSelectAgain = false;
                final int ioRatio = this.ioRatio;
                if (ioRatio == 100) {
                    try {//处理事件
processSelectedKeys();
                    } finally{
                        //Ensure we always run tasks.
runAllTasks();
                    }
                } else{
                    final long ioStartTime =System.nanoTime();
                    try{
                        processSelectedKeys();
                    } finally{
                        //Ensure we always run tasks.
                        final long ioTime = System.nanoTime() -ioStartTime;
                        runAllTasks(ioTime * (100 - ioRatio) /ioRatio);
                    }
                }
            } catch(Throwable t) {
                handleLoopException(t);
            }
            //Always handle shutdown even if the loop processing threw an exception.
            try{
                if(isShuttingDown()) {
                    closeAll();
                    if(confirmShutdown()) {
                        return;
                    }
                }
            } catch(Throwable t) {
                handleLoopException(t);
            }
        }
    }

    private static voidhandleLoopException(Throwable t) {
        logger.warn("Unexpected exception in the selector loop.", t);

        //Prevent possible consecutive immediate failures that lead to
        //excessive CPU consumption.
        try{
            Thread.sleep(1000);
        } catch(InterruptedException e) {
            //Ignore.
}
    }

    private voidprocessSelectedKeys() {
        if (selectedKeys != null) {
            processSelectedKeysOptimized();
        } else {//处理事件
processSelectedKeysPlain(selector.selectedKeys());
        }
    }
private void processSelectedKeysPlain(Set<SelectionKey>selectedKeys) {
        //check if the set is empty and if so just return to not create garbage by
        //creating a new Iterator every time even if there is nothing to process.
        //See https://github.com/netty/netty/issues/597
        if(selectedKeys.isEmpty()) {
            return;
        }
        //获取selector所有选中的事件(ServerSocketChannel主要是OP_ACCEPT,SocketChannle主要是OP_READ)
        Iterator<SelectionKey> i =selectedKeys.iterator();
        for(;;) {
            final SelectionKey k =i.next();
            final Object a =k.attachment();
            i.remove();

            if (a instanceof AbstractNioChannel) {//处理niochannel事件
processSelectedKey(k, (AbstractNioChannel) a);
            } else{
                @SuppressWarnings("unchecked")
                NioTask<SelectableChannel> task = (NioTask<SelectableChannel>) a;
                processSelectedKey(k, task);
            }

            if (!i.hasNext()) {
                break;
            }

            if(needsToSelectAgain) {
                selectAgain();
                selectedKeys =selector.selectedKeys();

                //Create the iterator again to avoid ConcurrentModificationException
                if(selectedKeys.isEmpty()) {
                    break;
                } else{
                    i =selectedKeys.iterator();
                }
            }
        }
    }
EventLoop自身实现了Executor接口,当调用executor方法提交任务时,则判断是否启动,未启动则调用内置的executor创建新线程来触发run方法执行

channel注册到selector上
请求
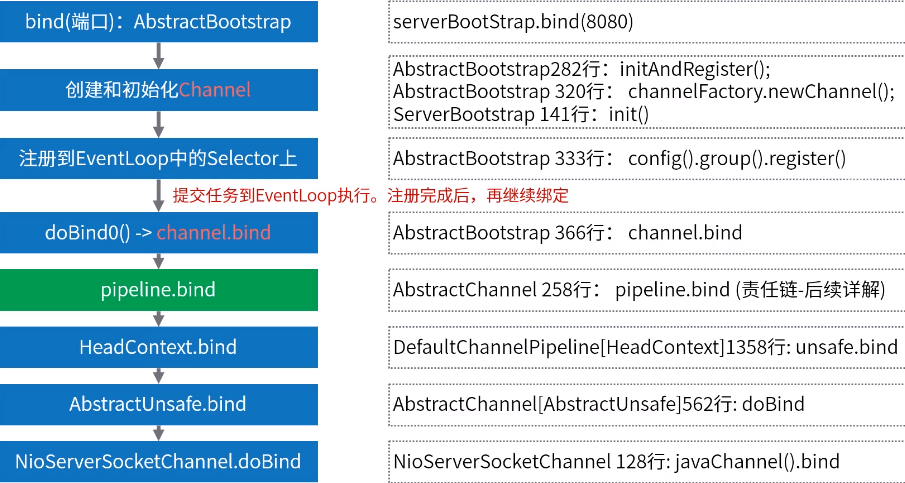
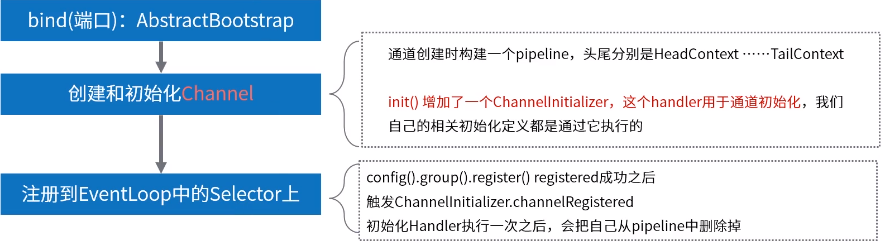
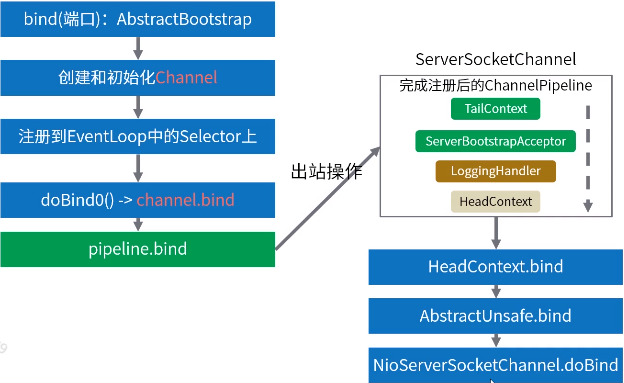
服务端启动的过程,服务端的启动就是Bind绑定端口的过程
回到EchoServer
追踪bind源码
 //Start the server.
ChannelFuture f = b.bind(PORT).sync();
bind绑定端口并创建通道
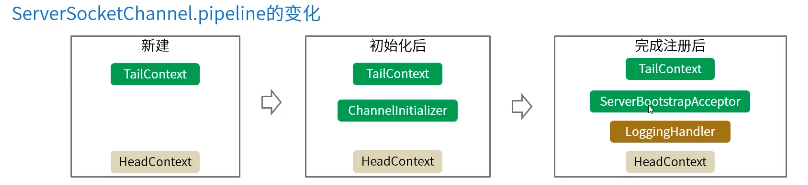
 public ChannelFuture bind(intinetPort) {
        return bind(new InetSocketAddress(inetPort)); //绑定端口的入口代码
}

    /*** Create a new {@linkChannel} and bind it.
     */
    public ChannelFuture bind(String inetHost, intinetPort) {
        returnbind(SocketUtils.socketAddress(inetHost, inetPort));
    }

    /*** Create a new {@linkChannel} and bind it.
     */
    public ChannelFuture bind(InetAddress inetHost, intinetPort) {
        return bind(newInetSocketAddress(inetHost, inetPort));
    }

    /*** Create a new {@linkChannel} and bind it.
     */
    publicChannelFuture bind(SocketAddress localAddress) {
        validate();
        if (localAddress == null) {
            throw new NullPointerException("localAddress");
        }
        return doBind(localAddress);//真正干事的代码
}

    private ChannelFuture doBind(finalSocketAddress localAddress) {
        final ChannelFuture regFuture = initAndRegister();//创建/初始化ServerSocketChannel对象,并注册到Selector
        final Channel channel =regFuture.channel();
        if (regFuture.cause() != null) {
            returnregFuture;
        }
        //等注册完成之后,再绑定端口。 防止端口开放了,却不能处理请求
        if(regFuture.isDone()) {
            //At this point we know that the registration was complete and successful.
            ChannelPromise promise =channel.newPromise();
            doBind0(regFuture, channel, localAddress, promise);//实际操作绑定端口的代码
            returnpromise;
        } else{
            //Registration future is almost always fulfilled already, but just in case it's not.
            final PendingRegistrationPromise promise = newPendingRegistrationPromise(channel);
            regFuture.addListener(newChannelFutureListener() {
                @Override
                public void operationComplete(ChannelFuture future) throwsException {
                    Throwable cause =future.cause();
                    if (cause != null) {
                        //Registration on the EventLoop failed so fail the ChannelPromise directly to not cause an
                        //IllegalStateException once we try to access the EventLoop of the Channel.
promise.setFailure(cause);
                    } else{
                        //Registration was successful, so set the correct executor to use.
                        //See https://github.com/netty/netty/issues/2586
promise.registered();

                        doBind0(regFuture, channel, localAddress, promise);
                    }
                }
            });
            returnpromise;
        }
    }

    finalChannelFutureinitAndRegister() {
        Channel channel = null;
        try{
            channel =channelFactory.newChannel(); // 通道
            init(channel); // 初始化通道
        } catch(Throwable t) {
            if (channel != null) {
                //channel can be null if newChannel crashed (eg SocketException("too many open files"))
channel.unsafe().closeForcibly();
                //as the Channel is not registered yet we need to force the usage of the GlobalEventExecutor
                return newDefaultChannelPromise(channel, GlobalEventExecutor.INSTANCE).setFailure(t);
            }
            //as the Channel is not registered yet we need to force the usage of the GlobalEventExecutor
            return new DefaultChannelPromise(newFailedChannel(), GlobalEventExecutor.INSTANCE).setFailure(t);
        }
        //(一开始初始化的group)MultithreadEventLoopGroup里面选择一个eventLoop进行绑定
        ChannelFuture regFuture =config().group().register(channel); // register见下面
        if (regFuture.cause() != null) {
            if(channel.isRegistered()) {
                channel.close();
            } else{
                channel.unsafe().closeForcibly();
            }
        }

        //If we are here and the promise is not failed, it's one of the following cases:
        //1) If we attempted registration from the event loop, the registration has been completed at this point.
        //i.e. It's safe to attempt bind() or connect() now because the channel has been registered.
        //2) If we attempted registration from the other thread, the registration request has been successfully
        //added to the event loop's task queue for later execution.
        //i.e. It's safe to attempt bind() or connect() now:
        //because bind() or connect() will be executed *after* the scheduled registration task is executed
        //because register(), bind(), and connect() are all bound to the same thread.

        returnregFuture;
    }

    abstract void init(Channel channel) throwsException;

    private static voiddoBind0(
            final ChannelFuture regFuture, finalChannel channel,
            final SocketAddress localAddress, finalChannelPromise promise) {

        //This method is invoked before channelRegistered() is triggered.  Give user handlers a chance to set up
        //the pipeline in its channelRegistered() implementation.
        channel.eventLoop().execute(newRunnable() {
            @Override
            public void run() {//这里向EventLoop提交任务,一旦有任务提交则会触发EventLoop的轮询
                if (regFuture.isSuccess()) {//本质又绕回到channel的bind方法上面。
channel.bind(localAddress, promise).addListener(ChannelFutureListener.CLOSE_ON_FAILURE);
                } else{
                    promise.setFailure(regFuture.cause());
                }
            }
        });
    }
@Override
publicChannelFuture register(Channel channel){
    return next().register(channel); //根据选择器,选择一个合适的NioEventLoop进行注册(SingleEventLoop)
}
追踪register代码...
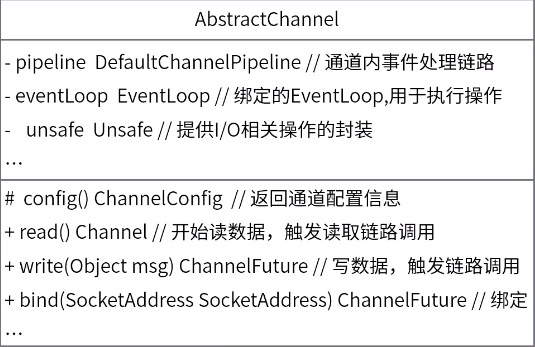
netty中的Channel是一个抽象的概念,可以理解为对JDK NIO Channel的增强和拓展。增加了很多属性和方法,下面罗列几个常见的属性和方法:
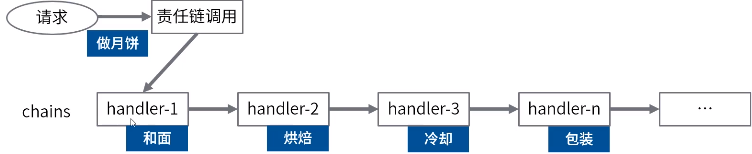
三、责任链设计模式
责任链(Chain of Responsibility Pattern)为请求创建了一个处理对象的链。
发起请求和具体处理请求的过程进行解耦:职责链上的处理者负责处理请求,客户只需要将请求发送到职责链上即可,无须关心请求的处理细节和请求的传递。
handler是具体处理请求的程序
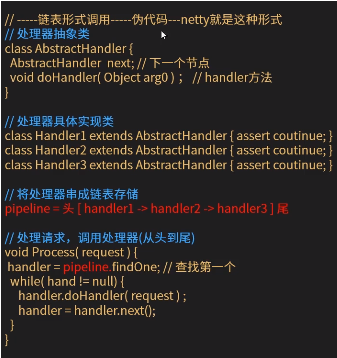
实现责任链模式4个要素:处理器抽象类、具体的处理器实现类、保存处理器信息、处理执行
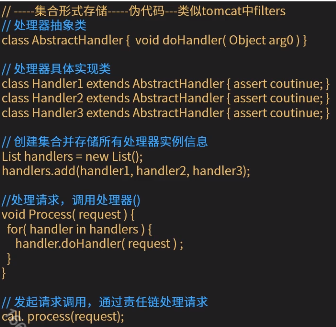
责任链代码示例
//-----链表形式调用------netty就是类似的这种形式
public classPipelineDemo {
    /*** 初始化的时候造一个head,作为责任链的开始,但是并没有具体的处理
     */
    public HandlerChainContext head = new HandlerChainContext(newAbstractHandler() {
        @Override
        voiddoHandler(HandlerChainContext handlerChainContext, Object arg0) {
            handlerChainContext.runNext(arg0);
        }
    });

    public voidrequestProcess(Object arg0) {
        this.head.handler(arg0);
    }

    public voidaddLast(AbstractHandler handler) {
        HandlerChainContext context =head;
        while (context.next != null) {
            context =context.next;
        }
        context.next = newHandlerChainContext(handler);
    }


    public static voidmain(String[] args) {
        PipelineDemo pipelineChainDemo = newPipelineDemo();
        pipelineChainDemo.addLast(newHandler2());
        pipelineChainDemo.addLast(newHandler1());
        pipelineChainDemo.addLast(newHandler1());
        pipelineChainDemo.addLast(newHandler2());

        //发起请求
        pipelineChainDemo.requestProcess("火车呜呜呜~~");

    }
}

/*** handler上下文,我主要负责维护链,和链的执行
 */
classHandlerChainContext {
    HandlerChainContext next; //下一个节点
AbstractHandler handler;

    publicHandlerChainContext(AbstractHandler handler) {
        this.handler =handler;
    }

    voidhandler(Object arg0) {
        this.handler.doHandler(this, arg0);
    }

    /*** 继续执行下一个
     */
    voidrunNext(Object arg0) {
        if (this.next != null) {
            this.next.handler(arg0);
        }
    }
}

//处理器抽象类
abstract classAbstractHandler {
    /*** 处理器,这个处理器就做一件事情,在传入的字符串中增加一个尾巴..
     */
    abstract void doHandler(HandlerChainContext handlerChainContext, Object arg0); //handler方法
}

//处理器具体实现类
class Handler1 extendsAbstractHandler {
    @Override
    voiddoHandler(HandlerChainContext handlerChainContext, Object arg0) {
        arg0 = arg0.toString() + "..handler1的小尾巴.....";
        System.out.println("我是Handler1的实例,我在处理:" +arg0);
        //继续执行下一个
handlerChainContext.runNext(arg0);
    }
}

//处理器具体实现类
class Handler2 extendsAbstractHandler {
    @Override
    voiddoHandler(HandlerChainContext handlerChainContext, Object arg0) {
        arg0 = arg0.toString() + "..handler2的小尾巴.....";
        System.out.println("我是Handler2的实例,我在处理:" +arg0);
        //继续执行下一个
handlerChainContext.runNext(arg0);
    }
}
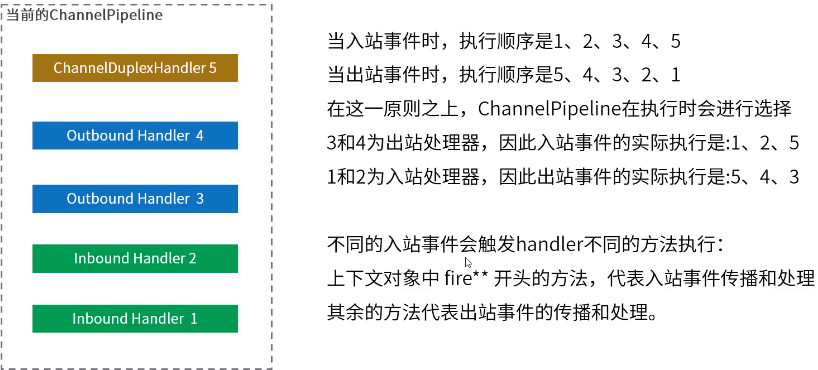
Netty中的ChannelPipeline责任链
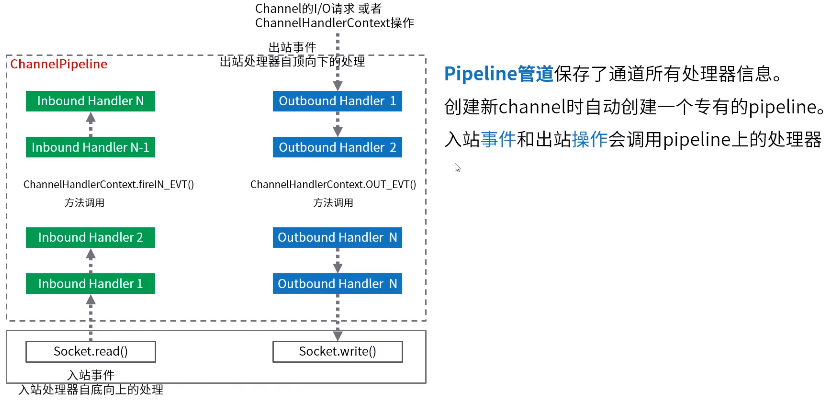
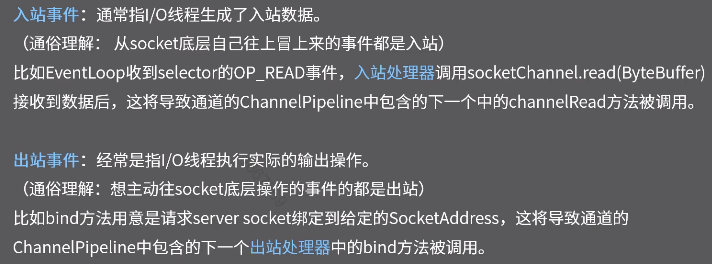
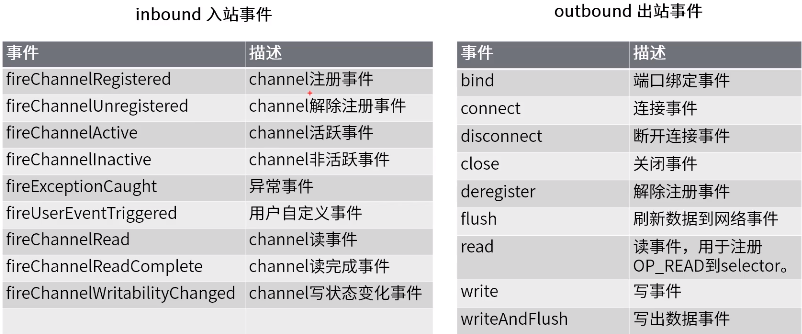
Nettty中定义了很多事件
Pipeline中的handler是什么?
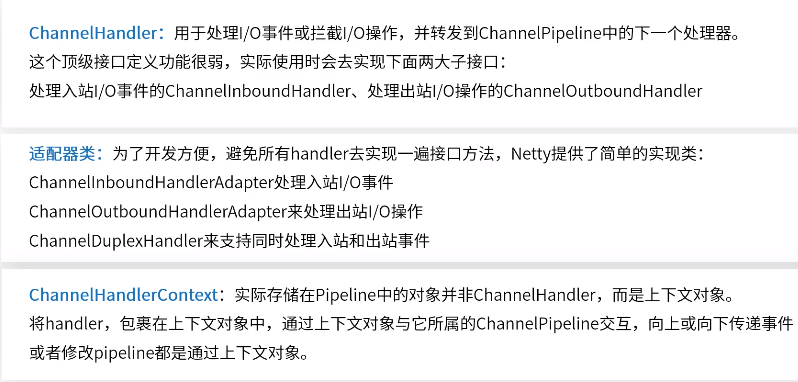
ChannelPipeline是线程安全的,ChannelHandler可以在任何时候添加或删除。
例如,可以在即将交换敏感信息时插入加密处理程序,并在交换后删除。
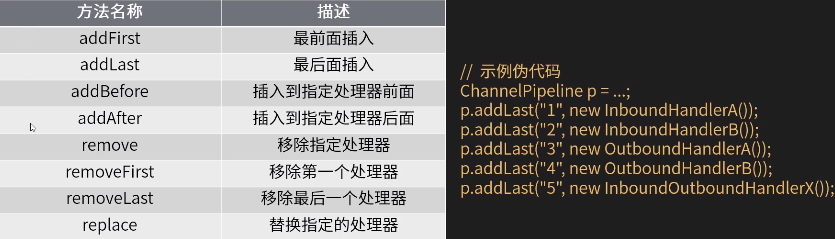
一般操作,初始化的时候增加进去,较少删除。下面是Pipeline中管理handler的API:
源码查看
handler执行分析
分析registered入站事件的处理
源码查看 从bind()进入
bind出站事件分析
源码查看
分析accept入站事件的处理
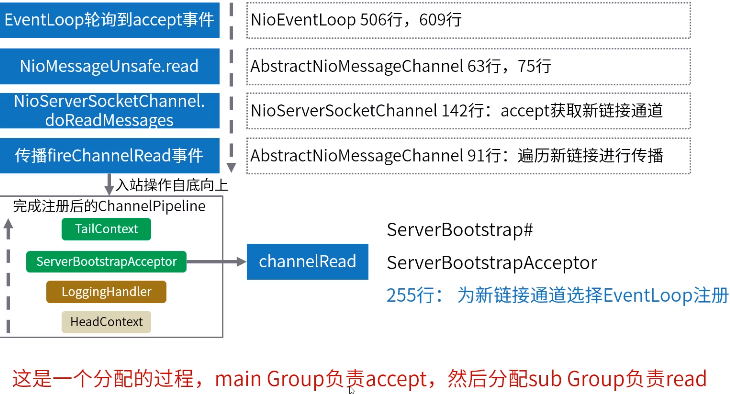
源码查看
read入站事件的处理
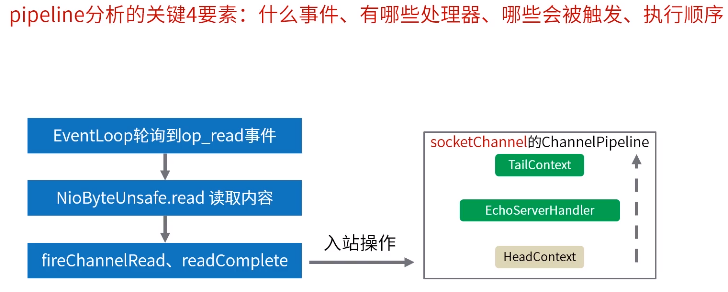
源码查看

四、零拷贝机制
JDK ByteBuffer存在一些缺点:
- 无法动态扩容。长度是固定的,不能动态扩展和收缩,当数据大于ByteBuffer容量时,会发生索引越界异常。
- API使用复杂。读写的时候需要手工调用flip()和rewind()等方法,使用时需要非常谨慎的使用这些api,否则容易出错。
1.Netty自己的ByteBuf
ByteBuf是为解决ByteBuffer的问题和满足网络应用程序开发人员的日常需求而设计的。
ByteBuf的增强:
- API操作便捷性
- 动态扩容
- 多种ByteBuf实现
- 高效的零拷贝机制
2.ByteBuf操作
ByteBuf三个重要属性:capacity容量、readerIndex读取位置、writeIndex写入位置。
提供了两个指针变量来支持顺序读和写操作,分别时readerIndex和写操作writeIndex
常用方法定义:
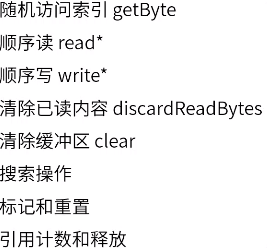
下图显示了一个缓冲区是如何被两个指针分割成三个区域的:

示例代码
/*** bytebuf的常规API操作示例
 */
public classByteBufDemo {
    @Test
    public voidapiTest() {
        //+-------------------+------------------+------------------+
        //| discardable bytes |  readable bytes  |  writable bytes  |
        //|                   |     (CONTENT)    |                  |
        //+-------------------+------------------+------------------+
        //|                   |                  |                  |
        //0      <=       readerIndex   <=   writerIndex    <=    capacity

        //1.创建一个非池化的ByteBuf,大小为10个字节
        ByteBuf buf = Unpooled.buffer(10);
        System.out.println("原始ByteBuf为====================>" +buf.toString());
        System.out.println("1.ByteBuf中的内容为===============>" + Arrays.toString(buf.array()) + "
");

        //2.写入一段内容
        byte[] bytes = {1, 2, 3, 4, 5};
        buf.writeBytes(bytes);
        System.out.println("写入的bytes为====================>" +Arrays.toString(bytes));
        System.out.println("写入一段内容后ByteBuf为===========>" +buf.toString());
        System.out.println("2.ByteBuf中的内容为===============>" + Arrays.toString(buf.array()) + "
");

        //3.读取一段内容
        byte b1 =buf.readByte();
        byte b2 =buf.readByte();
        System.out.println("读取的bytes为====================>" + Arrays.toString(new byte[]{b1, b2}));
        System.out.println("读取一段内容后ByteBuf为===========>" +buf.toString());
        System.out.println("3.ByteBuf中的内容为===============>" + Arrays.toString(buf.array()) + "
");

        //4.将读取的内容丢弃
buf.discardReadBytes();
        System.out.println("将读取的内容丢弃后ByteBuf为========>" +buf.toString());
        System.out.println("4.ByteBuf中的内容为===============>" + Arrays.toString(buf.array()) + "
");

        //5.清空读写指针
buf.clear();
        System.out.println("将读写指针清空后ByteBuf为==========>" +buf.toString());
        System.out.println("5.ByteBuf中的内容为===============>" + Arrays.toString(buf.array()) + "
");

        //6.再次写入一段内容,比第一段内容少
        byte[] bytes2 = {1, 2, 3};
        buf.writeBytes(bytes2);
        System.out.println("写入的bytes为====================>" +Arrays.toString(bytes2));
        System.out.println("写入一段内容后ByteBuf为===========>" +buf.toString());
        System.out.println("6.ByteBuf中的内容为===============>" + Arrays.toString(buf.array()) + "
");

        //7.将ByteBuf清零
        buf.setZero(0, buf.capacity());
        System.out.println("将内容清零后ByteBuf为==============>" +buf.toString());
        System.out.println("7.ByteBuf中的内容为================>" + Arrays.toString(buf.array()) + "
");

        //8.再次写入一段超过容量的内容
        byte[] bytes3 = {1, 2, 3, 4, 5, 6, 7, 8, 9, 10, 11};
        buf.writeBytes(bytes3);
        System.out.println("写入的bytes为====================>" +Arrays.toString(bytes3));
        System.out.println("写入一段内容后ByteBuf为===========>" +buf.toString());
        System.out.println("8.ByteBuf中的内容为===============>" + Arrays.toString(buf.array()) + "
");
        //随机访问索引 getByte
        //顺序读 read*
        //顺序写 write*
        //清除已读内容 discardReadBytes
        //清除缓冲区 clear
        //搜索操作
        //标记和重置
        //完整代码示例:参考
        //搜索操作 读取指定位置 buf.getByte(1);
        //
}

}
Unpooled推荐的方式创建buf
可以动态扩容
运行结果
原始ByteBuf为====================>UnpooledByteBufAllocator$InstrumentedUnpooledUnsafeHeapByteBuf(ridx: 0, widx: 0, cap: 10)
1.ByteBuf中的内容为===============>[0, 0, 0, 0, 0, 0, 0, 0, 0, 0]

写入的bytes为====================>[1, 2, 3, 4, 5]
写入一段内容后ByteBuf为===========>UnpooledByteBufAllocator$InstrumentedUnpooledUnsafeHeapByteBuf(ridx: 0, widx: 5, cap: 10)
2.ByteBuf中的内容为===============>[1, 2, 3, 4, 5, 0, 0, 0, 0, 0]

读取的bytes为====================>[1, 2]
读取一段内容后ByteBuf为===========>UnpooledByteBufAllocator$InstrumentedUnpooledUnsafeHeapByteBuf(ridx: 2, widx: 5, cap: 10)
3.ByteBuf中的内容为===============>[1, 2, 3, 4, 5, 0, 0, 0, 0, 0]

将读取的内容丢弃后ByteBuf为========>UnpooledByteBufAllocator$InstrumentedUnpooledUnsafeHeapByteBuf(ridx: 0, widx: 3, cap: 10)
4.ByteBuf中的内容为===============>[3, 4, 5, 4, 5, 0, 0, 0, 0, 0]

将读写指针清空后ByteBuf为==========>UnpooledByteBufAllocator$InstrumentedUnpooledUnsafeHeapByteBuf(ridx: 0, widx: 0, cap: 10)
5.ByteBuf中的内容为===============>[3, 4, 5, 4, 5, 0, 0, 0, 0, 0]

写入的bytes为====================>[1, 2, 3]
写入一段内容后ByteBuf为===========>UnpooledByteBufAllocator$InstrumentedUnpooledUnsafeHeapByteBuf(ridx: 0, widx: 3, cap: 10)
6.ByteBuf中的内容为===============>[1, 2, 3, 4, 5, 0, 0, 0, 0, 0]

将内容清零后ByteBuf为==============>UnpooledByteBufAllocator$InstrumentedUnpooledUnsafeHeapByteBuf(ridx: 0, widx: 3, cap: 10)
7.ByteBuf中的内容为================>[0, 0, 0, 0, 0, 0, 0, 0, 0, 0]

写入的bytes为====================>[1, 2, 3, 4, 5, 6, 7, 8, 9, 10, 11]
写入一段内容后ByteBuf为===========>UnpooledByteBufAllocator$InstrumentedUnpooledUnsafeHeapByteBuf(ridx: 0, widx: 14, cap: 64)
8.ByteBuf中的内容为===============>[0, 0, 0, 1, 2, 3, 4, 5, 6, 7, 8, 9, 10, 11, 0, 0, 0, 0, 0, 0, 0, 0, 0, 0, 0, 0, 0, 0, 0, 0, 0, 0, 0, 0, 0, 0, 0, 0, 0, 0, 0, 0, 0, 0, 0, 0, 0, 0, 0, 0, 0, 0, 0, 0, 0, 0, 0, 0, 0, 0, 0, 0, 0, 0]
动态扩容
io.netty.buffer.AbstractByteBuf下:
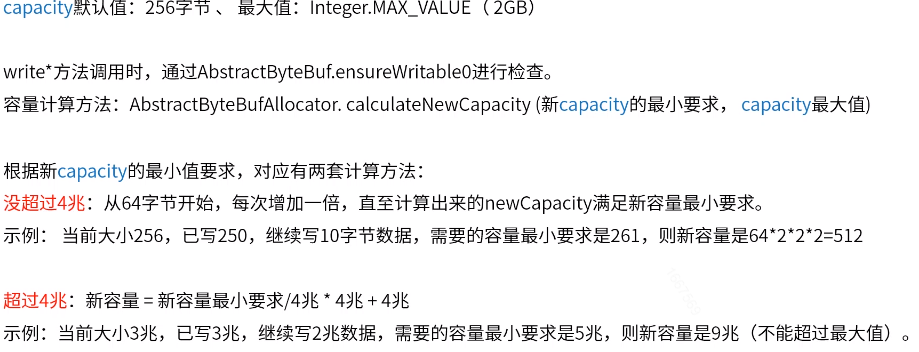
  final void ensureWritable0(intminWritableBytes) {
        ensureAccessible();
        if (minWritableBytes <=writableBytes()) {
            return;
        }
        final int writerIndex =writerIndex();
        if(checkBounds) {
            if (minWritableBytes > maxCapacity -writerIndex) {
                throw newIndexOutOfBoundsException(String.format(
                        "writerIndex(%d) + minWritableBytes(%d) exceeds maxCapacity(%d): %s",
                        writerIndex, minWritableBytes, maxCapacity, this));
            }
        }

        //Normalize the current capacity to the power of 2.
        int minNewCapacity = writerIndex +minWritableBytes;
        int newCapacity =alloc().calculateNewCapacity(minNewCapacity, maxCapacity);

        int fastCapacity = writerIndex +maxFastWritableBytes();
        //Grow by a smaller amount if it will avoid reallocation
        if (newCapacity > fastCapacity && minNewCapacity <=fastCapacity) {
            newCapacity =fastCapacity;
        }

        //Adjust to the new capacity.
capacity(newCapacity);
    }
calculateNewCapacity
@Override
    public int calculateNewCapacity(int minNewCapacity, intmaxCapacity) { // minNewCapacity:14 maxCapacity:2147483647
        checkPositiveOrZero(minNewCapacity, "minNewCapacity");
        if (minNewCapacity >maxCapacity) { // minCapacity:14
            throw newIllegalArgumentException(String.format(
                    "minNewCapacity: %d (expected: not greater than maxCapacity(%d)",
                    minNewCapacity, maxCapacity));
        } // 阈值4M,这个阈值的用意:容量要求4M以内,每次扩容以2的倍数进行计算,超过4M容量,另外的计算方式。
        final int threshold = CALCULATE_THRESHOLD; //4 MiB page

        if (minNewCapacity ==threshold) { // 新容量的最小要求,如果等于阈值,则立刻返回
            returnthreshold;
        }

        //If over threshold, do not double but just increase by threshold.
        if (minNewCapacity >threshold) {
            int newCapacity = minNewCapacity / threshold *threshold;
            if (newCapacity > maxCapacity -threshold) {
                newCapacity =maxCapacity;
            } else{
                newCapacity +=threshold;
            }
            returnnewCapacity;
        }
        // 如果容量要求没超过阈值,则从64字节开始,不断增加一倍,直至满足新容量最小要求
        //Not over threshold. Double up to 4 MiB, starting from 64.
        int newCapacity = 64;
        while (newCapacity <minNewCapacity) {
            newCapacity <<= 1;
        }

        returnMath.min(newCapacity, maxCapacity);
    }

选择合适的ByteBuf实现:
了解核心的3个维度的划分方式,8种具体实现

在使用中,都是使用ByteBufAllocator分配器进行申请,同时分配器具有内存管理的功能
堆外内存示例
/*** 堆外内存的常规API操作示例
 */
public classDirectByteBufDemo {
    @Test
    public voidapiTest() {
        //+-------------------+------------------+------------------+
        //| discardable bytes |  readable bytes  |  writable bytes  |
        //|                   |     (CONTENT)    |                  |
        //+-------------------+------------------+------------------+
        //|                   |                  |                  |
        //0      <=       readerIndex   <=   writerIndex    <=    capacity

        //1.创建一个非池化的ByteBuf,大小为10个字节
        ByteBuf buf = Unpooled.directBuffer(10);
        System.out.println("原始ByteBuf为====================>" +buf.toString());
        //System.out.println("1.ByteBuf中的内容为===============>" + Arrays.toString(buf.array()) + "
"); 堆外内存不能用buf.array()

        //2.写入一段内容
        byte[] bytes = {1, 2, 3, 4, 5};
        buf.writeBytes(bytes);
        System.out.println("写入的bytes为====================>" +Arrays.toString(bytes));
        System.out.println("写入一段内容后ByteBuf为===========>" +buf.toString());
        //System.out.println("2.ByteBuf中的内容为===============>" + Arrays.toString(buf.array()) + "
");

        //3.读取一段内容
        byte b1 =buf.readByte();
        byte b2 =buf.readByte();
        System.out.println("读取的bytes为====================>" + Arrays.toString(new byte[]{b1, b2}));
        System.out.println("读取一段内容后ByteBuf为===========>" +buf.toString());
       //System.out.println("3.ByteBuf中的内容为===============>" + Arrays.toString(buf.array()) + "
");

        //4.将读取的内容丢弃
buf.discardReadBytes();
        System.out.println("将读取的内容丢弃后ByteBuf为========>" +buf.toString());
        //System.out.println("4.ByteBuf中的内容为===============>" + Arrays.toString(buf.array()) + "
");

        //5.清空读写指针
buf.clear();
        System.out.println("将读写指针清空后ByteBuf为==========>" +buf.toString());
        //System.out.println("5.ByteBuf中的内容为===============>" + Arrays.toString(buf.array()) + "
");

        //6.再次写入一段内容,比第一段内容少
        byte[] bytes2 = {1, 2, 3};
        buf.writeBytes(bytes2);
        System.out.println("写入的bytes为====================>" +Arrays.toString(bytes2));
        System.out.println("写入一段内容后ByteBuf为===========>" +buf.toString());
       //System.out.println("6.ByteBuf中的内容为===============>" + Arrays.toString(buf.array()) + "
");

        //7.将ByteBuf清零
        buf.setZero(0, buf.capacity());
        System.out.println("将内容清零后ByteBuf为==============>" +buf.toString());
       //System.out.println("7.ByteBuf中的内容为================>" + Arrays.toString(buf.array()) + "
");

        //8.再次写入一段超过容量的内容
        byte[] bytes3 = {1, 2, 3, 4, 5, 6, 7, 8, 9, 10, 11};
        buf.writeBytes(bytes3);
        System.out.println("写入的bytes为====================>" +Arrays.toString(bytes3));
        System.out.println("写入一段内容后ByteBuf为===========>" +buf.toString());
       //System.out.println("8.ByteBuf中的内容为===============>" + Arrays.toString(buf.array()) + "
");
        //随机访问索引 getByte
        //顺序读 read*
        //顺序写 write*
        //清除已读内容 discardReadBytes
        //清除缓冲区 clear
        //搜索操作
        //标记和重置
        //完整代码示例:参考
        //搜索操作 读取指定位置 buf.getByte(1);
        //
}

}
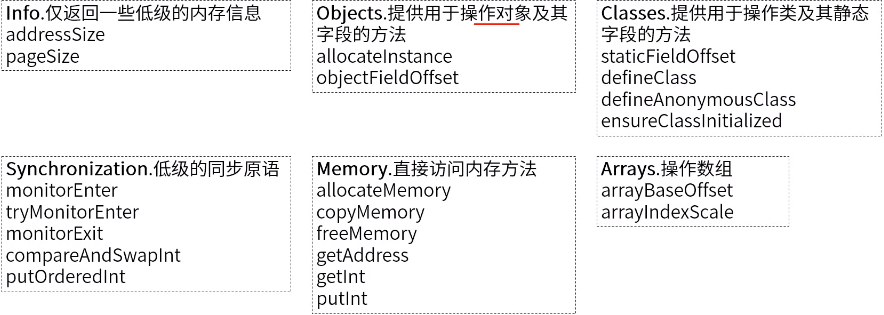
Unsafe的实现

内存复用
PooledByteBuf对象、内存复用


3.零拷贝机制
Netty的零拷贝机制,是一种应用层的实现。和底层的JVM、操作系统内存机制并无过多关联。
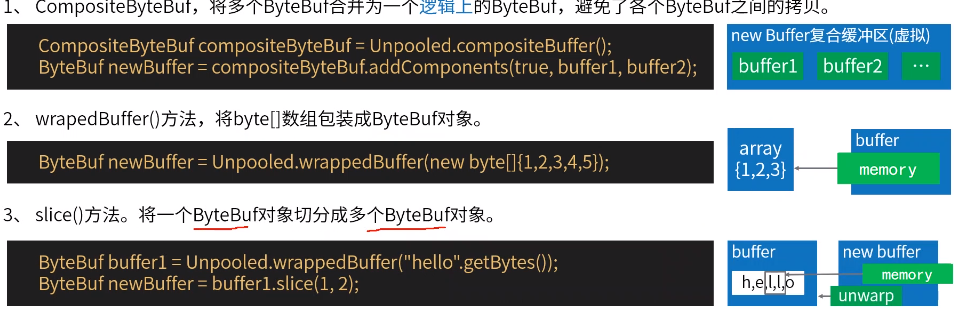
代码示例
/*** 零拷贝示例
 */
public classZeroCopyTest {
    @org.junit.Test
    public voidwrapTest() {
        byte[] arr = {1, 2, 3, 4, 5};
        ByteBuf byteBuf =Unpooled.wrappedBuffer(arr);
        System.out.println(byteBuf.getByte(4));
        arr[4] = 6;
        System.out.println(byteBuf.getByte(4));
    } // java数组转为buf 5 arr修改为6后,byteBuf也变为6,说明两者用的是相同的数据,零拷贝

    @org.junit.Test
    public voidsliceTest() {
        ByteBuf buffer1 = Unpooled.wrappedBuffer("hello".getBytes());
        ByteBuf newBuffer = buffer1.slice(1, 2);
        newBuffer.unwrap();
        System.out.println(newBuffer.toString());
    } // 拆分。不会动原来的buf,还保留原来buf的地址

    @org.junit.Test
    public voidcompositeTest() {
        ByteBuf buffer1 = Unpooled.buffer(3);
        buffer1.writeByte(1);
        ByteBuf buffer2 = Unpooled.buffer(3);
        buffer2.writeByte(4);
        CompositeByteBuf compositeByteBuf =Unpooled.compositeBuffer();
        CompositeByteBuf newBuffer = compositeByteBuf.addComponents(true, buffer1, buffer2);
        System.out.println(newBuffer);
    } // 合并。还保留原来buf的信息

}