摘要:
在一个vue页面中有时候内容会很多,为了方便编写查看,可以分为多个子组件,最后在父组件中引入对应的子组件即可。下面这个是父子组件通信中的一个具体实例:新增、修改弹框。cancel(){this.$emit}3.在父组件中通过定义的方法接收到子组件传递的参数,即可。cancels{console.log;}完整代码:新增˂el-table-columnprop=
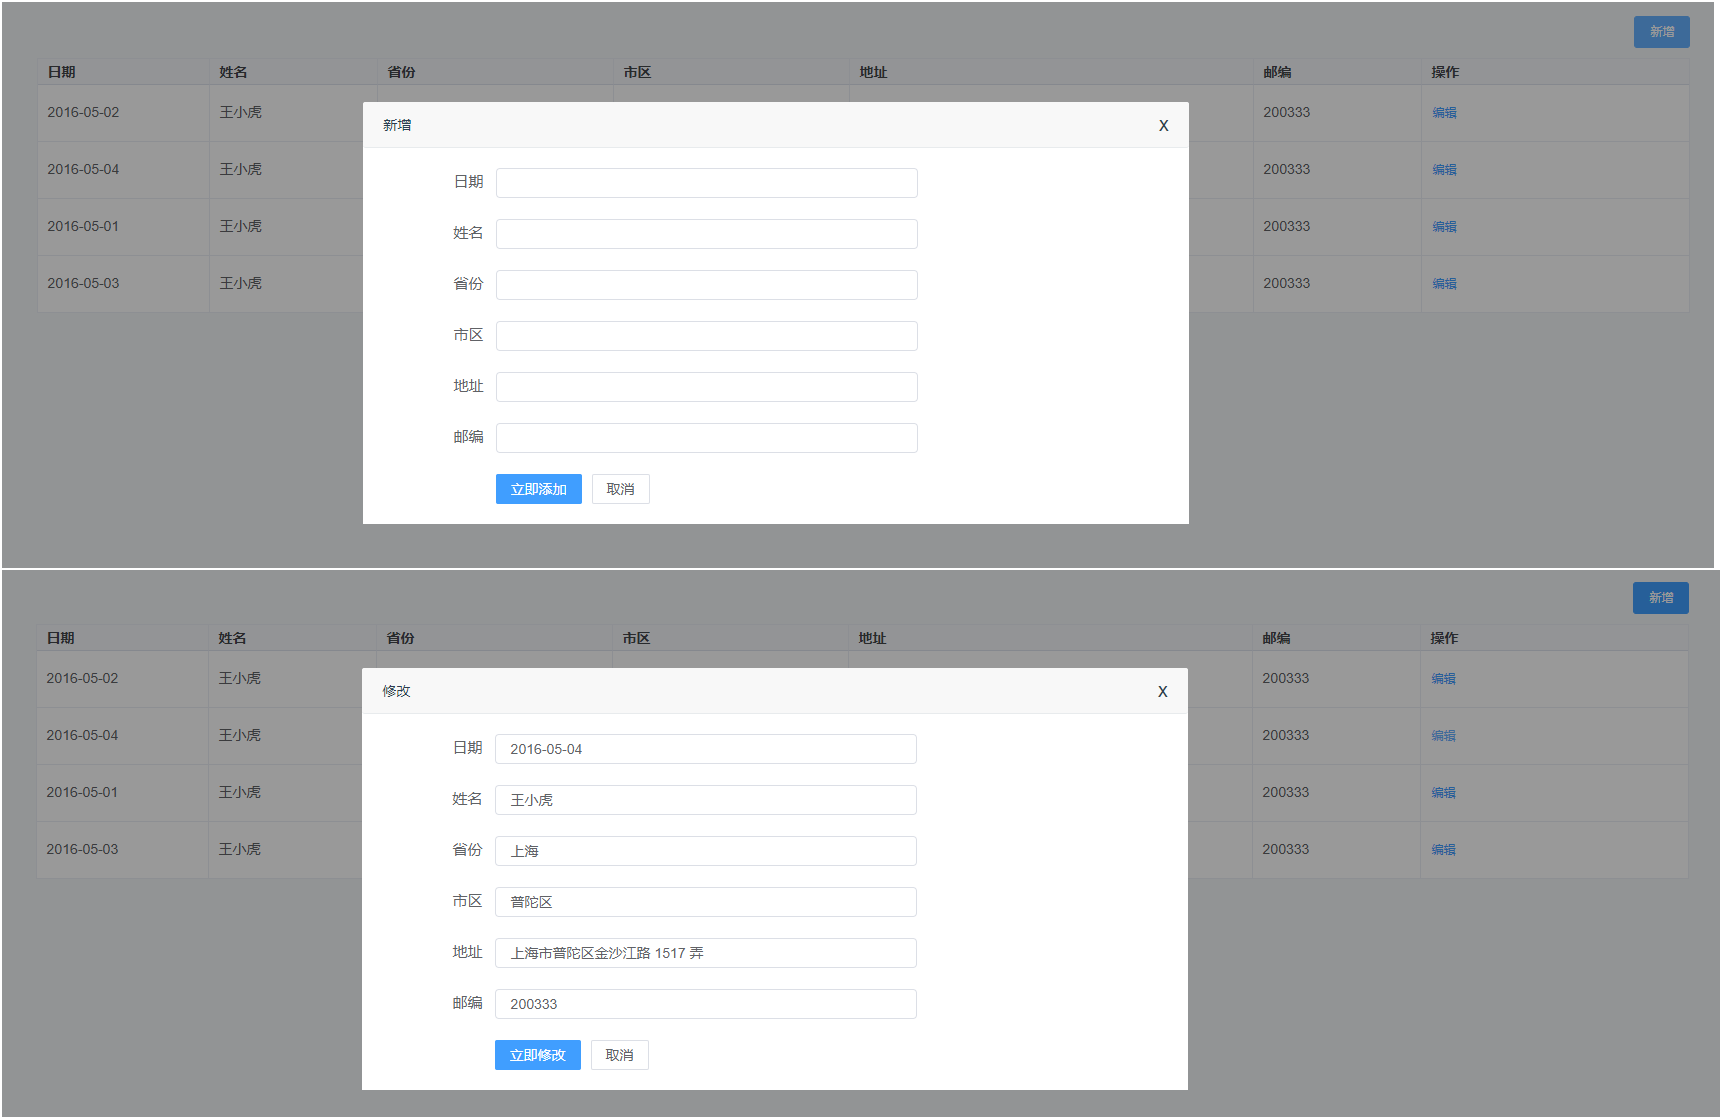
在一个vue页面中有时候内容会很多,为了方便编写查看,可以分为多个子组件,最后在父组件中引入对应的子组件即可。
下面这个是父子组件通信中的一个具体实例:新增、修改弹框。子组件中主要写了关于新增、修改的弹框,
子组件:
1.弹框:
<div class="newDocuments">
  <div class="newDocuments_center">
    <div class="center_header">
      <div class="header_left">{{ headers }}</div>
      <div class="header_right">
        <div @click="cancel" style="font-size:20px;">x</div>
      </div>
    </div>
    <div class="center_center">
      <el-form :model="form" :rules="rules" ref="form" label-  class="demo-ruleForm">
        <el-form-item label="日期" style="422px;height:51px;">
          <el-input v-model="form.date" autocomplete="off"></el-input>
        </el-form-item>
        <el-form-item label="姓名" style="422px;height:51px;">
          <el-input v-model="form.name" autocomplete="off"></el-input>
        </el-form-item>
        <el-form-item label="省份" style="422px;height:51px;">
          <el-input v-model="form.province" autocomplete="off"></el-input>
        </el-form-item>
        <el-form-item label="市区" style="422px;height:51px;">
          <el-input v-model="form.city" autocomplete="off"></el-input>
        </el-form-item>
        <el-form-item label="地址" style="422px;height:51px;">
          <el-input v-model="form.address" autocomplete="off"></el-input>
        </el-form-item>
        <el-form-item label="邮编" style="422px;height:51px;">
          <el-input v-model="form.zip" autocomplete="off"></el-input>
        </el-form-item>
        <el-form-item>
          <el-button type="primary" @click="submitForm('form')" v-if="headers == '新增'">立即添加</el-button>
          <el-button type="primary" @click="submitForm('form')" v-else>立即修改</el-button>
          <el-button @click="cancel">取消</el-button>
        </el-form-item>
      </el-form>
    </div>
  </div>
</div>
2.接收的数据以及需要依靠父组件的点击事件
props:["modify", "headers"],

cancel() {
  this.$emit("cancel")
}
3.新增、修改时弹框显示的内容需要进行监听
watch: {
  modify: function(){
    this.form = this.modify;
  }
},
父组件:
1.引入子组件:
<children v-show="addTo" @cancel="cancels" :modify='modify' :headers='headers'></children>

import children from './father/children'

components: {
  children,
},
2.定义需要传给子组件的数据:
modify: '',
headers: '',
3.点击新增、修改按钮时传对应的数据给子组件:
addData(){
  this.addTo = true;
  this.modify = {
    date: '',
    name: '',
    province: '',
    city: '',
    address: '',
    zip: '',
  };
  this.headers = '新增';
},
editData(row){
  this.addTo = true;
  this.modify = row;
  this.headers = '修改';
},
cancels(){
  this.addTo = false;
}
注意:
1.父子组件之间可以双向传值,父组件向子组件传值使用props,子组件向父组件传值需要依赖事件,然后通过emit传递。
2.在子组件中定义事件以及需要传递的值:
emit中的cancel为子组件向父组件传值定义的方法名称,后面可以加需要传递的值,只是在该例子中不需要传值。
cancel() {
  this.$emit("cancel", value)
}
3.在父组件中通过定义的方法接收到子组件传递的参数,即可。
cancels(data){
  console.log(data);
}
完整代码:


<template>
  <div class="contrainer">
    <children v-show="addTo" @cancel="cancels" :modify='modify' :headers='headers'></children>
    <div class="contrainer_top">
      <el-button @click="addData" type="primary" size="small">新增</el-button>
    </div>
    <div class="contrainer_bottom">
      <el-table
        :data="tableData"border
        style=" 100%">
        <el-table-column
          prop="date"label="日期"min-width="50">
        </el-table-column>
        <el-table-column
          prop="name"label="姓名"min-width="50">
        </el-table-column>
        <el-table-column
          prop="province"label="省份"min-width="70">
        </el-table-column>
        <el-table-column
          prop="city"label="市区"min-width="70">
        </el-table-column>
        <el-table-column
          prop="address"label="地址"min-width="120">
        </el-table-column>
        <el-table-column
          prop="zip"label="邮编"min-width="50">
        </el-table-column>
        <el-table-column
          label="操作">
          <template slot-scope="scope">
            <el-button @click="editData(scope.row)" type="text" size="small">编辑</el-button>
          </template>
        </el-table-column>
      </el-table>
    </div>

  </div>
</template>

<script>import children from './father/children'export default{
  name: 'father',
  components: {
    children,
  },
  data () {
    return{
      tableData: [{
        date: '2016-05-02',
        name: '王小虎',
        province: '上海',
        city: '普陀区',
        address: '上海市普陀区金沙江路 1518 弄',
        zip: 200333}, {
        date: '2016-05-04',
        name: '王小虎',
        province: '上海',
        city: '普陀区',
        address: '上海市普陀区金沙江路 1517 弄',
        zip: 200333}, {
        date: '2016-05-01',
        name: '王小虎',
        province: '上海',
        city: '普陀区',
        address: '上海市普陀区金沙江路 1519 弄',
        zip: 200333}, {
        date: '2016-05-03',
        name: '王小虎',
        province: '上海',
        city: '普陀区',
        address: '上海市普陀区金沙江路 1516 弄',
        zip: 200333}],
      addTo: false,
      modify: '',
      headers: '',

    }
  },
  methods: {
    addData(){
      this.addTo = true;
      this.modify ={
        date: '',
        name: '',
        province: '',
        city: '',
        address: '',
        zip: '',
      };
      this.headers = '新增';
    },
    editData(row){
      this.addTo = true;
      this.modify =row;
      this.headers = '修改';
    },
    cancels(){
      this.addTo = false;
    }

  },

}
</script>

<!-- Add "scoped" attribute to limit CSS to this component only -->
<style lang="scss" scoped>.contrainer{
  .contrainer_top{
    display: flex;
    justify-content: flex-end;
    margin-bottom: 10px;
  }
  .contrainer_bottom{
    /deep/ .el-table .cell {
      -webkit-box-sizing: border-box;
      box-sizing: border-box;
      white-space: normal;
      word-break: break-all;
      line-height: 15px;
    }
    /deep/ .el-table thead th {
      padding: 4px 0;
      font-size: 14px;
      color: #43464a;
      background-color: #f5f6fa !important;
      border-bottom: 1px solid #dee2ed;
      border-right: 1px solid #ebeef5;
    }
    /deep/ .el-table td, .el-table th.is-leaf {
      border-bottom: 1px solid #EBEEF5;
    }
    .el-table th, .el-table td {
      padding: 10px 0;
    }
  }
}
</style><template>
<div class="newDocuments">
<div class="newDocuments_center">
<div class="center_header">
<div class="header_left">{{ headers }}</div>
<div class="header_right">
<div @click="cancel" style="font-size:20px;">x</div>
</div>
</div>
<div class="center_center">
<el-form :model="form" :rules="rules" ref="form" label- class="demo-ruleForm">
<el-form-item label="日期" style="422px;height:51px;">
<el-input v-model="form.date" autocomplete="off"></el-input>
</el-form-item>
<el-form-item label="姓名" style="422px;height:51px;">
<el-input v-model="form.name" autocomplete="off"></el-input>
</el-form-item>
<el-form-item label="省份" style="422px;height:51px;">
<el-input v-model="form.province" autocomplete="off"></el-input>
</el-form-item>
<el-form-item label="市区" style="422px;height:51px;">
<el-input v-model="form.city" autocomplete="off"></el-input>
</el-form-item>
<el-form-item label="地址" style="422px;height:51px;">
<el-input v-model="form.address" autocomplete="off"></el-input>
</el-form-item>
<el-form-item label="邮编" style="422px;height:51px;">
<el-input v-model="form.zip" autocomplete="off"></el-input>
</el-form-item>
<el-form-item>
<el-button type="primary" @click="submitForm('form')" v-if="headers == '新增'">立即添加</el-button>
<el-button type="primary" @click="submitForm('form')" v-else>立即修改</el-button>
<el-button @click="cancel">取消</el-button>
</el-form-item>
</el-form>
</div>
</div>
</div>
</template>
<script>
export default{
props:["modify", "headers"],
components:{
},
data() {
return{
form: {
date: '',
name: '',
province: '',
city: '',
address: '',
zip: '',
},
rules: {
}
};
},
watch: {
modify: function(){
this.form = this.modify;
}
},
methods: {
submitForm(formName) {
},
cancel() {
this.$emit("cancel")
}
}
}
</script>
<style lang="scss" scoped>.newDocuments{
position: absolute;
top: 0;
left: 0;
100%;
height: 100%;
z-index: 999;
background: rgba($color: #000000, $alpha: 0.4);
//display: flex;
//align-items: center;
//justify-content: center;
min-height: 500px;
overflow: auto;
.newDocuments_center{
43%;
background: white;
border-top-right-radius: 3px;
border-top-left-radius: 3px;
position: relative;
margin: 5% auto; /*水平居中*/top: 70px; /*偏移*/transform: translateY(-50% -50%);
.center_header{
background: #f8f8f8;
height: 45px;
border-bottom: 1px solid #e7eaec;
display: flex;
align-items: center;
justify-content: space-between;
border-radius: 3px;
font-size: 14px;
.header_left{
margin-left: 20px;
}
.header_right{
margin-right: 20px;
display: flex;
align-items: center;
div{
margin-left: 10px;
cursor: pointer;
}
}
}
.center_center{
border-radius: 3px;
97%;
margin: 20px auto;
padding: 0 0 20px 0;
/deep/ .el-form-item__label {
font-size: 15px !important;
}
/deep/ .el-input__inner{
height: 30px;
line-height: 30px;
}
/deep/ .el-form-item {
margin-bottom: 12px;
}
/deep/ .el-form-item__content {
line-height: 30px;
position: relative;
font-size: 14px;
300px;
}
/deep/ .el-date-editor.el-input, .el-date-editor.el-input__inner{
300px;
line-height: 30px;
position: relative;
font-size: 14px;
}
/deep/ .el-input__icon{
line-height: 30px;
height: 30px;
}
/deep/ .el-form-item__error {
color: #f56c6c;
font-size: 12px;
line-height: 2px;
padding-top: 0px;
position: absolute;
top: 100%;
left: 0;
}
/deep/ .el-form-item {
margin-bottom: 0px;
}
/deep/ .el-form-item__content{
100%;
display: flex;
}
/deep/ .el-form-item__label{
line-height: 27px;
}
/deep/ .el-button{
padding: 7px 14px;
font-size: 14px;
border-radius: 2px;
}
/deep/ .el-form-item__label {
font-size: 15px !important;
}
}
}
}
</style>OK了。