摘要:
mongodbc#driver(驱动)介绍目前基于C#的mongodb驱动有两种,分别是官方驱动和samus驱动。第二步:构造MongodbHelper类代码如下:usingMongoDB.Driver;usingSystem;usingSystem.Collections.Generic;usingSystem.Linq;usingSystem.Text;usingSystem.Threading.Tasks;namespaceServer.DAL.DBHelper{publicsealedclassMongodbHelper{staticpublicreadonlyMongodbHelperInstance=newMongodbHelper();privateMongoDatabasedb;privateMongodbHelper(){//http://www.studyofnet.com/news/337.html//mongodb://[username:password@]host1[:port1][,host2[:port2],…options]]stringstrconn="mongodb://sa:123456@127.0.0.1:27017";stringdbName="test";MongoDB.Driver.MongoClientmongoClient=newMongoClient;MongoServerserver=mongoClient.GetServer();db=server.GetDatabase;}publicMongoDatabaseDB{get{returndb;}}publicMongoCollectionthis[stringvalue]{get{returndb.GetCollection;}}}}第三步:添加实体对象在此建立的是一个复杂person对象,如下代码:publicclassTest:BaseEntity{}publicclassPersonType:BaseEntity{publicstringCode{get;set;}publicstringDisplay{get;set;}}publicclassPerson:BaseEntity{//如果对应多个分类,则格式为:,3,34,2publicstringPersonType{get;set;}publicstringName{get;set;}publicboolSex{get;set;}publicintAge{get;set;}//默认是国际时间[MongoDB.Bson.Serialization.Attributes.BsonDateTimeOptions]publicDateTimeAddTime{get;set;}publicListAddresses{get;set;}publicListCourses{get;set;}}publicclassAddress{publicstringProvince{get;set;}publicstringCity{get;set;}}BaseEntity说明BaseEntity中放的是mongodb数据库中自动生成的_idpublicclassBaseEntity{//////字段映射,告诉mongodb这个字段在数据库中对应_id///[BsonId]//告诉mongodb这个字段在数据库中的类型是ObjectId[BsonRepresentation]publicstring_id{get;set;}}第四步:创建ApiController创建ApiController基类BaseApiControllerBaseApiController中会初始化一些变量,代码如下:publicclassBaseApiController:ApiController{publicintskip,take;publicMongoDatabasedb;publicMongoCollectioncol=null;//用于直接返回查询的jsonpublicBaseApiController{skip=GetIntRequest;take=GetIntRequest;if{take=int.MaxValue;}db=Server.DAL.DBHelper.MongodbHelper.Instance.DB;col=db.GetCollection;}publicstringGetStringRequest{returnHttpContext.Current.Request.QueryString[paramter]??
mongodb c# driver(驱动)介绍
目前基于C#的mongodb驱动有两种,分别是官方驱动(下载地址)和samus驱动(下载地址)。
本次我们只演示官方驱动的使用方法。
官方驱动文档查看
第一步:引用驱动dll
引用驱动有两种方式:
1. 根据上面的下载地址下载对应的版本,然后引用到项目中。
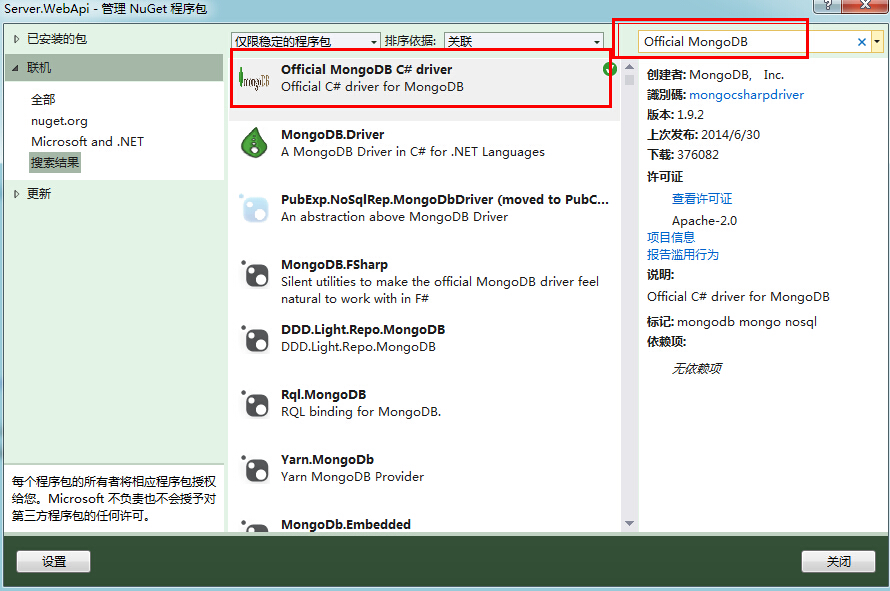
2. 在项目的引用上右击->管理NuGet程序包(首先确保安装了nuget扩展包)->联机搜索官方驱动dll(搜索条件是 “Official MongoDB”)->安装成功后会引用3个dll(MongoDB.Driver和MongoDB.Bson,Newtonsoft.Json)。
第二步:构造MongodbHelper类
代码如下:
usingMongoDB.Driver;
usingSystem;
usingSystem.Collections.Generic;
usingSystem.Linq;
usingSystem.Text;
usingSystem.Threading.Tasks;

namespaceServer.DAL.DBHelper
{
    public sealed classMongodbHelper
    {
        static public readonly MongodbHelper Instance = newMongodbHelper();
        privateMongoDatabase db;

        privateMongodbHelper()
        {
            //http://www.studyofnet.com/news/337.html
            //mongodb://[username:password@]host1[:port1][,host2[:port2],…[,hostN[:portN]]][/[database][?options]]
            string strconn = "mongodb://sa:123456@127.0.0.1:27017";
            string dbName = "test";
            MongoDB.Driver.MongoClient mongoClient = newMongoClient(strconn);
            MongoServer server =mongoClient.GetServer();
            db =server.GetDatabase(dbName);
        }

        publicMongoDatabase DB
        {
            get { returndb; }
        }

        public MongoCollection this[stringvalue]
        {
            get{
                returndb.GetCollection(value);
            }
        }

     }
}
第三步:添加实体对象
在此建立的是一个复杂person对象,如下代码:
 public classTest:BaseEntity
{
}
public classPersonType : BaseEntity
{
    public string Code { get; set; }
    public string Display { get; set; }
}
public classPerson : BaseEntity
{
    //如果对应多个分类,则格式为:,3,34,2
    public string PersonType { get; set; }
    public string Name { get; set; }
    public bool Sex { get; set; }
    public int Age { get; set; }
   //默认是国际时间
        [MongoDB.Bson.Serialization.Attributes.BsonDateTimeOptions(Kind =DateTimeKind.Local)]
    public DateTime AddTime { get; set; }
    public List<Address> Addresses { get; set; }
    public List<string> Courses { get; set; }
}

public classAddress
{
    public string Province { get; set; }
    public string City { get; set; }
}
BaseEntity说明
BaseEntity中放的是mongodb数据库中自动生成的_id(类型是ObjectId)
 public classBaseEntity
{
    /// <summary>
    ///字段映射,告诉mongodb这个字段在数据库中对应_id
    /// </summary>
[BsonId]
    //告诉mongodb这个字段在数据库中的类型是ObjectId
[BsonRepresentation(BsonType.ObjectId)]
    public string _id { get; set; }
}
第四步:创建ApiController
创建ApiController基类BaseApiController
BaseApiController中会初始化一些变量,代码如下:
 public classBaseApiController : ApiController
    {
        public intskip, take;
        publicMongoDatabase db;
        public MongoCollection col = null;//用于直接返回查询的json
        public BaseApiController(stringcollectionName)
        {
            skip = GetIntRequest("skip");
            take = GetIntRequest("take");
            if (skip == 0 && take == 0)
            {
                take = int.MaxValue;
            }

            db =Server.DAL.DBHelper.MongodbHelper.Instance.DB;
            col =db.GetCollection(collectionName);
        }
        public string GetStringRequest(stringparamter)
        {
            return HttpContext.Current.Request.QueryString[paramter] ?? "";
        }
        public int GetIntRequest(stringparamter)
        {
            string tmp = HttpContext.Current.Request.QueryString[paramter] ?? "";
            int tag = 0;
            int.TryParse(tmp, outtag);
            returntag;
        }
    }
创建TestController继承BaseApiController
我们就用TestController来演示CURD.
具体代码如下,不再做详细说明:
public classTestController : Filter.BaseApiController
{
    publicTestController()
        : base("Person")
    {
    }

    public string Post([FromBody]objectvalue)
    {
        var model = JsonConvert.DeserializeObject<Person>(value.ToString());
        model._id =ObjectId.GenerateNewId().ToString();
        try{
            col.Insert(model);
            returnmodel._id;
        }
        catch(WebException ex)
        {
            throwex;
        }
    }
    public objectGet()
    {
        try{
            IEnumerable<Person> queryable = col.AsQueryable<Person>();
            Func<Person, bool> where = null;

            //有多少条件并多少条件

            //like
            //var name = GetStringRequest("Name");
            if (!string.IsNullOrEmpty(name))
            {
                where = c =>c.Name.Contains(name);
                queryable = queryable.Where(where);
            }
            //单个条件等值查询
            var personType = GetStringRequest("personType");
            if (!string.IsNullOrEmpty(personType))
            {
                where = c => c.PersonType ==personType;
                queryable = queryable.Where(where);
            }
            //嵌套数组查询
            var course = GetStringRequest("course");
            if (!string.IsNullOrEmpty(course))
            {
                where = c =>c.Courses.Contains(course);
                queryable = queryable.Where(where);

            }
            //嵌套实体集合查询---查数量
            var address = GetStringRequest("address");
            if (!string.IsNullOrEmpty(address))
            {
                where = c => c.Addresses.Count > GetIntRequest("address");
                queryable = queryable.Where(where);

            }
            var personList = queryable.OrderByDescending(c =>c._id).Skip(skip).Take(take).ToList();
            var count =queryable.Count();

            var data = new { count = count, dataList =personList };
            returndata;
        }
        catch(WebException ex)
        {
            throwex;
        }
    }

    public Person Get(stringid)
    {
        try{
            var model = col.AsQueryable<Person>().FirstOrDefault(c => c._id ==id);
            returnmodel;
        }
        catch(WebException ex)
        {

            throwex;
        }
    }

    //部分字段修改模式,只修改需要修改的字段。缺点是只能修改单个属性,对于嵌套数组和嵌套实体集合无法修改
    public int Put(string id, [FromBody]objectvalue)
    {
        try{
            var query = new QueryDocument { { "_id", ObjectId.Parse(id) } };
            var dicData = JsonConvert.DeserializeObject<Dictionary<string, object>>(value.ToString());
            var update = new UpdateDocument { { "$set", newQueryDocument(dicData) } };
            col.Update(query, update);
            return 1;
        }
        catch(WebException ex)
        {
            throwex;
        }

    }

    //完全修改模式,先查后改,支持任意类型的对象的修改。缺点是需要先查询一次
    public int Put([FromBody]objectvalue)
    {
        try{
            var model = JsonConvert.DeserializeObject<Person>(value.ToString());
            col.Save(model);
            return 1;
        }
        catch(WebException ex)
        {

            throwex;
        }

    }
    public void Delete(stringid)
    {
        try{
            var query = new QueryDocument { { "_id", ObjectId.Parse(id) } };
            col.Remove(query);
        }
        catch(WebException ex)
        {

            throwex;
        }
    }
}
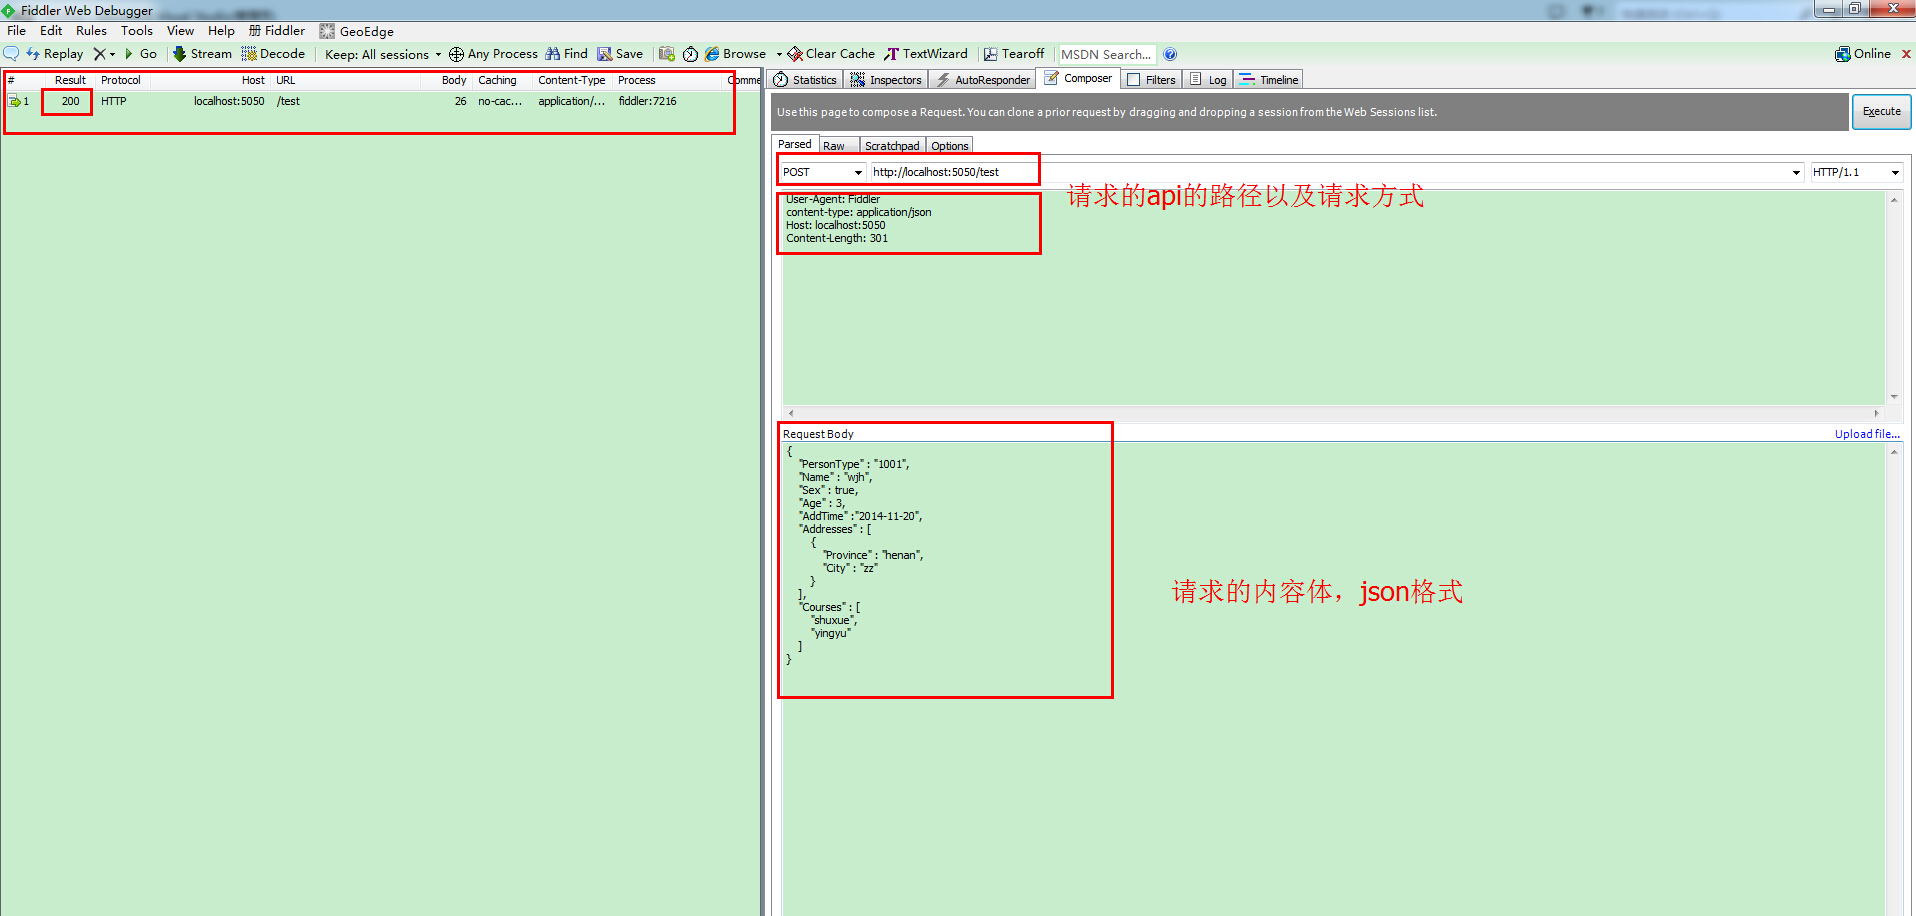
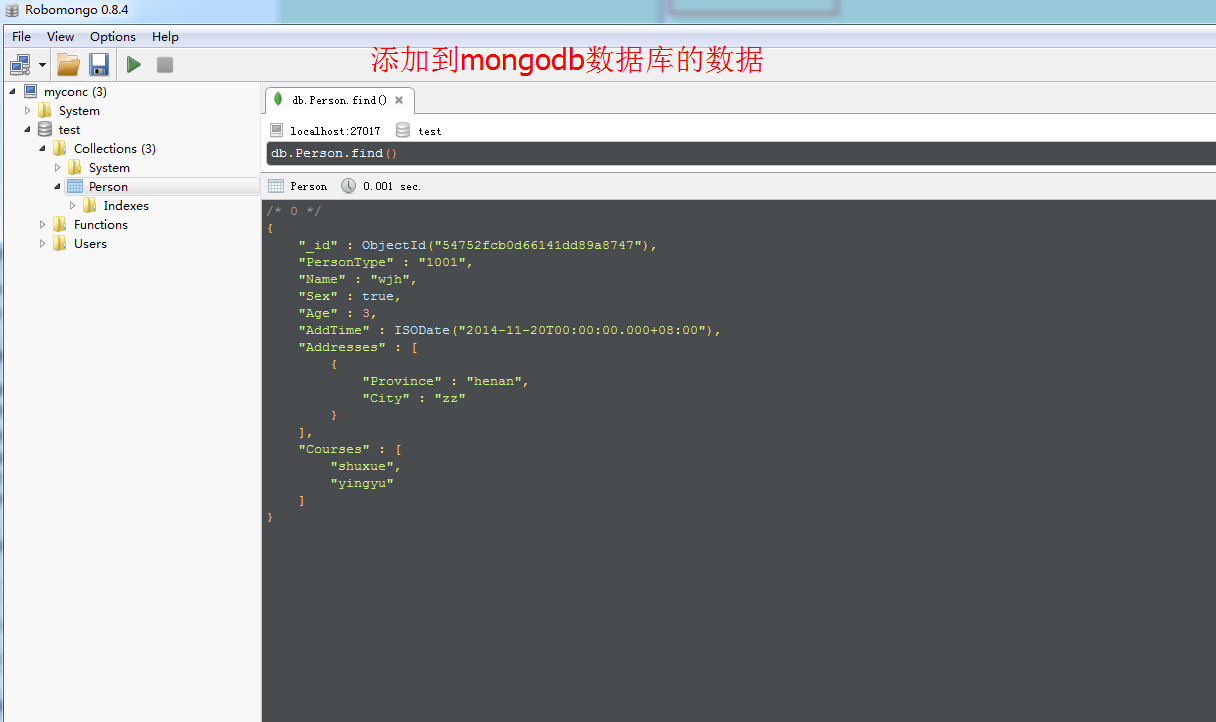
第五步:CURD演示
在这里我们使用一个工具Fiddler2演示。
添加