3台虚拟机都是20G磁盘,用着用着发现不够了,先扩容了一台,各种百度...各种坑,每个人的情况不一样,发现不一样的地方最后立即百度查看。一台扩容成功后,打算再扩容一台,目的是留一个记录。(我是用xshell超级用户链接的的虚拟机)
扩容大致分为3步:1.外部设置;2.设置分区;3.重启;4挂载;(挂载过程中解决了物理卷、卷组、逻辑卷、格式化问题,如果挂载失败,则可以一次解决排除这些问题)
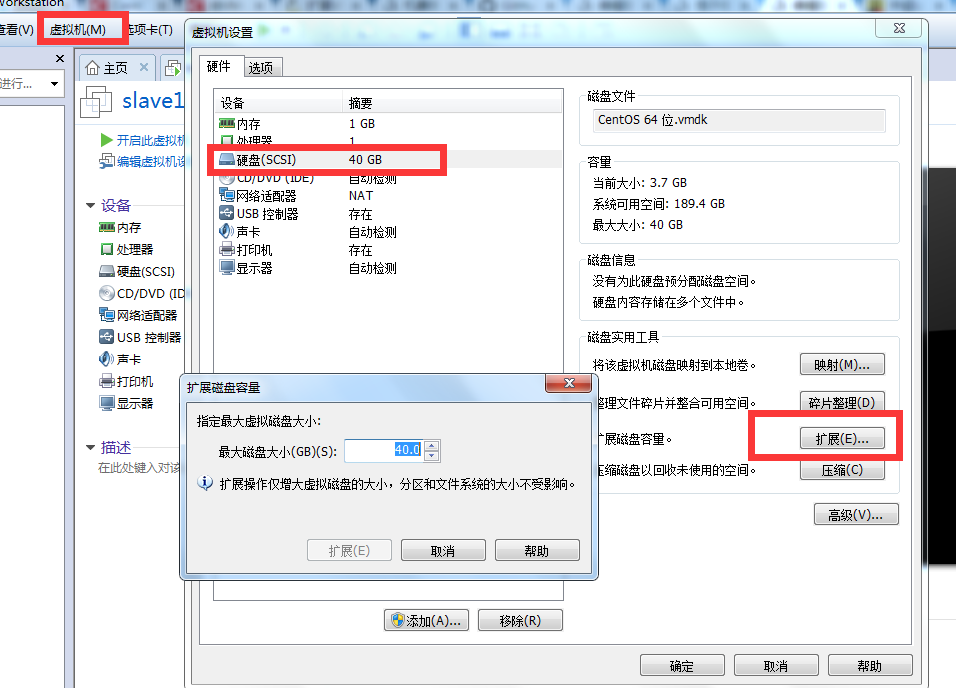
1.关闭虚拟机(不是挂起),点击“虚拟机/设置”,选择“硬盘”,扩容至40G

2.启动虚拟机,root用户进入linux系统,添加新的分区
2.1查看当前分区状况
[root@slave1 /root]$ fdisk -l
Disk /dev/sda: 42.9 GB, 42949672960 bytes
255 heads, 63 sectors/track, 5221 cylinders
Units = cylinders of 16065 * 512 = 8225280 bytes
Sector size (logical/physical): 512 bytes / 512 bytes
I/O size (minimum/optimal): 512 bytes / 512 bytes
Disk identifier: 0x000381a8
Device Boot Start End Blocks Id System
/dev/sda1 * 1 39 307200 83 Linux
Partition 1 does not end on cylinder boundary.
/dev/sda2 39 2358 18631680 83 Linux
/dev/sda3 2358 2611 2031616 82 Linux swap / Solaris
当前最大分区为sda3,新创建的分区为sda4。(请留意加重部分)
2.2输入以下命令
[root@slave1 /root]$ fdisk /dev/sda
WARNING: DOS-compatible mode is deprecated. It's strongly recommended to
switch off the mode (command 'c') and change display units to
sectors (command 'u').
Command (m for help): m #2.3命令行提示下输入【m】
Command action
a toggle a bootable flag
b edit bsd disklabel
c toggle the dos compatibility flag
d delete a partition
l list known partition types
m print this menu
n add a new partition
o create a new empty DOS partition table
p print the partition table
q quit without saving changes
s create a new empty Sun disklabel
t change a partition's system id
u change display/entry units
v verify the partition table
w write table to disk and exit
x extra functionality (experts only)
Command (m for help): n #输入命令【n】添加新分区
Command action
e extended
p primary partition (1-4)
p #输入命令【p】创建主分区。
Selected partition 4
First cylinder (2611-5221, default 2611): #回车
Using default value 2611
Last cylinder, +cylinders or +size{K,M,G} (2611-5221, default 5221): #回车
Using default value 5221
Command (m for help): w #输入【w】保存
The partition table has been altered!
Calling ioctl() to re-read partition table.
WARNING: Re-reading the partition table failed with error 16: Device or resource busy.
The kernel still uses the old table. The new table will be used at
the next reboot or after you run partprobe(8) or kpartx(8)
Syncing disks.
[root@slave1 /]$ mkdir disk4
[root@slave1 /]$ mount /dev/sda4 /disk4
mount: you must specify the filesystem type
挂载的时候发生了报错,看红色字体,原因可能是没有物理卷、卷组、逻辑卷、格式化引起的(4.1,4.2,4.3主要用于解决这3个问题)
4.1查看物理卷:
[root@slave1 /]$ pvs
没有输出!!!说明没有物理卷,创建的分区是sda4,这里为这个分区创建物理卷。
[root@slave1 /]$ pvcreate /dev/sda4
  Physical volume "/dev/sda4" successfully created
此时再查看物理卷,ok
[root@slave1 /]$ pvs
  PV         VG   Fmt  Attr PSize  PFree
  /dev/sda4       lvm2 a--  19.99g 19.99g
4.2查看卷组
[root@slave1 /]$ vgs
No volume groups found报错,没有,先创建卷组vgdata
[root@slave1 /]$ vgcreate vgdata /dev/sda4
Volume group "vgdata" successfully created
再次查看卷组,OK!!!
[root@slave1 /]$ vgs
  VG     #PV #LV #SN Attr   VSize  VFree
  vgdata   1   1   0 wz--n- 19.99g 15.09g
[root@slave1 /]$ vgdisplay
  --- Volume group ---
  VG Name               vgdata
  System ID
  Format                lvm2
  Metadata Areas        1
  Metadata Sequence No  2
  VG Access             read/write
  VG Status             resizable
  MAX LV                0
  Cur LV                1
  Open LV               0
  Max PV                0
  Cur PV                1
  Act PV                1
  VG Size               19.99 GiB
  PE Size               4.00 MiB
  Total PE              5118
  Alloc PE / Size       1255 / 4.90 GiB
  Free  PE / Size       3863 / 15.09 GiB
  VG UUID               f8keeP-x5yH-qdfd-9roM-hbAt-ALEI-yYG4wB
4.3查看逻辑卷
[root@slave1 /]$ lvdisplay
  No volume groups found
报错,没有,创建逻辑卷
[root@slave1 /]$ lvcreate -L4.9G vgdata -n lvolhome /dev/sda4
  Rounding up size to full physical extent 4.90 GiB
  Logical volume "lvolhome" created
查看创建结果,OK!!!
[root@slave1 /]$ lvdisplay
  --- Logical volume ---
  LV Path                /dev/vgdata/lvolhome
  LV Name                lvolhome
  VG Name                vgdata
  LV UUID                dI2lMQ-sayc-XGlG-xa9I-USfC-97kt-0Kbt6k
  LV Write Access        read/write
  LV Creation host, time slave1, 2018-04-27 23:23:00 -0700
  LV Status              available
  # open                 0
  LV Size                4.90 GiB
  Current LE             1255
  Segments               1
  Allocation             inherit
  Read ahead sectors     auto
  - currently set to     256
  Block device           253:0
4.4格式化磁盘
[root@slave1 /]$ mkfs.ext4 /dev/sda4
mke2fs 1.41.12 (17-May-2010)
/dev/sda4 is apparently in use by the system; will not make a filesystem here!
报错、手动移除DM管理
[root@slave1 /]$ dmsetup status
vgdata-lvolhome: 0 10280960 linear
[root@slave1 /]$ dmsetup remove_all
[root@slave1 /]$ dmsetup status
No devices found
重新格式化,OK!!!
[root@slave1 /]$ mkfs.ext4 /dev/sda4
mke2fs 1.41.12 (17-May-2010)
Filesystem label=
OS type: Linux
Block size=4096 (log=2)
Fragment size=4096 (log=2)
Stride=0 blocks, Stripe width=0 blocks
1310720 inodes, 5241540 blocks
262077 blocks (5.00%) reserved for the super user
First data block=0
Maximum filesystem blocks=4294967296
160 block groups
32768 blocks per group, 32768 fragments per group
8192 inodes per group
Superblock backups stored on blocks:
    32768, 98304, 163840, 229376, 294912, 819200, 884736, 1605632, 2654208,
    4096000

Writing inode tables: done
Creating journal (32768 blocks): done
Writing superblocks and filesystem accounting information: done

This filesystem will be automatically checked every 30 mounts or
180 days, whichever comes first.  Use tune2fs -c or -i to override.
重新挂载,没有报错,mount成功,磁盘扩容成功
[root@slave1 /]$ mount /dev/sda4 /disk4挂载前:
[root@slave1 /root]$ df -lh
Filesystem      Size  Used Avail Use% Mounted on
/dev/sda2        18G  3.0G   14G  18% /
tmpfs           491M   72K  491M   1% /dev/shm
/dev/sda1       291M   34M  242M  13% /boot
挂载后:
Filesystem      Size  Used Avail Use% Mounted on
/dev/sda2        18G  3.1G   14G  19% /
tmpfs           491M   72K  491M   1% /dev/shm
/dev/sda1       291M   34M  242M  13% /boot
/dev/sda4        20G  172M   19G   1% /disk4