摘要:
事件{worker_connections1024;access_log/var/log/nginx/access.logmain;tcp_nodelayon;default_typeapplication/octet流;location/{}error_page404/404.html;
Nginx的基本功能
1.静态资源的web服务器
2.http协议反向代理服务器
3.tcp/udp协议的请求转发


安装nginx
yum install epel-release
yum install nginx
systemctl start nginx

#查看nginx帮助
[root@localhost ~]# nginx -h
nginx version: nginx/1.12.2

检查配置文件语法
[root@localhost ~]# nginx -t
nginx: the configuration file /etc/nginx/nginx.conf syntax is ok
nginx: configuration file /etc/nginx/nginx.conf test is successful
Nginx配置文件管理
主配置文件结构: 四大配置段
主配置段即全局配置段,对http,mail,stream都有效
每个段负责一种功能配置,不能把不同的配置段和不同功能混合配置 如 http配置段就只能配置和http协议相关配置而不能配置mail和stream的信息
user nginx;
worker_processes auto;
error_log /var/log/nginx/error.log;
pid /run/nginx.pid;

# Load dynamic modules. See /usr/share/nginx/README.dynamic.
include /usr/share/nginx/modules/*.conf;

events {
    worker_connections 1024;
}
http配置段 http/https协议相关配置
http {
    log_format  main  '$remote_addr - $remote_user [$time_local] "$request" '
                      '$status $body_bytes_sent "$http_referer" '
                      '"$http_user_agent" "$http_x_forwarded_for"';

    access_log  /var/log/nginx/access.log  main;

    sendfile            on;
    tcp_nopush          on;
    tcp_nodelay         on;
    keepalive_timeout   65;
    types_hash_max_size 2048;

    include             /etc/nginx/mime.types;
    default_type        application/octet-stream;

    # Load modular configuration files from the /etc/nginx/conf.d directory.
    # See http://nginx.org/en/docs/ngx_core_module.html#include
    # for more information.
    include /etc/nginx/conf.d/*.conf;

    server {
        listen       80 default_server;
        listen       [::]:80 default_server;
        server_name  _;
        root         /usr/share/nginx/html;

        # Load configuration files for the default server block.
        include /etc/nginx/default.d/*.conf;

        location / {
        }

        error_page 404 /404.html;
            location = /40x.html {
        }

        error_page 500 502 503 504 /50x.html;
            location = /50x.html {
        }
    }
}
mail配置段 mail协议相关配置段
mail
  {

       mail 协议相关配置段

} stream配置段 stream服务器相关配置段
stream
  {
     stream 服务器相关配置段

} http协议相关配置
 #nginx对配置文件的配置项目所处的位置要求比较严格,有严格的嵌套关系
 # for more information.
   http{
   #如果需要添加自定义虚拟主机配置,必须在此处指定目录
   #因为server必须位于http{}里面
   include /etc/nginx/conf.d/*.conf;
   include /etc/nginx/conf.d/vhosts/*.conf;
    server {
        listen       80 default_server;
        listen       [::]:80 default_server;
        server_name  _;
        root         /usr/share/nginx/html;

        # Load configuration files for the default server block.
        #此处不能添加自定义虚拟主机配置文件 这里添加的是对默认虚拟主机的配置
        #server{}中不能再添加server{} 否则会报语法错误
        include /etc/nginx/default.d/*.conf;

        location / {
        }
  }
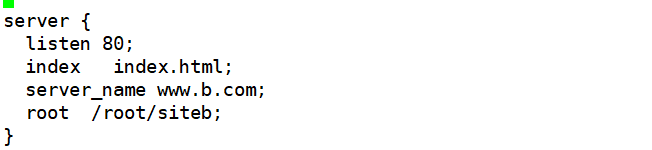
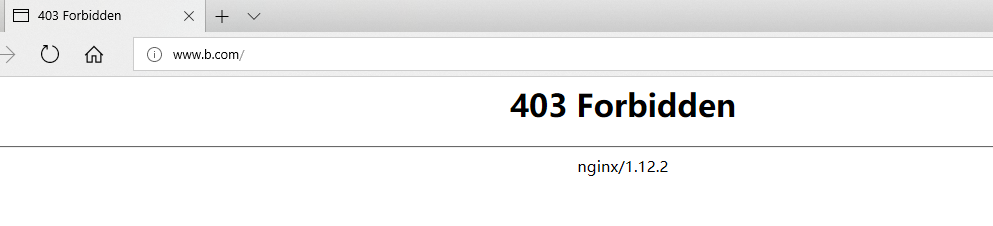
nginx的虚拟主机根目录不能指向/root目录,必须在nginx用户有权限读取的目录
错误示例:
正确示例:
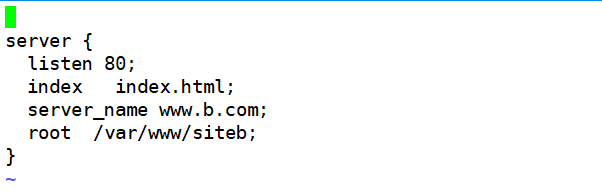

mkdir /etc/nginx/conf.d/vhosts
[root@localhost vhosts]# ls
  a.conf  b.conf  c.conf
[root@localhost vhosts]# vi a.conf
 server {
        listen       80;
        server_name  www.a.com;
        root         /var/www/sitea;
        index       index.html;
 }
[root@localhost vhosts]# vi b.conf
server {
  listen 80;
  index   index.html;
  server_name www.b.com;
  root  /var/www/siteb;
}
[root@localhost vhosts]# nginx -s reload

[root@localhost www]# pwd
/var/www
[root@localhost www]# ls
sitea  siteb  sitec
[root@localhost www]# cd sitea
[root@localhost sitea]# ls
index.html
location可以定义匹配到的某个资源位置,针对这个位置做单独的处理
 server {
        listen       80;
        server_name  www.a.com;
        root         /var/www/sitea;
        index       index.html;
        location /news {
           root /var/www/siteb/;
           #这里表示访问www.a.com/news的时候跳转到/www/siteb/news/index.html 并不是直接访问siteb目录下的index.html siteb目录下必须存在news目录 否则会提示404
        }
       location /news {
        alias /var/www/siteb/;
        #访问www.a.com/news的时候跳转到/www/siteb/index.html
      }
 }

 location /images/
      {
         如果uri不存在就用default.gif代替返回
         try_files $uri   /images/default.gif;
      }
hash运算设置网站上传目录
[root@localhost ~]# sha1sum anaconda-ks.cfg
fe9da4faa341470772d182a1e3f42b288ce43f9a  anaconda-ks.cfg
[root@localhost ~]# mkdir a/9f/43/useruploadfile
[root@localhost ~]# echo 16*256*256 | bc
1048576
通过对上传的文件名进行哈希运算得到hash值,hash值是一串16进制的字符串.每个字符所占的范围是0-f16种可能,所以如果文件目录设计模式为1-2-2.代表取最后一个字符作为第一级总目录名称,取倒数2和3个字符作为二级目录名称,取倒数4和5个字符作为三级目录名称,总共可以生成100多万的目录组合.每个文件夹存放100个文件就可以存储上亿个文件.
因为文件系统查找文件是通过查找inode表来实现文件定位的,如果把上亿个文件都存储在同一个目录将会大大的降低文件查找效率,所以采取hash值为文件目录的方式会大大提高文件查找效率.
网站压力性能测试
[root@localhost ~]# yum install httpd-tools
[root@localhost ~]# ab -c 200 -n 5000 http://www.a.com
ab: invalid URL  #不能只写http://www.a.com
Usage: ab [options] [http[s]://]hostname[:port]/path
[root@localhost ~]# ab -c 100 -n 2000 http://www.a.com/index.html
Nginx动态增加编译模块
[root@hz-ds-itssjjd-199-136-45 ~]# nginx -V
nginx version: nginx/1.14.0
built by gcc 4.4.7 20120313 (Red Hat 4.4.7-23) (GCC)
built with OpenSSL 1.0.1e-fips 11 Feb 2013
TLS SNI support enabled
configure arguments: --prefix=/usr/local/nginx --with-stream --with-http_stub_status_module --with-http_ssl_module --with-http_realip_module --with-http_gzip_static_module --with-pcre=/usr/local/src/pcre-8.41 --with-zlib=/usr/local/src/zlib-1.2.11

在nginx源码的目录下执行
cd /usr/local/src/nginx
./configure --prefix=/usr/local/nginx --with-stream --with-http_stub_status_module --with-http_ssl_module --with-http_realip_module --with-http_gzip_static_module  --with-pcre=/usr/local/src/pcre-8.41 --with-zlib=/usr/local/src/zlib-1.2.11 --add-module=/opt/tools/lua-nginx-module-master

[root@hz-ds-itssjjd-199-136-45 nginx-1.14.0]# ls
auto  CHANGES  CHANGES.ru  conf  configure  contrib  html  LICENSE  Makefile  man  objs  objs2  README  src
[root@hz-ds-itssjjd-199-136-45 nginx-1.14.0]# pwd
/usr/local/src/nginx-1.14.0
[root@hz-ds-itssjjd-199-136-45 nginx-1.14.0]# cd objs
[root@hz-ds-itssjjd-199-136-45 objs]# ls
addon  autoconf.err  Makefile  nginx  nginx.8  ngx_auto_config.h  ngx_auto_headers.h  ngx_modules.c  ngx_modules.o  src

把objs目录下的nginx拷贝到nginx之前安装好的目录下 替换到原来的二进制文件