1.1 Flume定义
Flume是Cloudera提供的一个高可用、高可靠的分布式的海量日志采集、聚合和传输的系统。
1.2 Flume基础机构

Agent
Agent是一个JVM进程,它以事件的形式将数据从源头送至目的。
Agent主要由三个部分组成:Source、Channel、Sink
Source
Source是负责接收数据到Flume Agent的组件。Source组件可以处理各种类型、各种格式的日志数据,包括avro、thrift、exec、jms、spooling directory、netcat、sequence generator、syslog、http、legacy。
Channel
Channel是位于Source和Sink之间的缓冲区。因此,Channel允许Source和Sink运作在不同的速率上。Channel是线程安全的,可以同时处理几个Source的写入操作和几个Sink的读取操作。
Flume自带两种Channel:Memory Channel和File Channel 以及 Kafka Channel。
Memory Channel是内存中的队列。
Memory Channel在不需要关系数据丢失的情景下适用。如果需要关心数据丢失,那么Memory Channel就不应该使用,程序死亡、机器宕机或者重启都会导致数据丢失。
File Channel
File Channel将所有事件写到磁盘。所以在程序关闭或机器宕机的情况下不会丢失数据。
Sink
Sink不断地轮询Channel中的事件且批量地移除它们,并将这些事件批量写入到存储或索引系统、或者被发送到另一个Flume Agent。
Sink组件目的地包括:hdfs、logger、avro、thrift、ipc、file、HBase、solr、自定义组件
Event
传输单元,Flume数据传输的基本单元,以Event的形式将数据从源头送至目的地。
Event由Header和Body两部分组成,Header用来存放该event的一些属性,为K-V结构,Body用来存放该条数据,形式为字节数组。

2.1 安装部署
官网
安装部署
将下载文件解压到
opt/software目录下将
$FLUME_HOME/conf下的flume-env.sh.template文件修改为flume-env.sh,并配置其中的JAVA_HOME属性
2.2 入门案例
2.2.1 监控端口数据官方案例:netcat-flume-logger.conf
可以参考如下官方案例说明:
需求
使用Flume监听一个端口,收集该端口数据,并打印到控制台

配置文件
安装netcat工具:
sudo yum install nc -y检查44444端口是否被占用:
netstat -unltp | grep 44444创建Flume Agent配置文件 netcat-flume-logger.conf
在$FLUME_HOME创建job文件夹:
mkdir $FLUME_HOME/job在job文件夹下创建Flume Agent配置文件
netcat-flume-logger.conf# Name the components of this agent # a1:表示agent的名称 a1.sources=r1 # r1:表示a1的source名称 a1.sinks=k1 # k1:表示a1的sink名称 a1.channels=c1 # c1:表示c1的channel名称 #Discribe/Configure the source a1.sources.r1.type=netcat # 表示a1的输入源类型为netcat类型 a1.sources.r1.bind=localhost # 表示a1的监听主机 a1.sources.r1.port=44444 # 表示a1的监听端口号 #Discribe the sink a1.sinks.k1.type=logger # 表示a1的输出目的地是控制台logger类型 #Use a channel which buffers events in memory a1.channels.c1.type=memory # 表示a1的channel类型是memory内存型 a1.channels.c1.capacity=1000 # 表示a1的channel总容量为1000个event a1.channels.c1.transactionCapacity=100 # 表示a1的channel传输时收集到了100条event以后再去提交事务 #Bind the source and sink to the channel a1.sources.r1.channels=c1 # 表示将source和channel关联 # 注意a1.sinks.k1.channel环节的channel,不能写成channels,应为channel与sink的关系是一对多(即 1:n) a1.sinks.k1.channel=c1 # 表示将sink和channel关联
测试
开启服务端
# 方式一 [nuochengze@pc001 job]$ flume-ng agent --conf conf --conf-file $FLUME_HOME/job/netcat-flume-logger.conf --name a1 -Dflume.root.logger=INFO,console # 方式二(简写) [nuochengze@pc001 job]$ flume-ng agent -c conf -f $FLUME_HOME/jobs/netcat-flume-logger.conf -n a1 -Dflume.root.logger=INFO,console- --conf/-c:表示配置文件存储在
$FLUME_HOME/conf目录中 - --name/-n:表示给agent起的名称
- --conf -file/-f :flume本次启动读取的配置文件是在
$FLUME_HOME/job文件下的netcat-flume-logger.conf文件 - -Dflume.root.logger=INFO,console:-D表示flume运行时动态修改flume.root.logger参数属性值,并将控制台日志打印级别设置为INFO级别。日志级别包括:log、info、warn、error
- --conf/-c:表示配置文件存储在
开启客户端
nc localhost 44444在客户端发送数据

在服务端接收数据

2.2.2 实时监控单个追加文件案例:exec-flume-hdfs.conf
需求
实时监控Hive日志,并上传到HDFS中
配置文件
http://flume.apache.org/releases/content/1.7.0/FlumeUserGuide.html#exec-source
http://flume.apache.org/releases/content/1.7.0/FlumeUserGuide.html#flume-sinks
# singlefilehive_flume_hdfs.conf
# Name the components of this agent
a1.sources=r1
a1.sinks=k1
a1.channels=c1


# Discribe/Configure the source
a1.sources.r1.type=exec
a1.sources.r1.command="tail -F /$HIVE_HOME/logs/hive.log"


# Discribe the sink
a1.sinks.k1.type=hdfs
a1.sinks.k1.hdfs.path="hdfs://pc001:8082"
a1.sinks.k1.hdfs.filePrefix=logs-    # 上传文件前缀
a1.sinks.k1.hdfs.round=true    # 是否按照时间滚动文件夹
a1.sinks.k1.hdfs.roundValue=1 # 多少时间单位创建一个新的文件夹
a1.sinks.k1.hdfs.roundUnit=hour # 重新定义时间单位
a1.sinks.k1.hdfs.userLocalTimeStamp=true # 是否使用本地时间戳
a1.sinks.k1.hdfs.batchSize=1000 # 积累多少个Event才flush到HDFS一次
a1.sinks.k1.hdfs.fileType=DataStream # 设置文件类型,可支持压缩
a1.sinks.k1.hdfs.rollInterval=30 # 多久生成一个新的文件
a1.sinks.k1.hdfs.rollSize=134217700 # 设置每个文件的滚动大小,比128M小一点
a1.sinks.k1.hdfs.rollCount=0 # 文件的滚动与Event数量无关

# Use a channel which buffers events in memory
a1.channels.c1.type=memory
a1.channels.c1.capacity=1000
a1.channels.c1.transactionCapacity=100

# Bind the source and sink to the channel
a1.sources.r1.channels=c1
a1.sinks.k1.channel=c1
注意:
对于所有与时间相关的转义序列,Event Header 中必须存在以 “timestamp”的 key(除非 hdfs.useLocalTimeStamp 设置为 true,此方法会使用 TimestampInterceptor 自动添加 timestamp)。
2.2.3 实时监控目录下多个新文件:spooldir-flume-hdfs.conf
需求
使用 Flume 监听整个目录的文件,并上传至 HDFS
配置文件
# Name the components of this agent
a3.sources = r3
a3.sinks = k3
a3.channels = c3


# Describe/configure the source
a3.sources.r3.type = spooldir
# 定义监控目录
a3.sources.r3.spoolDir = /opt/software/flume-1.7.0/upload
# 定义上传文件后缀名
a3.sources.r3.fileSuffix = .COMPLETED
# 是否有文件头
a3.sources.r3.fileHeader = true
#忽略所有以.tmp 结尾的文件,不上传
a3.sources.r3.ignorePattern = ([^ ]*.tmp)


# Describe the sink
a3.sinks.k3.type = hdfs
a3.sinks.k3.hdfs.path = hdfs://pc001:8082/flume/upload/%Y%m%d/%H
#上传文件的前缀
a3.sinks.k3.hdfs.filePrefix = upload-
#是否按照时间滚动文件夹
a3.sinks.k3.hdfs.round = true
#多少时间单位创建一个新的文件夹
a3.sinks.k3.hdfs.roundValue = 1
#重新定义时间单位
a3.sinks.k3.hdfs.roundUnit = hour
#是否使用本地时间戳
a3.sinks.k3.hdfs.useLocalTimeStamp = true
#积攒多少个 Event 才 flush 到 HDFS 一次
a3.sinks.k3.hdfs.batchSize = 100
#设置文件类型,可支持压缩
a3.sinks.k3.hdfs.fileType = DataStream
#多久生成一个新的文件
a3.sinks.k3.hdfs.rollInterval = 60
#设置每个文件的滚动大小大概是 128M
a3.sinks.k3.hdfs.rollSize = 134217700
#文件的滚动与 Event 数量无关
a3.sinks.k3.hdfs.rollCount = 0

# Use a channel which buffers events in memory
a3.channels.c3.type = memory
a3.channels.c3.capacity = 1000
a3.channels.c3.transactionCapacity = 100


# Bind the source and sink to the channel
a3.sources.r3.channels = c3
a3.sinks.k3.channel = c3
说明
在使用Spooling Directory Source时,不要再监控目录中创建并持续修改文件
2.2.4 实时监控目录下的多个追加文件:taildir-flume-hdfs.conf
Exec source 适用于监控一个实时追加的文件,但不能保证数据不丢失;Spooldir Source 能够保证数据不丢失,且能够实现断点续传,但延迟较高,不能实时监控;而 Taildir Source 既能够实现断点续传,又可以保证数据不丢失,还能够进行实时监控
需求
使用 Flume 监听整个目录的实时追加文件,并上传至 HDFS
配置文件
# Name the components of this agent
a1.sources = r1
a1.sinks = k1
a1.channels = c1

# Describe/configure the source
a1.sources.r1.type = TAILDIR
# 指定position_file位置
a1.sources.r1.positionFile = /opt/software/flume-1.7.0/tail_dir.json
# 注意,存在多个f时,分别指定监控目录文件,否则会覆盖上一个
a1.sources.r1.filegroups = f1
# 定义监控目录文件
a1.sources.r1.filegroups.f1 = /opt/software/flume-1.7.0/files/file.*

# Describe the sink
a1.sinks.k1.type = hdfs
a1.sinks.k1.hdfs.path = hdfs://pc001:8082/flume/taildir/%Y%m%d/%H
#上传文件的前缀
a1.sinks.k1.hdfs.filePrefix = upload-
#是否按照时间滚动文件夹
a1.sinks.k1.hdfs.round = true
#多少时间单位创建一个新的文件夹
a1.sinks.k1.hdfs.roundValue = 1
#重新定义时间单位
a1.sinks.k1.hdfs.roundUnit = hour
#是否使用本地时间戳
a1.sinks.k1.hdfs.useLocalTimeStamp = true
#积攒多少个 Event 才 flush 到 HDFS 一次
a1.sinks.k1.hdfs.batchSize = 100
#设置文件类型,可支持压缩
a1.sinks.k1.hdfs.fileType = DataStream
#多久生成一个新的文件
a1.sinks.k1.hdfs.rollInterval = 60
#设置每个文件的滚动大小大概是 128M
a1.sinks.k1.hdfs.rollSize = 134217700
#文件的滚动与 Event 数量无关
a1.sinks.k1.hdfs.rollCount = 0

# Use a channel which buffers events in memory
a1.channels.c1.type = memory
a1.channels.c1.capacity = 1000
a1.channels.c1.transactionCapacity = 100

# Bind the source and sink to the channel
a1.sources.r1.channels = c1
a1.sinks.k1.channel = c1
说明
Taildir Source 维护了一个 json 格式的 position File,其会定期的往 position File 中更新每个文件读取到的最新的位置,因此能够实现断点续传:
[{"inode":69133564,"pos":6,"file":"/opt/software/flume-1.7.0/files/file1.txt"},{"inode":69133565,"pos":6,"file":"/opt/software/flume-1.7.0/files/file2.txt"}]注:Linux 中储存文件元数据的区域就叫做 inode,每个 inode 都有一个号码,操作系统用 inode 号码来识别不同的文件,Unix/Linux 系统内部不使用文件名,而使用 inode 号码来识别文件
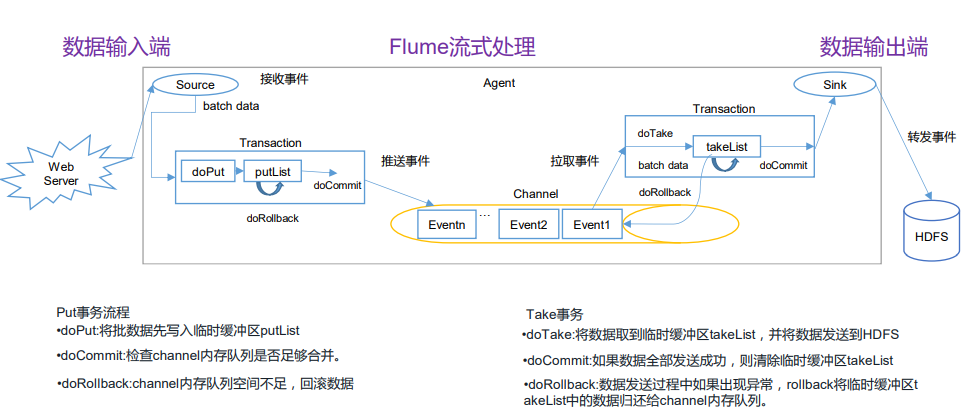
3.1 Flume事务
3.2 Flume Agent内部原理
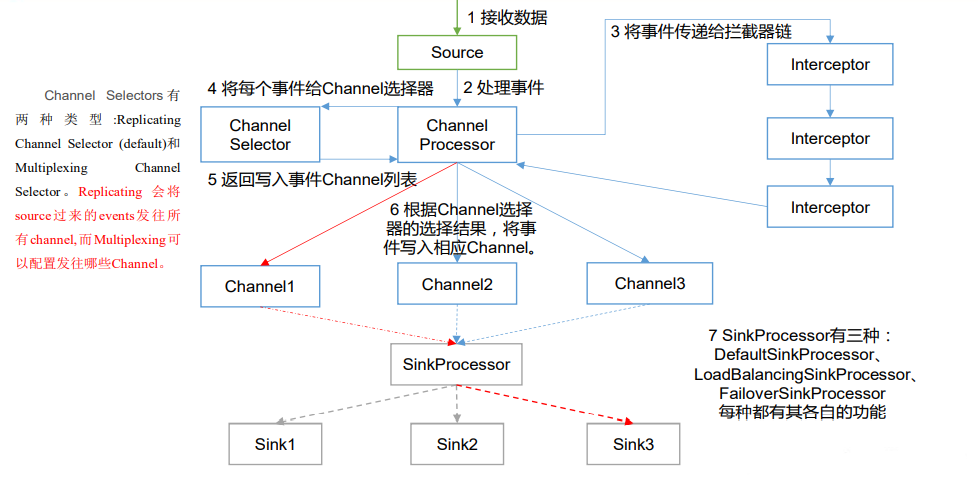
ChannelSelector
ChannelSelector的作用就是选出Event将要被发送哪个Channel。
其共有两种类型,分别是Replicating(复制)和 Multiplexing(多路复用)。
- ReplicatingSelector会将同一个Event发往所有的Channel。
- Multiplexing会根据相应的原则,将不同的Event发往不同的Channel。
SinkProcessor
SinkProcessor共有三种类型,分别是DefaultSinkProcessor、LoadBalancingSinkProcessor和FailoverSinkProcessor
- DefaultSinkProcessor对应的是单个的Sink
- LoadBalancingSinkProcessor和FailoverSinkProcessor对应的是Sink Group
- LoadBalancingSinkProcessor可以实现负载均衡的功能
- FailoverSinkProcessor可以实现故障转移的功能
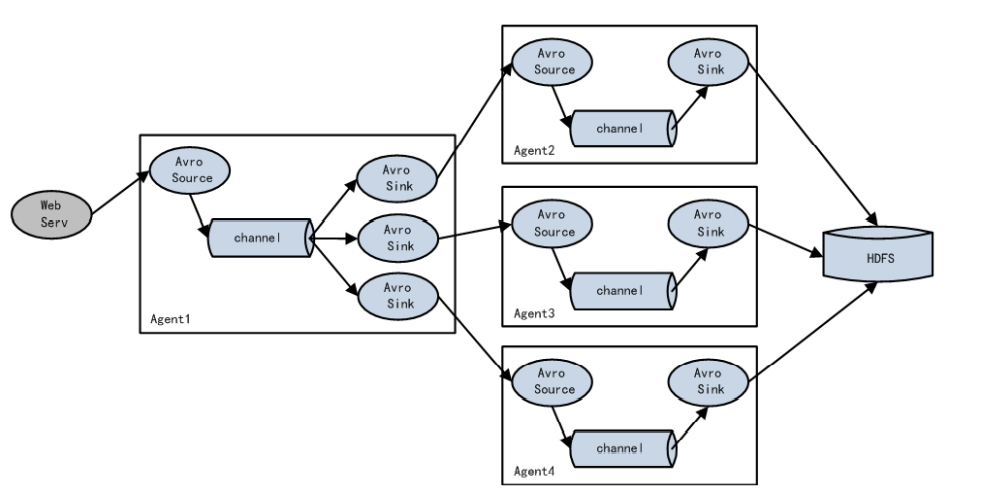
3.3 Flume拓扑结构
3.3.1 简单串联
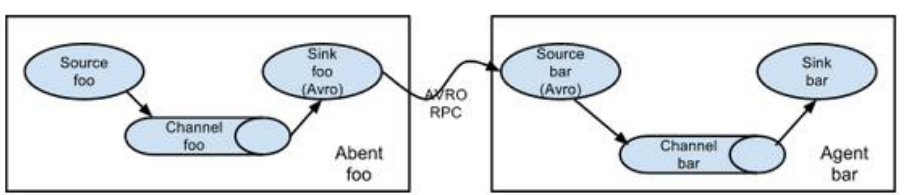
将多个flume顺序连接起来了,从最初的source开始到最终sink传送的目的地存储系统。
当桥接过多的flume数量,flume数量过多不仅会影响传输速率,而且一旦传输过程中某个节点flume宕机,会影响整个传输系统。
3.3.2 复制和多路复用
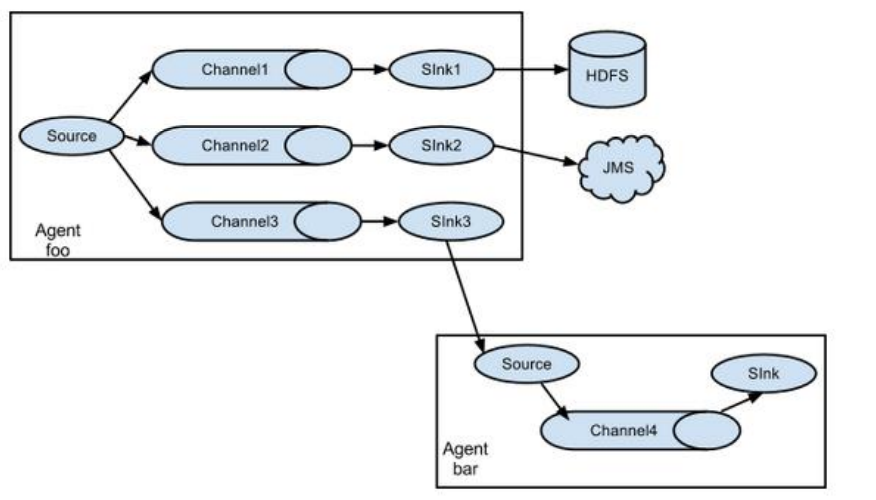
Flume支持将事件流向一个或者多个目的地,这种模式可以将相同数据复制到多个channel中,或者将不同数据分发到不同的channel中,sink可以选择传送到不同的目的地。
3.3.3 负载均衡和故障转移
Flume支持使用将多个Sink逻辑上分到一个Sink组,Sink组配合不同的SinkProcessor可以实现均衡负载和错误恢复的功能。
3.3.4 聚合

每台服务器部署一个flume采集日志,传输到一个集中收集日志的flume,再有此flume上传到hdfs、hive、hbase等,进行日志分析。
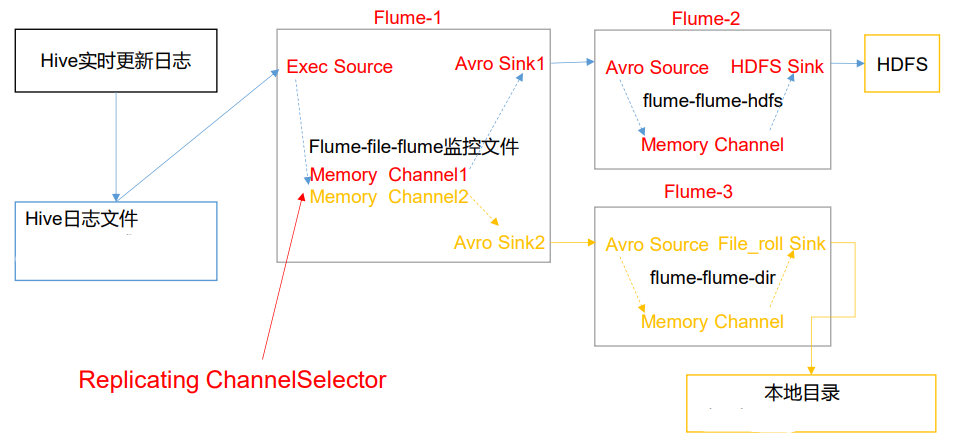
四、案例4.1 复制和多路复用
案例需求
使用 Flume-1 监控文件变动,Flume-1 将变动内容传递给 Flume-2,Flume-2 负责存储 到 HDFS。同时 Flume-1 将变动内容传递给 Flume-3,Flume-3 负责输出到 Local FileSystem。
需求分析
实现步骤
准备工作
- 创建conf文件夹,并创建文件hive_flume_avro.conf、avro_flume_hdfs.conf、avro_flume_localfile.conf
hive_flume_avro.conf文件创建:1个source,2个channel,2个sink
# Name the components of this agent is a1
a1.sources = r1
a1.sinks = k1 k2
a1.channels = c1 c2

# 将数据流复制给所有 channel
a1.sources.r1.selector.type=replicationg

# Describe/configure the source
a1.sources.r1.type = TAILDIR
# 指定position_file位置
a1.sources.r1.positionFile = /opt/software/flume-1.7.0/datas/position_file/tail_dir.json
# 注意,存在多个f时,分别指定监控目录文件,否则会覆盖上一个
a1.sources.r1.filegroups = f1
# 定义监控目录文件
a1.sources.r1.filegroups.f1 = /opt/software/hive-3.1.2/logs/hive.log


# Describe the sink
# k1
a1.sinks.k1.type=avro
a1.sinks.k1.hostname=pc001
a1.sinks.k1.port=4141
# k2
a1.sinks.k2.type=avro
a1.sinks.k2.hostname=pc001
a1.sinks.k2.port=4142

# Use a channel which buffers events in memory
# c1
a1.channels.c1.type = memory
a1.channels.c1.capacity = 1000
a1.channels.c1.transactionCapacity = 100
# c2
a1.channels.c2.type = memory
a1.channels.c2.capacity = 1000
a1.channels.c2.transactionCapacity = 100

# Bind the source and sink to the channel
a1.sources.r1.channels = c1 c2
a1.sinks.k1.channel = c1
a1.sinks.k2.channel = c2
avro_flume_hdfs.conf文件创建:1个source,1个channel,1个sink
# Name the components of this agent is a2
a2.sources = r1
a2.sinks = k1
a2.channels = c1

# Describe/configure the source
a2.sources.r1.type=avro
a2.sources.r1.bind=pc001
a2.sources.r1.port=4141


# Describe the sink
a2.sinks.k1.type = hdfs
a2.sinks.k1.hdfs.path = hdfs://pc001:8082/flume/group_test1/%Y%m%d/%H
#上传文件的前缀
a2.sinks.k1.hdfs.filePrefix = upload-
#是否按照时间滚动文件夹
a2.sinks.k1.hdfs.round = true
#多少时间单位创建一个新的文件夹
a2.sinks.k1.hdfs.roundValue = 1
#重新定义时间单位
a2.sinks.k1.hdfs.roundUnit = hour
#是否使用本地时间戳
a2.sinks.k1.hdfs.useLocalTimeStamp = true
#积攒多少个 Event 才 flush 到 HDFS 一次
a2.sinks.k1.hdfs.batchSize = 100
#设置文件类型,可支持压缩
a2.sinks.k1.hdfs.fileType = DataStream
#多久生成一个新的文件
a2.sinks.k1.hdfs.rollInterval = 60
#设置每个文件的滚动大小大概是 128M
a2.sinks.k1.hdfs.rollSize = 134217700
#文件的滚动与 Event 数量无关
a2.sinks.k1.hdfs.rollCount = 0

# Use a channel which buffers events in memory
a2.channels.c1.type = memory
a2.channels.c1.capacity = 1000
a2.channels.c1.transactionCapacity = 100

# Bind the source and sink to the channel
a2.sources.r1.channels = c1
a2.sinks.k1.channel = c1
avro_flume_localfile.conf文件创建:1个source,1个channel,1个sink
# Name the components of this agent is a3
a3.sources = r1
a3.sinks = k1
a3.channels = c1

# Describe/configure the source
a3.sources.r1.type=avro
a3.sources.r1.bind=pc001
a3.sources.r1.port=4142


# Describe the sink
# 输出的本地目录必须是已经存在的目录,如果该目录不存在,并不会创建新的目录
a3.sinks.k1.type=file_roll
a3.sinks.k1.sink.directory=/opt/software/flume-1.7.0/datas/group_test1_output_file

# Use a channel which buffers events in memory
a3.channels.c1.type = memory
a3.channels.c1.capacity = 1000
a3.channels.c1.transactionCapacity = 100

# Bind the source and sink to the channel
a3.sources.r1.channels = c1
a3.sinks.k1.channel = c1
执行配置文件
注意启动的顺序
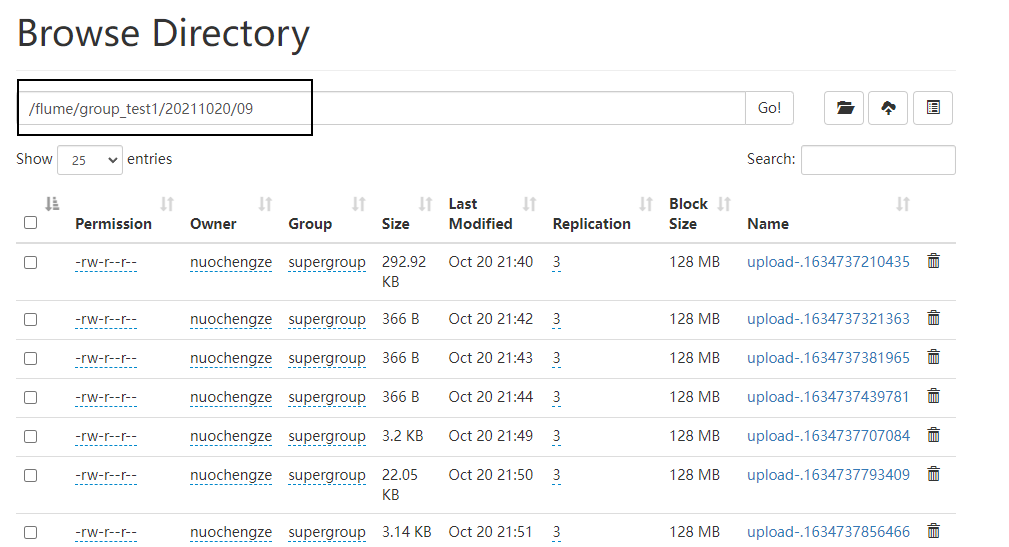
[1] flume-ng agent --conf conf --conf-file /opt/software/flume-1.7.0/jobs/group_test1/avro_flume_localfile.conf --name a3
[2] flume-ng agent --conf conf --conf-file /opt/software/flume-1.7.0/jobs/group_test1/avro_flume_hdfs.conf --name a2
[3] flume-ng agent --conf conf --conf-file /opt/software/flume-1.7.0/jobs/group_test1/hive_flume_avro.conf --name a1
效果
HDFS
localFile

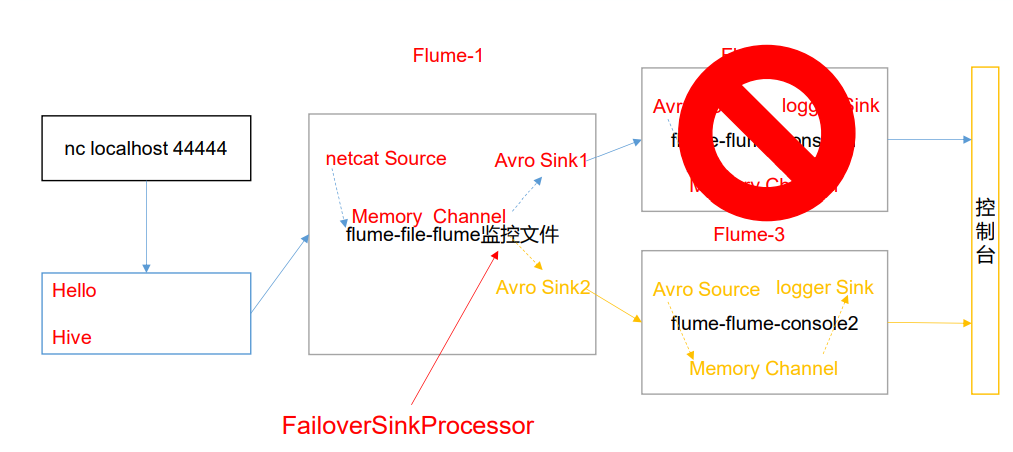
4.2 负载均衡和故障转移
案例需求
使用 Flume1 监控一个端口,其 sink 组中的 sink 分别对接 Flume2 和 Flume3,采用 FailoverSinkProcessor,实现故障转移的功能。
需求分析
实现步骤
准备工作
创建conf文件夹,并创建文件netcat_flume_avro.conf、avro_flume_logger1.conf、avro_flume_logger2.conf
netcat_flume_avro.conf文件创建:1个source,1个channel,2个sink(在一个组中)
# Name the components of this agent is a1
a1.sources = r1
a1.sinks = k1 k2
a1.channels = c1
a1.sinkgroups = g1


#Discribe/Configure the source
a1.sources.r1.type=netcat
a1.sources.r1.bind=pc001
a1.sources.r1.port=44444

# Discribe then sinkgroup -- 多路复用(二选一)
a1.sinkgroups.g1.processor.type=failover
a1.sinkgroups.g1.processor.priority.k1=5
a1.sinkgroups.g1.processor.priority.k2=10
a1.sinkgroups.g1.processor.maxpenalty=10000


# Discribe then sinkgroup  -- 均衡负载(二选一)
a1.sinkgroups.g1.processor.type = load_balance
a1.sinkgroups.g1.processor.backoff = true
a1.sinkgroups.g1.processor.selector = random

# Describe the sink
# k1
a1.sinks.k1.type=avro
a1.sinks.k1.hostname=pc001
a1.sinks.k1.port=4141
# k2
a1.sinks.k2.type=avro
a1.sinks.k2.hostname=pc001
a1.sinks.k2.port=4142

# Use a channel which buffers events in memory
a1.channels.c1.type = memory
a1.channels.c1.capacity = 1000
a1.channels.c1.transactionCapacity = 100


# Bind the source and sink to the channel
a1.sources.r1.channels = c1
a1.sinkgroups.g1.sinks= k1 k2
a1.sinks.k1.channel = c1
a1.sinks.k2.channel = c1
avro_flume_logger1.conf文件创建:1个source,1个channel,1个sink
# Name the components of this agent is a2
a2.sources = r1
a2.sinks = k1
a2.channels = c1

# Describe/configure the source
a2.sources.r1.type=avro
a2.sources.r1.bind=pc001
a2.sources.r1.port=4141


# Describe the sink
a2.sinks.k1.type = logger

# Use a channel which buffers events in memory
a2.channels.c1.type = memory
a2.channels.c1.capacity = 1000
a2.channels.c1.transactionCapacity = 100

# Bind the source and sink to the channel
a2.sources.r1.channels = c1
a2.sinks.k1.channel = c1
avro_flume_logger2.conf文件创建:1个source,1个channel,1个sink
# Name the components of this agent is a3
a3.sources = r1
a3.sinks = k1
a3.channels = c1

# Describe/configure the source
a3.sources.r1.type=avro
a3.sources.r1.bind=pc001
a3.sources.r1.port=4142


# Describe the sink
a3.sinks.k1.type = logger

# Use a channel which buffers events in memory
a3.channels.c1.type = memory
a3.channels.c1.capacity = 1000
a3.channels.c1.transactionCapacity = 100

# Bind the source and sink to the channel
a3.sources.r1.channels = c1
a3.sinks.k1.channel = c1
启动命令
[1] flume-ng agent --conf conf --conf-file /opt/software/flume-1.7.0/jobs/group_test2/avro_flume_logger2.conf --name a3 -Dflume.root.logger=INFO,console
[2] flume-ng agent --conf conf --conf-file /opt/software/flume-1.7.0/jobs/group_test2/avro_flume_logger1.conf --name a2 -Dflume.root.logger=INFO,console
[3] flume-ng agent --conf conf --conf-file /opt/software/flume-1.7.0/jobs/group_test2/netcat_flume_avro.conf --name a1 -Dflume.root.logger=INFO,console
4.3 聚合
案例需求
在pc001上监控文件flume_test.log,数据发送至avro;
在pc002上监控端口4141,发送数据到avro;
在pc003上汇总数据,并将数据打印到控制台;
执行步骤
taildir_flume_avro.conf文件创建:1个source,1个channel,1个sink
# Name the components of this agent is a1
a1.sources = r1
a1.sinks = k1
a1.channels = c1


# Describe/configure the source
a1.sources.r1.type = TAILDIR
a1.sources.r1.positionFile = /opt/software/flume-1.7.0/datas/tail_dir.json
a1.sources.r1.filegroups = f1
a1.sources.r1.filegroups.f1 = /opt/software/flume-1.7.0/datas/test_data1/flume.log


# Describe the sink
a1.sinks.k1.type=avro
a1.sinks.k1.hostname=pc003
a1.sinks.k1.port=4141

# Use a channel which buffers events in memory
a1.channels.c1.type = memory
a1.channels.c1.capacity = 1000
a1.channels.c1.transactionCapacity = 100

# Bind the source and sink to the channel
a1.sources.r1.channels = c1
a1.sinks.k1.channel = c1
netcat_flume_avro.conf文件创建:1个source,1个channel,1个sink
# Name the components of this agent is a1
a1.sources = r1
a1.sinks = k1
a1.channels = c1


#Discribe/Configure the source
a1.sources.r1.type=netcat
a1.sources.r1.bind=pc002
a1.sources.r1.port=44444

# Describe the sink
a1.sinks.k1.type=avro
a1.sinks.k1.hostname=pc003
a1.sinks.k1.port=4141

# Use a channel which buffers events in memory
a1.channels.c1.type = memory
a1.channels.c1.capacity = 1000
a1.channels.c1.transactionCapacity = 100


# Bind the source and sink to the channel
a1.sources.r1.channels = c1
a1.sinks.k1.channel = c1
avro_flume_avro.conf文件创建:1个source,1个channel,1个sink
# Name the components of this agent is a1
a1.sources = r1
a1.sinks = k1
a1.channels = c1

#Discribe/Configure the source
a1.sources.r1.type=avro
a1.sources.r1.bind=pc003
a1.sources.r1.port=4141

# Describe the sink
a1.sinks.k1.type=logger

# Use a channel which buffers events in memory
a1.channels.c1.type = memory
a1.channels.c1.capacity = 1000
a1.channels.c1.transactionCapacity = 100

# Bind the source and sink to the channel
a1.sources.r1.channels = c1
a1.sinks.k1.channel = c1
效果
pc002

pc001

pc003

5.1 自定义拦截器
案例需求
使用flume采集服务器日志,按照日志类型的不同,将不同种类的日志发往不同的分析系统
需求分析
Flume 拓扑结构中的 Multiplexing 结构,Multiplexing 的原理是,根据 event 中 Header 的某个 key 的值,将不同的 event 发送到不同的 Channel中,所以我们需要自定义一个 Interceptor,为不同类型的 event 的 Header 中的 key 赋予不同的值。
以端口数据模拟日志。
实现步骤
创建maven项目,导入依赖
<dependencies>
    <dependency>
        <groupId>org.apache.flume</groupId>
        <artifactId>flume-ng-core</artifactId>
        <version>1.7.0</version>
    </dependency>
</dependencies>
定义 CustomInterceptor 类并实现 Interceptor 接口
package com.nuochengze.interceptor;

import org.apache.flume.Context;
import org.apache.flume.Event;
import org.apache.flume.interceptor.Interceptor;

import java.util.ArrayList;
import java.util.List;
import java.util.Map;

public class TypeInterceptor implements Interceptor {

    private List<Event> hasAddHeaderEvents;

    @Override
    public void initialize() {
        // 初始化
        hasAddHeaderEvents = new ArrayList<>();
    }

    @Override
    public Event intercept(Event event) {
        // 获取事件中的头信息
        Map<String, String> headers = event.getHeaders();
        // 获取事件中的body信息
        String bodyString = new String(event.getBody());
        // 按内容,添加头信息
        if (bodyString.contains("nuochengze")){
            headers.put("own","nuochengze");
        }else{
            headers.put("own","other");
        }
        return event;
    }

    @Override
    public List<Event> intercept(List<Event> events) {
        for (Event event : events) {
            hasAddHeaderEvents.add(intercept(event));
        }
        return hasAddHeaderEvents;
    }

    @Override
    public void close() {

    }

    public static class Builder implements Interceptor.Builder{
        @Override
        public Interceptor build() {
            return new TypeInterceptor();
        }

        @Override
        public void configure(Context context) {

        }
    }
}
将程序打包并上传到
$FLUME_HOME/lib目录中编写配置文件
pc001上创建配置文件netcat-flume-avro.conf:1个source,2个memory channel,2个avro sink,并配置相应的 ChannelSelector 和 interceptor
# Name the components of this agent is a1
a1.sources = r1
a1.sinks = k1 k2
a1.channels = c1 c2


# 定义拦截器
a1.sources.r1.interceptors = i1
# 注意:别忘记在主类后面$上静态类
a1.sources.r1.interceptors.i1.type = com.nuochengze.interceptor.TypeInterceptor$Builder
# 定义选择器
a1.sources.r1.selector.type = multiplexing
a1.sources.r1.selector.header = own
a1.sources.r1.selector.mapping.nuochengze = c1
a1.sources.r1.selector.mapping.other = c2


#Discribe/Configure the source
a1.sources.r1.type=netcat
a1.sources.r1.bind=pc001
a1.sources.r1.port=44444

# Describe the sink
# k1
a1.sinks.k1.type=avro
a1.sinks.k1.hostname=pc002
a1.sinks.k1.port=4141
# k2
a1.sinks.k2.type=avro
a1.sinks.k2.hostname=pc003
a1.sinks.k2.port=4141

# Use a channel which buffers events in memory
# c1
a1.channels.c1.type = memory
a1.channels.c1.capacity = 1000
a1.channels.c1.transactionCapacity = 100

# c2
a1.channels.c2.type = memory
a1.channels.c2.capacity = 1000
a1.channels.c2.transactionCapacity = 100

# Bind the source and sink to the channel
a1.sources.r1.channels = c1 c2
a1.sinks.k1.channel = c1
a1.sinks.k2.channel = c2
pc002上创建配置文件avro-flume-logger.conf
# Name the components of this agent is a2
a2.sources = r1
a2.sinks = k1
a2.channels = c1

# Describe/configure the source
a2.sources.r1.type=avro
a2.sources.r1.bind=pc002
a2.sources.r1.port=4141

# Describe the sink
a2.sinks.k1.type = logger

# Use a channel which buffers events in memory
a2.channels.c1.type = memory
a2.channels.c1.capacity = 1000
a2.channels.c1.transactionCapacity = 100

# Bind the source and sink to the channel
a2.sources.r1.channels = c1
a2.sinks.k1.channel = c1
pc003上创建配置文件avro-flume-logger.conf
# Name the components of this agent is a3
a3.sources = r1
a3.sinks = k1
a3.channels = c1

# Describe/configure the source
a3.sources.r1.type=avro
a3.sources.r1.bind=pc003
a3.sources.r1.port=4141

# Describe the sink
a3.sinks.k1.type = logger

# Use a channel which buffers events in memory
a3.channels.c1.type = memory
a3.channels.c1.capacity = 1000
a3.channels.c1.transactionCapacity = 100

# Bind the source and sink to the channel
a3.sources.r1.channels = c1
a3.sinks.k1.channel = c1
pc003、pc002、pc001上分别启动
效果
pc001

pc002

pc003

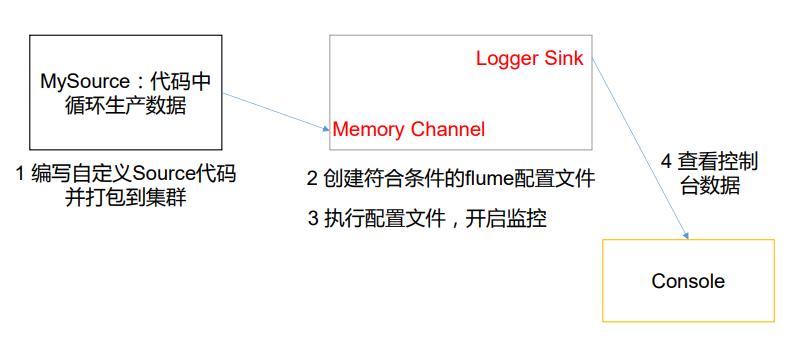
5.2 自定义Source
Source 是负责接收数据到 Flume Agent 的组件。Source 组件可以处理各种类型、各种格式的日志数据,包括 avro、thrift、exec、jms、spooling directory、netcat、sequence generator、syslog、http、legacy。
官方也提供了自定义 source 的接口:自定义 MySource 需要继承 AbstractSource 类并实现 Configurable 和 PollableSource 接口。
实现相应方法:
- getBackOffSleepIncrement()//暂不用
- getMaxBackOffSleepInterval()//暂不用
- configure(Context context)//初始化 context(读取配置文件内容)
- process()//获取数据封装成 event 并写入 channel,这个方法将被循环调用。
使用场景:读取 MySQL 数据或者其他文件系统。
参考:
http://flume.apache.org/releases/content/1.7.0/FlumeDeveloperGuide.html#source
需求分析
使用flume接收数据,并给每条数据添加前缀,输出到控制台。

实现步骤
创建maven项目,导入依赖
<dependencies>
    <dependency>
        <groupId>org.apache.flume</groupId>
        <artifactId>flume-ng-core</artifactId>
        <version>1.7.0</version>
    </dependency>
</dependencies>
编写代码
package com.nuochengze.source;

import org.apache.flume.Context;
import org.apache.flume.Event;
import org.apache.flume.EventDeliveryException;
import org.apache.flume.PollableSource;
import org.apache.flume.conf.Configurable;
import org.apache.flume.event.SimpleEvent;
import org.apache.flume.source.AbstractSource;

import java.util.Arrays;
import java.util.HashMap;

public class MySource extends AbstractSource implements Configurable, PollableSource {

    // 定义全局的前缀和后缀
    private String header_string;
    private String body_string;

    @Override
    public void configure(Context context) {
        // 读取配置文件
        body_string = context.getString("body_string");
        header_string = context.getString("header_string", "test_mysource");
    }

    @Override
    public Status process() throws EventDeliveryException {
        Status status = null;
        try {
            // 接收数据
            for (int i = 0; i < 5; i++) {
                // 创建事件头信息
                HashMap<String, String> header_map = new HashMap<String, String>();
                // 构建事件对象
                SimpleEvent event = new SimpleEvent();
                // 给事件设置值
                header_map.put("customer",header_string);
                event.setHeaders(header_map);
                event.setBody((body_string+"--"+i+"--"+ Arrays.toString(event.getBody())).getBytes());
                // 将事件写入channel中
                getChannelProcessor().processEvent(event);
                status=Status.READY;
            }
        } catch (Exception e) {
            e.printStackTrace();
            status=Status.BACKOFF;
        }
        try {
            Thread.sleep(2000);
        } catch (InterruptedException e) {
            e.printStackTrace();
        }
        return status;
    }

    @Override
    public long getBackOffSleepIncrement() {
        return 0;
    }

    @Override
    public long getMaxBackOffSleepInterval() {
        return 0;
    }

}
编写配置
# Name the components of this agent is a1
a1.sources = r1
a1.sinks = k1
a1.channels = c1


#Discribe/Configure the source
a1.sources.r1.type=com.nuochengze.source.MySource
a1.sources.r1.header_string = this is header of mysource
a1.sources.r1.body_string = nuochengze

# Describe the sink
a1.sinks.k1.type=logger


# Use a channel which buffers events in memory
a1.channels.c1.type = memory
a1.channels.c1.capacity = 1000
a1.channels.c1.transactionCapacity = 100


# Bind the source and sink to the channel
a1.sources.r1.channels = c1
a1.sinks.k1.channel = c1
将打包好的代码放置在
$FLUME_HOME/lib中结果

5.3 自定义Sink
Sink 不断地轮询 Channel 中的事件且批量地移除它们,并将这些事件批量写入到存储 或索引系统、或者被发送到另一个 Flume Agent。
Sink 是完全事务性的。在从 Channel 批量删除数据之前,每个 Sink 用 Channel 启动一 个事务。批量事件一旦成功写出到存储系统或下一个 Flume Agent,Sink 就利用 Channel 提 交事务。事务一旦被提交,该 Channel 从自己的内部缓冲区删除事件。
Sink 组件目的地包括 hdfs、logger、avro、thrift、ipc、file、null、HBase、solr、 自定义。自定义 MySink 需要继承 AbstractSink 类并实现 Configurable 接口。
实现相应方法:
- configure(Context context)//初始化 context(读取配置文件内容)
- process()//从 Channel 读取获取数据(event),这个方法将被循环调用。
使用场景:读取channel数据后写入mysql或其他文件系统
参考:
http://flume.apache.org/releases/content/1.7.0/FlumeDeveloperGuide.html#sink
需求分析
使用 flume 接收数据,并在 Sink 端给每条数据添加前缀和后缀,输出到控制台。前后 缀可在 flume 任务配置文件中配置
实现步骤
代码
package com.nuochengze.sink;

import org.apache.flume.*;
import org.apache.flume.conf.Configurable;
import org.apache.flume.sink.AbstractSink;
import org.slf4j.Logger;
import org.slf4j.LoggerFactory;

import java.util.Arrays;

public class MySink extends AbstractSink implements Configurable {
    private String content_sink;
    // 创建logger对象
    private final Logger logger= LoggerFactory.getLogger(MySink.class);

    @Override
    public void configure(Context context) {
        content_sink = context.getString("content_sink", "!@!");
    }

    @Override
    public Status process() throws EventDeliveryException {
        Status status = null;
        // 获取channel
        Channel channel = getChannel();
        // 获取channel中的事务
        Transaction channel_transaction = channel.getTransaction();
        // 开始事务
        channel_transaction.begin();
        try {
            // 从channel获取数据
            Event event = channel.take();
            if (event != null) {
                // 处理事件
                String s = content_sink + " " +new String(event.getBody()) + " " + content_sink;
                logger.info(s);

            }
            // 提交事务,就算没有事件,也要提交
            channel_transaction.commit();
            // 提交成功后,修改状态信息
            status = Status.READY;
        } catch (ChannelException e) {
            e.printStackTrace();
            status = Status.BACKOFF;
        }finally {
            channel_transaction.close();
        }

        return status;
    }
}
配置信息
# Name the components of this agent is a1
a1.sources = r1
a1.sinks = k1
a1.channels = c1


#Discribe/Configure the source
a1.sources.r1.type = netcat
a1.sources.r1.bind = pc001
a1.sources.r1.port = 44444

# Describe the sink
a1.sinks.k1.type=com.nuochengze.sink.MySink
a1.sinks.k1.content_sink=!@!

# Use a channel which buffers events in memory
a1.channels.c1.type = memory
a1.channels.c1.capacity = 1000
a1.channels.c1.transactionCapacity = 100

# Bind the source and sink to the channel
a1.sources.r1.channels = c1
a1.sinks.k1.channel = c1
启动命令
flume-ng agent --conf conf --conf-file ./netcat-flume-logger.conf --name a1 -Dflume.root.logger=INFO,console结果

