1. 概述
Robolectric(http://robolectric.org/)是一款支持在桌面JVM模拟Android环境的测试框架,通过shadow包下的类来截取view、activity等类的调用,代替它们运行。举个例子说明一下,比如android里面有个类叫TextView,他们实现了一个类叫ShadowTextView。这个类基本上实现了TextView的所有公共接口,假设你在unit test里面写到String text = textView.getText().toString();。在这个unit test运行的时候,Robolectric会自动判断你调用了Android相关的代码textView.getText(),然后这个调用过程在底层截取了,转到ShadowTextView的getText实现。而ShadowTextView是真正实现了getText这个方法的,所以这个过程便可以正常执行。
除此之外,Robolectric还为shadow类额外提供了很多接口,可以读取对应的Android类的一些状态。
对于一些测试对象依赖度较高而需要解除依赖的场景,可以借助mock框架。
对于网络请求还可以进行网络请求测试。
2. 配置
在module 的build.gradle中添加测试依赖:
dependencies {
    testCompile 'junit:junit:4.12'
    testCompile "org.robolectric:robolectric:3.3.2"
    testCompile 'org.robolectric:shadows-httpclient:3.3.2'
}
3. 基本用法汇总
创建测试类
在类的前面添加:
@RunWith(RobolectricTestRunner.class):指定Junit的构建程序为RobolectricTestRunner
@Config(constants=BuildConfig.class,sdk=21):为每个类或测试的基础上添加配置设置。
可以设置sdk版本,buildConfig、manifest等。@RunWith(RobolectricTestRunner.class) @Config(constants = BuildConfig.class, sdk=21) public class BrowseTest { @Before public void before(){ ... } @Test public void test()throws Exception{ ... } }具体事例地址:
https://github.com/robolectric/robolectric-samples
google官方的一个例子网络访问
利用Robolectric进行测试,可以使用框架自带的FakeHttp,该功能可以模拟网络访问,也可以真实访问网络。
访问真实网络
@Test
public void requestTest() throws Exception {
    //设置是否拦截真实的请求。若不设置则默认为TRUE,若设false,则会真实访问网络。
    FakeHttp.getFakeHttpLayer().interceptHttpRequests(false);
    String url="https://api.douban.com/v2/movie/celebrity/1054395";
    URL url1=new URL(url);
    HttpURLConnection connection= (HttpURLConnection) url1.openConnection();
    InputStream inputStream = connection.getInputStream();
    BufferedReader reader=new BufferedReader(new InputStreamReader(inputStream));
    String result=new String(reader.readLine().getBytes(),"UTF-8");
    System.out.println(result);
}
- 模拟网络访问
@Test
    public void fakeRequestTest() throws IOException {
        //设置拦截真实请求
        FakeHttp.getFakeHttpLayer().interceptHttpRequests(true);
        //模拟返回
        ProtocolVersion version=new ProtocolVersion("HTTP",1,1);
        HttpResponse httpResponse=new BasicHttpResponse(version,400,"OK");
        //设置默认返回,所有请求返回这个
        FakeHttp.setDefaultHttpResponse(httpResponse);
        //添加一个返回规则,指定一个请求的期望返回
        FakeHttp.addHttpResponseRule("http://www.baidu.com",httpResponse);
        //执行请求
        HttpGet get=new HttpGet("http://www.baidu.com");
        HttpResponse response=new DefaultHttpClient().execute(get);

        //若response==httpResponse则通过。
        Assert.assertThat(response,is(httpResponse));
    }
注意事项(遇到的坑)
- volley框架不返回结果
由于volley一般是将结果回调到UI线程进行处理的,但是Robolectric对Ui线程的模拟支持似乎不太好,所以会导致能运行但是没结果的现象。
final CountDownLatch latch = new CountDownLatch(1); //设置是否拦截真实的请求。若不设置则默认为TRUE,若设false,则会真实访问网络。 FakeHttp.getFakeHttpLayer().interceptHttpRequests(false); String url="https://api.douban.com/v2/movie/celebrity/1054395"; StringRequest req=new StringRequest(Request.Method.GET, url, new Response.Listener<String>() { @Override public void onResponse(String response) { System.out.println(response); latch.countDown(); } }, new Response.ErrorListener() { @Override public void onErrorResponse(VolleyError error) { } } ); HttpStack stack=new HurlStack(); Network network=new BasicNetwork(stack); ResponseDelivery responseDelivery=new ExecutorDelivery(Executors.newSingleThreadExecutor()); RequestQueue queue=new RequestQueue(new NoCache(),network,4,responseDelivery); queue.start(); queue.add(req);- 运行测试用例返回以下错误:
    java.lang.VerifyError: Expecting a stackmap frame at branch target 45
Exception Details:
Location:
    com/umeng/message/NotificationProxyBroadcastReceiver.a(Landroid/content/Context;)V @13: ifnonnull
Reason:
    Expected stackmap frame at this location.
Bytecode:
    0x0000000: 2bb6 0027 2bb6 0028 b600 2e4d 2cc7 0020
    0x0000010: b200 21bb 001e 59b7 003d 120c b600 3e2b
    0x0000020: b600 28b6 003e b600 3fb8 002f b12c 01b6
    0x0000030: 002d 572c 1205 b600 2a57 2b2c b600 29b2
    0x0000040: 0021 bb00 1e59 b700 3d12 0db6 003e 2bb6
    0x0000050: 0028 b600 3eb6 003f b800 30b1


at java.lang.Class.getDeclaredConstructors0(Native Method)
at java.lang.Class.privateGetDeclaredConstructors(Class.java:2671)
at java.lang.Class.getConstructor0(Class.java:3075)
at java.lang.Class.getDeclaredConstructor(Class.java:2178)
at org.robolectric.util.ReflectionHelpers.callConstructor(ReflectionHelpers.java:319)
at org.robolectric.internal.bytecode.ShadowImpl.newInstanceOf(ShadowImpl.java:20)
at org.robolectric.shadow.api.Shadow.newInstanceOf(Shadow.java:35)
at org.robolectric.shadows.ShadowApplication.registerBroadcastReceivers(ShadowApplication.java:138)
at org.robolectric.shadows.ShadowApplication.bind(ShadowApplication.java:127)
at org.robolectric.shadows.CoreShadowsAdapter.bind(CoreShadowsAdapter.java:71)
at org.robolectric.android.internal.ParallelUniverse.setUpApplicationState(ParallelUniverse.java:107)
at org.robolectric.RobolectricTestRunner.beforeTest(RobolectricTestRunner.java:290)
at org.robolectric.internal.SandboxTestRunner$2.evaluate(SandboxTestRunner.java:203)
at org.robolectric.internal.SandboxTestRunner.runChild(SandboxTestRunner.java:109)
at org.robolectric.internal.SandboxTestRunner.runChild(SandboxTestRunner.java:36)
at org.junit.runners.ParentRunner$3.run(ParentRunner.java:290)
at org.junit.runners.ParentRunner$1.schedule(ParentRunner.java:71)
at org.junit.runners.ParentRunner.runChildren(ParentRunner.java:288)
at org.junit.runners.ParentRunner.access$000(ParentRunner.java:58)
at org.junit.runners.ParentRunner$2.evaluate(ParentRunner.java:268)
at org.robolectric.internal.SandboxTestRunner$1.evaluate(SandboxTestRunner.java:63)
at org.junit.runners.ParentRunner.run(ParentRunner.java:363)
at org.junit.runner.JUnitCore.run(JUnitCore.java:137)
at com.intellij.junit4.JUnit4IdeaTestRunner.startRunnerWithArgs(JUnit4IdeaTestRunner.java:117)
at com.intellij.junit4.JUnit4IdeaTestRunner.startRunnerWithArgs(JUnit4IdeaTestRunner.java:42)
at com.intellij.rt.execution.junit.JUnitStarter.prepareStreamsAndStart(JUnitStarter.java:262)
at com.intellij.rt.execution.junit.JUnitStarter.main(JUnitStarter.java:84)
at sun.reflect.NativeMethodAccessorImpl.invoke0(Native Method)
at sun.reflect.NativeMethodAccessorImpl.invoke(NativeMethodAccessorImpl.java:62)
at sun.reflect.DelegatingMethodAccessorImpl.invoke(DelegatingMethodAccessorImpl.java:43)
at java.lang.reflect.Method.invoke(Method.java:498)
at com.intellij.rt.execution.application.AppMain.main(AppMain.java:147)
解决方案:
https://github.com/robolectric/robolectric-gradle-plugin/issues/144#issuecomment-189561165
打开菜单Run->Edit Configuration
按照以下设置: 在VM option中添加-ea -noverify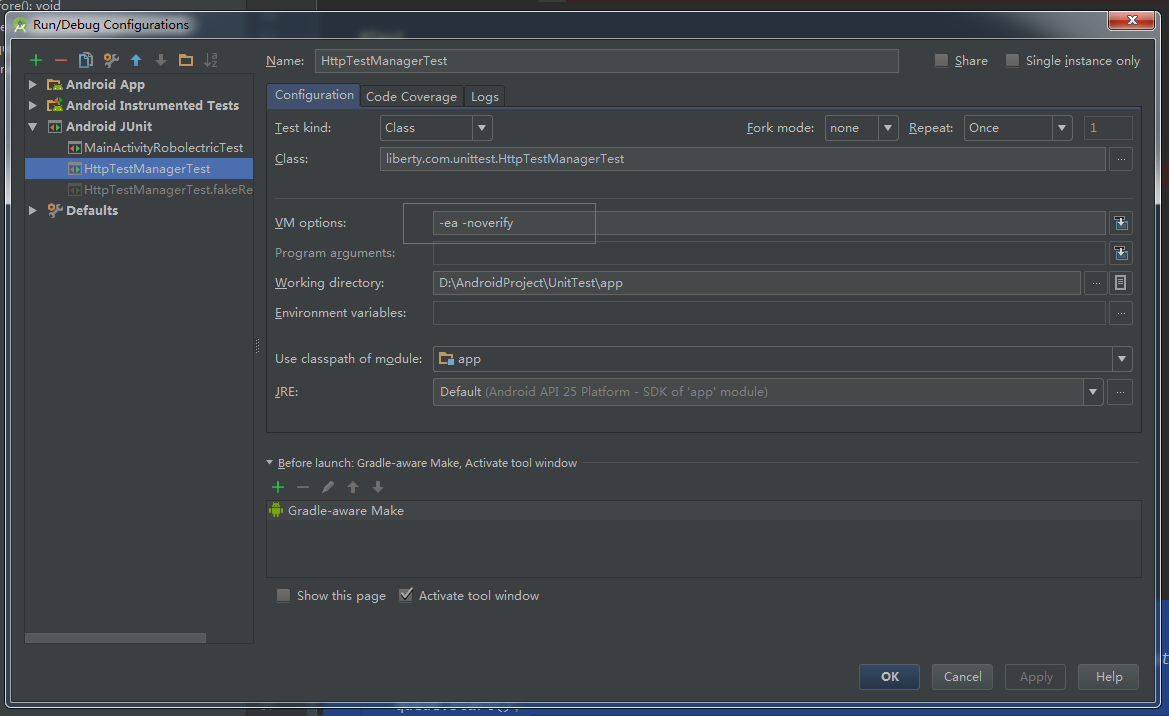
这样就可以了
- volley框架不返回结果
参考的文章:
http://www.vogella.com/tutorials/Robolectric/article.html#shadow-objects
http://blog.csdn.net/weijianfeng1990912/article/details/51020423