摘要:
参考资源:https://blog.csdn.net/qq_25430563/article/details/87968837https://blog.csdn.net/weixin_36250061/article/details/103472978https://github.com/serialport/node-串行端口/问题/1789https://www.cnblogs
参考:
https://blog.csdn.net/qq_25430563/article/details/87968837
https://blog.csdn.net/weixin_36250061/article/details/103472978
https://github.com/serialport/node-serialport/issues/1789
https://www.cnblogs.com/yangxiaobai123/p/11386799.html
最近打算做个家居环境监测系统,需要制作一个上位机控制下位机stm32对数据的采集,使用的是串口通信,故需要用到serialport,其中走了不少弯路,但是,经过两天的研究,还是成功编译安装成功
(使用了vue进行制作)
第一步:electron-vue环境的搭建、项目的创建
npm install -g vue-cli

vue init simulatedgreg/electron-vue my-project(这个是项目名称,根据实际需要修改)

cd my-project

npm install

(查看项目是否运行成功)
npm run dev
第二步:安装node-gyp(需要注意node如果为64位,可能需要转为32位,64位可能导致后面编译失败)
需要安装VS2017和python
npm install -g node-gyp

npm install --global --production windows-build-tools(直接安装这两个工具)

npm config set python python2.7

npm config set msvs_version 2017

npm config set python C:Python27(指定python2的路径)
测试是否安装完成:
node-gyp
成功显示:
  Usage: node-gyp <command> [options]

  where <command> is one of:
    - build - Invokes `msbuild` and builds the module
    - clean - Removes any generated build files and the "out" dir
    - configure - Generates MSVC project files for the current module
    - rebuild - Runs "clean", "configure" and "build" all at once
    - install - Install node development files for the specified node version.
    - list - Prints a listing of the currently installed node development files
    - remove - Removes the node development files for the specified version

node-gyp@6.1.0  H:
pm
ode_global
ode_modules
ode-gyp
node@8.16.2
第三步: 安装serialport,通过 electron-rebuild 包重新编译原生模块
npm install serialport

npm install --save-dev electron-rebuild
重新编译
.
ode_modules.binelectron-rebuild.cmd
重新编译完成之后, 如果运行 npm run dev  就会报错,
说明编译失败了,需要进行手动编译
防止出现gyp: binding.gyp not found的错误,我使用手动编译,步骤如下:
cd ./node_modules/@serialport/bindings

(项目路径不能有中文,否则编译识别)
(npm是64位的)
node-gyp rebuild --target=2.0.4 --arch=x64 --dist-url=https://npm.taobao.org/mirrors/atom-shell

(npm是32位的)
node-gyp rebuild --target=2.0.4 --arch=ia32 --dist-url=https://npm.taobao.org/mirrors/atom-shell
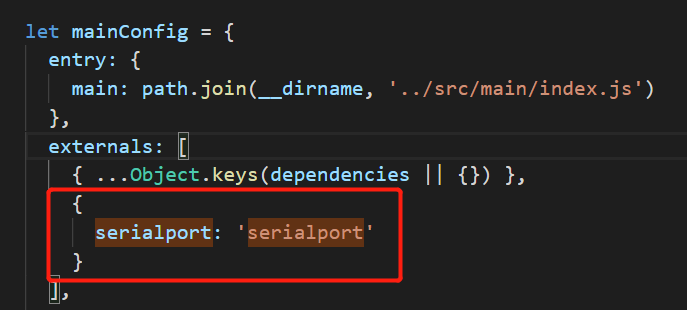
第四步:如果代码运行后,出现require is not defined的报错,在webpack中添加以下代码
{
  externals:  {
    serialport: 'serialport'
  }
}
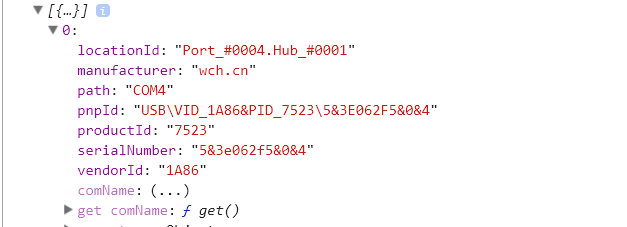
测试是否成功的页面代码:
import serialport from 'serialport'

serialport.list().then(ports => {
  //ports 串口信息
  console.log(ports);
});
成功后,打印串口信息: