摘要: 简介:pytest是python的一个单元测试框架。它与python附带的unittest框架类似,但比unittest框架更简单、更高效。上面的示例将运行TestMyClass.test _ Something,而不运行TestMyClass.test _ method_ Simple4。每个按节点收集的测试运行都分配了一个唯一的nodeid,它由模块文件名和说明符组成,后跟参数化类名、函数名和参数,用::字符分隔。
简介 pytest是python的一种单元测试框架,与python自带的unittest测试框架类似,但是比unittest框架使用起来更简洁,效率更高。并且pytest兼容unittest的用例,支持的插件也更多
安装
简单上手,创建个test_sample.py文件
def func(x): return x + 1 def test_answer(): assert func(3) == 5
运行测试,直接在当前文件夹运行pytest
collected 1 item test_sample.py F [100%] ================================= FAILURES ================================= _______________________________ test_answer ________________________________ def test_answer(): > assert func(3) == 5 E assert 4 == 5 E + where 4 = func(3) test_sample.py:6: AssertionError ============================ 1 failed in 0.12s =============================
pytest运行规则:查找当前目录及其子目录下以test_*.py或*_test.py文件,找到文件后,在文件中找到以test开头函数并执行。
以类来封装用例
# content of test_class.py class TestClass: def test_one(self): x = "this" assert "h" in x def test_two(self): x = "hello" assert hasattr(x, "check")
运行可以使用pytest [file_path]指定文件,-q是静默模式,不会打印用例输出
$ pytest -q test_class.py .F [100%] ================================= FAILURES ================================= ____________________________ TestClass.test_two ____________________________ self = <test_class.TestClass object at 0xdeadbeef> def test_two(self): x = "hello" > assert hasattr(x, "check") E AssertionError: assert False E + where False = hasattr('hello', 'check') test_class.py:8: AssertionError 1 failed, 1 passed in 0.12s
用例设计原则
文件名以test_*.py文件和*_test.py 以test_开头的函数 以Test开头的类 以test_开头的方法 所有的包pakege必须要有__init__.py文件 执行用例 1.执行某个目录下所有的用例
2.执行某一个py文件下用例
3.-k 按关键字匹配
pytest -k "MyClass and not method"
这将运行包含与给定字符串表达式匹配的名称的测试,其中包括Python使用文件名,类名和函数名作为变量的运算符。 上面的例子将运行TestMyClass.test_something但不运行TestMyClass.test_method_simple
4.按节点运行
每个收集的测试都分配了一个唯一的nodeid,它由模块文件名和后跟说明符组成来自参数化的类名,函数名和参数,由:: characters分隔。
运行.py模块里面的某个函数
pytest test_mod.py::test_func
运行.py模块里面,测试类里面的某个方法
pytest test_mod.py::TestClass::test_method
5.标记表达式
将运行用@ pytest.mark.slow装饰器修饰的所有测试,slow是自己命名的标记,可以自定义
import pytest @pytest.mark.finished def test_send_http(): pass def test_something_quick(): pass
运行测试时使用-m选项可以加上逻辑
>pytest -m "finished and commit" //匹配finished和commit运行 >pytest -m "finished and not merged" //finished运行,merged不运行
6.从包里面运行
pytest --pyargs pkg.testing
这将导入pkg.testing并使用其文件系统位置来查找和运行测试。
7.在第一个(或N个)失败后停止
pytest -x # stop after first failure pytest --maxfail=2 # stop after two failures
8.跳过测试
使用pytest.mark.skip标记需要跳过的用例
@pytest.mark.skip(reason="not finished") def test_send_http(): pass
也支持使用 pytest.mark.skipif 为测试函数指定被忽略的条件
@pytest.mark.skipif(finishflag==Fasle,reason="not finished") def test_send_http(): pass
9.脚本调用执行
直接使用 pytest.main() 像命令行一样传递参数 pytest.main(["-x", "mytestdir"])
用例编写 断言 pytest直接使用python assert语法来写
def f(): return 3 def test_function(): assert f() == 4
断言中添加消息
assert a % 2 == 0, "value was odd, should be even"
预设与清理 与unittest中的setup和teardown类似,pytest也有这样的环境清理方法,主要有
模块级(setup_module/teardown_module)开始于模块始末,全局的
函数级(setup_function/teardown_function)只对函数用例生效(不在类中)
类级(setup_class/teardown_class)只在类中前后运行一次(在类中)
方法级(setup_method/teardown_method)开始于方法始末(在类中)
类里面的(setup/teardown)运行在调用方法的前后
import pytest class TestClass: def setup_class(self): print("setup_class:类中所有用例执行之前") def teardown_class(self): print("teardown_class:类中所有用例执行之前") def setup_method(self): print("setup_method: 每个用例开始前执行") def teardown_method(self): print("teardown_method: 每个用例结束后执行") def setup(self): print("setup: 每个用例开始前执行") def teardown(self): print("teardown: 每个用例结束后执行") def test_one(self): print("执行第一个用例") def test_two(self): print("执行第二个用例") def setup_module(): print("setup_module:整个.py模块只执行一次") def teardown_module(): print("teardown_module:整个.py模块只执行一次") def setup_function(): print("setup_function:每个方法用例开始前都会执行") def teardown_function(): print("teardown_function:每个方法用例结束前都会执行") def test_three(): print("执行第三个用例")
使用pytest -s test_sample.py运行,-s参数是为了显示用例的打印信息,下面是输出,可以看出几个方法之间的优先级
test_sample.py setup_module:整个.py模块只执行一次 setup_class:类中所有用例执行之前 setup_method: 每个用例开始前执行 setup: 每个用例开始前执行 执行第一个用例 .teardown: 每个用例结束后执行 teardown_method: 每个用例结束后执行 setup_method: 每个用例开始前执行 setup: 每个用例开始前执行 执行第二个用例 .teardown: 每个用例结束后执行 teardown_method: 每个用例结束后执行 teardown_class:类中所有用例执行之前 setup_function:每个方法用例开始前都会执行 执行第三个用例 .teardown_function:每个方法用例结束前都会执行 teardown_module:整个.py模块只执行一次
注意:setup_method和teardown_method的功能和setup/teardown功能是一样的,一般二者用其中一个即可;函数里面用到的setup_function/teardown_function与类里面的setup_class/teardown_class互不干涉
参数化 使用pytest.mark.parametrize(argnames, argvalues)可以实现函数的参数化
@pytest.mark.parametrize('text',['test1','test2','test3']) def test_one(text): print(text)
argnames就是形参名称,argvalues就是待测的一组数据
固件fixture 基本使用 固件Fixture是一些函数,pytest 会在执行测试函数之前(或之后)加载运行它们。主要是为一些单独测试用例需要预先设置与清理的情况下使用的。
不同于上面的setup和teardown的就是,可以自定义函数,可以指定用例运行,使用方法如下
@pytest.fixture() def text(): print("开始执行") #使用pytest.fixture()装饰一个函数成为fixture def test_one(): print("执行第一个用例") def test_two(text): #用例传入fixture函数名,以此来确认执行 print("执行第二个用例")
使用yield可以实现固件的拆分运行,yield前在用例前执行,yield后再用例后执行
@pytest.fixture() def text(): print("开始执行") yield #yield 关键词将固件分为两部分,yield 之前的代码属于预处理,会在测试前执行;yield 之后的代码属于后处理,将在测试完成后执行 print("执行完毕") def test_one(): print("执行第一个用例") def test_two(text): print("执行第二个用例")
统一管理 固件可以直接定义在各测试脚本中,就像上面的例子。更多时候,我们希望一个固件可以在更大程度上复用,这就需要对固件进行集中管理。Pytest 使用文件 conftest.py 集中管理固件。
不用显式调用 conftest.py,pytest 会自动调用,可以把 conftest 当做插件来理解
./conftest.py @pytest.fixture() def text(): print("开始执行") yield print("执行完毕") ./test_sample.py def test_one(): print("执行第一个用例") def test_two(text): print("执行第二个用例")
作用域 fixture可以通过 scope 参数声明作用域,比如
function: 函数级,每个测试函数都会执行一次固件; class: 类级别,每个测试类执行一次,所有方法都可以使用; module: 模块级,每个模块执行一次,模块内函数和方法都可使用; session: 会话级,一次测试只执行一次,所有被找到的函数和方法都可用。 ./conftest.py @pytest.fixture(scope="module") def text(): print("开始执行") yield print("执行完毕") ./test_sample.py def test_one(text): print("执行第一个用例") def test_two(text): print("执行第二个用例")
执行情况
test_sample.py 开始执行 执行第一个用例 .执行第二个用例 .执行完毕
如果对于类使用作用域,需要使用 pytest.mark.usefixtures(对函数和方法也适用)
./conftest.py @pytest.fixture(scope="class") def text(): print("开始执行") yield print("执行完毕") ./test_sample.py @pytest.mark.usefixtures('text') class TestClass: def test_one(self): print("执行第一个用例") def test_two(self): print("执行第二个用例")
自动运行 将fixture的autouse参数设置为True时,可以不用传入函数,自动运行
./conftest.py @pytest.fixture(scope="module",autouse=True) def text(): print("开始执行") yield print("执行完毕") ./test_sample.py def test_one(): print("执行第一个用例") def test_two(): print("执行第二个用例")
参数化 使用fixture的params参数可以实现参数化
./conftest.py @pytest.fixture(scope="module",params=['test1','test2']) def text(request): print("开始执行") yield request.param print("执行完毕") ./test_sample.py def test_one(text): print("执行第一个用例") print(text) def test_two(text): print("执行第二个用例")
固件参数化需要使用 pytest 内置的固件 request,并通过 request.param 获取参数。
结果如下
test_sample.py 开始执行 执行第一个用例 test1 .执行第二个用例 .执行完毕 开始执行 执行第一个用例 test2 .执行第二个用例 .执行完毕
生成报告 HTML报告 安装pytest-html
使用方法是,直接在命令行pytest命令后面加--html=<文件名字或者路径>.html参数就可以了
pytest --html=report.html
结果如下
上面生成的报告包括html和一个assets文件(里面是报告CSS样式),如果要合成一个文件可以添加下面的参数
pytest --html=report.html --self-contained-html
XML报告 使用命令可以生成XML格式报告
pytest --junitxml=report.xml
allure报告 1.首先安装java环境
下载JDK http://www.oracle.com/technetwork/java/javase/downloads/index.html
安装对应系统的包,如windowsx64是xxx-windows-x64.exe
一路下一步安装就可以了
然后在环境变量中添加下面变量
变量名:JAVA_HOME 变量值:C:Program Files (x86)Javajdk1.8.0_91 // 要根据自己的实际路径配置 变量名:CLASSPATH 变量值:.;%JAVA_HOME%libdt.jar;%JAVA_HOME%lib ools.jar; //记得前面有个"." 变量名:Path 变量值:%JAVA_HOME%in;%JAVA_HOME%jrein;
然后再cmd中运行 java -version 、java 、javac 几个命令没有报错即可
2.安装allure
下载allure 会跳转到github,找到link下载
解压包后进入bin文件,复制路径并添加到环境变量Path中
cmd运行allure命令,没有报错即正确
3.pytest使用
安装插件
pip install allure-pytest 如果timeout就加 --index-url https://pypi.douban.com/simple 用豆瓣源
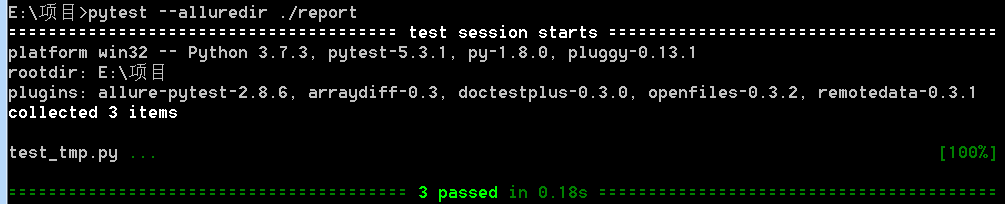
进入测试py文件目录,运行
pytest --alluredir ./report
运行完成后生成report文件,-alluredir后面跟的是文件路径,可以自定义
使用allure查看报告,直接启动allure server后面加报告路径就行
allure serve report(报告文件夹名)
等一会就生成报告
参考:
https://learning-pytest.readthedocs.io/zh/latest/index.html
https://docs.pytest.org/en/latest/contents.html