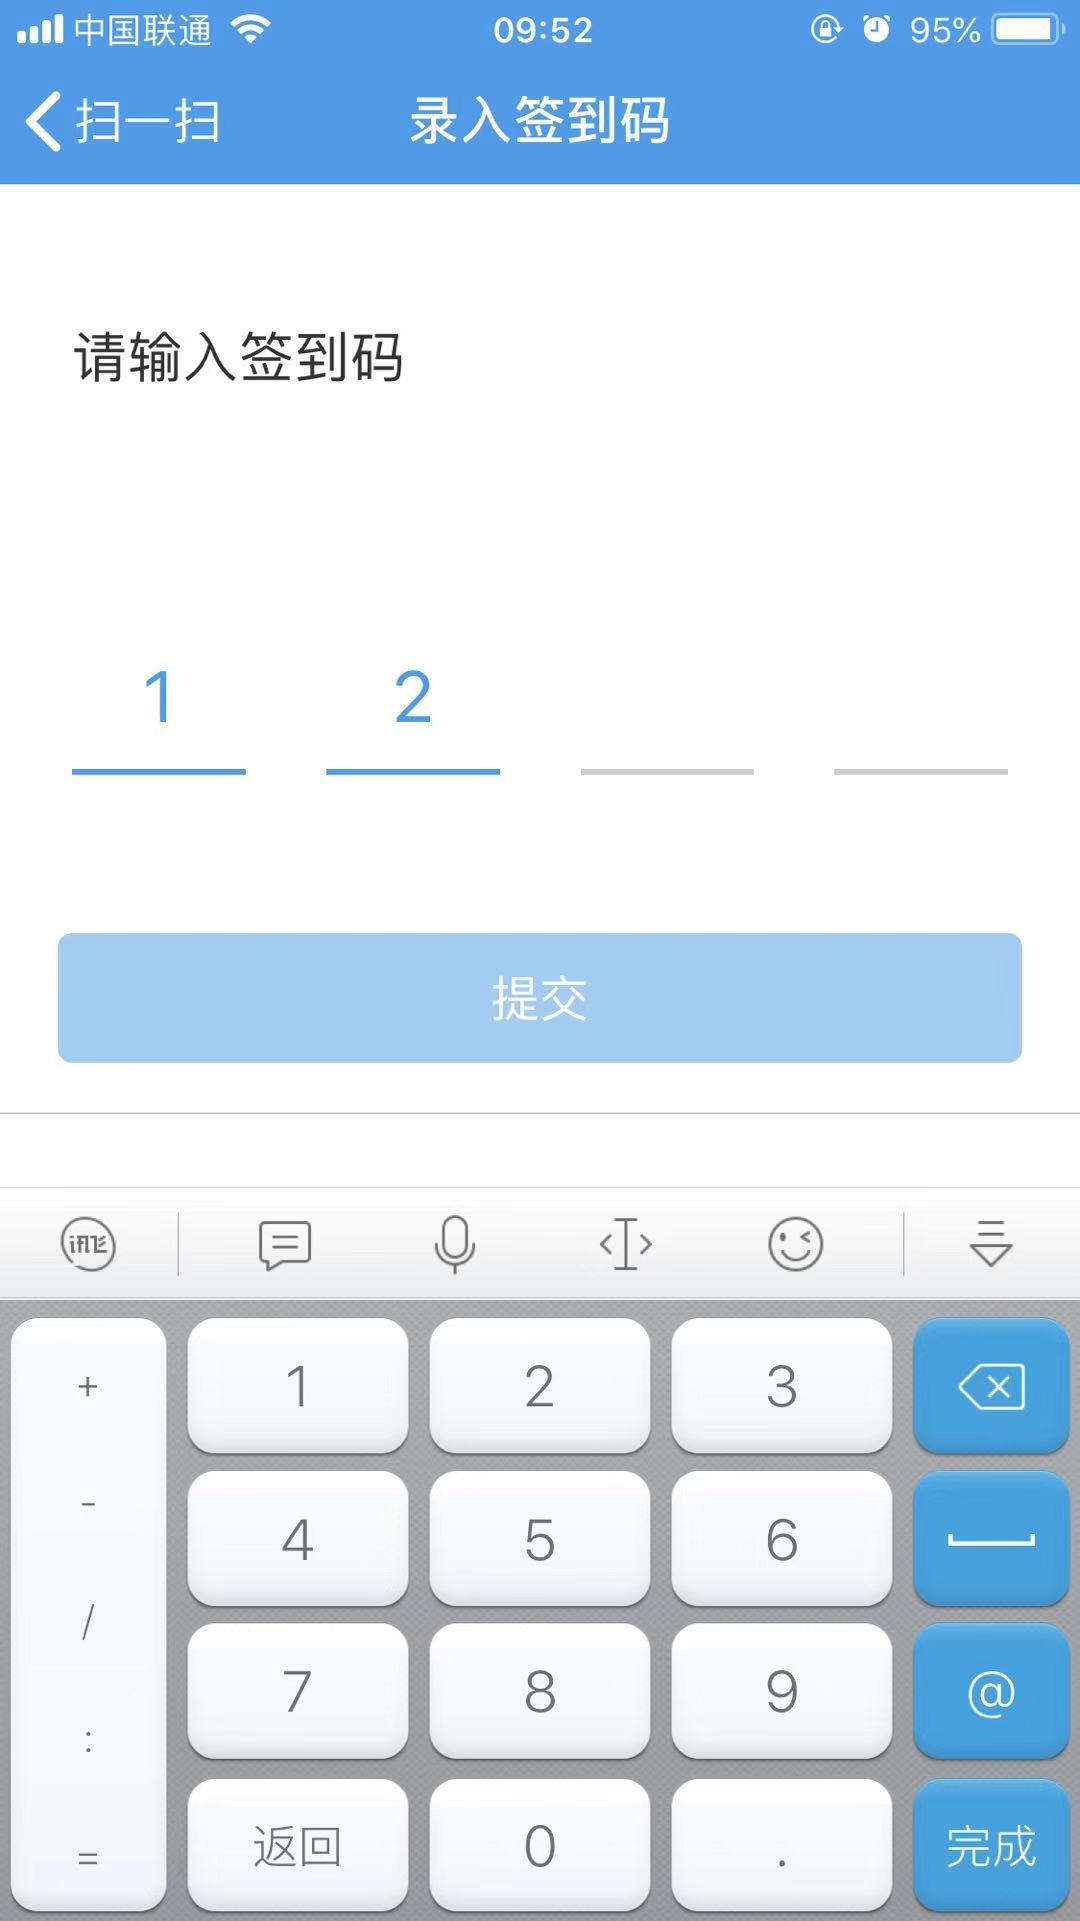
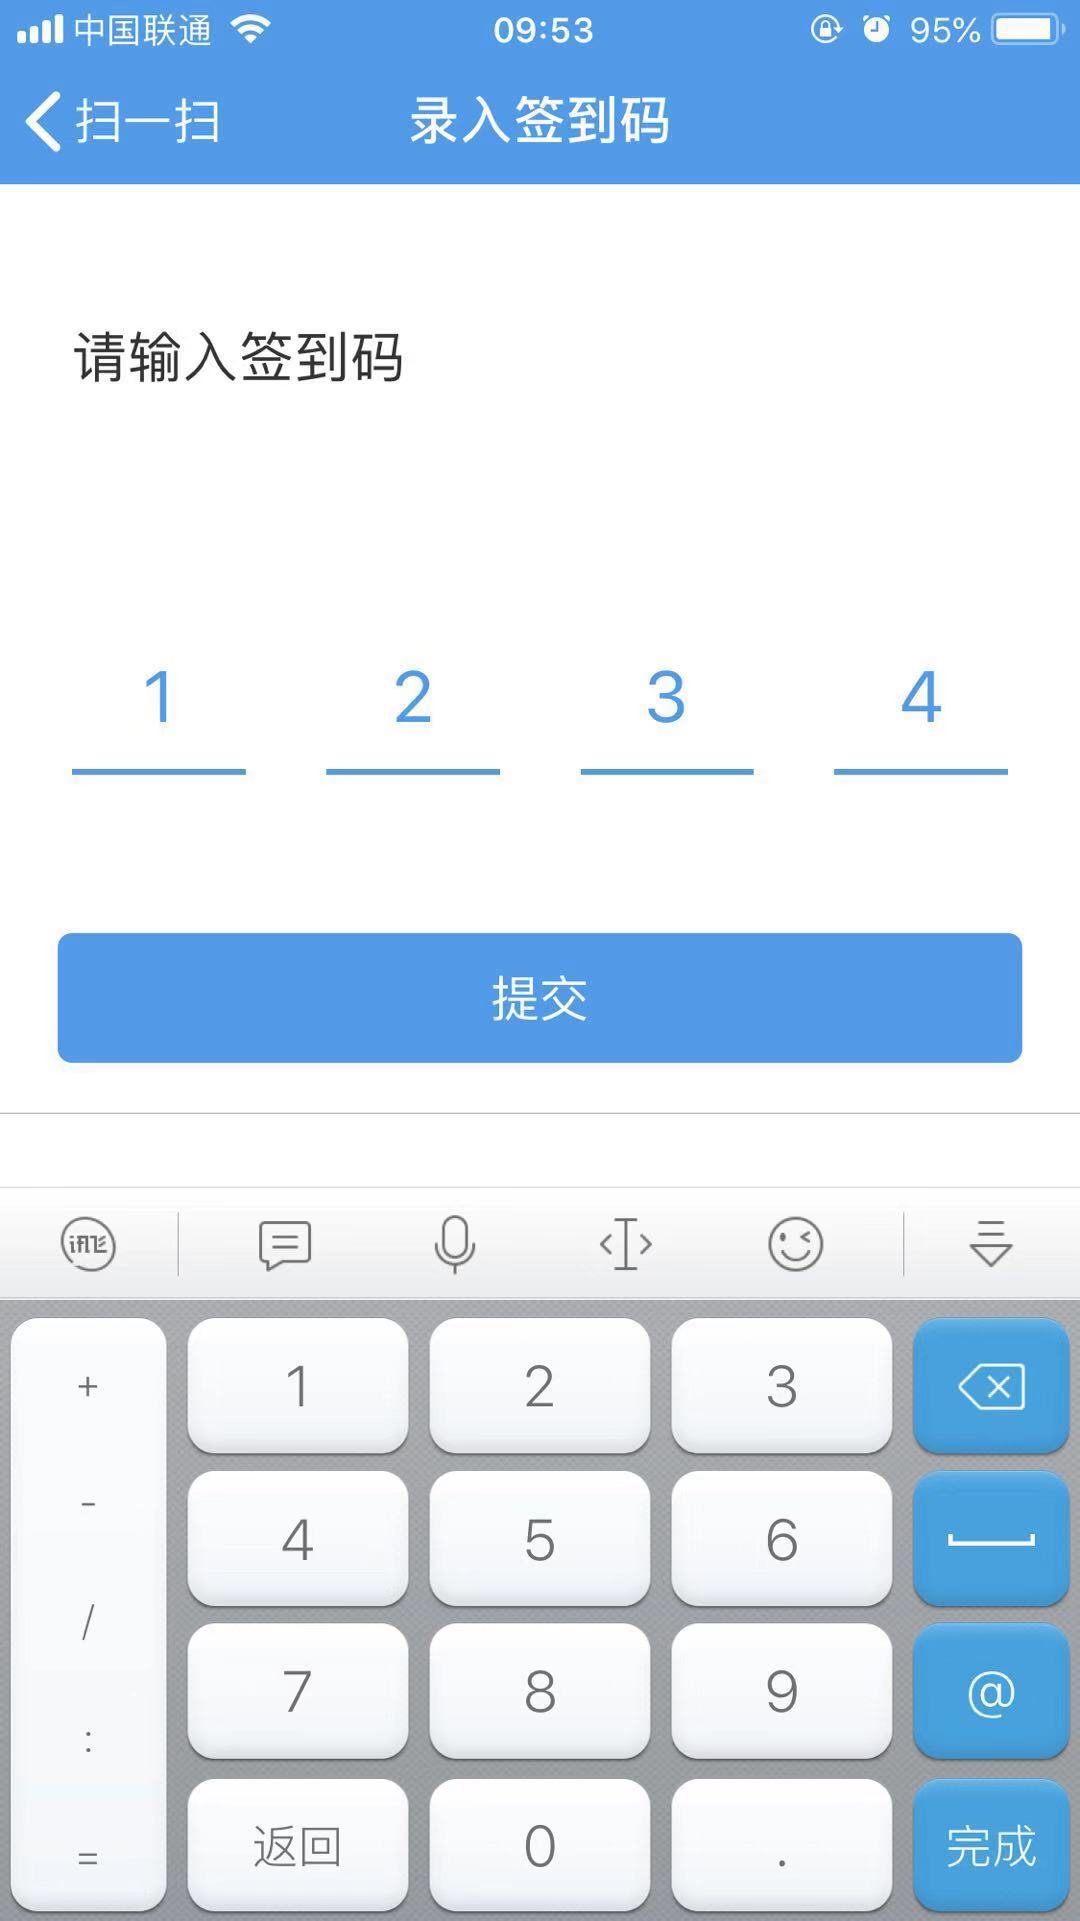
在很多App中都有输入验证码的功能需求,最近项目需要也有这个功能。做完之后简单整理了一下,将实现的基本思路做下记录。实现后的效果大致如下图所示,当四位签到码全部输入时,提交按钮是可以提交的,否则提交按钮失效,不允许提交。
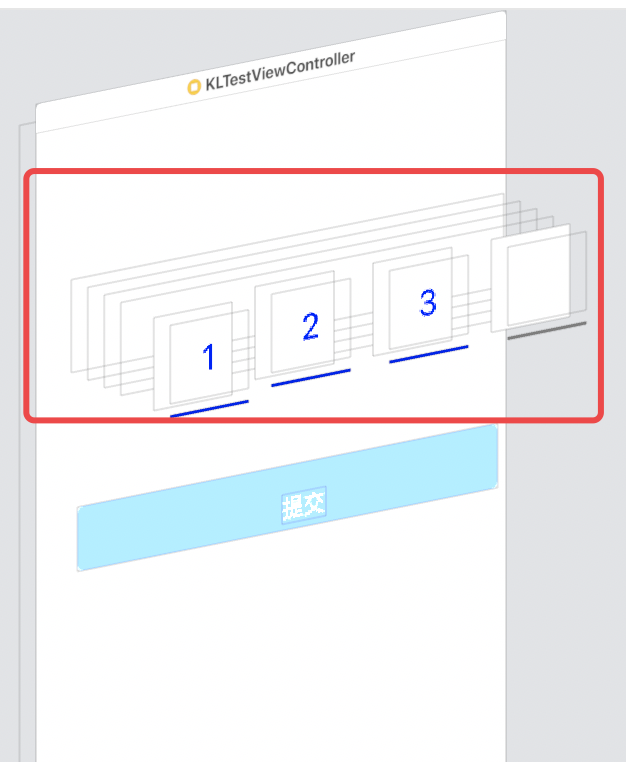
上图整个界面的布局很简单,就不多说了,重点就是中间这一块的验证码输入功能,我把它单独封装拿出来封装在一个自定义View(KLCodeResignView)里了,下图是KLCodeResignView布局的层次结构。
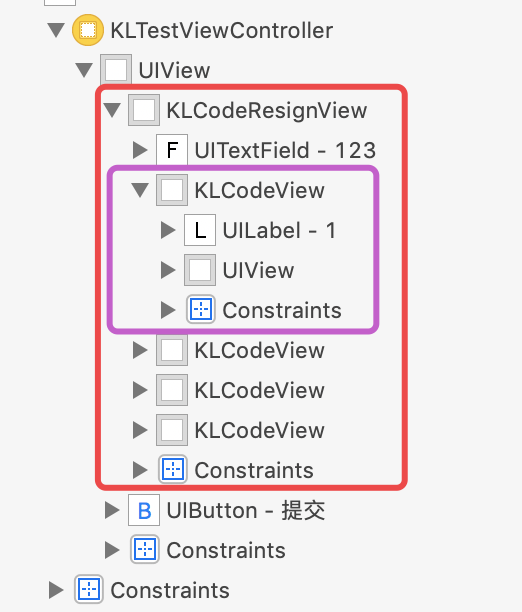
验证码输入视图(KLCodeResignView)的最底层用一个透明的UITextField来接收键盘的输入信息,上面则用4个展示视图(KLCodeView)来分别展示输入的验证码信息,所有的展示视图(KLCodeView)都放在一个数组中,方便后续的访问和调用。所以,KLCodeResignView应该向外提供两个处理入口,验证码输入完成和输入未完成时的操作入口,并在完成时提供输入验证码信息,这里我们采用block的方式进行向外提供操作入口。此外,我们还提供了一个可以修改验证码位数的入口,调用 initWithCodeBits: 即可设置验证码的位数。KLCodeResignView.h以及KLCodeResignView分类的代码如下:
#import <UIKit/UIKit.h>

NS_ASSUME_NONNULL_BEGIN

typedef void (^CodeResignCompleted)(NSString *content);
typedef void (^CodeResignUnCompleted)(NSString *content);

@interface KLCodeResignView : UIView

@property (copy, nonatomic) CodeResignCompleted codeResignCompleted;
@property (copy, nonatomic) CodeResignUnCompleted codeResignUnCompleted;

- (instancetype) initWithCodeBits:(NSInteger)codeBits;

@end
@interface KLCodeResignView () <UITextFieldDelegate>

@property (strong, nonatomic) UITextField *contentF; //监听内容输入
@property (strong, nonatomic) NSArray<KLCodeView *> *codeViewsArr;//展示验证码内容的codeView数组
@property (assign, nonatomic) NSInteger currIndex;//当前待输入的codeView的下标

@property (assign, nonatomic) NSInteger codeBits;//位数

@end
2.1 信息输入框UITextField
信息输入框UITextField是最重要的一部分,布局在KLCodeResignView的最底层,主要作用是用于接收验证码的输入,但是对应的光标肯定是不能显示出来的,而且该UITextField不能进行复制、粘贴、选择等操作。所以信息输入框contentF的配置如下:
- (UITextField *)contentF {
    if (!_contentF) {
        _contentF = [[UITextField alloc] init];
        //背景颜色和字体颜色都设置为透明的,这样在界面上就看不到
        _contentF.backgroundColor = [UIColor clearColor];
        _contentF.textColor = [UIColor clearColor];
        _contentF.keyboardType = UIKeyboardTypeNumberPad;//数字键盘
        _contentF.returnKeyType = UIReturnKeyDone;//完成
        _contentF.tintColor = [UIColor clearColor];//设置光标的颜色
        _contentF.delegate = self;
    }
    return _contentF;
}
最后,我们通过添加UITextField的分类来实现屏蔽复制、粘贴、选择等操作,其实这些都是在UITextField的 - (BOOL)canPerformAction:(SEL)action withSender:(id)sender 进行控制的,返回YES则允许,否则不允许,所以这里我们不管什么操作,全部返回NO,这就屏蔽了所有的操作。
@implementation UITextField (ForbiddenSelect)

/*
 该函数控制是否允许 选择 全选 剪切 f粘贴等功能,可以针对不同功能进行限制
 返回YES表示允许对应的功能,返回NO则表示不允许对应的功能
 直接返回NO则表示不允许任何编辑
 */
- (BOOL)canPerformAction:(SEL)action withSender:(id)sender {
    return NO;
}

@end
2.2 展示视图(KLCodeView)
展示视图(KLCodeView)就很简单了,布局就是一个UILabel在上面,最下面一个UIView的下划线,唯一需要考虑的点就是下划线的颜色问题,如何根据是否有内容进行颜色变化。这个问题的解决也很简单,因为这个 UILabel的内容是通过一个属性text来进行设置的,所以我们重写text的设置方法就OK了,当设置的text内容不为空时,我们就设置对应的颜色为需要的颜色(蓝色),否则设置为灰色。
- (void)setText:(NSString *)text {
    if (text.length > 0) {//有数据时设置为蓝色
        self.codeLabel.text = [text substringToIndex:1];//只取一位数
        self.lineView.backgroundColor = [UIColor blueColor];
    } else {
        self.codeLabel.text = @"";
        self.lineView.backgroundColor = [UIColor grayColor];
    }
}
2.3 输入逻辑处理
输入处理逻辑就是在输入和删除时进内容进行判断,并将对应的内容显示到对应的展示视图(KLCodeView)中,内容的输入就都在UITextField的代理UITextFieldDelegate中的 - (BOOL)textField: shouldChangeCharactersInRange: replacementString: 方法中。
- 我们用属性currIndex来表示当前待输入的展示视图KLCodeView的下标,所以,当输入一个合法的验证码时,currIndex要加1,当删除一个验证码时,currIndex要减1,并且当currIndex == 0时,删除按钮不起作用,currIndex不再减1了。
- 如果在验证码输入完成和未完成时做不同的处理,通过我们前面提供的两个block codeResignCompleted 和 codeResignUnCompleted 就可以了,我们再这里通过判断currIndex 是否等于 self.codeBits,相等则完成,否则没有完成,并且调用对应的block进行处理。
- 对输入内容进行判断是否是纯数字,这个很简单,判断方法网上有很多方案,这里也简单地贴在下面的代码中。
- 对输入的字符串的长度进行判断,如果超过当前位数,则输入无效。
- 完成、删除操作的判断一定要在是否是纯数字以及位数过长判断之前,否则可能会导致完成、删除操作失效。
#pragma mark --- UITextField delegate
- (BOOL)textField:(UITextField *)textField shouldChangeCharactersInRange:(NSRange)range replacementString:(NSString *)string {
    //完成 则收回键盘
    if ([string isEqualToString:@"
"]) {
        [textField resignFirstResponder];
        return NO;
    }
    //删除 操作
    if ([string isEqualToString:@""]) {
        if (self.currIndex == 0) {//待输入的下标为0时 删除时下标不变化,否则下标减1
            self.codeViewsArr[self.currIndex].text = string;
        } else {
            self.codeViewsArr[--self.currIndex].text = string;
            if (self.codeResignUnCompleted) {
                NSString *content = [textField.text substringToIndex:self.currIndex];
                self.codeResignUnCompleted(content);
            }
        }
        return YES;
    }
    //判断 输入的是否是纯数字,不是纯数字 输入无效
    if (![self judgePureInt:string]) {
        return NO;
    }
    //如果输入的内容超过了验证码的长度 则输入无效
    if ((textField.text.length + string.length) > self.codeBits) {
        return NO;
    }
    //输入的数字,则当前待输入的下标对应的 view中添加输入的数字,并且下标加1
    self.codeViewsArr[self.currIndex++].text = string;
    //当当前待输入的下标为codebits时表示已经输入了对应位数的验证码,执行完成操作
    if (self.currIndex == self.codeBits && self.codeResignCompleted) {
        NSString *content = [NSString stringWithFormat:@"%@%@", textField.text, string];
        self.codeResignCompleted(content);
    } else {
        if (self.codeResignUnCompleted) {
            NSString *content = [NSString stringWithFormat:@"%@%@", textField.text, string];
            self.codeResignUnCompleted(content);
        }
    }

    return YES;
}
//判断一个字符串是都是纯数字
- (BOOL)judgePureInt:(NSString *)content {
    NSScanner *scan = [NSScanner scannerWithString:content];
    int val;
    return [scan scanInt:&val] && [scan isAtEnd];
}
使用时只需要创建对应的View进行布局就OK了,然后设置验证码输入完成和验证码输入未完成对应的处理方案。
- (void)viewDidLoad {
    [super viewDidLoad];
    self.view.backgroundColor = [UIColor whiteColor];
    WEAKSELF
    KLCodeResignView *codeView = [[KLCodeResignView alloc] initWithCodeBits:4];
    codeView.codeResignCompleted = ^(NSString * _Nonnull content) {
        //对应位数输入完成时 允许提交按钮有效 允许提交
        NSLog(@"%@", content);
        weakSelf.submitBtn.enabled = YES;
        weakSelf.submitBtn.alpha = 1.0f;
    };
    codeView.codeResignUnCompleted = ^(NSString * _Nonnull content) {
        //对应位数未输入完成时 提交按钮失效 不允许提交
        weakSelf.submitBtn.enabled = NO;
        weakSelf.submitBtn.alpha = 0.5f;
    };
    [self.view addSubview:codeView];

    [codeView mas_makeConstraints:^(MASConstraintMaker *make) {
        make.left.mas_equalTo(weakSelf.view).mas_offset(15.0f);
        make.right.mas_equalTo(weakSelf.view).mas_offset(-15.0f);
        make.top.mas_equalTo(weakSelf.view).mas_offset(100.0f);
        make.height.mas_equalTo(40.0f);
    }];

    _submitBtn = [UIButton buttonWithType:UIButtonTypeCustom];
    _submitBtn.titleLabel.font = FONT(17.0f);
    [_submitBtn setTitle:@"提交" forState:UIControlStateNormal];
    [_submitBtn setTitleColor:[UIColor whiteColor] forState:UIControlStateNormal];
    [_submitBtn setBackgroundColor:XRGB(3d,9a,e8)];
    _submitBtn.enabled = NO;
    _submitBtn.alpha = 0.5f;
    _submitBtn.layer.cornerRadius = 5.0f;
//    [submitBtn addTarget:self action:@selector(submitBtnClicked:) forControlEvents:UIControlEventTouchUpInside];
    [self.view addSubview:_submitBtn];
    [_submitBtn mas_makeConstraints:^(MASConstraintMaker *make) {
        make.left.mas_equalTo(weakSelf.view).mas_offset(20.0f);
        make.right.mas_equalTo(weakSelf.view).mas_offset(-20.0f);
        make.top.mas_equalTo(weakSelf.view).mas_offset(260.0f);
        make.height.mas_equalTo(45.0f);
    }];
}
所有的代码如下,主要分为两个文件,一个 KLCodeResignView.h,一个KLCodeResignView.m,如下:


#import <UIKit/UIKit.h>

NS_ASSUME_NONNULL_BEGIN

typedef void (^CodeResignCompleted)(NSString *content);
typedef void (^CodeResignUnCompleted)(NSString *content);

@interface KLCodeResignView : UIView

@property (copy, nonatomic) CodeResignCompleted codeResignCompleted;
@property (copy, nonatomic) CodeResignUnCompleted codeResignUnCompleted;

- (instancetype) initWithCodeBits:(NSInteger)codeBits;

@end
#import "KLCodeResignView.h"

#define WEAKSELF typeof(self) __weak weakSelf = self;
//自定义 验证码展示视图 view,由一个label和一个下划线组成
@interface KLCodeView : UIView

@property (strong, nonatomic) NSString *text;
@property (strong, nonatomic) UILabel *codeLabel;
@property (strong, nonatomic) UIView *lineView;

@end


@interface KLCodeResignView () <UITextFieldDelegate>

@property (strong, nonatomic) UITextField *contentF; //监听内容输入
@property (strong, nonatomic) NSArray<KLCodeView *> *codeViewsArr;//显示输入内容的codeView数组
@property (assign, nonatomic) NSInteger currIndex;//当前待输入的codeView的下标

@property (assign, nonatomic) NSInteger codeBits;//位数

@end

@implementation KLCodeResignView

- (instancetype)initWithCodeBits:(NSInteger)codeBits {
    self = [super init];
    self.backgroundColor = [UIColor whiteColor];
    self.codeBits = codeBits;
    if (self) {
        //验证码默认是4位
        if (self.codeBits < 1) {
            self.codeBits = 4;
        }
        WEAKSELF
        [self addSubview:self.contentF];
        [self.contentF mas_makeConstraints:^(MASConstraintMaker *make) {
            make.top.bottom.right.left.mas_equalTo(weakSelf).mas_offset(0.0f);
        }];

        for(NSInteger i = 0; i < self.codeBits; i++) {
            KLCodeView *codeView = self.codeViewsArr[i];
            [self addSubview:codeView];
        }
    }
    return self;
}

- (void)layoutSubviews {
    [super layoutSubviews];
    WEAKSELF
    //设定每个数字之间的间距为数字view宽度的一半 总宽度就是 bits + (bits - 1)* 0.5
    CGFloat codeViewWidth = self.bounds.size.width/(self.codeBits * 1.5 - 0.5);
    for(NSInteger i = 0; i < self.codeBits; i++) {
        KLCodeView *codeView = self.codeViewsArr[i];
        [codeView mas_updateConstraints:^(MASConstraintMaker *make) {
            CGFloat left = codeViewWidth * 1.5 * i;
            make.left.mas_equalTo(weakSelf).mas_offset(left);
            make.top.bottom.mas_equalTo(weakSelf).mas_offset(0.0f);
            make.width.mas_equalTo(codeViewWidth);
        }];
    }
}

#pragma mark --- UITextField delegate
- (BOOL)textField:(UITextField *)textField shouldChangeCharactersInRange:(NSRange)range replacementString:(NSString *)string {
    //完成 则收回键盘
    if ([string isEqualToString:@"
"]) {
        [textField resignFirstResponder];
        return NO;
    }
    //删除 操作
    if ([string isEqualToString:@""]) {
        if (self.currIndex == 0) {//待输入的下标为0时 删除时下标不变化,否则下标减1
            self.codeViewsArr[self.currIndex].text = string;
        } else {
            self.codeViewsArr[--self.currIndex].text = string;
            if (self.codeResignUnCompleted) {
                NSString *content = [textField.text substringToIndex:self.currIndex];
                self.codeResignUnCompleted(content);
            }
        }
        return YES;
    }
    //判断 输入的是否是纯数字,不是纯数字 输入无效
    if (![self judgePureInt:string]) {
        return NO;
    }
    //如果输入的内容超过了验证码的长度 则输入无效
    if ((textField.text.length + string.length) > self.codeBits) {
        return NO;
    }
    //输入的数字,则当前待输入的下标对应的 view中添加输入的数字,并且下标加1
    self.codeViewsArr[self.currIndex++].text = string;
    //当当前待输入的下标为codebits时表示已经输入了对应位数的验证码,执行完成操作
    if (self.currIndex == self.codeBits && self.codeResignCompleted) {
        NSString *content = [NSString stringWithFormat:@"%@%@", textField.text, string];
        self.codeResignCompleted(content);
    } else {
        if (self.codeResignUnCompleted) {
            NSString *content = [NSString stringWithFormat:@"%@%@", textField.text, string];
            self.codeResignUnCompleted(content);
        }
    }

    return YES;
}

- (UITextField *)contentF {
    if (!_contentF) {
        _contentF = [[UITextField alloc] init];
        //背景颜色和字体颜色都设置为透明的,这样在界面上就看不到
        _contentF.backgroundColor = [UIColor clearColor];
        _contentF.textColor = [UIColor clearColor];
        _contentF.keyboardType = UIKeyboardTypeNumberPad;//数字键盘
        _contentF.returnKeyType = UIReturnKeyDone;//完成
        _contentF.tintColor = [UIColor clearColor];//设置光标的颜色
        _contentF.delegate = self;
    }
    return _contentF;
}

- (NSArray<KLCodeView *> *)codeViewsArr {
    if (!_codeViewsArr) {
        NSMutableArray *arr = [NSMutableArray array];
        for (NSInteger i = 0; i < self.codeBits; i++) {
            KLCodeView *codeView = [[KLCodeView alloc] init];
            [arr addObject:codeView];
        }
        _codeViewsArr = [NSArray arrayWithArray:arr];
    }
    return _codeViewsArr;
}

//判断一个字符串是都是纯数字
- (BOOL)judgePureInt:(NSString *)content {
    NSScanner *scan = [NSScanner scannerWithString:content];
    int val;
    return [scan scanInt:&val] && [scan isAtEnd];
}

@end


@implementation UITextField (ForbiddenSelect)

/*
 该函数控制是否允许 选择 全选 剪切 f粘贴等功能,可以针对不同功能进行限制
 返回YES表示允许对应的功能,返回NO则表示不允许对应的功能
 直接返回NO则表示不允许任何编辑
 */
- (BOOL)canPerformAction:(SEL)action withSender:(id)sender {
    return NO;
}

@end


//验证码展示视图 的实现
@implementation KLCodeView

- (instancetype)initWithFrame:(CGRect)frame {
    self = [super initWithFrame:frame];
    if (self) {
        WEAKSELF
        self.backgroundColor = [UIColor whiteColor];
        self.userInteractionEnabled = NO;
        //数字编码 label
        _codeLabel = [[UILabel alloc] init];
        _codeLabel.textColor = [UIColor blueColor];
        _codeLabel.font = FONT(25.0f);
        _codeLabel.textAlignment = NSTextAlignmentCenter;
        [self addSubview:_codeLabel];
        [_codeLabel mas_makeConstraints:^(MASConstraintMaker *make) {
            make.top.left.right.mas_equalTo(weakSelf).mas_offset(0.0f);
            make.bottom.mas_equalTo(weakSelf).mas_offset(-10.0f);
        }];

        _lineView = [[UIView alloc] init];
        _lineView.backgroundColor = [UIColor grayColor];
        [self addSubview:_lineView];
        [_lineView mas_makeConstraints:^(MASConstraintMaker *make) {
            make.bottom.left.right.mas_equalTo(weakSelf).mas_offset(0.0f);
            make.height.mas_equalTo(2.0f);
        }];
    }
    return self;
}

- (void)setText:(NSString *)text {
    if (text.length > 0) {
        self.codeLabel.text = [text substringToIndex:1];
        self.lineView.backgroundColor = [UIColor blueColor];
    } else {
        self.codeLabel.text = @"";
        self.lineView.backgroundColor = [UIColor grayColor];
    }
}


@end