摘要:
FragmentTabHost由Tabhost、TabWidget、切换内容容器FrameLayout层次关系组成----FragmentTabHost|-----TabWidget |-----FrameLayout布局实现Tabhost采用android.support.v4.app。FragmentTabHost Note-id:@android:id/tabhost实现tabWidget Note-id
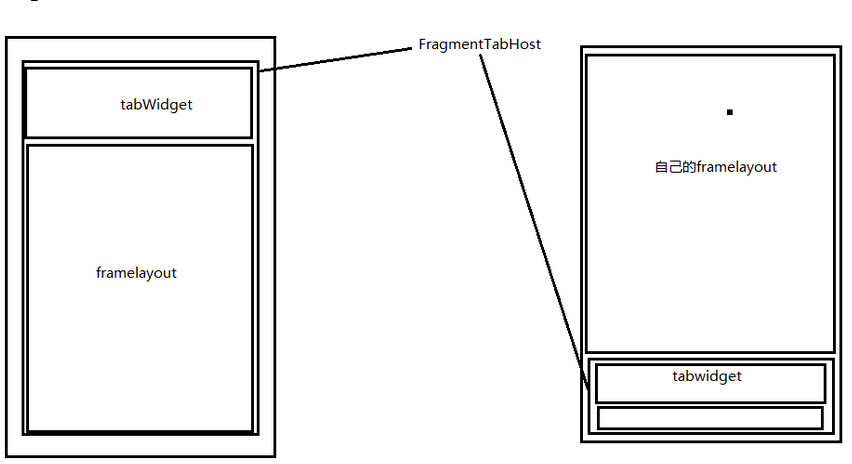
FragmentTabHost组成
- Tabhost,TabWidget,切换的内容容器FrameLayout
层级关系
----FragmentTabHost
    |-----TabWidget
    |-----FrameLayout
布局实现
- 实现tabhost采用android.support.v4.app.FragmentTabHost
注意 id:@android:id/tabhost
- 实现tabWidget
注意 id:@android:id/tabs
实现FrameLayout
注意
1. id: @android:id/tabcontent
2. 此容器已经被废除,但在布局中必须有
实现自定义的内容容器区域(FrameLayout)
注意 :
1. 整体需采用线性布局
2. 将自定义展示的区域放到TabHost之上
3. 自定义的内容需要给权重
代码实现
- 初始化TabHost
调用setup(Context,FragmentManager,int);
最后一个参数 指的是 Fragment的容器id 用来切换fragment的
- 新建TabSpec
调用setIndicator(View view)//实现自定义的tab
- 添加TabSpec
调用addTab(TabSpec,Class,Bundle)的方法添加TabSpec
Class 指的是 tab对应的 Fragment
Bundle 指的是 Fragment 初始化的参数
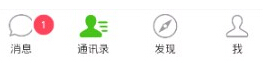
组合式控件的实现(下面的Tab一般都自定义)
- 新建布局
- 将布局和代码进行关联
新建的View 必须继承 和 布局容器一样的容器类
通过View.inflate(context,LayoutId, this)将View和xml进行绑定
- 功能进行封装
根据当前View需要的功能进行封装
布局:
<LinearLayout xmlns:android="http://schemas.android.com/apk/res/android"
    xmlns:tools="http://schemas.android.com/tools"
    android:layout_width="match_parent"
    android:layout_height="match_parent"
    android:orientation="vertical" >
    <FrameLayout
        android:
        android:layout_width="fill_parent"
        android:layout_height="0dp"
        android:layout_weight="1" >
    </FrameLayout>
    <android.support.v4.app.FragmentTabHost
        android:
        android:layout_width="match_parent"
        android:layout_height="wrap_content" >
        <TabWidget
            android:
            android:layout_width="match_parent"
            android:layout_height="wrap_content"
            android:layout_alignParentBottom="true"
            android:background="#FFF1F1F1" >
        </TabWidget>
        <FrameLayout
            android:
            android:layout_width="0dp"
            android:layout_height="0dp" >
        </FrameLayout>
    </android.support.v4.app.FragmentTabHost>
</LinearLayout>
代码:
public class HomeActivity extends BaseActivity implements OnTabChangeListener {
	private static final String TAB_CHAT = "chat";
	private static final String TAB_CONTACT = "contact";
	private static final String TAB_DISCOVER = "discover";
	private static final String TAB_ME = "me";
	private FragmentTabHost tabhost;
	private TabIndicatorView chatIndicator;
	private TabIndicatorView contactIndicator;
	private TabIndicatorView discoverIndicator;
	private TabIndicatorView meIndicator;
	@Override
	protected void onCreate(Bundle savedInstanceState) {
		super.onCreate(savedInstanceState);
		setContentView(R.layout.act_home);
		// 1. 初始化TabHost
		tabhost = (FragmentTabHost) findViewById(android.R.id.tabhost);
		tabhost.setup(this, getSupportFragmentManager(),
				R.id.activity_home_container);//上面的fargment
		// 2. 新建TabSpec
		TabSpec spec = tabhost.newTabSpec(TAB_CHAT);//需要自定义常量
		chatIndicator = new TabIndicatorView(this);
		chatIndicator.setTabTitle("消息");
		chatIndicator.setTabIcon(R.drawable.tab_icon_chat_normal,
				R.drawable.tab_icon_chat_focus);//选中和默认的图标
		spec.setIndicator(chatIndicator);
		// 3. 添加TabSpec
		tabhost.addTab(spec, ChatFra.class, null);//添加上面的fargment
		// 2. 新建TabSpec
		spec = tabhost.newTabSpec(TAB_CONTACT);
		contactIndicator = new TabIndicatorView(this);
		contactIndicator.setTabIcon(R.drawable.tab_icon_contact_normal,
				R.drawable.tab_icon_contact_focus);
		contactIndicator.setTabTitle("通讯录");
		contactIndicator.setTabUnreadCount(10);
		spec.setIndicator(contactIndicator);
		// 3. 添加TabSpec
		tabhost.addTab(spec, ContactFra.class, null);
		// 2. 新建TabSpec
		spec = tabhost.newTabSpec(TAB_DISCOVER);
		discoverIndicator = new TabIndicatorView(this);
		discoverIndicator.setTabIcon(R.drawable.tab_icon_discover_normal,
				R.drawable.tab_icon_discover_focus);
		discoverIndicator.setTabTitle("发现");
		discoverIndicator.setTabUnreadCount(10);
		spec.setIndicator(discoverIndicator);
		// 3. 添加TabSpec
		tabhost.addTab(spec, DiscoverFra.class, null);
		// 2. 新建TabSpec
		spec = tabhost.newTabSpec(TAB_ME);
		meIndicator = new TabIndicatorView(this);
		meIndicator.setTabIcon(R.drawable.tab_icon_me_normal,
				R.drawable.tab_icon_me_focus);
		meIndicator.setTabTitle("我");
		meIndicator.setTabUnreadCount(10);
		spec.setIndicator(meIndicator);
		// 3. 添加TabSpec
		tabhost.addTab(spec, MeFra.class, null);
		// 去掉分割线
		tabhost.getTabWidget().setDividerDrawable(android.R.color.white);
		// 初始化 tab选中
		tabhost.setCurrentTabByTag(TAB_CHAT);
		chatIndicator.setTabSelected(true);
		// 设置tab切换的监听
		tabhost.setOnTabChangedListener(this);
	}
	@Override
	public void onTabChanged(String tag) {
		chatIndicator.setTabSelected(false);
		contactIndicator.setTabSelected(false);
		discoverIndicator.setTabSelected(false);
		meIndicator.setTabSelected(false);
		if (TAB_CHAT.equals(tag)) {
			chatIndicator.setTabSelected(true);
		} else if (TAB_CONTACT.equals(tag)) {
			contactIndicator.setTabSelected(true);
		} else if (TAB_DISCOVER.equals(tag)) {
			discoverIndicator.setTabSelected(true);
		} else if (TAB_ME.equals(tag)) {
			meIndicator.setTabSelected(true);
		}
	}
}

下面的自定义,动态的去添加信息
public class TabIndicatorView extends RelativeLayout {
	private ImageView ivTabIcon;
	private TextView tvTabHint;
	private TextView tvTabUnRead;
	private int normalIconId;
	private int focusIconId;
	public TabIndicatorView(Context context) {
		this(context, null);//这个实现这个构造函数就可以了
	}
	public TabIndicatorView(Context context, AttributeSet attrs) {
		super(context, attrs);
		// 将布局文件和 代码进行绑定
		View.inflate(context, R.layout.tab_indicator, this);
		ivTabIcon = (ImageView) findViewById(R.id.tab_indicator_icon);
		tvTabHint = (TextView) findViewById(R.id.tab_indicator_hint);
		tvTabUnRead = (TextView) findViewById(R.id.tab_indicator_unread);

		setTabUnreadCount(0);
	}
	// 设置tab的title
	public void setTabTitle(String title) {
		tvTabHint.setText(title);
	}
	public void setTabTitle(int titleId) {
		tvTabHint.setText(titleId);
	}
	// 初始化图标
	public void setTabIcon(int normalIconId, int focusIconId) {
		this.normalIconId = normalIconId;
		this.focusIconId = focusIconId;
		ivTabIcon.setImageResource(normalIconId);
	}
	// 设置未读数
	public void setTabUnreadCount(int unreadCount) {
		if (unreadCount <= 0) {
			tvTabUnRead.setVisibility(View.GONE);
		} else {
			if (unreadCount <= 99) {
				tvTabUnRead.setText(unreadCount + "");
			} else {
				tvTabUnRead.setText("99+");
			}
			tvTabUnRead.setVisibility(View.VISIBLE);
		}
	}
	// 设置选中
	public void setTabSelected(boolean selected) {
		if (selected) {
			ivTabIcon.setImageResource(focusIconId);
		} else {
			ivTabIcon.setImageResource(normalIconId);
		}
	}
}