摘要:
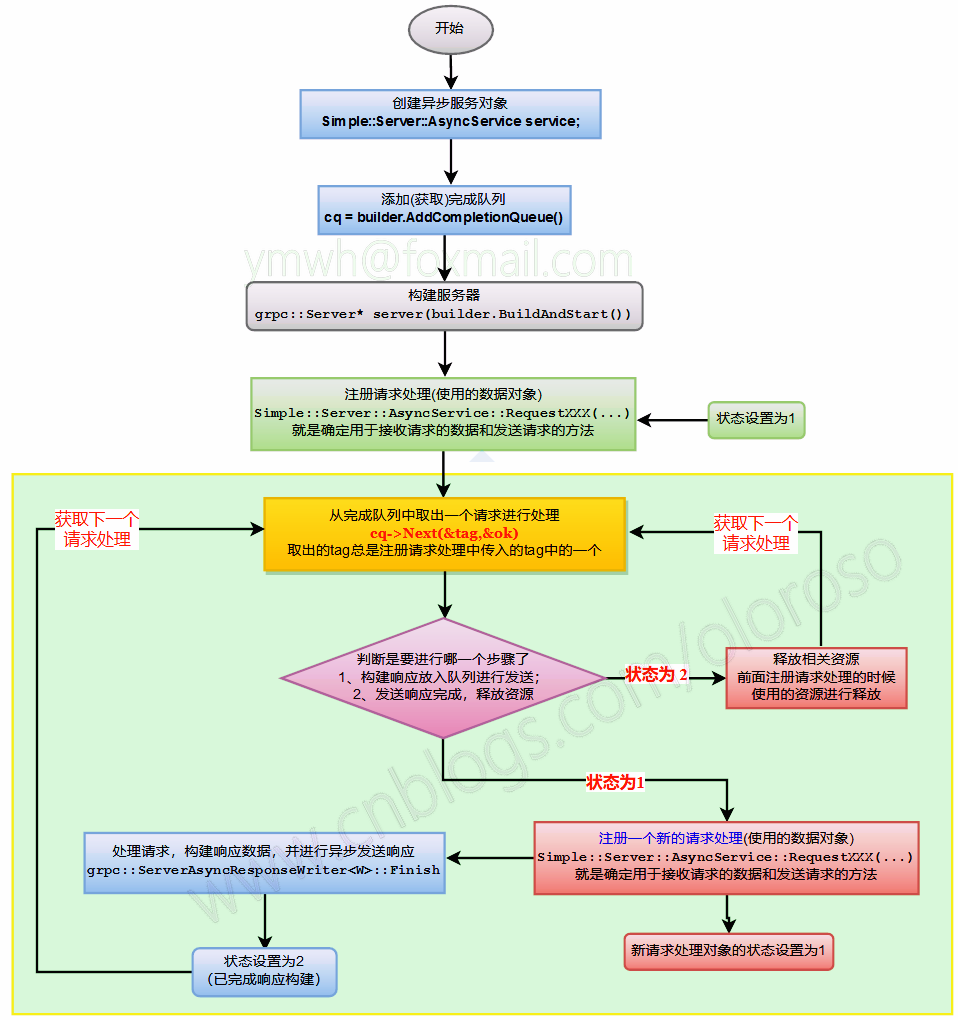
grpc使用记录(三)简单异步服务实例 您只需要实现相关的服务接口来同步服务,而不需要管理太多的事情。当异步服务GRPC运行时,它会将读取的客户端请求放入CompletionQueue。它需要主动将它们取出,然后进行相关处理。它可以是多线程或单线程的。简而言之,创建GRPC异步服务的关键点如下:1。创建服务对象时,请创建AsyncService而不是service。
编写异步服务和编写同步服务的基本流程都差不多,稍有点区别。
同步服务你只需要实现相关服务接口的实现即可,不需要管理太多东西。异步服务GRPC运行时会把读取到的客户端请求放入CompletionQueue中,需要主动从中取出,然后进行相关的处理,可以多线程也可以单线程。
1、编写proto文件,定义服务
这里和grpc使用记录(二)简单同步服务实例中的一样,这里就不多说了。
2、编译proto文件,生成代码
这里也是和grpc使用记录(二)简单同步服务实例中的一样的。
3、编写服务端代码
这里可以复用前面同步服务的代码,只需要做简单的修改即可。
简单说一下创建一个GRPC异步服务的要点:
- 1、创建服务对象的时候要创建
AsyncService,而不是Service。 - 2、至少需要添加一个
grpc::ServerCompletionQueue用于异步任务操作。 - 3、必须要通过
AsyncService::RequestXXXX来注册XXXX接口的处理。 - 4、一个客户端请求的处理可简单的分为两个步骤:1、构建返回给客户端的响应数据;2、发送响应数据给客户端。
- 5、完成队列和注册请求处理都可以有多个,不一定非得是一个。
async_service.cpp
下面代码简单的创建了3个HandlerContext的结构体类型,用于保存三个接口请求处理过程中的数据,实际的请求处理还是和之前同步服务的一样,这里只是写成了Test1、Test2、Test3三个函数的形式。
// > g++ -o aservice async_service.cpp  simple.grpc.pb.cc simple.pb.cc -std=c++11 -I. -lgrpc++ -lgrpc -lprotobuf -lgpr -lz -lcares -laddress_sorting -lpthread -Wno-deprecated

#include "simple.grpc.pb.h"
#include <grpcpp/grpcpp.h>

#include <memory>
#include <iostream>
#include <strstream>

struct HandlerContext {
  // 当前处理状态(处理分为两步:1处理请求构建响应数据;2发送响应)
  // 这里记录一下完成到哪一步了,以便进行相关操作
  int                 status_; // (1构建响应完成;2发送完成)
  // rpc的上下文,允许通过它进行诸如压缩、身份验证,以及把元数据发回客户端等。
  grpc::ServerContext ctx_;
};

struct HandlerTest1Context:public HandlerContext {
  // 用于接收客户端发送的请求
  Simple::TestRequest req_;
  // 用于发送响应给客户端
  Simple::TestNull    rep_;

  // 发送到客户端的方法对象
  grpc::ServerAsyncResponseWriter<Simple::TestNull> responder_;
  // 构造函数
  HandlerTest1Context()
    :responder_(&ctx_)
  {}
};

struct HandlerTest2Context:public HandlerContext  {
  // 用于接收客户端发送的请求
  Simple::TestNull req_;
  // 用于发送响应给客户端
  Simple::TestReply   rep_;

  // 发送到客户端的方法对象
  grpc::ServerAsyncResponseWriter<Simple::TestReply> responder_;
  // 构造函数
  HandlerTest2Context()
    :responder_(&ctx_)
  {}
};

struct HandlerTest3Context:public HandlerContext {
  // 用于接收客户端发送的请求
  Simple::TestRequest req_;
  // 用于发送响应给客户端
  Simple::TestReply   rep_;

  // 发送到客户端的方法对象
  grpc::ServerAsyncResponseWriter<Simple::TestReply> responder_;
  // 构造函数
  HandlerTest3Context()
    :responder_(&ctx_)
  {}
};


// Test1 实现都是差不都的,这里只是为了测试,就随便返回点数据了
grpc::Status Test1(grpc::ServerContext*       context,
                   const Simple::TestRequest* request,
                   Simple::TestNull*          response)
{
  printf("%s %d
",__func__,__LINE__);
  std::ostrstream os;
  os << "Client Name = " << request->name() << '
';
  os << "Clinet ID   = " << request->id()   << '
';
  os << "Clinet Value= " << request->value()<< '
';
  std::string message = os.str();
  // grpc状态可以设置message,所以也可以用来返回一些信息
  return grpc::Status(grpc::StatusCode::OK,message);
}
// Test2
grpc::Status Test2(grpc::ServerContext*       context,
                   const Simple::TestNull*    request,
                   Simple::TestReply*         response)
{
  printf("%s %d
",__func__,__LINE__);
  response->set_tid(100);
  response->set_svrname("Simple Server");
  response->set_takeuptime(0.01);
  return grpc::Status::OK;
}
// Test3
grpc::Status Test3(grpc::ServerContext*       context,
                   const Simple::TestRequest* request,
                   Simple::TestReply*         response)
{
  printf("%s %d
",__func__,__LINE__);
  std::ostrstream os;
  os << "Client Name = " << request->name() << '
';
  os << "Clinet ID   = " << request->id()   << '
';
  os << "Clinet Value= " << request->value()<< '
';
  std::string message = os.str();

  response->set_tid(__LINE__);
  response->set_svrname(__FILE__);
  response->set_takeuptime(1.234);
  // grpc状态可以设置message
  return grpc::Status(grpc::StatusCode::OK,std::move(message));
}

int main()
{
  // 服务构建器,用于构建同步或者异步服务
  grpc::ServerBuilder builder;
  // 添加监听的地址和端口,后一个参数用于设置认证方式,这里选择不认证
  builder.AddListeningPort("0.0.0.0:33333",grpc::InsecureServerCredentials());
  // 创建一个异步服务对象
  Simple::Server::AsyncService service;
  // 注册服务
  builder.RegisterService(&service);

  // 添加一个完成队列,用于与 gRPC 运行时异步通信
  std::unique_ptr<grpc::ServerCompletionQueue> cq_ptr = builder.AddCompletionQueue();

  // 构建服务器
  std::unique_ptr<grpc::Server> server(builder.BuildAndStart());
  std::cout<<"Server Runing"<<std::endl;
  // 这里用一个map来记录一下下面要进行处理的请求
  // 因为这里也是单线程的,所以不加锁了
  std::map<HandlerContext*,int> handlerMap; // value用于记录是Test1还是2、3
  {
    // 先创建三个类型接口的请求处理上下文对象
    HandlerTest1Context* htc1 = new HandlerTest1Context;
    htc1->status_ = 1; // 设置状态为1(因为只需要区分是否已经发送响应完成)
    HandlerTest2Context* htc2 = new HandlerTest2Context;
    htc2->status_ = 1;
    HandlerTest3Context* htc3 = new HandlerTest3Context;
    htc3->status_ = 1;

    // 将三个上下文对象存入map中
    handlerMap[htc1] = 1; // 值用于区分是哪个类型
    handlerMap[htc2] = 2;
    handlerMap[htc3] = 3;

    // 进入下面死循环前需要先注册一下请求
    service.RequestTest1(
        &htc1->ctx_         /*服务上下文对象*/,
        &htc1->req_         /*用于接收请求的对象*/,
        &htc1->responder_   /*异步写响应对象*/,
        cq_ptr.get()        /*新的调用使用的完成队列*/,
        cq_ptr.get()        /*通知使用的完成队列*/,
        htc1                /*唯一标识tag*/);
    service.RequestTest2(&htc2->ctx_,&htc2->req_,&htc2->responder_,cq_ptr.get(),cq_ptr.get(),htc2);
    service.RequestTest3(&htc3->ctx_,&htc3->req_,&htc3->responder_,cq_ptr.get(),cq_ptr.get(),htc3);
  }
  // 异步服务这里不能使用 server.Wait() 来等待处理,因为是异步服务
  // 服务器会把到达的请求放入队列,需要自己从完成队列取出请求进行处理
  // 所以这里需要一个死循环来获取请求并进行处理
  while(true){
    // 前面已经注册了请求处理,这里阻塞从完成队列中取出一个请求进行处理
    HandlerContext* htc = NULL;
    bool ok = false;
    GPR_ASSERT(cq_ptr->Next((void**)&htc, &ok));
    GPR_ASSERT(ok);
    // 根据tag判断是哪一个请求
    // 因为前面注册请求处理的时候使用的就是对象地址
    // 所以这里直接从map里面取出来判断即可
    int type = handlerMap[htc];
    // 判断状态,看是不是已经响应发送了
    if(htc->status_ == 2) {
      // 从map中移除
      handlerMap.erase(htc);
      // 因为这里并不是多态类,必须根据类型操作
      switch(type) {
        case 1:
          {
            // 释放对象(这里未对这个对象进行复用)
            delete (HandlerTest1Context*)htc;
          }
          break;
        case 2:
          {
            delete (HandlerTest2Context*)htc;
          }
          break;
        case 3:
          {
            delete (HandlerTest3Context*)htc;
          }
          break;
      }
      continue; // 回到从完成队列获取下一个
    }

    // 根据type进行相应的处理
    switch(type) {
      case 1: /*Test1的处理*/
        {
          // 重新创建一个请求处理上下文对象(以便不影响下一个请求的处理)
          HandlerTest1Context* htc1 = new HandlerTest1Context;
          htc1->status_ = 1;    // 设置状态为1
          handlerMap[htc1] = 1; // 保存到handlerMap中
          service.RequestTest1(&htc1->ctx_,&htc1->req_,&htc1->responder_,
                               cq_ptr.get(),cq_ptr.get(),htc1);

          HandlerTest1Context* h = (HandlerTest1Context*)htc;
          grpc::Status status = Test1(&h->ctx_,&h->req_,&h->rep_);
          // 设置状态为发送响应
          h->status_ = 2;
          // 调用responder_进行响应发送(异步)
          h->responder_.Finish(h->rep_/*发送的响应*/,status/*状态码*/,htc/*请求处理的唯一tag*/);
        }
        break;
      case 2: /*Test2的处理*/
        {
          HandlerTest2Context* htc2 = new HandlerTest2Context;
          htc2->status_ = 1;    // 设置状态为1
          handlerMap[htc2] = 2; // 保存到handlerMap中
          service.RequestTest2(&htc2->ctx_,&htc2->req_,&htc2->responder_,
                               cq_ptr.get(),cq_ptr.get(),htc2);

          HandlerTest2Context* h = (HandlerTest2Context*)htc;
          grpc::Status status = Test2(&h->ctx_,&h->req_,&h->rep_);
          // 设置状态为发送响应
          h->status_ = 2;
          // 调用responder_进行响应发送(异步)
          h->responder_.Finish(h->rep_/*发送的响应*/,status/*状态码*/,htc/*请求处理的唯一tag*/);
        }
        break;
      case 3: /*Test3的处理*/
        {
          HandlerTest3Context* htc3 = new HandlerTest3Context;
          htc3->status_ = 1;    // 设置状态为1
          handlerMap[htc3] = 3; // 保存到handlerMap中
          service.RequestTest3(&htc3->ctx_,&htc3->req_,&htc3->responder_,
                               cq_ptr.get(),cq_ptr.get(),htc3);

          HandlerTest3Context* h = (HandlerTest3Context*)htc;
          grpc::Status status = Test3(&h->ctx_,&h->req_,&h->rep_);
          // 设置状态为发送响应
          h->status_ = 2;
          // 调用responder_进行响应发送(异步)
          h->responder_.Finish(h->rep_/*发送的响应*/,status/*状态码*/,htc/*请求处理的唯一tag*/);
        }
        break;
    }
  }
  return 0;
}
async_service2.cpp
上面虽然是使用到了grpc的异步服务机制,但是只是为了描述清楚异步服务的创建过程,是一个单线程的简陋实现。下面写一个使用线程池的实现。
// > g++ -o aservice2 async_service2.cpp  simple.grpc.pb.cc simple.pb.cc -std=c++11 -I. -lgrpc++ -lgrpc -lprotobuf -lgpr -lz -lcares -laddress_sorting -lpthread -Wno-deprecated

// 线程池的代码可见 https://www.cnblogs.com/oloroso/p/5881863.html
#include "threadpool.h"
#include "simple.grpc.pb.h"
#include <grpcpp/grpcpp.h>

#include <memory>
#include <iostream>
#include <strstream>
#include <chrono>

struct HandlerContextBase {
  // 当前对象类型,用于确定是Test1/2/3哪一个请求的
  int                 type_;
  // 当前处理状态(处理分为两步:1处理请求构建响应数据;2发送响应)
  // 这里记录一下完成到哪一步了,以便进行相关操作
  int                 status_; // (1构建响应完成;2发送完成)
  // rpc的上下文,允许通过它进行诸如压缩、身份验证,以及把元数据发回客户端等。
  grpc::ServerContext ctx_;
};

template<typename RequestType,typename ReplyType>
struct HandlerContext:public HandlerContextBase {
  // 用于接收客户端发送的请求
  RequestType         req_;
  // 用于发送响应给客户端
  ReplyType           rep_;
  // 发送到客户端的方法对象
  grpc::ServerAsyncResponseWriter<ReplyType> responder_;
  //================================================
  // 构造函数
  HandlerContext()
    :responder_(&ctx_)
  {}

};
typedef HandlerContext<Simple::TestRequest,Simple::TestNull>  HandlerTest1Context;
typedef HandlerContext<Simple::TestNull,Simple::TestReply>    HandlerTest2Context;
typedef HandlerContext<Simple::TestRequest,Simple::TestReply> HandlerTest3Context;

unsigned long get_tid()
{
  std::thread::id tid = std::this_thread::get_id();
  std::ostrstream os;
  os << tid;
  unsigned long tidx = std::stol(os.str());
  return tidx;
}

// Test1 实现都是差不都的,这里只是为了测试,就随便返回点数据了
grpc::Status Test1(grpc::ServerContext*       context,
                   const Simple::TestRequest* request,
                   Simple::TestNull*          response)
{
  printf("%s %d
",__func__,__LINE__);
  std::ostrstream os;
  os << "Client Name = " << request->name() << '
';
  os << "Clinet ID   = " << request->id()   << '
';
  os << "Clinet Value= " << request->value()<< '
';
  std::string message = os.str();
  // grpc状态可以设置message,所以也可以用来返回一些信息
  return grpc::Status(grpc::StatusCode::OK,message);
}
// Test2
grpc::Status Test2(grpc::ServerContext*       context,
                   const Simple::TestNull*    request,
                   Simple::TestReply*         response)
{
  printf("%s %d
",__func__,__LINE__);
  response->set_tid(100);
  response->set_svrname("Simple Server");
  response->set_takeuptime(0.01);
  return grpc::Status::OK;
}
// Test3
grpc::Status Test3(grpc::ServerContext*       context,
                   const Simple::TestRequest* request,
                   Simple::TestReply*         response)
{
  printf("%s %d
",__func__,__LINE__);
  int tid = get_tid();
  std::ostrstream os;
  os << "Client Name = " << request->name() << '
';
  os << "Clinet ID   = " << request->id()   << '
';
  os << "Clinet Value= " << request->value()<< '
';
  os << "Server TID  = " << tid<<'
';
  std::string message = os.str();

  // 休眠0.5秒,以便观察异步执行的效果
  std::this_thread::sleep_for(std::chrono::milliseconds(500));

  response->set_tid(tid);
  response->set_svrname(__FILE__);
  response->set_takeuptime(1.234);
  // grpc状态可以设置message
  return grpc::Status(grpc::StatusCode::OK,std::move(message));
}

int main()
{
  // 服务构建器,用于构建同步或者异步服务
  grpc::ServerBuilder builder;
  // 添加监听的地址和端口,后一个参数用于设置认证方式,这里选择不认证
  builder.AddListeningPort("0.0.0.0:33333",grpc::InsecureServerCredentials());
  // 创建一个异步服务对象
  Simple::Server::AsyncService service;
  // 注册服务
  builder.RegisterService(&service);

  // 添加一个完成队列,用于与 gRPC 运行时异步通信
  std::unique_ptr<grpc::ServerCompletionQueue> cq_ptr = builder.AddCompletionQueue();

  // 构建服务器
  std::unique_ptr<grpc::Server> server(builder.BuildAndStart());
  std::cout<<"Server Runing"<<std::endl;
  // 下面可以有几个工作线程就先注册几个,也可以仅注册一个(至少一个)
  /*for(int i=0;i<4;++i)*/ {
    // 先创建三个类型接口的请求处理上下文对象
    HandlerTest1Context* htc1 = new HandlerTest1Context;
    htc1->status_ = 1; // 设置状态为1(因为只需要区分是否已经发送响应完成)
    htc1->type_   = 1; // 设置类型为1
    HandlerTest2Context* htc2 = new HandlerTest2Context;
    htc2->status_ = 1;
    htc2->type_   = 2;
    HandlerTest3Context* htc3 = new HandlerTest3Context;
    htc3->status_ = 1;
    htc3->type_   = 3;

    // 进入下面死循环前需要先注册一下请求
    service.RequestTest1(
        &htc1->ctx_         /*服务上下文对象*/,
        &htc1->req_         /*用于接收请求的对象*/,
        &htc1->responder_   /*异步写响应对象*/,
        cq_ptr.get()        /*新的调用使用的完成队列*/,
        cq_ptr.get()        /*通知使用的完成队列*/,
        htc1                /*唯一标识tag*/);
    service.RequestTest2(&htc2->ctx_,&htc2->req_,&htc2->responder_,cq_ptr.get(),cq_ptr.get(),htc2);
    service.RequestTest3(&htc3->ctx_,&htc3->req_,&htc3->responder_,cq_ptr.get(),cq_ptr.get(),htc3);
  }

  // 创建线程池,使用4个工作线程,用于构建请求的响应
  ThreadPool pool(4);

  // 异步服务这里不能使用 server->Wait() 来等待处理,因为是异步服务
  // 服务器会把到达的请求放入队列,需要自己从完成队列取出请求进行处理
  // 所以这里需要一个死循环来获取请求并进行处理
  while(true){
    // 前面已经注册了请求处理,这里阻塞从完成队列中取出一个请求进行处理
    HandlerContextBase* htc = NULL;
    bool ok = false;
    GPR_ASSERT(cq_ptr->Next((void**)&htc, &ok));
    GPR_ASSERT(ok);
    // 根据tag判断是哪一个请求
    // 因为前面注册请求处理的时候使用的就是对象地址
    // 所以这里直接从map里面取出来判断即可
    int type = htc->type_;
    // 判断状态,看是不是已经响应发送了
    if(htc->status_ == 2) {
      // 因为这里并不是多态类,必须根据类型操作
      switch(type) {
        case 1:
          {
            // 释放对象(这里未对这个对象进行复用)
            delete (HandlerTest1Context*)htc;
          }
          break;
        case 2:
          {
            delete (HandlerTest2Context*)htc;
          }
          break;
        case 3:
          {
            delete (HandlerTest3Context*)htc;
          }
          break;
      }
      continue; // 回到从完成队列获取下一个
    }

    // 重新创建一个请求处理上下文对象(以便能够接受下一个请求进行处理)
    switch(type) {
      case 1:
        {
          HandlerTest1Context* htc1 = new HandlerTest1Context;
          htc1->status_ = 1;    // 设置状态为1
          htc1->type_   = 1;    // 设置类型为1
          service.RequestTest1(&htc1->ctx_,&htc1->req_,&htc1->responder_,
                               cq_ptr.get(),cq_ptr.get(),htc1);
        }
        break;
      case 2:
        {
          HandlerTest2Context* htc2 = new HandlerTest2Context;
          htc2->status_ = 1;    // 设置状态为1
          htc2->type_   = 1;    // 设置类型为2
          service.RequestTest2(&htc2->ctx_,&htc2->req_,&htc2->responder_,
                               cq_ptr.get(),cq_ptr.get(),htc2);
        }
        break;
      case 3:
        {
          HandlerTest3Context* htc3 = new HandlerTest3Context;
          htc3->status_ = 1;    // 设置状态为1
          htc3->type_   = 3;    // 设置类型为3
          service.RequestTest3(&htc3->ctx_,&htc3->req_,&htc3->responder_,
                               cq_ptr.get(),cq_ptr.get(),htc3);
        }
        break;
    }

    pool.enqueue([type,htc](){
    // 根据type进行相应的处理
    switch(type) {
      case 1: /*Test1的处理*/
        {
          HandlerTest1Context* h = (HandlerTest1Context*)htc;
          grpc::Status status = Test1(&h->ctx_,&h->req_,&h->rep_);
          // 设置状态为发送响应
          h->status_ = 2;
          // 调用responder_进行响应发送(异步)
          h->responder_.Finish(h->rep_/*发送的响应*/,status/*状态码*/,htc/*请求处理的唯一tag*/);
        }
        break;
      case 2: /*Test2的处理*/
        {
          HandlerTest2Context* h = (HandlerTest2Context*)htc;
          grpc::Status status = Test2(&h->ctx_,&h->req_,&h->rep_);
          // 设置状态为发送响应
          h->status_ = 2;
          // 调用responder_进行响应发送(异步)
          h->responder_.Finish(h->rep_/*发送的响应*/,status/*状态码*/,htc/*请求处理的唯一tag*/);
        }
        break;
      case 3: /*Test3的处理*/
        {
          HandlerTest3Context* h = (HandlerTest3Context*)htc;
          grpc::Status status = Test3(&h->ctx_,&h->req_,&h->rep_);
          // 设置状态为发送响应
          h->status_ = 2;
          // 调用responder_进行响应发送(异步)
          h->responder_.Finish(h->rep_/*发送的响应*/,status/*状态码*/,htc/*请求处理的唯一tag*/);
        }
        break;
    }
  });
  }
  return 0;
}