1.angularJs简介
angularJs是一个MV*的javascript框架(Model-View-Whatever,不管是MVVM还是MVC,统归MDV(model drive view)),其实是由google推出的SPA(single-page-application)应用框架。它的用于 数据在后端和前端之间的双向绑定。这就意味着你在后台改变数据,这些变动立刻就会出现在view上。
在加载的时候,angular会将你的dom树和javascript转向一个angular app 。包含着angular指令和过滤器的html会被编译成一个树图,响应的范围和控制器会被附加在这个树上,内部的应用循环确保了视图和模型之间的数据绑定。每次模型被更新(可以通过ajax请求,也可以直接操作控制器),angular会重新运行它的 $digest循环,跟新数据绑定确保所有东西是同步的。
js代码是用一种命令的方式操作dom。而在angular中,直接操作dom是不被提倡的。dom由视图管理,data在scope中,方法在控制器里。
3. ng-app
(1)代码预览,引入angular文件
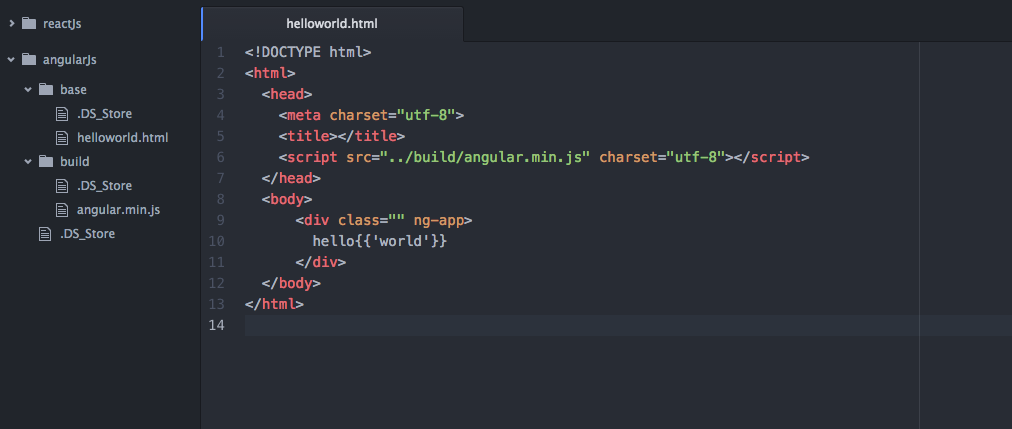
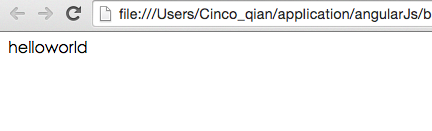
(2)游览器里效果
(3)源码
<!DOCTYPE html>
<html>
  <head>
    <meta charset="utf-8">
    <title></title>
    <script src="http://t.zoukankan.com/build/angular.min.js" charset="utf-8"></script>
  </head>
  <body>
      <div class="" ng-app>
        hello{{'world'}}
      </div>
  </body>
</html>
4. ng-model
(1)代码预览
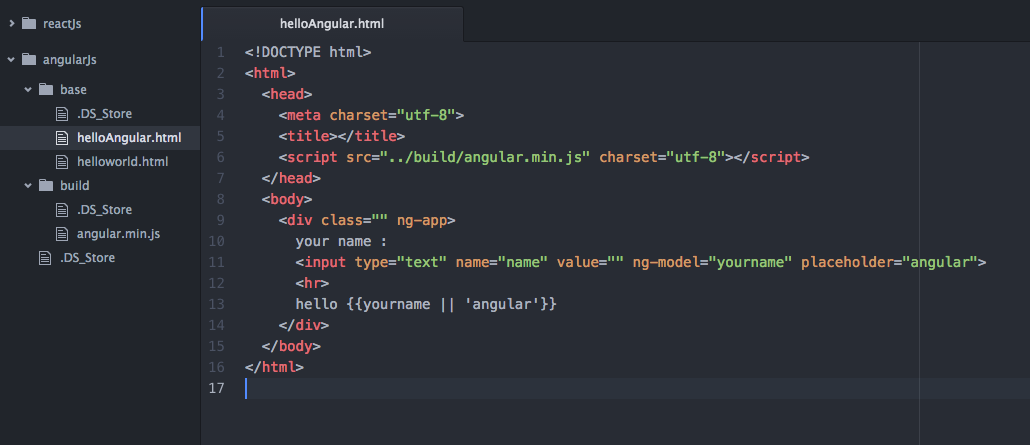
(2)游览器里效果

(3)源码
<!DOCTYPE html>
<html>
  <head>
    <meta charset="utf-8">
    <title></title>
    <script src="http://t.zoukankan.com/build/angular.min.js" charset="utf-8"></script>
  </head>
  <body>
    <div class="" ng-app>
      your name :
      <input type="text" name="name" value="" ng-model="yourname" placeholder="angular">
      <hr>
      hello {{yourname || 'angular'}}
    </div>
  </body>
</html>
5.ng-controller
(1)代码预览
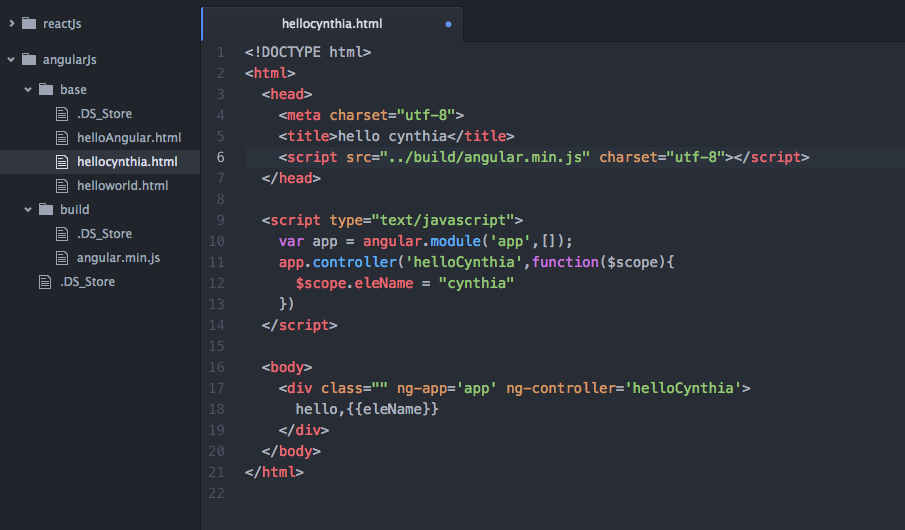
(2)游览器效果
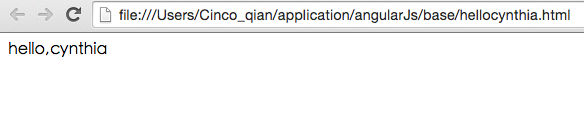
(3)源码
<!DOCTYPE html>
<html>
  <head>
    <meta charset="utf-8">
    <title>hello cynthia</title>
    <script src="http://t.zoukankan.com/build/angular.min.js" charset="utf-8"></script>
  </head>

  <script type="text/javascript">
    var app = angular.module('app',[]);
    app.controller('helloCynthia',function($scope){
      $scope.eleName = "cynthia"
    })
  </script>

  <body>
    <div class="" ng-app='app' ng-controller='helloCynthia'>
      hello,{{eleName}}
    </div>
  </body>
</html>
6.ng-repeat
(1)代码预览
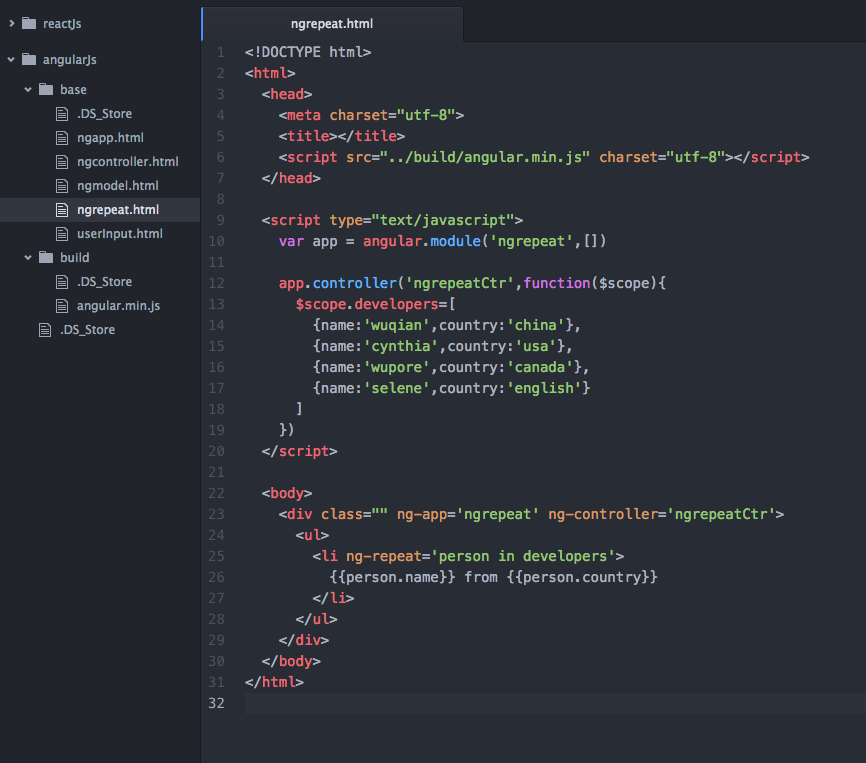
(2)游览器效果
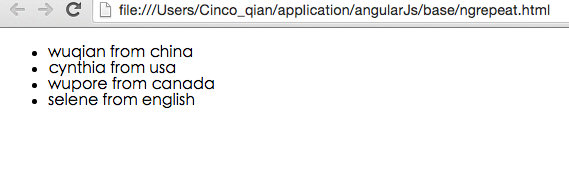
(3)源码
<!DOCTYPE html>
<html>
<head>
<meta charset="utf-8">
<title></title>
<script src="http://t.zoukankan.com/build/angular.min.js" charset="utf-8"></script>
</head>
<script type="text/javascript">
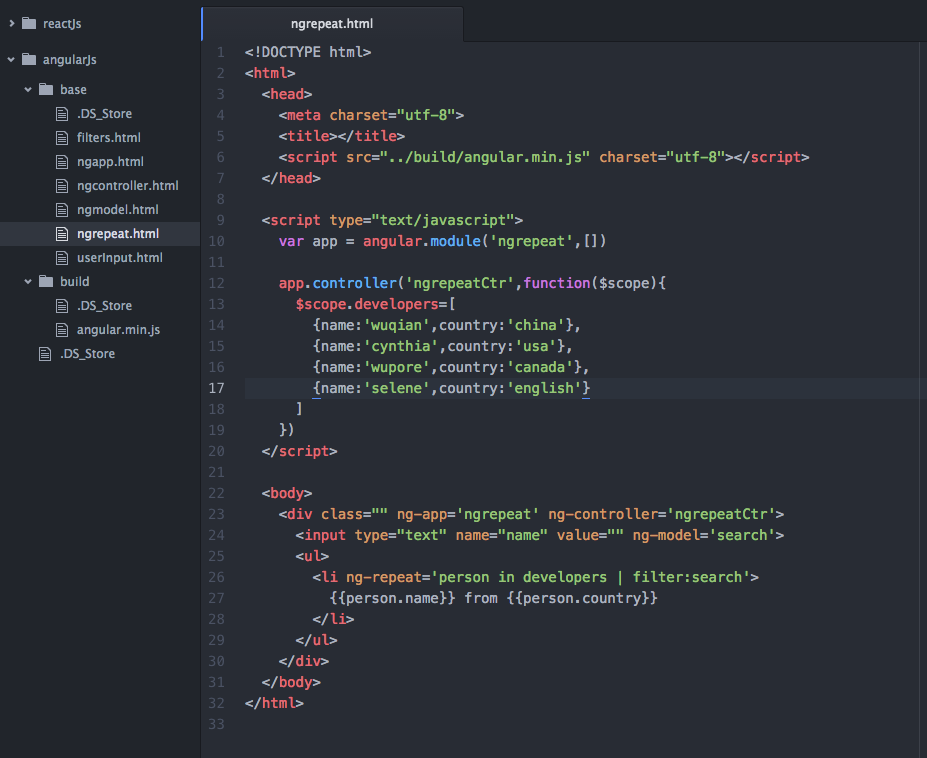
var app = angular.module('ngrepeat',[])
app.controller('ngrepeatCtr',function($scope){
$scope.developers=[
{name:'wuqian',country:'china'},
{name:'cynthia',country:'usa'},
{name:'wupore',country:'canada'},
{name:'selene',country:'english'}
]
})
</script>
<body>
<div class="" ng-app='ngrepeat' ng-controller='ngrepeatCtr'>
<ul>
<li ng-repeat='person in developers'>
{{person.name}} from {{person.country}}
</li>
</ul>
</div>
</body>
</html>7.example
(1)代码预览
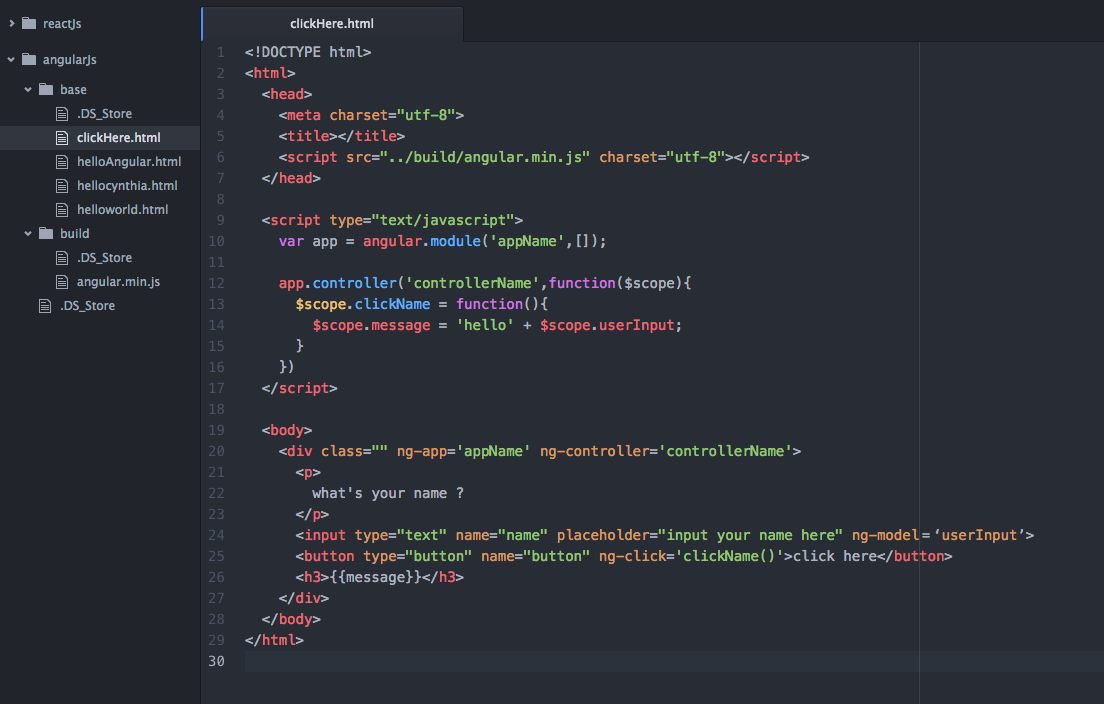
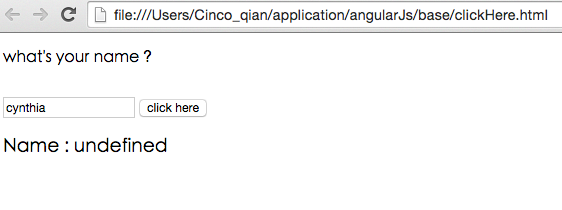
(2)游览器效果 (用户在input里输入后,点击button,在下方显示输入,但是目前显示undefined。。。)
(3)源码
<!DOCTYPE html>
<html>
  <head>
    <meta charset="utf-8">
    <title></title>
    <script src="http://t.zoukankan.com/build/angular.min.js" charset="utf-8"></script>
  </head>

  <script type="text/javascript">
    var app = angular.module('appName',[]);

    app.controller('controllerName',function($scope){
      $scope.clickName = function(){
        $scope.message = 'Name : ' + $scope.userInput;
      }
    })
  </script>

  <body>
    <div class="" ng-app='appName' ng-controller='controllerName'>
      <p>
        what's your name ?
      </p>
      <br>
      <input type="text" name="name" placeholer="input your name here" ng-model=‘userInput’>
      <button type="button" name="button" ng-click='clickName()'>click here</button>
      <h3>{{message}}</h3>
    </div>
  </body>
</html>
8.filters 过滤器
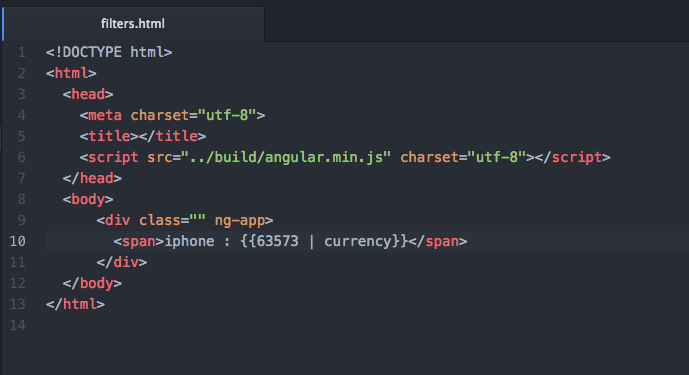
angular提供的过滤器和unix中的管道pipeline相似。比如我们要在网页中显示价格$可以这样写
(1)源码预览
(2)游览器中效果

(3)源码
<!DOCTYPE html>
<html>
  <head>
    <meta charset="utf-8">
    <title></title>
    <script src="http://t.zoukankan.com/build/angular.min.js" charset="utf-8"></script>
  </head>
  <body>
      <div class="" ng-app>
        <span>iphone : {{63573 | currency}}</span>
      </div>
  </body>
</html>
9.利用filters做删选
(1)代码预览
(2)游览器效果
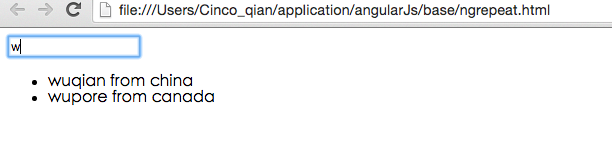
(3)源码
<!DOCTYPE html>
<html>
  <head>
    <meta charset="utf-8">
    <title></title>
    <script src="http://t.zoukankan.com/build/angular.min.js" charset="utf-8"></script>
  </head>

  <script type="text/javascript">
    var app = angular.module('ngrepeat',[])

    app.controller('ngrepeatCtr',function($scope){
      $scope.developers=[
        {name:'wuqian',country:'china'},
        {name:'cynthia',country:'usa'},
        {name:'wupore',country:'canada'},
        {name:'selene',country:'english'}
      ]
    })
  </script>

  <body>
    <div class="" ng-app='ngrepeat' ng-controller='ngrepeatCtr'>
      <input type="text" name="name" value="" ng-model='search'>
      <ul>
        <li ng-repeat='person in developers | filter:search'>
          {{person.name}} from {{person.country}}
        </li>
      </ul>
    </div>
  </body>
</html>
10.自定义filter
(1)代码预览
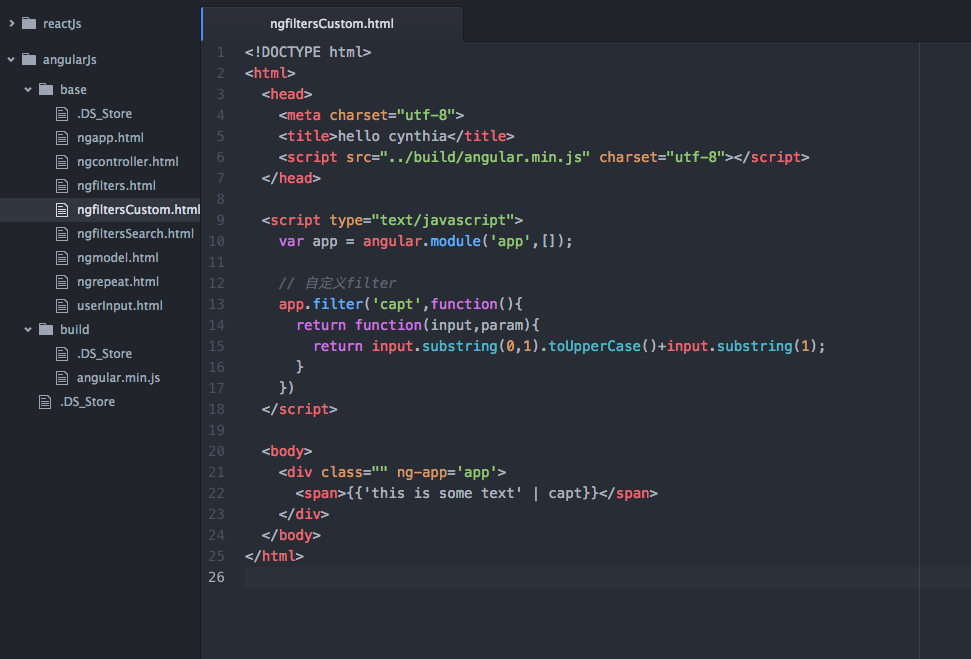
(2)游览器效果(首字母变大写)

(3)源码
<!DOCTYPE html>
<html>
  <head>
    <meta charset="utf-8">
    <title>hello cynthia</title>
    <script src="http://t.zoukankan.com/build/angular.min.js" charset="utf-8"></script>
  </head>

  <script type="text/javascript">
    var app = angular.module('app',[]);

    // 自定义filter
    app.filter('capt',function(){
      return function(input,param){
        return input.substring(0,1).toUpperCase()+input.substring(1);
      }
    })
  </script>

  <body>
    <div class="" ng-app='app'>
      <span>{{'this is some text' | capt}}</span>
    </div>
  </body>
</html>
11.services
在controller之间共享数据对我们是很有用的,但是每个controller都有自己的scope,所以我们不能将其绑定到其他的controller上。为此angular提供了的解决方案是services。
angular内置了很多services,比如http请求、异步promises编程模式。这也是angular的核心(依赖注入)的关键。
services都是单例的,也就是说在一个应用里,每个service对象只会被实例化一次。它主要负责提供一个接口把特定的函数需要的方法放在一起。最常见的方法是angular.module API的factory方式:
例子:通过services实现oneCtrl和twoCtrl之间共享一个数据 user
(1)源码预览
(2)游览器里面效果
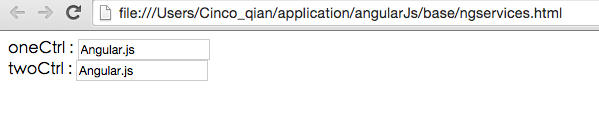
(3)源码
<!DOCTYPE html>
<html>
  <head>
    <meta charset="utf-8">
    <title>hello cynthia</title>
    <script src="http://t.zoukankan.com/build/angular.min.js" charset="utf-8"></script>
  </head>

  <script type="text/javascript">
    var app = angular.module('app',[]);

    // 通过services实现oneCtrl和twoCtrl之间共享一个数据 user
    app.factory('userInfor',function(){
      var user={
        name : 'Angular.js'
      }
      return user;
    })

    app.controller('oneCtrl',function($scope,userInfor){
      $scope.user = userInfor;
    })
    app.controller('twoCtrl',function($scope,userInfor){
      $scope.user = userInfor;
    })

  </script>

  <body>
    <div class="" ng-app='app'>
      <div class="" ng-controller='oneCtrl'>
        oneCtrl :
        <input type="text" name="name" value="" ng-model='user.name'>
      </div>
      <div class="" ng-controller='twoCtrl'>
        twoCtrl :
        <input type="text" name="name" value="" ng-model='user.name'>
      </div>
    </div>
  </body>
</html>
12.ng-show 和 ng-hide
(1) 源码预览
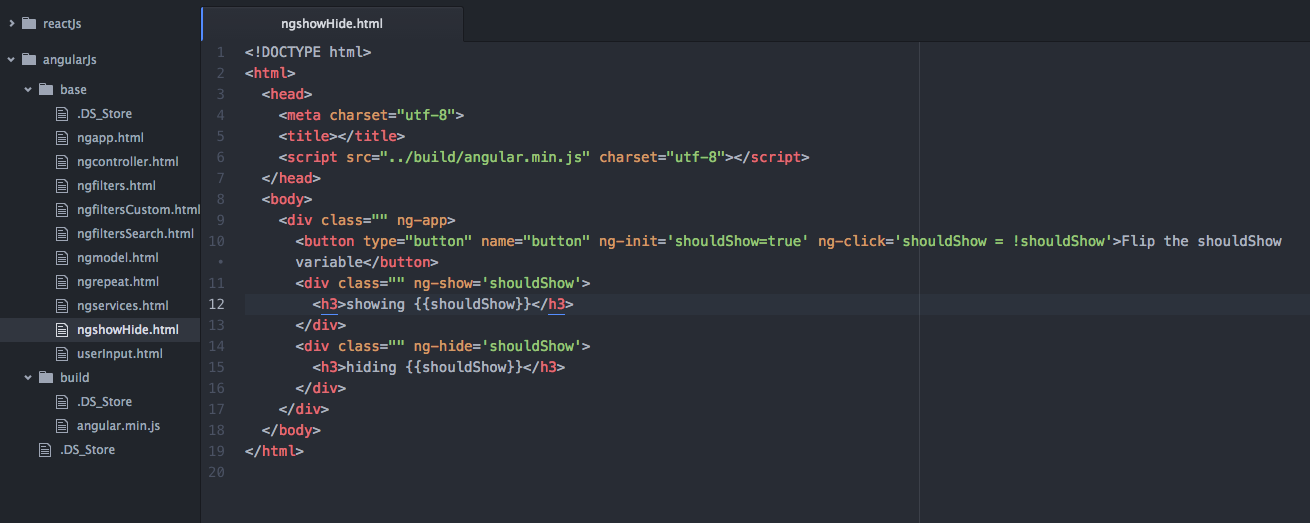
(2)游览器里效果:点击按钮下面的内容出现/隐藏

(3)源码
<!DOCTYPE html>
<html>
  <head>
    <meta charset="utf-8">
    <title></title>
    <script src="http://t.zoukankan.com/build/angular.min.js" charset="utf-8"></script>
  </head>
  <body>
    <div class="" ng-app>
      <button type="button" name="button" ng-init='shouldShow=true' ng-click='shouldShow = !shouldShow'>Flip the shouldShow variable</button>
      <div class="" ng-show='shouldShow'>
        <h3>showing {{shouldShow}}</h3>
      </div>
      <div class="" ng-hide='shouldShow'>
        <h3>hiding {{shouldShow}}</h3>
      </div>
    </div>
  </body>
</html>
13.