摘要:
9.Resulttest[youaijj@youai~]$curllocalhost:8031Welcometonginx!body{35em;margin:0auto;font-family:Tahoma,Verdana,Arial,sans-serif;}Welcometonginx!Ifyouseethispage,the
1. Install Nginx software prerequisites :
$ sudo yum install pcre pcre-devel openssl-devel perl gcc make -y
2. Download Nginx from official website and extract it :
$ wget http://nginx.org/download/nginx-1.6.2.tar.gz
$ tar xzvf nginx-1.6.2.tar.gz
3. 用户权限设置 chown -R group:user
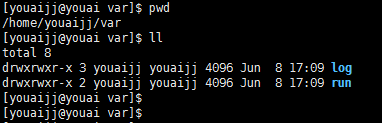
# chown -R youaijj:youaijj /home/youaijj4. make owner directory(在youaijj用户下执行)
配置文件:
$ mkdir /home/youaijj/etc执行文件:
$ mkdir /home/youaijj/usr日志等:
$ mkdir /home/youaijj/var
5. Go to the extracted directory and start Compiling and install Nginx :
$ cd nginx-1.6.2$ ./configure --prefix=/home/youaijj/etc/nginx --sbin-path=/home/youaijj/usr/sbin/nginx --conf-path=/home/youaijj/etc/nginx/nginx.conf --error-log-path=/home/youaijj/var/log/nginx/error.log --http-log-path=/home/youaijj/var/log/nginx/access.log --pid-path=/home/youaijj/var/run/nginx.pid --lock-path=/home/youaijj/var/run/nginx.lock --http-client-body-temp-path=/home/youaijj/var/cache/nginx/client_temp --http-proxy-temp-path=/home/youaijj/var/cache/nginx/proxy_temp --http-fastcgi-temp-path=/home/youaijj/var/cache/nginx/fastcgi_temp --http-uwsgi-temp-path=/home/youaijj/var/cache/nginx/uwsgi_temp --http-scgi-temp-path=/home/youaijj/var/cache/nginx/scgi_temp --user=youaijj --group=youaijj--with-http_ssl_module --with-http_ssl_module --with-http_realip_module --with-http_addition_module --with-http_sub_module --with-http_dav_module --with-http_flv_module --with-http_mp4_module --with-http_gunzip_module --with-http_gzip_static_module --with-http_random_index_module --with-http_secure_link_module --with-http_stub_status_module --with-http_auth_request_module --with-mail --with-mail_ssl_module --with-file-aio --with-ipv6 --with-http_spdy_module --with-cc-opt='-O2 -g -pipe -Wp,-D_FORTIFY_SOURCE=2 -fexceptions -fstack-protector --param=ssp-buffer-size=4 -m64 -mtune=generic'“--” 不要换行。查看其他选项:$ ./configure --help
configure的另外方式,换行使用“”
$ ./configure
--prefix=/home/youaijj/etc/nginx
--sbin-path=/home/youaijj/usr/sbin/nginx
--conf-path=/home/youaijj/etc/nginx/nginx.conf
--error-log-path=/home/youaijj/var/log/nginx/error.log --http-log-path=/home/youaijj/var/log/nginx/access.log
...
...
6. Still in the current, nginx-1.x.x directory, issue the installation command as below :
$ make && make install编译之后文件内容:
/home/youaijj/etc

/home/youaijj/usr

/home/youaijj/var
Ps:var下没有cache目录,之后需要手动创建
7. Change server port
因为普通用户只能用1024以上的端口,1024以内的端口只能由root用户使用,因此需要将nginx.conf文件中的80端口改为1024以上,这里改为了8031.
...
# another virtual host using mix of IP-, name-, and port-based configuration
#
 server {
  listen 8031;
  server_name cjj.test.dev;
  access_log /home/youaijj/var/log/nginx/access.test.log;
  location / {
   root html;
   index index.html index.htm;
  }
 }
...
8. Start Server :
$ cd /home/youaijj/usr/sbin
$ ./nginx
如果出现如下问题:
nginx: [emerg] mkdir() "/home/youaijj/var/cache/nginx/client_temp" failed (2: No such file or directory)
手动创建文件夹,然后重新启动nginx服务即可。
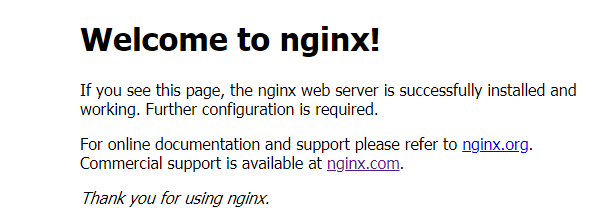
9. Result test
[youaijj@youai ~]$ curl localhost:8031
<!DOCTYPE html>
<html>
<head>
<title>Welcome to nginx!</title>
<style>
    body {
         35em;
        margin: 0 auto;
        font-family: Tahoma, Verdana, Arial, sans-serif;
    }
</style>
</head>
<body>
<h1>Welcome to nginx!</h1>
<p>If you see this page, the nginx web server is successfully installed and
working. Further configuration is required.</p>
<p>For online documentation and support please refer to
<a href="http://nginx.org/">nginx.org</a>.<br/>
Commercial support is available at
<a href="http://nginx.com/">nginx.com</a>.</p>
<p><em>Thank you for using nginx.</em></p>
</body>
</html>
[youaijj@youai ~]$
或者通过浏览器访问 “服务器ip:8031:
附:
I. 通过浏览器访问注意检查是否开放服务器防火墙。Centos7不再使用iptables,而是使用firewall
[root@youai nginx]# firewall-cmd --list-ports
[root@youai nginx]# systemctl status firewalld
[root@youai nginx]# systemctl start firewalld
[root@youai nginx]# firewall-cmd --zone=public --add-port=8031/tcp --permanen
重启防火墙:[root@youai nginx]# systemctl restart firewalld.service
查看状态:[root@youai nginx]# firewall-cmd --list-ports
II. Register Nginx service into systemd as a service by create the file named nginx.service
如果不想每次手动启动,也可以将服务注册到server中,使用systemctl的方式来控制。