摘要:
˃.RelativeLayout.ListView.GridView4.其他杂项内容4.1.距离单位之间的差异px,dp,sppx:像素分辨率,480*800像素,每个像素可以显示RGB颜色dpi:屏幕精细度dp:设备无关像素(最重要)为什么使用dp?Sp:可缩放像素:用于指定字体大小4.2.控件的外边距和内边距1。什么是内边距和外边距2.如何设置内边距和外边距5.Android控件5.1.多选按钮CheckBox 1.如何使用CheckBoxprivateCheckBoxatbox、sleppbox、,dotabox@OverrideprotectedvotionCreate{super.onCreate;setContentView;eatbox=findViewById;sleppbox=findView ById;dotabox=findViewById;onBoxClickListenerlistener=newonBoxClickListener();eatbox.setOnClickListener;sleppbox.setOnClickListener;dotabox.setOnClickListen;}配置文件如下?
目录
- 一个控件可以设置多个监听器
- 绑定监听器的步骤
- 获取代表控件的对象
- 定义一个类,实现监听器接口
- 生成监听器对象
- 为控件绑定监听器对象
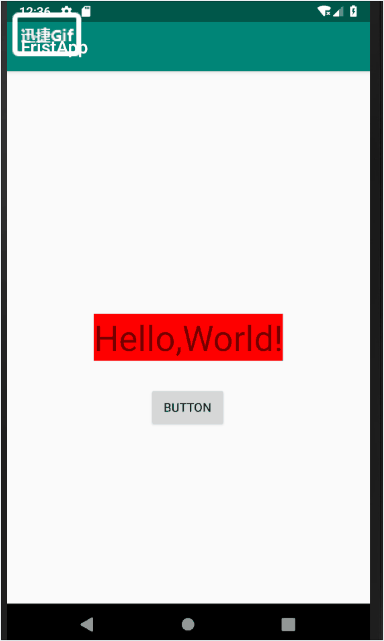
public class MainActivity extends AppCompatActivity {

    private Button bt;
    private TextView tv;
    int count=0;
    @Override
    protected void onCreate(Bundle savedInstanceState) {
        super.onCreate(savedInstanceState);
        setContentView(R.layout.activity_main);

        bt = (Button)findViewById(R.id.bt1);
        tv = (TextView)findViewById(R.id.hello);
        //生成监听器对象 new ButtonListener()
        //为控件绑定监听器对象 bt.setOnClickListener
        bt.setOnClickListener(new ButtonListener());

        System.out.println("--MainActivity: OnCreate--");
    }

    // 定义一个类,实现监听器接口
    class ButtonListener implements View.OnClickListener{

        @Override
        public void onClick(View v) {
            count++;
            tv.setText(count+"");
        }
    }
  }
- 控件布局方法:就是控制控件在Activity中的位置,大小,颜色以及其他控件样式属性的方法
- 如何设置布局
- 在布局文件完成控件布局
- 在Java代码中完成控件布局
3.1. 布局分类
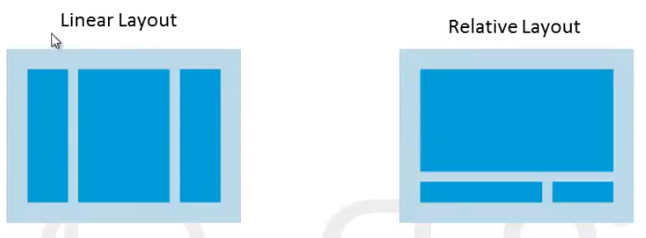
(1). Linear Layout
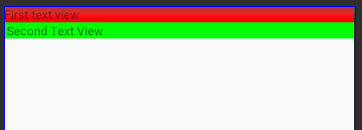
<?xml version="1.0" encoding="utf-8"?>
<LinearLayout xmlns:android="http://schemas.android.com/apk/res/android"
    android:layout_width="match_parent"
    android:orientation="vertical"
    android:layout_height="match_parent">

    <TextView
        android:layout_width="match_parent"
        android:layout_height="wrap_content"
        android:background="#FF0000"
        android:text="First text view"/>

    <TextView
        android:layout_width="match_parent"
        android:layout_height="wrap_content"
        android:background="#00FF00"
        android:text=" Second Text View"/>

</LinearLayout>
(2). Relative Layout
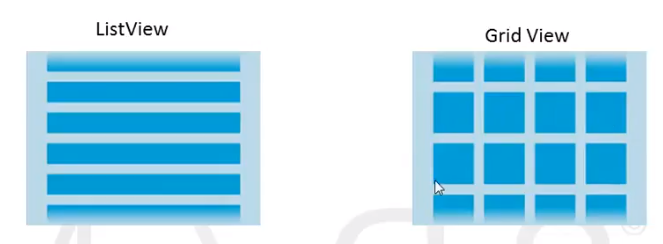
(3). ListView
(4). Grid View
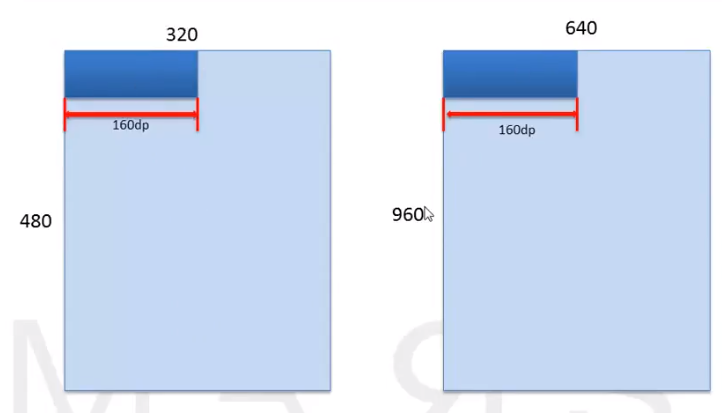
4. 其他比较杂的内容4.1. 距离单位的区别px,dp,sp
px: 像素分辨率,屏幕是480*800个像素,每个像素可以显示一个RGB颜色
dpi:屏幕细腻程度

dp:设备无关像素(最主要)
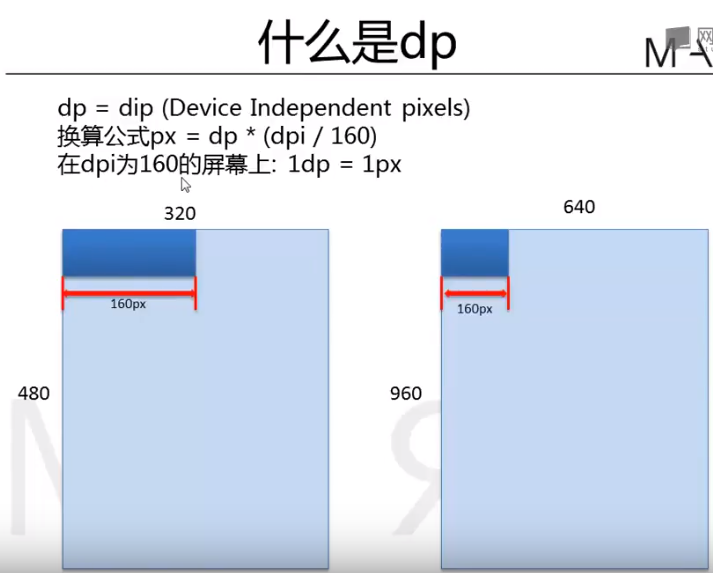
为什么使用dp?
- sp: 可以缩放的像素:用于指定字体大小
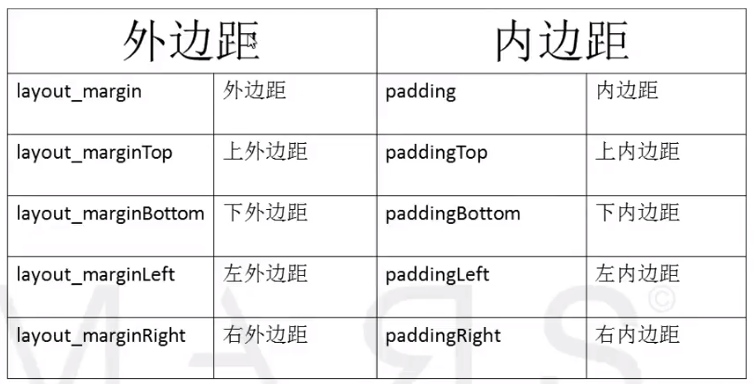
4.2. 控件的外边距和内边距
1. 什么是内外边距
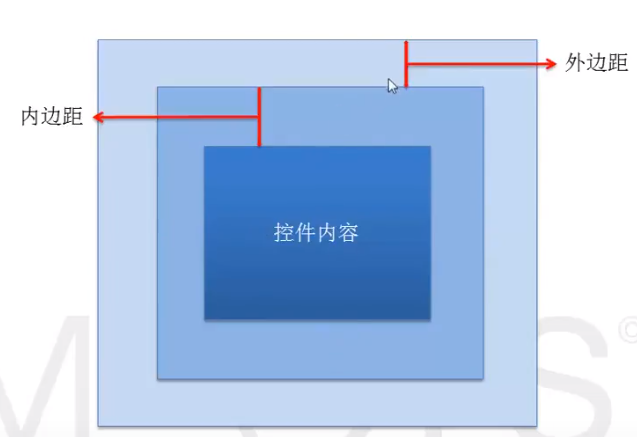
2. 如何设置内外边距
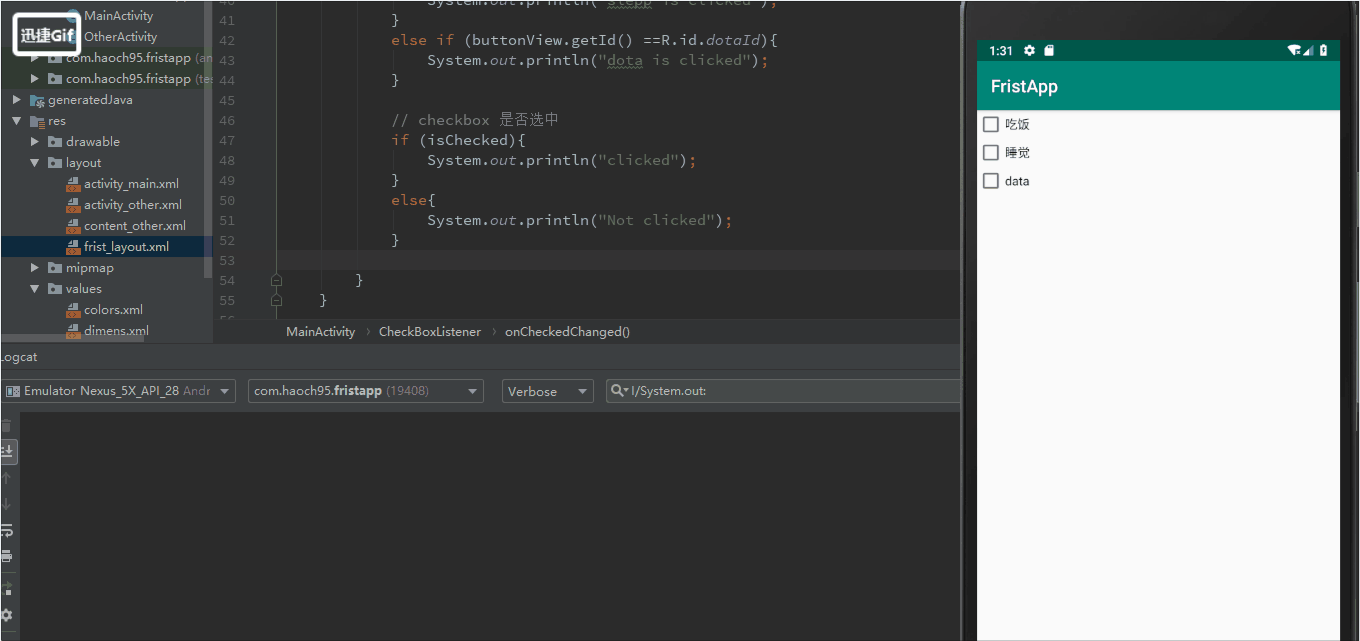
5.1.多选按钮CheckBox
1. 如何使用CheckBox
private CheckBox eatbox, sleppbox, dotabox;
@Override
protected void onCreate(Bundle savedInstanceState) {
    super.onCreate(savedInstanceState);
    setContentView(R.layout.frist_layout);

    eatbox = (CheckBox)findViewById(R.id.eatId);
    sleppbox = (CheckBox)findViewById(R.id.sleppId);
    dotabox = (CheckBox)findViewById(R.id.dotaId);

    onBoxClickListener listener = new onBoxClickListener();
    eatbox.setOnClickListener(listener);
    sleppbox.setOnClickListener(listener);
    dotabox.setOnClickListener(listener);

}
配置文件如下
<?xml version="1.0" encoding="utf-8"?>
<LinearLayout xmlns:android="http://schemas.android.com/apk/res/android"
    android:layout_width="match_parent"
    android:orientation="vertical"
    android:layout_height="match_parent">

    <CheckBox
        android:
        android:layout_width="wrap_content"
        android:layout_height="wrap_content"
        android:text="吃饭"/>

    <CheckBox
        android:
        android:layout_width="wrap_content"
        android:layout_height="wrap_content"
        android:text="睡觉"/>

    <CheckBox
        android:
        android:layout_width="wrap_content"
        android:layout_height="wrap_content"
        android:text="data"/>

</LinearLayout>
2. 常用onClickListener和onCheckedChangeListener监听器
2.1. onClickListener监听器
class onBoxClickListener implements View.OnClickListener{
    // view参数是调用setOnClickListener的对象
    // view是checkbox的父类
    // view.getId--查看是哪个对象调用的这个方法
    @Override
    public void onClick(View v) {
        // 向下转型
        CheckBox box = (CheckBox)v;

        if (v.getId() == R.id.eatId){
            System.out.println("eat is clicked");
        }
        else if (v.getId() == R.id.sleppId){
            System.out.println("slepp is clicked");
        }
        else if (v.getId() ==R.id.dotaId){
            System.out.println("dota is clicked");
        }
        // checkbox 是否选中
        if (box.isChecked()){
            System.out.println("clicked");
        }
        else{
            System.out.println("Not clicked");
        }


    }
}
2.2. onCheckedChangeListener监听器
CompoundButton
// 选中的时候就会调用这个状态
class CheckBoxListener implements CompoundButton.OnCheckedChangeListener{

    @Override
    public void onCheckedChanged(CompoundButton buttonView, boolean isChecked) {

        if (buttonView.getId() == R.id.eatId){
            System.out.println("eat is clicked");
        }
        else if (buttonView.getId() == R.id.sleppId){
            System.out.println("slepp is clicked");
        }
        else if (buttonView.getId() ==R.id.dotaId){
            System.out.println("dota is clicked");
        }

        // checkbox 是否选中
        if (isChecked){
            System.out.println("clicked");
        }
        else{
            System.out.println("Not clicked");
        }

    }
}