摘要:
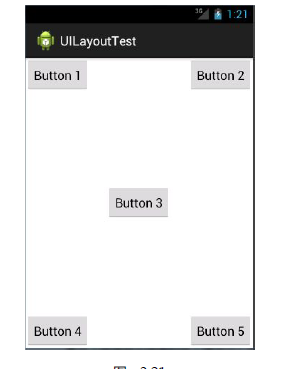
1.相对布局,也称为相对布局,是一种非常常见的布局。与LinearLayout的排列规则不同,RelativeLayout更随意。它可以通过相对定位使控件出现在布局中的任何位置效果图为2。表布局TableLayout允许我们以表的形式排列控件。这种布局不常用。你只需要了解它的基本用法。
1.相对布局
RelativeLayout 又称作相对布局,也是一种非常常用的布局。和LinearLayout 的排列规则不同,RelativeLayout 显得更加随意一些,它可以通过相对定位的方式让控件出现在布局的任何位置。也正因为如此,RelativeLayout 中的属性非常多,不过这些属性都是有规律可循的,其实并不难理解和记忆。
<RelativeLayout xmlns:android="http://schemas.android.com/apk/res/android"
android:layout_width="match_parent"
android:layout_height="match_parent" >
<Button
android:id="@+id/button1"
android:layout_width="wrap_content"
android:layout_height="wrap_content"
android:layout_alignParentLeft="true"
android:layout_alignParentTop="true"
android:text="Button 1" />
<Button
android:id="@+id/button2"
android:layout_width="wrap_content"
android:layout_height="wrap_content"
android:layout_alignParentRight="true"
android:layout_alignParentTop="true"
android:text="Button 2" />
<Button
android:id="@+id/button3"
android:layout_width="wrap_content"
android:layout_height="wrap_content"
android:layout_centerInParent="true"
android:text="Button 3" />
<Button
android:id="@+id/button4"
android:layout_width="wrap_content"
android:layout_height="wrap_content"
android:layout_alignParentBottom="true"
android:layout_alignParentLeft="true"
android:text="Button 4" />
<Button
android:id="@+id/button5"
android:layout_width="wrap_content"
android:layout_height="wrap_content"
android:layout_alignParentBottom="true"
android:layout_alignParentRight="true"
android:text="Button 5" />
</RelativeLayout>
效果图为
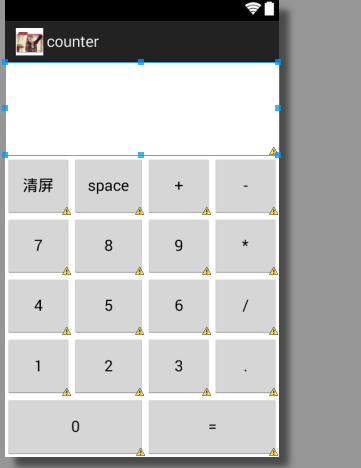
2.表格布局
TableLayout 允许我们使用表格的方式来排列控件,这种布局也不是很常用,你只需要了解一下它的基本用法就可以了。既然是表格,那就一定会有行和列,在设计表格时我们尽量应该让每一行都拥有相同的列数,这样的表格也是最简单的。不过有时候事情并非总会顺从我们的心意,当表格的某行一定要有不相等的列数时,就需要通过合并单元格的方式来应对。
  1 <TableLayout xmlns:android="http://schemas.android.com/apk/res/android"
  2     xmlns:tools="http://schemas.android.com/tools"
  3     android:layout_width="match_parent"
  4     android:layout_height="match_parent"
  5     android:stretchColumns="*"
  6     tools:context="com.calc.minicalculator.MainActivity" >
  7
  8
  9
 10          <TextView
 11         android:
 12         android:layout_width="match_parent"
 13         android:layout_height="109dp"
 14         android:layout_gravity="center_horizontal|top"
 15         android:gravity="right|center_vertical"
 16         android:text=""
 17
 18         android:textSize="40dp"
 19         android:textStyle="bold" />
 20
 21
 22          <TableRow
 23              android:layout_weight="1"
 24              android:
 25              android:layout_width="wrap_content"
 26              android:layout_height="match_parent" >
 27
 28              <Button
 29                  android:
 30                  android:layout_width="wrap_content"
 31                  android:layout_height="match_parent"
 32                  android:text="清屏" />
 33
 34              <Button
 35                  android:
 36                  android:layout_width="wrap_content"
 37                  android:layout_height="match_parent"
 38                  android:text="space" />
 39
 40              <Button
 41                  android:
 42                  android:layout_width="wrap_content"
 43                  android:layout_height="match_parent"
 44                  android:text="+" />
 45
 46              <Button
 47                  android:
 48                  android:layout_width="wrap_content"
 49                  android:layout_height="match_parent"
 50                  android:text="-" />
 51
 52          </TableRow>
 53
 54          <TableRow
 55              android:layout_weight="1"
 56              android:
 57              android:layout_width="wrap_content"
 58              android:layout_height="match_parent" >
 59
 60              <Button
 61                  android:
 62                  android:layout_width="wrap_content"
 63                  android:layout_height="match_parent"
 64                  android:text="7" />
 65
 66              <Button
 67                  android:
 68                  android:layout_width="wrap_content"
 69                  android:layout_height="match_parent"
 70                  android:text="8" />
 71
 72              <Button
 73                  android:
 74                  android:layout_width="wrap_content"
 75                  android:layout_height="match_parent"
 76                  android:text="9" />
 77
 78              <Button
 79                  android:
 80                  android:layout_width="wrap_content"
 81                  android:layout_height="match_parent"
 82                  android:text="*" />
 83
 84          </TableRow>
 85
 86          <TableRow
 87              android:layout_weight="1"
 88              android:
 89              android:layout_width="wrap_content"
 90              android:layout_height="match_parent" >
 91
 92              <Button
 93                  android:
 94                  android:layout_width="wrap_content"
 95                  android:layout_height="match_parent"
 96                  android:text="4" />
 97
 98              <Button
 99                  android:
100                  android:layout_width="wrap_content"
101                  android:layout_height="match_parent"
102                  android:text="5" />
103
104              <Button
105                  android:
106                  android:layout_width="wrap_content"
107                  android:layout_height="match_parent"
108                  android:text="6" />
109
110              <Button
111                  android:
112                  android:layout_width="wrap_content"
113                  android:layout_height="match_parent"
114                  android:text="/" />
115
116          </TableRow>
117
118          <TableRow
119              android:layout_weight="1"
120              android:
121              android:layout_width="wrap_content"
122              android:layout_height="match_parent" >
123
124              <Button
125                  android:
126                  android:layout_width="wrap_content"
127                  android:layout_height="match_parent"
128                  android:text="1" />
129
130              <Button
131                  android:
132                  android:layout_width="wrap_content"
133                  android:layout_height="match_parent"
134                  android:text="2" />
135
136              <Button
137                  android:
138                  android:layout_width="wrap_content"
139                  android:layout_height="match_parent"
140                  android:text="3" />
141
142              <Button
143                  android:
144                  android:layout_width="wrap_content"
145                  android:layout_height="match_parent"
146                  android:text="." />
147
148          </TableRow>
149
150          <TableRow
151              android:layout_weight="1"
152              android:
153              android:layout_width="wrap_content"
154              android:layout_height="match_parent"
155           >
156
157              <Button
158                  android:
159                  android:layout_width="wrap_content"
160                  android:layout_height="match_parent"
161                  android:text="0"
162                 android:layout_span="2"
163                  />
164
165              <Button
166                  android:
167                  android:layout_width="wrap_content"
168                  android:layout_height="match_parent"
169                  android:text="="
170                   android:layout_span="2"/>
171
172          </TableRow>
173
174 </TableLayout>
效果图: