一、Point Vs Pixel
iOS中当我们使用Quartz,UIKit,CoreAnimation等框架时,所有的坐标系统采用Point来衡量。系统在实际渲染到设置时会帮助我们处理Point到Pixel的转换。
这样做的好处隔离变化,即我们在布局的事后不需要关注当前设备是否为Retina,直接按照一套坐标系统来布局即可。
实际使用中我们需要牢记下面这一点:
One point does not necessarily correspond to one physical pixel.1 Point的线在非Retina屏幕则是一个像素,在Retina屏幕上则可能是2个或者3个,取决于系统设备的DPI。
iOS系统中,UIScreen,UIView,UIImage,CALayer类都提供相关属性来获取scale factor。
原生的绘制技术天然的帮我们处理了scale factor,例如在drawRect:方法中,UIKit自动的根据当前运行的设备设置了正切的scale factor。所以我们在drawRect: 方法中绘制的任何内容都会被自动缩放到设备的物理屏幕上。
基于以上信息可以看出,我们大部分情况下都不需要去关注pixel,然而存在部分情况需要考虑像素的转化。
例如画1个像素的分割线 看到这个问题你的第一想法可能是,直接根据当前屏幕的缩放因子计算出1 像素线对应的Point,然后设置线宽即可。
代码如下:
1.0f / [UIScreen mainScreen].scale表面上看着一切正常了,但是通过实际的设备测试你会发现渲染出来的线宽并不是1个像素。
Why?
为了获得良好的视觉效果,绘图系统通常都会采用一个叫“antialiasing(反锯齿)”的技术,iOS也不例外。
显示屏幕有很多小的显示单元组成,可以接单的理解为一个单元就代表一个像素。如果要画一条黑线,条线刚好落在了一列或者一行显示显示单元之内,将会渲染出标准的一个像素的黑线。
但如果线落在了两个行或列的中间时,那么会得到一条“失真”的线,其实是两个像素宽的灰线。
如下图所示:
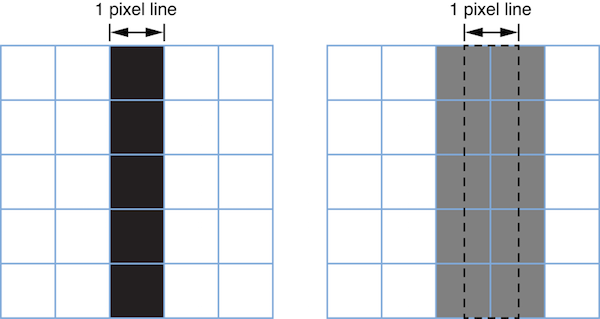
Positions defined by whole-numbered points fall at the midpoint between pixels. For example, if you draw a one-pixel-wide vertical line from (1.0, 1.0) to (1.0, 10.0), you get a fuzzy grey line. If you draw a two-pixel-wide line, you get a solid black line because it fully covers two pixels (one on either side of the specified point). As a rule, lines that are an odd number of physical pixels wide appear softer than lines with widths measured in even numbers of physical pixels unless you adjust their position to make them cover pixels fully.官方解释如上,简单翻译一下:
规定:奇数像素宽度的线在渲染的时候将会表现为柔和的宽度扩展到向上的整数宽度的线,除非你手动的调整线的位置,使线刚好落在一行或列的显示单元内。如何对齐呢?
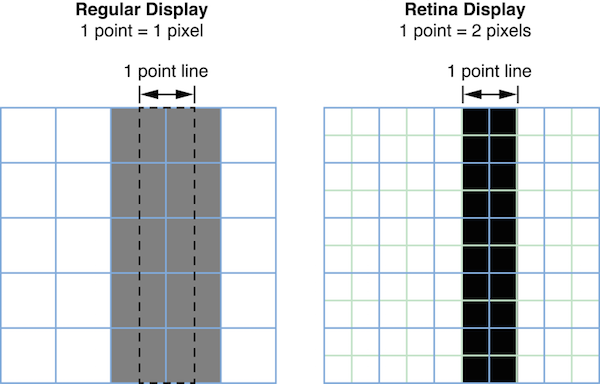
On a low-resolution display (with a scale factor of 1.0), a one-point-wide line is one pixel wide. To avoid antialiasing when you draw a one-point-wide horizontal or vertical line, if the line is an odd number of pixels in width, you must offset the position by 0.5 points to either side of a whole-numbered position. If the line is an even number of points in width, to avoid a fuzzy line, you must not do so.
On a high-resolution display (with a scale factor of 2.0), a line that is one point wide is not antialiased at all because it occupies two full pixels (from -0.5 to +0.5). To draw a line that covers only a single physical pixel, you would need to make it 0.5 points in thickness and offset its position by 0.25 points. A comparison between the two types of screens is shown in Figure 1-4.
翻译一下
在非高清屏上,一个Point对应一个像素。为了防止“antialiasing”导致的奇数像素的线渲染时出现失真,你需要设置偏移0.5 Point。
在高清屏幕上,要绘制一个像素的线,需要设置线宽为0.5个Point,同事设置偏移为0.25 Point。
如果线宽为偶数Point的话,则不要去设置偏移,否则线条也会失真。
如下图所示:
看了上述一通解释,我们了解了1像素宽的线条失真的原因,及解决办法。
至此问题貌似都解决了?再想想为什么在非Retina和Retina屏幕上调整位置时值不一样,前者为0.5Point,后者为0.25Point,那么scale为3的6 Plus设备又该调整多少呢?
要回答这个问题,我们需要理解调整多少依旧什么原则。
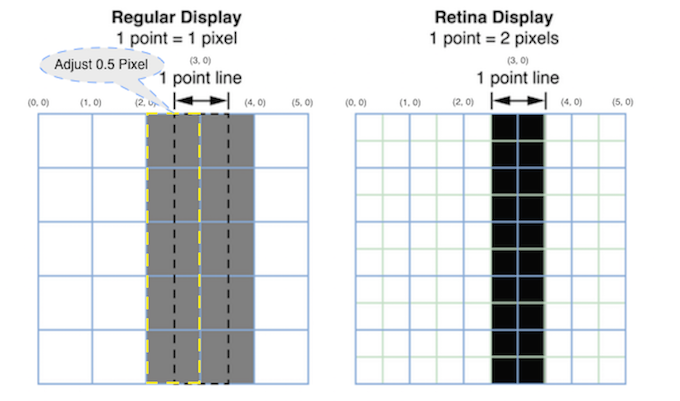
再回过头来看看这上面的图片,图片中每一格子代表一个像素,而顶部标记的则代码我们布局时的坐标。
可以看到左边的非Retina屏幕,我们要在(3,0)这个位置画一条一个像素宽的竖线时,由于渲染的最小单位是像素,而(3,0)这个坐标恰好位于两个像素中间,此时系统会对坐标3左右两列的像素对填充,为了不至于线显得太宽,为对线的颜色淡化。那么根据上述信息我们可以得出,如果要画出一个像素宽的线,就得把绘制的坐标移动到(2.5, 0)或者(3.5,0)这个位置,这样系统渲染的时候刚好可以填充一列像素,也就是标准的一个像素的线。
基于上面的分析,我们可以得出“Scale为3的6 Plus”设备如果要绘制1个像素宽的线条时,位置调整也应该是0.5像素,对应该的Point计算如下:
(1.0f / [UIScreen mainScreen].scale) / 2;奉上一个画一像素线的一个宏:
#define SINGLE_LINE_WIDTH           (1 / [UIScreen mainScreen].scale)
#define SINGLE_LINE_ADJUST_OFFSET   ((1 / [UIScreen mainScreen].scale) / 2)
使用代码如下:
	CGFloat xPos = 5;
	UIView *view = [[UIView alloc] initWithFrame:CGrect(x - SINGLE_LINE_ADJUST_OFFSET, 0, SINGLE_LINE_WIDTH, 100)];
二、正确的绘制Grid线条
贴上一个写的GridView的代码,代码中对Grid线条的奇数像素做了偏移,防止出现线条模糊的情况。
SvGridView.h
//
//  SvGridView.h
//  SvSinglePixel
//
//  Created by xiaoyong.cxy on 6/23/15.
//  Copyright (c) 2015 smileEvday. All rights reserved.
//

#import <UIKit/UIKit.h>

@interface SvGridView : UIView

/**
 * @brief 网格间距,默认30
 */
@property (nonatomic, assign) CGFloat   gridSpacing;

/**
 * @brief 网格线宽度,默认为1 pixel (1.0f / [UIScreen mainScreen].scale)
 */
@property (nonatomic, assign) CGFloat   gridLineWidth;

/**
 * @brief 网格颜色,默认蓝色
 */
@property (nonatomic, strong) UIColor   *gridColor;

@end
SvGridView.m
//
//  SvGridView.m
//  SvSinglePixel
//
//  Created by xiaoyong.cxy on 6/23/15.
//  Copyright (c) 2015 smileEvday. All rights reserved.
//

#import "SvGridView.h"

#define SINGLE_LINE_WIDTH           (1 / [UIScreen mainScreen].scale)
#define SINGLE_LINE_ADJUST_OFFSET   ((1 / [UIScreen mainScreen].scale) / 2)

@implementation SvGridView

@synthesize gridColor = _gridColor;
@synthesize gridSpacing = _gridSpacing;

- (instancetype)initWithFrame:(CGRect)frame
{
    self = [super initWithFrame:frame];
    if (self) {
        self.backgroundColor = [UIColor clearColor];

        _gridColor = [UIColor blueColor];
        _gridLineWidth = SINGLE_LINE_WIDTH;
        _gridSpacing = 30;
    }

    return self;
}

- (void)setGridColor:(UIColor *)gridColor
{
    _gridColor = gridColor;

    [self setNeedsDisplay];
}

- (void)setGridSpacing:(CGFloat)gridSpacing
{
    _gridSpacing = gridSpacing;

    [self setNeedsDisplay];
}

- (void)setGridLineWidth:(CGFloat)gridLineWidth
{
    _gridLineWidth = gridLineWidth;

    [self setNeedsDisplay];
}


// Only override drawRect: if you perform custom drawing.
// An empty implementation adversely affects performance during animation.
- (void)drawRect:(CGRect)rect
{
    CGContextRef context = UIGraphicsGetCurrentContext();

    CGContextBeginPath(context);
    CGFloat lineMargin = self.gridSpacing;

    /**
     *  https://developer.apple.com/library/ios/documentation/2DDrawing/Conceptual/DrawingPrintingiOS/GraphicsDrawingOverview/GraphicsDrawingOverview.html
     * 仅当要绘制的线宽为奇数像素时,绘制位置需要调整
     */
    CGFloat pixelAdjustOffset = 0;
    if (((int)(self.gridLineWidth * [UIScreen mainScreen].scale) + 1) % 2 == 0) {
        pixelAdjustOffset = SINGLE_LINE_ADJUST_OFFSET;
    }

    CGFloat xPos = lineMargin - pixelAdjustOffset;
    CGFloat yPos = lineMargin - pixelAdjustOffset;
    while (xPos < self.bounds.size.width) {
        CGContextMoveToPoint(context, xPos, 0);
        CGContextAddLineToPoint(context, xPos, self.bounds.size.height);
        xPos += lineMargin;
    }

    while (yPos < self.bounds.size.height) {
        CGContextMoveToPoint(context, 0, yPos);
        CGContextAddLineToPoint(context, self.bounds.size.width, yPos);
        yPos += lineMargin;
    }

    CGContextSetLineWidth(context, self.gridLineWidth);
    CGContextSetStrokeColorWithColor(context, self.gridColor.CGColor);
    CGContextStrokePath(context);
}


@end
使用方法如下:
SvGridView *gridView = [[SvGridView alloc] initWithFrame:self.view.bounds];
gridView.autoresizingMask = UIViewAutoresizingFlexibleWidth | UIViewAutoresizingFlexibleHeight;
gridView.alpha = 0.6;
gridView.gridColor = [UIColor greenColor];
[self.view addSubview:gridView];
三、一个问题
好了,到这儿本文的全部知识就结束了,最后我还有一个问题。
设计师为什么一定要一个像素的线? 一个像素的线可能在非Retina设备上显示宽度看着合适,在Retina屏幕上显示可能会比较细。是不是一定需要一个像素的线,需要根据情况来处理。