受保护 API 项目的思路是:
调用方先提交用户名和密码 (即凭证) 到登录接口, 由登录接口验证凭证合法性, 如果合法, 返回给调用方一个Jwt token.
以后调用方访问API时, 需要将该token 加到 Bearer Http 头上, 服务方验证该 token 是否有效, 如果验证通过, 将允许其继续访问受控API.
===================================
本文目标
===================================
1. 实现一个未受保护的API
2. 网站开启 CORS 跨域共享
3. 实现一个受保护的API
4. 实现一个密码hash的接口(测试用)
5. 实现一个登录接口
===================================
目标1: 实现一个未受保护的API
===================================
VS创建一个ASP.net core Host的Blazor wsam解决方案,其中 Server端项目即包含了未受保护的 WeatherForecast API接口.
稍微讲解一下 ASP.Net Core API的路由规则.
下面代码是模板自动生成的, Route 注解中的参数是 [controller], HttpGet 注解没带参数, 则该方法的url为 http://site/WeatherForecast,
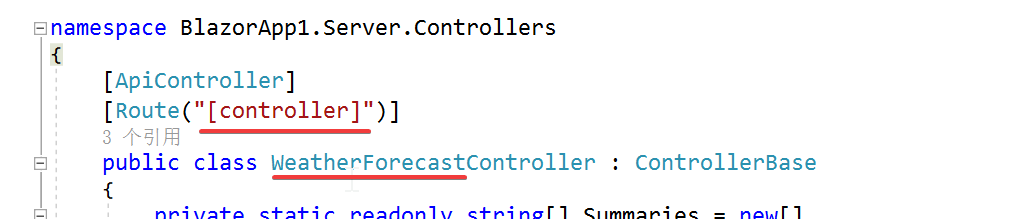
GET http://localhost:5223/WeatherForecast HTTP/1.1
content-type: application/json
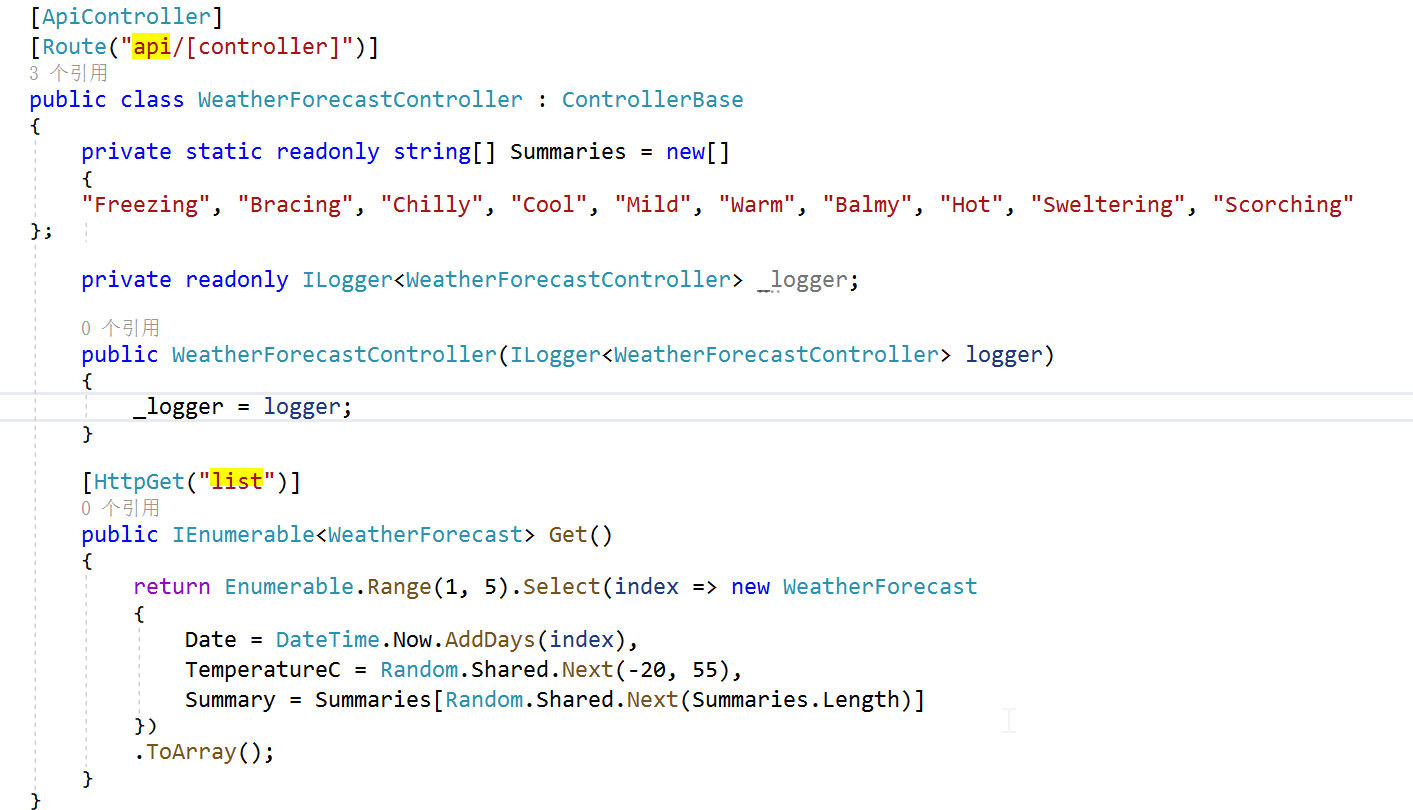
VS 插件 Rest Client 访问的指令需要调整为:
GET http://localhost:5223/api/WeatherForecast/list HTTP/1.1
content-type: application/json
===================================
目标2: API网站开启 CORS 跨域共享
===================================
默认情况下, 浏览器安全性是不允许网页向其他域名发送请求, 这种约束称为同源策略. 需要说明的是, 同源策略是浏览器端的安全管控, 但要解决却需要改造服务端.
究其原因, 需要了解浏览器同源策略安全管控的机制, 浏览器在向其他域名发送请求时候, 其实并没有做额外的管控, 管控发生在浏览器收到其他域名请求结果时, 浏览器会检查返回结果中, 如果结果包含CORS共享标识的话, 浏览器端也会通过检查, 如果不包含, 浏览器会抛出访问失败.
VS创建一个ASP.net core Host的Blazor wsam解决方案, wasm是托管ASP.net core 服务器端网站之内, 所以不会违反浏览器的同源策略约束. 模板项目中, 并没有开启CORS共享控制的代码
一般情况下, 我们要将blazor wasm独立部署的CDN上, 所以 api server 要开启CORS.
Program.cs 文件中增加两个小节代码:
先为 builder 增加服务:
builder.Services.AddCors(option =>
{
    option.AddPolicy("CorsPolicy", policy => policy
    .AllowAnyOrigin()
    .AllowAnyHeader()
    .AllowAnyMethod());
});
其次, 需要在 web request 的pipleline 增加 UseCors() 中间件, pipeline 各个中间件顺序至关重要,
Cors 中间件紧跟在 UseRouting() 之后即可.
app.UseRouting();

//Harry: enable Cors Policy, must be after Routing
app.UseCors("CorsPolicy");
===================================
目标3: 实现一个受保护的API
===================================
增加一个获取产品清单的API, 该API需要访问方提供合法的JWT token才行.
步骤1: 增加nuget依赖包 Microsoft.AspNetCore.Authentication.JwtBearer
步骤2: 增加 product 实体类
    public class Product
    {
        public int Id { get; set; }
        public string? Name { get; set; }
        public decimal Price { get; set; }
    }
步骤3: 增加ProductsController 类
using BlazorApp1.Shared;
using Microsoft.AspNetCore.Authorization;
using Microsoft.AspNetCore.Mvc;

namespace BlazorApp1.Server.Controllers
{
    [ApiController]
    [Route("[controller]")]
    [Authorize]
    public class ProductsController : ControllerBase
    {
        [HttpGet]
        public IActionResult GetProducts()
        {
            var products = new List<Product>()
            {
                new Product()
                {
                    Id = 1,
                    Name = "Wireless mouse",
                    Price = 29.99m
                },
                new Product()
                {
                    Id = 2,
                    Name = "HP printer",
                    Price = 100
                },
                new Product()
                {
                    Id = 3,
                    Name = "Sony keyboard",
                    Price = 20
                }
            };
            return Ok(products);
        }

    }

}
注意加上了 Authorize 注解后访问url, 得到 500 报错, 提示需要加上相应的 Authorization 中间件.
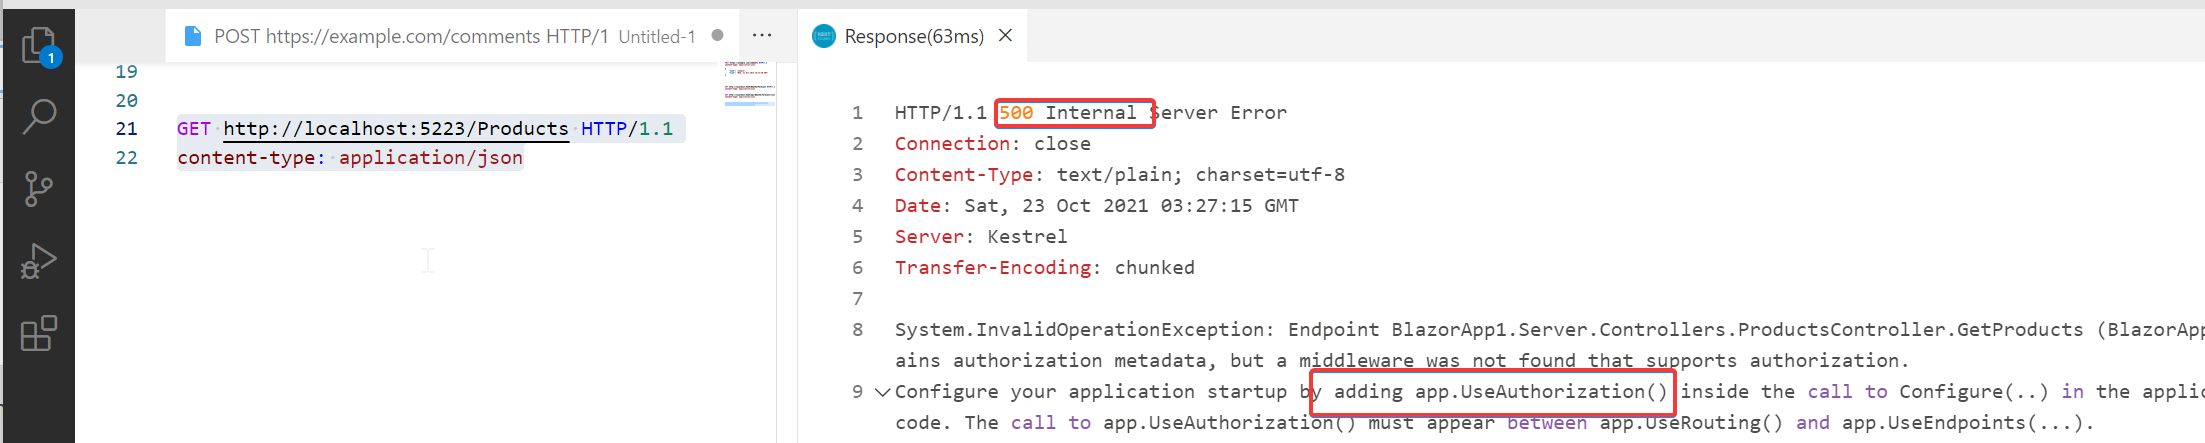
app 增加 Authorization 中间件 app.UseAuthorization() 后, 测试包 401 错误, 说明授权这块功能已经OK.
测试效果图:

[Authorize] 注解的说明:
- [Authorize] 不带参数: 只要通过身份验证, 就能访问
- [Authorize(Roles="Admin,User")], 只有 jwt token 的 Role Claim 包含 Admin 或 User 才能访问, 这种方式被叫做基于role的授权
- [Authorize(Policy="IsAdmin"] , 称为基于Claim的授权机制. 它属于基于Policy策略的授权的简化版, 简化版的Policy 授权检查是看Jwt token中是否包含 IsAdmin claim, 如包含则授权验证通过.
- [Authorize(Policy="UserOldThan20"], 基于Policy策略的授权机制, 它是基于 claim 授权的高级版, 不是简单地看 token是否包含指定的 claim, 而是可以采用代码逻辑来验证, 实现较为复杂, 需要先实现 IAuthorizationRequirement 和 IAuthorizationHander 接口.
- 基于资源的授权, 这种机制更灵活, 参见 https://andrewlock.net/resource-specific-authorisation-in-asp-net-core/
不管是基于Role还是基于Claim还是基于Policy的授权验证, token中都需要带有特定claim, token内的信息偏多, 带来的问题是: 服务端签发token较为复杂, 另外, token 中的一些信息很可能过期, 比如服务端已经对某人的角色做了修改, 但客户端token中的角色还是老样子, 两个地方的role不一致, 使得授权验证更复杂了.
我个人推荐的做法是, API 仅仅加上不带参数的 [Authorize] , 指明必须是登录用户才能访问, 授权这块完全控制在服务端, 从token中提取userId, 然后查询用户所在的 userGroup 是否具有该功能. 这里的 userGroup 和 role 完全是一回事. accessString 和功能点是1:n的关系, 最好是能做到 1:1.

下面代码是我推荐方案的伪代码, 同时也展现 Claim / Claims /ClaimsIdentity /ClaimsPrincipal 几个类的关系:
        [HttpGet]
        [Authorize]
        public IActionResult get(int productId)
        {
            //构建 Claims 清单
            const string Issuer = "https://gov.uk";
            var claims = new List<Claim> {
            new Claim(ClaimTypes.Name, "Andrew", ClaimValueTypes.String, Issuer),
            new Claim(ClaimTypes.Surname, "Lock", ClaimValueTypes.String, Issuer),
            new Claim(ClaimTypes.Country, "UK", ClaimValueTypes.String, Issuer),
            new Claim("ChildhoodHero", "Ronnie James Dio", ClaimValueTypes.String)
            };

            //生成 ClaimsIdentity 对象
            var userIdentity = new ClaimsIdentity(claims, "Passport");

            //生成 ClaimsPrincipal 对象, 一般也叫做 userPrincipal
            var userPrincipal = new ClaimsPrincipal(userIdentity);

            object product = loadProductFromDb(productId);
            var hasRight = checkUserHasRight(userPrincipal, resource:product, acccessString: "Product.Get");
            if (!hasRight)
            {
                return new UnauthorizedResult();   //返回401报错
            }
            else
            {
                return Ok(product);
            }
        }

        private bool checkUserHasRight(ClaimsPrincipal userPrincipal, object resource, string accessString)
        {
            throw new NotImplementedException();  // 自行实现
        }

        private object loadProductFromDb(int id)
        {
            throw new NotImplementedException(); // 自行实现
        }
===================================
目标4: 实现一个生成密码hash的接口(测试用)
===================================
这个小节主要是为登录接口做数据准备工作. 用户的密码不应该是明文形式保存, 必须存储加密后的密码.
一般的 Password hash 算法, 需要我们自己指定 salt 值, 然后为我们生成一个哈希后的密码摘要. 校验密码时候, 需要将最初的salt值和用户传入的原始密码, 通过同样的哈希算法, 得到另一个密码摘要, 如果两个密码摘要一致, 表明新传入的原始密码是对的.
Asp.net core提供的默认 PasswordHasher 类, 提供了方便而且安全的密码hash算法, 具体的讨论见 https://stackoverflow.com/questions/20621950/ , PasswordHasher 类 Rfc2898算法, 不需要我们指定 salt 值, 有算法本身生成一个随机的salt值, 并将该随机的 salt 值存在最终的密码hash中的前一部分, 所以验证时也不需要提供该salt 值.
该算法的特点是:
- 使用非常简单, 做hash之前不需要准备 salt 值, 加密之后也不需要额外保存salt值,
- 同一个明文,多次做hash摘要会得到不同的结果.
下面是一个测试 controller 用于生成密码hash值:
using Microsoft.AspNetCore.Identity;
using Microsoft.AspNetCore.Mvc;

namespace BlazorApp1.Server.Controllers
{
    [ApiController]
    [Route("[controller]")]

    public class TestController : ControllerBase
    {
        private readonly IConfiguration _configuration;
        public TestController(IConfiguration configuration)=>_configuration = configuration;

        [HttpPost("GenerateHashedPwd")]
        public string Generate([FromBody] string plainPassword)
        {
            var passwordHasher=new PasswordHasher<String>();
            var hashedPwd = passwordHasher.HashPassword("",plainPassword);
            var verifyResult = passwordHasher.VerifyHashedPassword("", hashedPwd, plainPassword);
            Console.WriteLine(verifyResult);
            return hashedPwd;
        }

    }

}
Rest client 指令:
POST http://localhost:5223/Test/GenerateHashedPwd HTTP/1.1
content-type: application/json

"123abc"
得到的hash值为:
AQAAAAEAACcQAAAAEGVtM0HmzqITBdnkZNzbdDwM3u7zz2F5XQfRIJN/78/UGM9u8Lqcn/eh4zWlUbbDmQ== ===================================
目标5: 实现登录API
===================================
(1) appsettings.json 配置文件中, 新增 Credentials 清单, 代表我们的用户库.
  "Credentials": {
    "Email": "user@test.com",
    "Password": "AQAAAAEAACcQAAAAENsLEigZGIs6kEdhJ7X1d7ChFZ4TKQHHYZCDoLSiPYy/GpYw4lmMOalsn8g/7debnA=="
  }
(2) appsettings.json 配置文件中, 增加 jwt 配置项, 用于jwt token的生成和验证.
jwt token 的生成是由新的 LoginController 实现,
jwt token的验证是在 ASP.net Web的 Authentication 中间件完成的.
  "Jwt": {
    "Key": "ITNN8mPfS2ivOqr1eRWK0Rac3sRAchQdG8BUy0pK4vQ3",",
    "Issuer": "MyApp",
    "Audience": "MyAppAudience",
    "TokenExpiry": "60" //minutes
  }
(3) 增加 Credentials 类, 用来传入登录的凭证信息.
public class Credentials
{
    [Required]
    public string Email { get; set; }
    [Required]
    public string Password { get; set; }
}
(4) 增加一个登录结果类 LoginResult:
public class LoginResult
{
    public string? Token { get; set; }
    public string? ErrorMessage { get; set; }
}
(5) 新增 LoginController API类
using BlazorApp1.Shared;
using Microsoft.AspNetCore.Authorization;
using Microsoft.AspNetCore.Identity;
using Microsoft.AspNetCore.Mvc;
using Microsoft.IdentityModel.Tokens;
using System.IdentityModel.Tokens.Jwt;
using System.Security.Claims;
using System.Text;

namespace BlazorApp1.Server.Controllers
{
    [ApiController]
    [Route("[controller]")]

    public class LoginController : ControllerBase
    {
        private readonly IConfiguration _configuration;
        public LoginController(IConfiguration configuration)=>_configuration = configuration;

        [HttpPost("login")]
        public LoginResult Login(Credentials credentials)
        {
            var passed=ValidateCredentials(credentials);
            if (passed)
            {
                return new LoginResult { Token = GenerateJwt(credentials.Email), ErrorMessage = "" };
            }
            else
            {
                return new LoginResult { Token = "", ErrorMessage = "Wrong password" };
            }
        }

        bool ValidateCredentials(Credentials credentials)
        {
            var user = _configuration.GetSection("Credentials").Get<Credentials>();
            var password = user.Password;
            var plainPassword = credentials.Password;
            var passwordHasher =new PasswordHasher<string>();
            var result= passwordHasher.VerifyHashedPassword(null, password, plainPassword);
            return (result == PasswordVerificationResult.Success);
        }

        private string GenerateJwt(string email)
        {
            var jwtKey = Encoding.UTF8.GetBytes(_configuration["Jwt:Key"]);
            var securtiyKey = new SymmetricSecurityKey(jwtKey);
            var issuer = _configuration["Jwt:Issuer"];
            var audience=_configuration["Jwt:Audience"];
            var tokenExpiry = Convert.ToDouble( _configuration["Jwt:TokenExpiry"]);

            var token = new JwtSecurityToken(
                issuer: issuer,
                audience: audience,
                expires: DateTime.Now.AddMinutes(tokenExpiry),
                claims: new[] { new Claim(ClaimTypes.Name, email) },
                signingCredentials: new SigningCredentials(securtiyKey, SecurityAlgorithms.HmacSha256)
                );
            var tokenHandler = new JwtSecurityTokenHandler();

            return tokenHandler.WriteToken(token);
        }

    }

}
代码说明:
- JwtSecurityToken 类的 claims 数组参数, 对应的是 JWT token payload key-value, 一个 claim 对应一个key-value, 可以指定多个claim, 这样 jwt token的 payload 会变长.
代码中的 JwtSecurityToken 类的 claims 参数, 其传入值为 new[] { new Claim(ClaimTypes.Name, email) } , 说明 payload 仅有一个 claim 或者叫 key-value对, 其 key 为 name, value为邮箱号; 如果jwt token中要包含用户的 Role, 可以再增加 new Claim(ClaimTypes.Role, "Admin")
- JwtSecurityTokenHandler 类其实很关键, 可以将 Token 对象转成字符串, 也可以用它验证 token 字符串是否合法.
(5) app 增加 Authentication 中间件
using Microsoft.AspNetCore.Authentication.JwtBearer;
using Microsoft.AspNetCore.ResponseCompression;
using Microsoft.IdentityModel.Tokens;
using System.Text;

var builder = WebApplication.CreateBuilder(args);

// Add services to the container.
builder.Services.AddControllersWithViews();
builder.Services.AddRazorPages();

//Harry: Add Cors Policy service
builder.Services.AddCors(option =>
{
    option.AddPolicy("CorsPolicy", policy => policy
    .AllowAnyOrigin()
    .AllowAnyHeader()
    .AllowAnyMethod());
});


//Harry: Read Jwt settings
var jwtIssuser = builder.Configuration["Jwt:Issuer"];
var jwtAudience = builder.Configuration["Jwt:Audience"];
var jwtKey = Encoding.UTF8.GetBytes(builder.Configuration["Jwt:Key"]);
var securtiyKey = new SymmetricSecurityKey(jwtKey);

//Harry: Add authentication service
builder.Services.AddAuthentication("Bearer").AddJwtBearer(options => {
    options.TokenValidationParameters = new TokenValidationParameters
    {
        //验证 Issuer
        ValidateIssuer = true,
        ValidIssuer = jwtIssuser,

        //验证 Audience
        ValidateAudience = true,
        ValidAudience = jwtAudience,

        //验证 Security key
        ValidateIssuerSigningKey = true,
        IssuerSigningKey = securtiyKey,

        //验证有效性
        ValidateLifetime = true,
        LifetimeValidator = (DateTime? notBefore, DateTime? expires, SecurityToken securityToken,
                                     TokenValidationParameters validationParameters) =>
        {
            return expires<=DateTime.Now;
        }
    };
});


var app = builder.Build();

// Configure the HTTP request pipeline.
if (app.Environment.IsDevelopment())
{
    app.UseWebAssemblyDebugging();
}
else
{
    app.UseExceptionHandler("/Error");
}

app.UseBlazorFrameworkFiles();
app.UseStaticFiles();

app.UseRouting();

//Harry: enable Cors Policy, must be after Routing
app.UseCors("CorsPolicy");

//Harry: authentication and authorization middleware to pipeline. must be after Routing/Cors and before EndPoint configuation
app.UseAuthentication();

//Harry: add authorization middleware to pipeline. must be after Routing/Cors and before EndPoint configuation
app.UseAuthorization();

app.MapRazorPages();
app.MapControllers();
app.MapFallbackToFile("index.html");


app.Run();
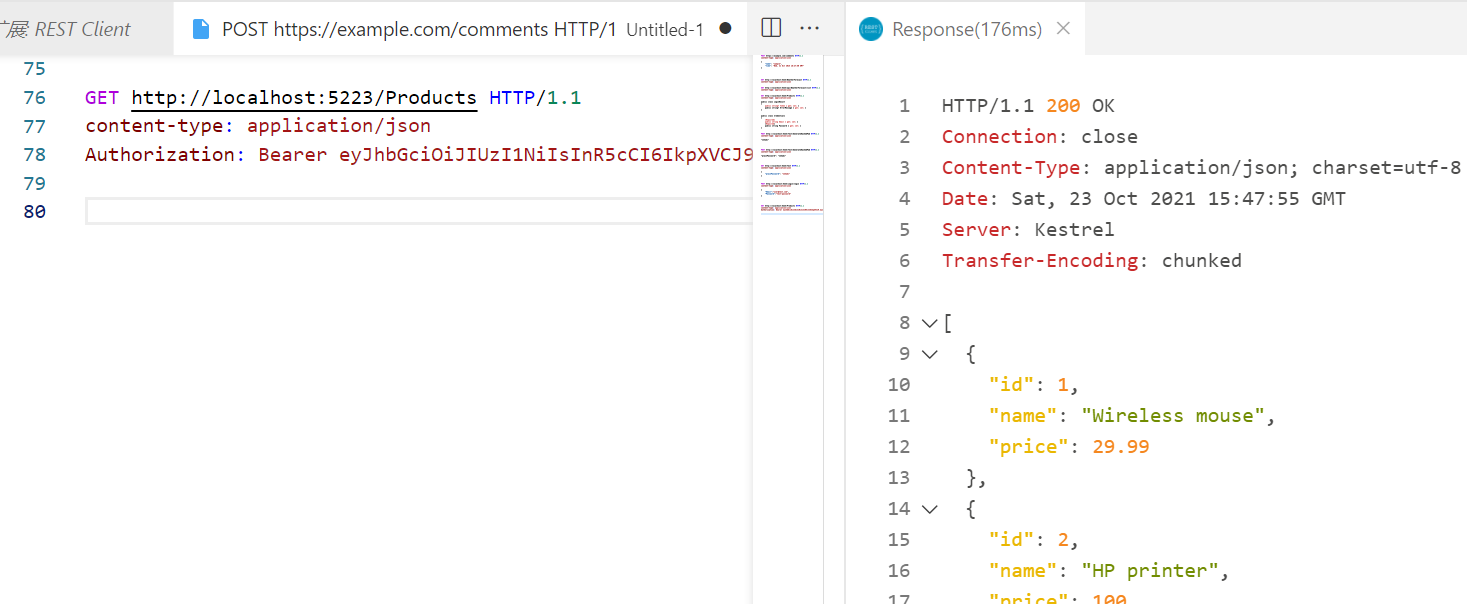
Rest client测试代码:
GET http://localhost:5223/Products HTTP/1.1
content-type: application/json
Authorization: Bearer eyJhbGciOiJIUzI1NiIsInR5cCI6IkpXVCJ9.eyJodHRwOi8vc2NoZW1hcy54bWxzb2FwLm9yZy93cy8yMDA1LzA1L2lkZW50aXR5L2NsYWltcy9uYW1lIjoidXNlckB0ZXN0LmNvbSIsImV4cCI6MTYzNTAwNTcyMywiaXNzIjoiTXlBcHAiLCJhdWQiOiJNeUFwcEF1ZGllbmNlIn0.6rGq0Ouay9-3bvTDWVEouCHg4T7tDv129PQTha4GhP8
测试结果:
===================================
参考
===================================
https://www.mikesdotnetting.com/article/342/managing-authentication-token-expiry-in-webassembly-based-blazor
https://chrissainty.com/avoiding-accesstokennotavailableexception-when-using-blazor-webassembly-hosted-template-with-individual-user-accounts/
https://www.puresourcecode.com/dotnet/blazor/blazor-using-httpclient-with-authentication/
https://code-maze.com/using-access-token-with-blazor-webassembly-httpclient/#accessing-protected-resources
https://andrewlock.net/resource-specific-authorisation-in-asp-net-core/
https://www.cnblogs.com/wjsgzcn/p/12936257.html
https://www.cnblogs.com/ittranslator/p/making-http-requests-in-blazor-webassembly-apps.html