概述
在正常的使用场景中,我们处理了比较多的矩形区域内触摸事件,比如UIButton、UIControl。一般来说,这些控件的图形以及触摸区域都是矩形或者圆角矩形的。但是在一些特殊应用场景中我们有时不得不面对这样一种比较严苛的需求,比如要求程序只对某个圆形、五角形等非常规区域的点击事件进行处理,这就需要花点功夫了。本文以圆形为例子来介绍此类场景的处理方法。
先看下面一张图(附图1),我们的目标是实现如下自定义tabbar。中间带突起圆形的自定义tabbar曾一度流行,今天我们来粗糙地实现一下。
在附图一中,红色代表tabbar,上面有三个蓝色按钮。在三个按钮中我们重点解决按钮A,因为它有一半的区域突在tabbar的有效区域外。
对于按钮A,我们有以下两个问题需要解决:
1、如何准确过滤掉A外接矩形里非蓝色区域的点击事件?
2、如何让A的上半部分也能响应触摸事件?
其实两个问题的解决方法是基本一致的。在iOS中所有控件都是以矩形的方式存在的,在图2中尽管蓝色部分看起来是圆形,但当点击外接矩形内的非圆形区域时也会默认触发点击事件。因此,我们需要用一些手段把触摸事件“拦截”下来。想要“拦截”事件,就必须了解iOS的事件分发机制,也就是当你点击设备屏幕后,iOS是如何决定由那个view去最终响应你的触摸!下面插播一小段关于iOS事件分发的介绍:
==================================
当你手指触摸屏幕后会发生以下事情:触摸事件被封装成一个UIEvent事件,去当前iOS操作系统的active app队列中取当前活跃的APP,把event传给它--->event传给UIApplication--->传给UIWindow的root view controller(rootVC)--->调用rootVC.view的所有subviews的hitTest:event:方法。哪个view的hitTest:event方法返回非nil值,则触摸事件就交给该view处理。关于事件分发的详细机制及举例可以参考技术哥大神的文章
==================================
分析
让我们重新回到探讨的问题上。通过以上简介我们可以知道,想“拦截”触摸事件,则应该在tabbar的hitTest:event方法中做处理(坐标判断等)。以下是具体的demo源码:
#import <UIKit/UIKit.h>

@interface panelView : UIView

@end
panelView.h

#import <UIKit/UIKit.h> @interface panelView : UIView @end
#import "panelView.h"
@implementation panelView
- (id)initWithFrame:(CGRect)frame
{
self = [super initWithFrame:frame];
if (self) {
[self initSubviews];
}
return self;
}
- (void)initSubviews
{
UIButton *roundBtn = [UIButton buttonWithType:UIButtonTypeCustom];
roundBtn.frame = CGRectMake(self.frame.size.width / 2 - 30, -30, 60, 60);
roundBtn.backgroundColor = [UIColor blueColor];
roundBtn.layer.cornerRadius = 30;
roundBtn.tag = 10086;
[roundBtn addTarget:self action:@selector(onBtnPressed:)
forControlEvents:UIControlEventTouchUpInside];
[self addSubview:roundBtn];
UIButton *leftBtn = [UIButton buttonWithType:UIButtonTypeCustom];
leftBtn.frame = CGRectMake(0, 15, 30, 30);
leftBtn.backgroundColor = [UIColor blueColor];
leftBtn.tag = 10087;
[leftBtn addTarget:self action:@selector(onBtnPressed:)
forControlEvents:UIControlEventTouchUpInside];
[self addSubview:leftBtn];
UIButton *rightBtn = [UIButton buttonWithType:UIButtonTypeCustom];
rightBtn.frame = CGRectMake(self.frame.size.width - 30, 15, 30, 30);
rightBtn.backgroundColor = [UIColor blueColor];
rightBtn.tag = 10088;
[rightBtn addTarget:self action:@selector(onBtnPressed:)
forControlEvents:UIControlEventTouchUpInside];
[self addSubview:rightBtn];
}
- (UIView *)hitTest:(CGPoint)point withEvent:(UIEvent *)event
{
UIView *hitView = nil;
//NSLog(@"point:%@", NSStringFromCGPoint(point));
UIButton *roundBtn = (UIButton *)[self viewWithTag:10086];
UIButton *leftBtn = (UIButton *)[self viewWithTag:10087];
UIButton *rightBtn = (UIButton *)[self viewWithTag:10088];
BOOL pointInRound = [self touchPointInsideCircle:roundBtn.center radius:30 targetPoint:point];
if (pointInRound) {
hitView = roundBtn;
} else if(CGRectContainsPoint(leftBtn.frame, point)) {
hitView = leftBtn;
} else if(CGRectContainsPoint(rightBtn.frame, point)) {
hitView = rightBtn;
} else {
hitView = self;
}
return hitView;
}
- (BOOL)touchPointInsideCircle:(CGPoint)center radius:(CGFloat)radius targetPoint:(CGPoint)point
{
CGFloat dist = sqrtf((point.x - center.x) * (point.x - center.x) +
(point.y - center.y) * (point.y - center.y));
return (dist <= radius);
}
- (void)onBtnPressed:(id)sender
{
UIButton *btn = (UIButton *)sender;
NSLog(@"btn tag:%d", btn.tag);
}
@end
panelView.m(控件初始化,不展开)
 1 #import "panelView.h"
 2
 3 @implementation panelView
 4
 5 - (id)initWithFrame:(CGRect)frame
 6 {
 7     self = [super initWithFrame:frame];
 8     if (self) {
 9         [self initSubviews];
10     }
11     return self;
12 }
13
14 - (void)initSubviews
15 {
16     UIButton *roundBtn = [UIButton buttonWithType:UIButtonTypeCustom];
17     roundBtn.frame = CGRectMake(self.frame.size.width / 2 - 30, -30, 60, 60);
18     roundBtn.backgroundColor = [UIColor blueColor];
19     roundBtn.layer.cornerRadius = 30;
20     roundBtn.tag = 10086;
21     [roundBtn addTarget:self action:@selector(onBtnPressed:)
22        forControlEvents:UIControlEventTouchUpInside];
23     [self addSubview:roundBtn];
24
25     UIButton *leftBtn = [UIButton buttonWithType:UIButtonTypeCustom];
26     leftBtn.frame = CGRectMake(0, 15, 30, 30);
27     leftBtn.backgroundColor = [UIColor blueColor];
28     leftBtn.tag = 10087;
29     [leftBtn addTarget:self action:@selector(onBtnPressed:)
30        forControlEvents:UIControlEventTouchUpInside];
31     [self addSubview:leftBtn];
32
33     UIButton *rightBtn = [UIButton buttonWithType:UIButtonTypeCustom];
34     rightBtn.frame = CGRectMake(self.frame.size.width - 30, 15, 30, 30);
35     rightBtn.backgroundColor = [UIColor blueColor];
36     rightBtn.tag = 10088;
37     [rightBtn addTarget:self action:@selector(onBtnPressed:)
38        forControlEvents:UIControlEventTouchUpInside];
39     [self addSubview:rightBtn];
40 }
41
42 - (UIView *)hitTest:(CGPoint)point withEvent:(UIEvent *)event
43 {
44     UIView *hitView = nil;
45     //NSLog(@"point:%@", NSStringFromCGPoint(point));
46     UIButton *roundBtn = (UIButton *)[self viewWithTag:10086];
47     UIButton *leftBtn = (UIButton *)[self viewWithTag:10087];
48     UIButton *rightBtn = (UIButton *)[self viewWithTag:10088];
49     BOOL pointInRound = [self touchPointInsideCircle:roundBtn.center radius:30 targetPoint:point];
50     if (pointInRound) {
51         hitView = roundBtn;
52     } else if(CGRectContainsPoint(leftBtn.frame, point)) {
53         hitView  = leftBtn;
54     } else if(CGRectContainsPoint(rightBtn.frame, point)) {
55         hitView = rightBtn;
56     } else {
57         hitView = self;
58     }
59     return hitView;
60 }
61
62 - (BOOL)touchPointInsideCircle:(CGPoint)center radius:(CGFloat)radius targetPoint:(CGPoint)point
63 {
64     CGFloat dist = sqrtf((point.x - center.x) * (point.x - center.x) +
65                          (point.y - center.y) * (point.y - center.y));
66     return (dist <= radius);
67 }
68
69
70 - (void)onBtnPressed:(id)sender
71 {
72     UIButton *btn = (UIButton *)sender;
73     NSLog(@"btn tag:%d", btn.tag);
74 }
75
76 @end
在hitTest方法中最重要的是判断按钮A所在的区域,其实仅仅用到两点的距离公式来圈出蓝色部分所在的圆形,判断方法如下:
1 2 3 4 5 6 | - (BOOL)touchPointInsideCircle:(CGPoint)center radius:(CGFloat)radius targetPoint:(CGPoint)point{CGFloat dist = sqrtf((point.x - center.x) * (point.x - center.x) +(point.y - center.y) * (point.y - center.y));return(dist <= radius);} |
而判断点是否在按钮B/C内就更简单了,系统提供了封装好的api:
1 | boolCGRectContainsPoint(CGRect rect, CGPoint point) |
最终,关于事件“拦截”的判断如下:
1 2 3 4 5 6 7 8 9 10 11 12 13 14 15 16 17 18 19 | - (UIView *)hitTest:(CGPoint)point withEvent:(UIEvent *)event{UIView *hitView =nil;//NSLog(@"point:%@", NSStringFromCGPoint(point));UIButton *roundBtn = (UIButton *)[selfviewWithTag:10086];UIButton *leftBtn = (UIButton *)[selfviewWithTag:10087];UIButton *rightBtn = (UIButton *)[selfviewWithTag:10088];BOOLpointInRound = [selftouchPointInsideCircle:roundBtn.center radius:30 targetPoint:point];if(pointInRound) {hitView = roundBtn;}elseif(CGRectContainsPoint(leftBtn.frame, point)) {hitView = leftBtn;}elseif(CGRectContainsPoint(rightBtn.frame, point)) {hitView = rightBtn;}else{hitView =self;}returnhitView;} |
此外,在hitTest中还可以玩其他花样,比如将本该由按钮A响应的时间强制性转发给其他按钮,这只需在hitTest的返回值中修改一下即可!
本文所用demo完整源码点这里test.zip下载。
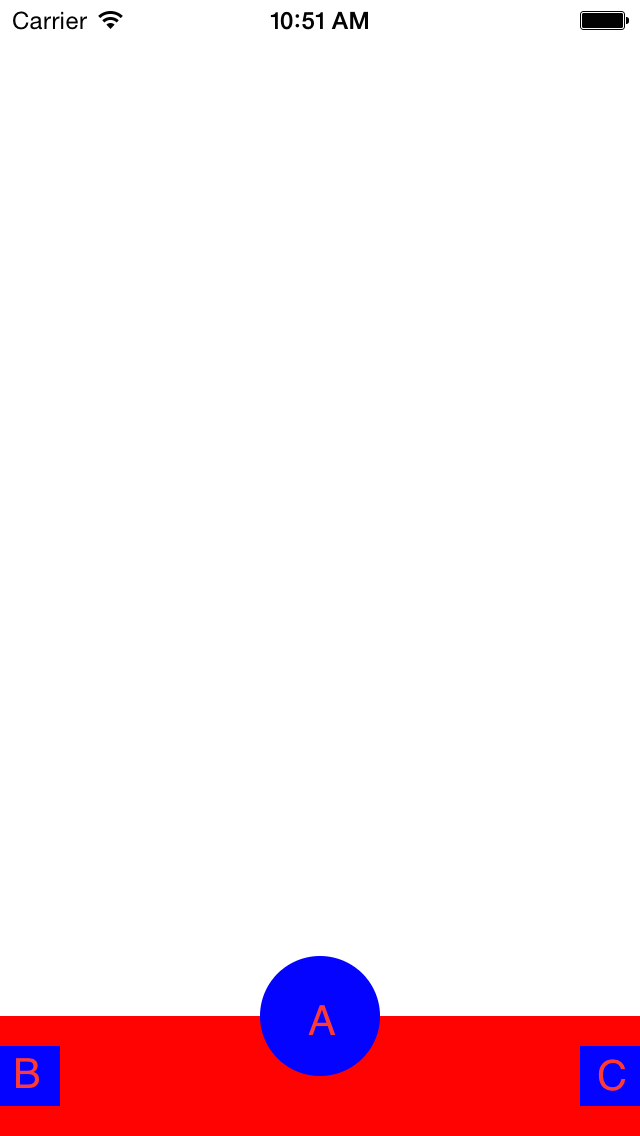
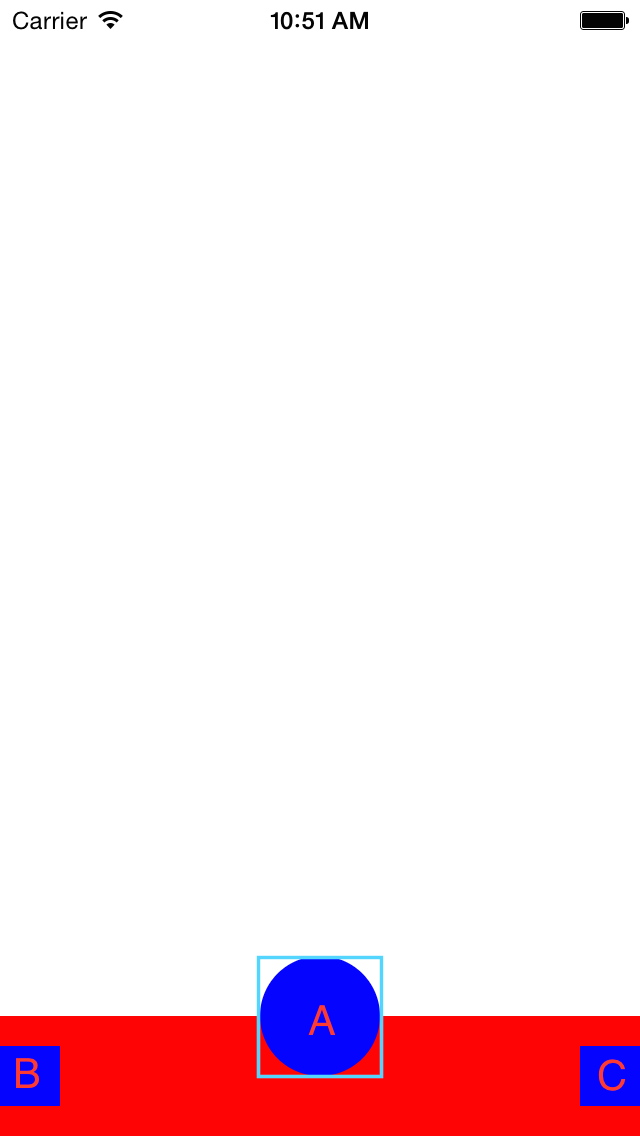
图1 图2