Spring Boot 命名配置很少,却可以做到和其他配置复杂的框架相同的功能工作,从源码来看是怎么做到的。
我这里使用的Spring Boot版本是 2.0.1.RELEASE
Spring Boot最重要的注解: @SpringBootApplication
打开它:

其中的几个注解:
@SpringBootConfiguration 标注这个类是一个配置类,类似Spring的@Configuration
@EnableAutoConfiguration 开启自动配置
@ComponentScan 开启组件扫描
打开@SpringBootConfiguration:
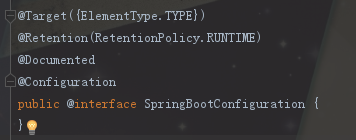
可以看作是springboot将spring的Configuration注解进行一个包装
@EnableAutoConfiguration
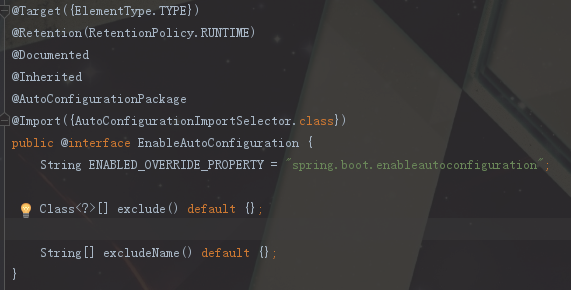
@AutoConfigurationPackage 自动扫描包的注解
@Import({AutoConfigurationImportSelector.class}) 引入组件
这个@AutoConfigurationPackage注解就是扫描跟主配置类同级目录以及子目录下的包,这也是什么Spring Boot其他的包必须在主配置类同级或者子目录以下的原因。
这里最关键的就是@Import注解向容器里导入了什么组件,导入的AutoConfigurationImportSelector.class,打开这个类,注意:在Spring Boot1.5版本中这里导入的类是:EnableAutoConfigurationImportSelector,而EnableAutoConfigurationImportSelector是继承自AutoConfigurationImportSelector的。
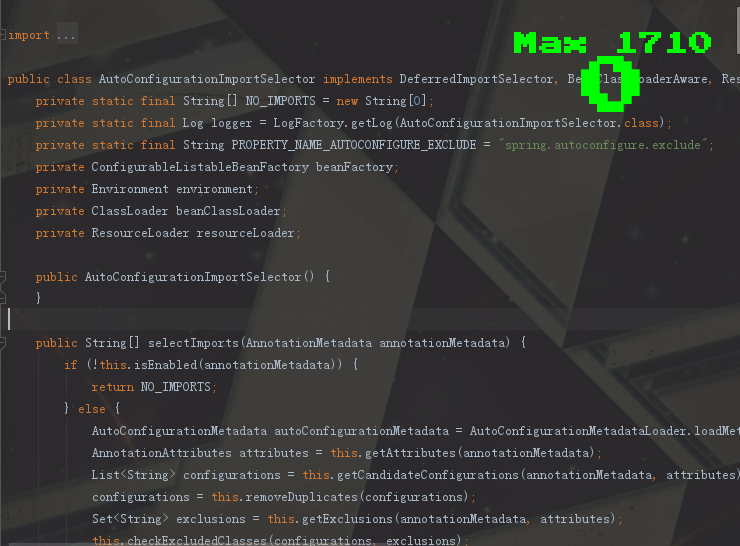
里面有一个 selectImports() 方法很重要。
    public String[] selectImports(AnnotationMetadata annotationMetadata) {
        if (!this.isEnabled(annotationMetadata)) {
            return NO_IMPORTS;
        } else {
            AutoConfigurationMetadata autoConfigurationMetadata = AutoConfigurationMetadataLoader.loadMetadata(this.beanClassLoader);
            AnnotationAttributes attributes = this.getAttributes(annotationMetadata);
            List<String> configurations = this.getCandidateConfigurations(annotationMetadata, attributes);
            configurations = this.removeDuplicates(configurations);
            Set<String> exclusions = this.getExclusions(annotationMetadata, attributes);
            this.checkExcludedClasses(configurations, exclusions);
            configurations.removeAll(exclusions);
            configurations = this.filter(configurations, autoConfigurationMetadata);
            this.fireAutoConfigurationImportEvents(configurations, exclusions);
            return StringUtils.toStringArray(configurations);
        }
    }
getCandidateConfigurations() 方法
    protected List<String> getCandidateConfigurations(AnnotationMetadata metadata, AnnotationAttributes attributes) {
        List<String> configurations = SpringFactoriesLoader.loadFactoryNames(this.getSpringFactoriesLoaderFactoryClass(), this.getBeanClassLoader());
        Assert.notEmpty(configurations, "No auto configuration classes found in META-INF/spring.factories. If you are using a custom packaging, make sure that file is correct.");
        return configurations;
    }
SpringFactoryLoader去加载一些组件的名字,看加载那些组件的名字,继续点开loadFactoryNames方法
    public static List<String> loadFactoryNames(Class<?> factoryClass, @Nullable ClassLoader classLoader) {
        String factoryClassName = factoryClass.getName();
        return (List)loadSpringFactories(classLoader).getOrDefault(factoryClassName, Collections.emptyList());
    }
loadSpringFactories方法:
   private static Map<String, List<String>> loadSpringFactories(@Nullable ClassLoader classLoader) {
        MultiValueMap<String, String> result = (MultiValueMap)cache.get(classLoader);
        if (result != null) {
            return result;
        } else {
            try {
                Enumeration<URL> urls = classLoader != null ? classLoader.getResources("META-INF/spring.factories") : ClassLoader.getSystemResources("META-INF/spring.factories");
                LinkedMultiValueMap result = new LinkedMultiValueMap();

                while(urls.hasMoreElements()) {
                    URL url = (URL)urls.nextElement();
                    UrlResource resource = new UrlResource(url);
                    Properties properties = PropertiesLoaderUtils.loadProperties(resource);
                    Iterator var6 = properties.entrySet().iterator();

                    while(var6.hasNext()) {
                        Entry<?, ?> entry = (Entry)var6.next();
                        List<String> factoryClassNames = Arrays.asList(StringUtils.commaDelimitedListToStringArray((String)entry.getValue()));
                        result.addAll((String)entry.getKey(), factoryClassNames);
                    }
                }

                cache.put(classLoader, result);
                return result;
            } catch (IOException var9) {
                throw new IllegalArgumentException("Unable to load factories from location [META-INF/spring.factories]", var9);
            }
        }
    }
标黄部分将url转何曾properties,通过传入的键获取值,在将值切割成一个个字符串,转成Array存到result里。
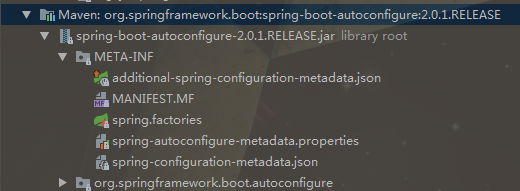
META-INF/spring.factories:
找到其中的
# Auto Configure
可以看到:
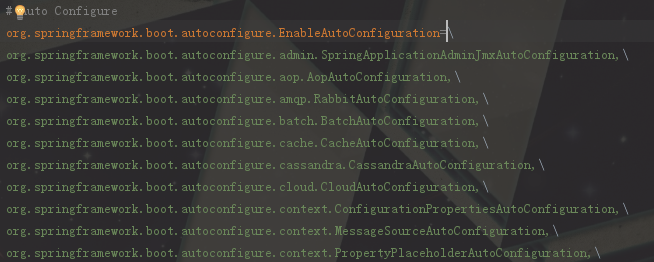
上图里面这么多的xxxAutoConfiguration就是我们的这么久得出的结果,最终就是加载这么多的类的全路径,然后springboot内部就是实例化这些类并加载到容器里面,完成springboot应用启动时的自动配置。
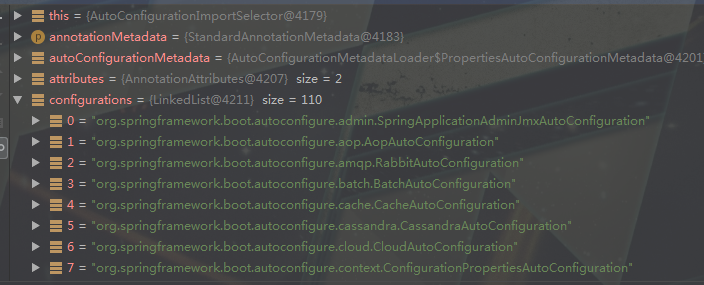
通过断点我们可以看到:
总结一下流程:
Spring Boot启动 >
@SpringBootApplication >
@EnableAutoConfiguration >
@AutoConfigurationPackage + @Import({AutoConfigurationImportSelector.class}) >
public String[] selectImports() {List<String> configurations = this.getCandidateConfigurations(annotationMetadata, attributes);} >
List<String> configurations = SpringFactoriesLoader.loadFactoryNames(); >
classLoader.getResources("META-INF/spring.factories") >
org/springframework/boot/spring-boot-autoconfigure/2.0.1.RELEASE/spring-boot-autoconfigure-2.0.1.RELEASE.jar!/META-INF/spring.factories >
spring.factories:各种xxxxAutoConfiguration的全类名