一.Sqoop数据采集引擎
采集关系型数据库中的数据
用在离线计算的应用中
强调:批量
(1)数据交换引擎: RDBMS <---> Sqoop <---> HDFS、HBase、Hive
(2)底层依赖MapReduce
(3)依赖JDBC
(4)安装:tar -zxvf sqoop-1.4.5.bin__hadoop-0.23.tar.gz -C ~/training/
设置环境变量:
SQOOP_HOME=/root/training/sqoop-1.4.5.bin__hadoop-0.23
export SQOOP_HOME

PATH=$SQOOP_HOME/bin:$PATH
export PATH
注意:如果是Oracle数据库,大写:用户名、表名、列名
(*)codegen Generate code to interact with database records
根据表结构自动生成对应Java类
sqoop codegen --connect jdbc:oracle:thin:@192.168.153.135:1521/orcl --username SCOTT --password tiger --table EMP --outdir /root/sqoop
(*)create-hive-table Import a table definition into Hive
(*)eval Evaluate a SQL statement and display the results
在Sqoop中执行SQL
sqoop eval --connect jdbc:oracle:thin:@192.168.153.135:1521/orcl --username SCOTT --password tiger --query 'select * from emp'
(*)export Export an HDFS directory to a database table
(*)help List available commands
(*)import Import a table from a database to HDFS
导入数据
(1)导入EMP表的所有数据(HDFS上)
sqoop import --connect jdbc:oracle:thin:@192.168.153.135:1521/orcl --username SCOTT --password tiger --table EMP --target-dir /sqoop/import/emp1
(2)导入指定的列
sqoop import --connect jdbc:oracle:thin:@192.168.153.135:1521/orcl --username SCOTT --password tiger --table EMP --columns ENAME,SAL --target-dir /sqoop/import/emp2
(3) 导入订单表
sqoop import --connect jdbc:oracle:thin:@192.168.153.135:1521/orcl --username SH --password sh --table SALES --target-dir /sqoop/import/sales -m 1
错误:ERROR tool.ImportTool: Error during import: No primary key could be found for table SALES. Please specify one with --split-by or perform a sequential import with '-m 1'.
(*)import-all-tables Import tables from a database to HDFS
导入某个用户下所有的表,默认路径:/user/root
sqoop import-all-tables --connect jdbc:oracle:thin:@192.168.153.135:1521/orcl --username SCOTT --password tiger
(*)job Work with saved jobs
(*)list-databases List available databases on a server
(*) MySQL数据库:就是数据库的名字
(*) Oracle数据库:是数据库中所有用户的名字
sqoop list-databases --connect jdbc:oracle:thin:@192.168.153.135:1521/orcl --username SYSTEM --password password
(*)list-tables List available tables in a database
(*)merge Merge results of incremental imports
(*)metastore Run a standalone Sqoop metastore
(*)version Display version information
3、Flume:采集日志
用在实时计算(流式计算)的应用中
强调:实时
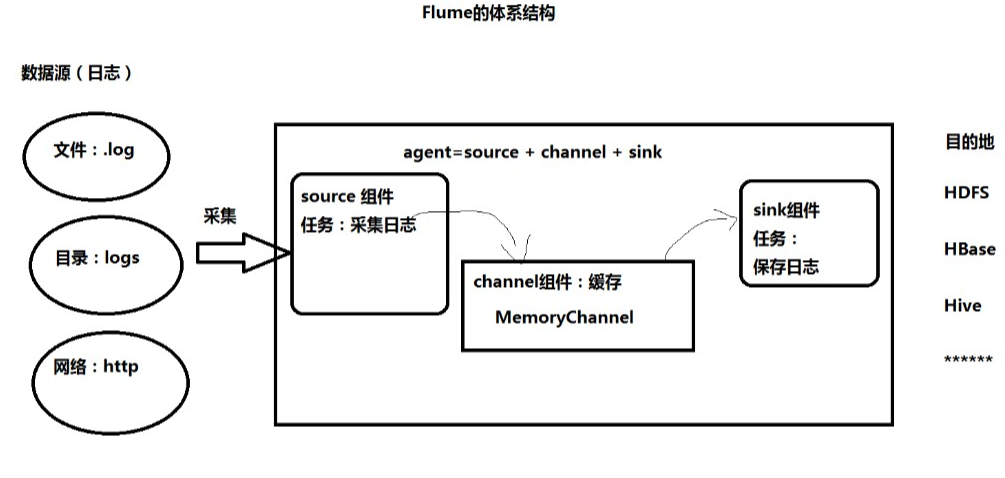
Flume的体系结构:

1.安装:通过winscp上传到linux

解压:tar -zxvf 安装包名字 -C ~/training
进入flume安装目录,修改配置文件:
cd conf
cp flume-env.sh.template flume-env.sh
vim flume-env.sh
找到JAVA_HOME那一列,配置成你自己的jdk路径。
2.flume监听telnet接口测试
下面通过一个简单的例子来测试一下:
在 conf目录下新建一个文件netcat-logger.conf,用来从网络接口接收数据,打印到控制台。
vim netcat-logger.conf
内容:
# example.conf: A single-node Flume configuration

# Name the components on this agent
#定义这个agent中各组件的名字,给那三个组件sources,sinks,channels取个名字,是一个逻辑代号:
#a1是agent的代表。
a1.sources = r1
a1.sinks = k1
a1.channels = c1

# Describe/configure the source 描述和配置source组件:r1
#类型, 从网络端口接收数据,在本机启动, 所以localhost, type=spoolDir采集目录源,目录里有就采
#type是类型,是采集源的具体实现,这里是接受网络端口的,netcat可以从一个网络端口接受数据的。netcat在linux里的程序就是nc,可以学习一下。
#bind绑定本机localhost。port端口号为1234。

a1.sources.r1.type = netcat
a1.sources.r1.bind = localhost
a1.sources.r1.port = 1234

# Describe the sink 描述和配置sink组件:k1
#type,下沉类型,使用logger,将数据打印到屏幕上面。
a1.sinks.k1.type = logger

# Use a channel which buffers events in memory 描述和配置channel组件,此处使用是内存缓存的方式
#type类型是内存memory。
#下沉的时候是一批一批的, 下沉的时候是一个个eventChannel参数解释:
#capacity:默认该通道中最大的可以存储的event数量,1000是代表1000条数据。
#trasactionCapacity:每次最大可以从source中拿到或者送到sink中的event数量。
a1.channels.c1.type = memory
a1.channels.c1.capacity = 1000
a1.channels.c1.transactionCapacity = 100

# Bind the source and sink to the channel 描述和配置source  channel   sink之间的连接关系
#将sources和sinks绑定到channel上面。
a1.sources.r1.channels = c1
a1.sinks.k1.channel = c1
在flume目录下,执行:
bin/flume-ng agent -c conf -f conf/netcat-logger.conf -n a1 -Dflume.root.logger=INFO,console
启动命令:
#告诉flum启动一个agent。
#--conf conf指定配置参数,。
#conf/netcat-logger.conf指定采集方案的那个文件(自命名)。
#--name a1:agent的名字,即agent的名字为a1。
#-Dflume.root.logger=INFO,console给log4j传递的参数。
$ bin/flume-ng agent --conf conf --conf-file conf/netcat-logger.conf --name a1 -Dflume.root.logger=INFO,console

另起一个窗口,运行:
telnet localhost 1234

看到采集结果如下:

注:如果没有telnet,就安装一个:
yum install telnet
3.监听文件夹
监视文件夹


第一步:
首先 在flume的conf的目录下创建文件名称为:spool-logger.conf的文件。
将下面的内容复制到这个文件里面。

# Name the components on this agent
a1.sources = r1
a1.sinks = k1
a1.channels = c1

# Describe/configure the source
#监听目录,spoolDir指定目录, fileHeader要不要给文件夹前坠名
a1.sources.r1.type = spooldir
a1.sources.r1.spoolDir = /data/flumetest
a1.sources.r1.fileHeader = true

# Describe the sink
a1.sinks.k1.type = logger

# Use a channel which buffers events in memory
a1.channels.c1.type = memory
a1.channels.c1.capacity = 1000
a1.channels.c1.transactionCapacity = 100

# Bind the source and sink to the channel
a1.sources.r1.channels = c1
a1.sinks.k1.channel = c1

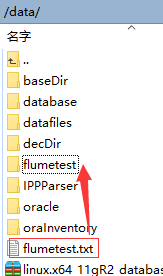
第二步:根据a1.sources.r1.spoolDir = /data/flumetest 配置的文件路径,创建相应的目录。必须先创建对应的目录,不然报错。java.lang.IllegalStateException: Directory does not exist: /home/hadoop/flumespool
[root@master conf]# mkdir  /data/flumetest
第三步:启动命令:
bin/flume-ng agent -c ./conf -f ./conf/spool-logger.conf -n a1 -Dflume.root.logger=INFO,console
36[root@master apache-flume-1.6.0-bin]# bin/flume-ng agent --conf conf --conf-file conf/spool-logger.conf --name a1 -Dflume.root.logger=INFO,console
第四步:测试:
往/data/flumetest放文件(mv ././xxxFile /data/flumetest)。

采集成功,内容被采集到了flumetest.txt.COMPLETED里面。

4.采集目录到hdfs
编写配置文件a4.conf:
#bin/flume-ng agent -n a4 -f myagent/a4.conf -c conf -Dflume.root.logger=INFO,console
#定义agent名, source、channel、sink的名称
a4.sources = r1
a4.channels = c1
a4.sinks = k1

#具体定义source 监听目录
a4.sources.r1.type = spooldir
a4.sources.r1.spoolDir = /root/training/logs

#具体定义channel
a4.channels.c1.type = memory
a4.channels.c1.capacity = 10000
a4.channels.c1.transactionCapacity = 100

#定义拦截器,为消息添加时间戳
a4.sources.r1.interceptors = i1
a4.sources.r1.interceptors.i1.type = org.apache.flume.interceptor.TimestampInterceptor$Builder


#具体定义sink 目的地
a4.sinks.k1.type = hdfs
a4.sinks.k1.hdfs.path = hdfs://192.168.153.11:9000/flume/%Y%m%d
a4.sinks.k1.hdfs.filePrefix = events-
a4.sinks.k1.hdfs.fileType = DataStream

#不按照条数生成文件
a4.sinks.k1.hdfs.rollCount = 0
#HDFS上的文件达到128M时生成一个文件
a4.sinks.k1.hdfs.rollSize = 134217728
#HDFS上的文件达到60秒生成一个文件
a4.sinks.k1.hdfs.rollInterval = 60

#组装source、channel、sink
a4.sources.r1.channels = c1
a4.sinks.k1.channel = c1
启动Flume命令:
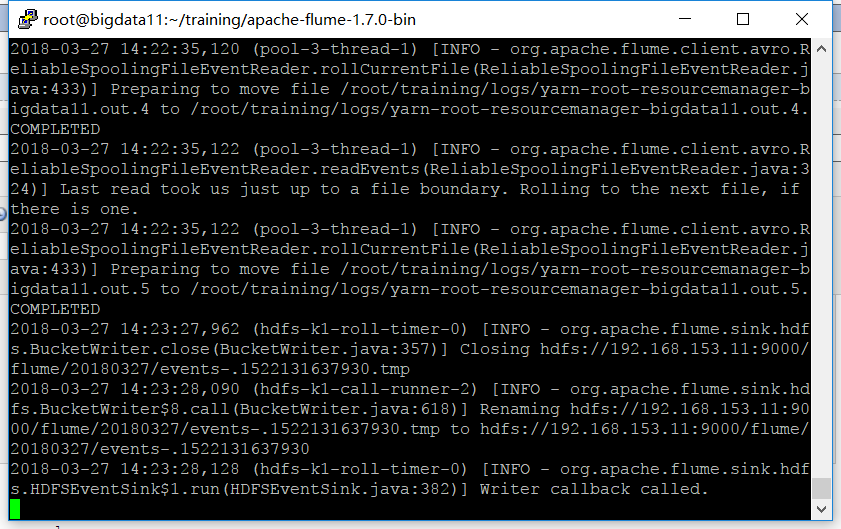
bin/flume-ng agent -n a4 -f myagent/a4.conf -c conf -Dflume.root.logger=INFO,console监听 /root/training/logs 目录,有变化时:

去WebUI查看,发现已经到达了hdfs:

更多请见Flume官方网站:
http://flume.apache.org/FlumeUserGuide