Vue项目环境搭建
node ≈ python: node是用c++编写用来运行js代码的
npm(cnpm) ≈ pip: npm 是一个终端应用商城,可以换国内源cnpm
vue ≈ django: vue是用来搭建vue前端项目的
1) 安装node
官网下载安装包,傻瓜式安装: https://nodejs.org/zh-cn/
2) 换源安装cnpm
>: npm install -g cnpm --registry = https://registry.npm.taobao.org
3) 安装vue项目脚手架
>: cnpm install -g @vue/cli
注: 2或3终端安装失败时,可以清空 npm缓存 再重复执行失败的步骤
npm cache clean --force
Vue项目创建
1) 进入存放项目的目录
>: cd ***
2) 创建项目
>: vue create 项目名
3) 项目初始化

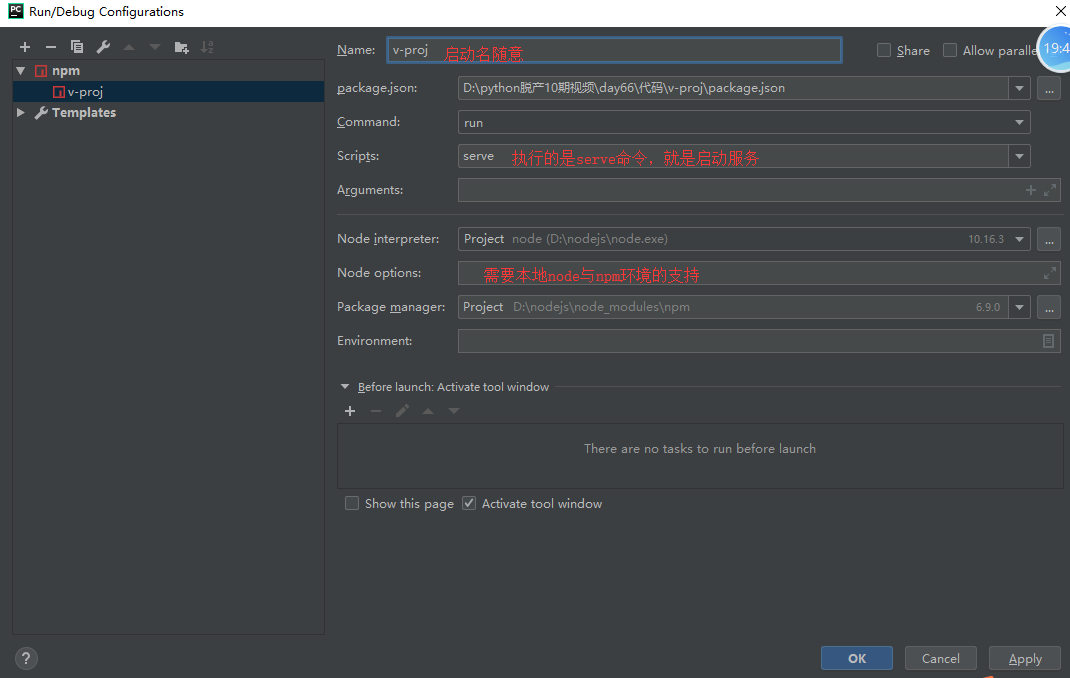
pycharm配置并启动vue项目
1) 用pycharm打开vue项目
2) 添加配置npm启动
vue项目目录结构分析
├── v-proj
|    ├── node_modules       // 当前项目所有依赖,一般不可以移植给其他电脑环境
|    ├── public
|    |    ├── favicon.ico   // 标签图标
|    |    └── index.html    // 当前项目唯一的页面
|    ├── src
|    |    ├── assets        // 静态资源img、css、js
|    |    ├── components    // 小组件
|    |    ├── views         // 页面组件
|    |    ├── App.vue       // 根组件
|    |    ├── main.js       // 全局脚本文件(项目的入口)
|    |    ├── router.js     // 路由脚本文件(配置路由 url链接 与 页面组件的映射关系)
|    |    └── store.js      // 仓库脚本文件(vuex插件的配置文件,数据仓库)
|    ├── README.md
└    └── **配置文件
vue组件(.vue文件)
1) template: 有且只有一个根标签
2) script: 必须将组件对象导出 export default {}
3) style: style标签必须明确scoped属性,代表该样式只在组件内部起作用(样式的组件化)
<template>
  <div class='test'>

  </div>
</template>

<script>
    export default {
        name: "Test"
    }
</script>

<style scoped>

</style>
全局脚本文件main.js(项目入口)
import Vue from 'vue'
import App from './App.vue'
import router from './router'
import store from './store'

Vue.config.productionTip = false

new Vue({
    router,
    store,
    render: h => h(App)
}).$mount('#app')
改写
import Vue from 'vue'  // 加载vue环境
import App from './App.vue'  // 加载根组件
import router from './router'  // 加载路由环境
import store from './store'  // 加载数据仓库环境

Vue.config.productionTip = false
new Vue({
    el: '#app',
    router,
    store,
    render: function (readFn) {
        return readFn(App);
    },
});
vue项目启动生命周期 与 页面组件的运用(重点)
请求过程
1) 加载main.js启动项目
i) import Vue from 'vue' 为项目加载vue环境
ii) import App from './App.vue' 加载根组件用于渲染替换挂载点
iii) import router from './router' 加载路由脚本文件,进入路由相关配置
2) 加载router.js 文件 , 为项目提供路由服务, 并加载已配置的路由(链接与页面组件的映射关系)
注: 不管当前渲染的是什么路由,页面渲染的一定是根组件,链接匹配到的页面组件只是替换根组件中的
3) 如果请求链接改变(路由改变),就会匹配新链接对应的页面组件,新页面组件会替换渲染router-view标签,替换掉之前的页面标签(就是完成了页面跳转)
参与文件
main.js : 该文件内容不变
App.vue
<template>
    <div id="app">
        <!-- url路径会加载不同的页面组件
            eg:/red => RegPage  | /blue => BluePage
         来替换router-view标签,完成页面的切换
         -->
        <router-view></router-view>
    </div>
</template>
views/RedPage.vue
<template>
    <div class="red-page">
        <Nav></Nav>
    </div>
</template>
<script>
    import Nav from '@/components/Nav'
    export default {
        name: "RedPage",
        components: {
            Nav
        },
    }
</script>
<style scoped>
    .red-page {
        width: 100vw;
        height: 100vh;
        background-color: red;
    }
</style>
views/BluePage.vue
<template>
    <div class="blue-page">
        <Nav></Nav>
    </div>
</template>
<script>
    import Nav from '@/components/Nav'
    export default {
        name: "BluePage",
        components: {
            Nav
        }
    }
</script>
<style scoped>
    .blue-page {
        width: 100vw;
        height: 100vh;
        background-color: blue;
    }
</style>
router.js
import Vue from 'vue'
import Router from 'vue-router'
import Home from './views/Home.vue'
import RedPage from "./views/RedPage";
import BluePage from "./views/BluePage";

Vue.use(Router);

export default new Router({
    mode: 'history',
    base: process.env.BASE_URL,
    routes: [
        {
            path: '/',
            name: 'home',
            component: Home
        },
        {
            path: '/red',
            name: 'red',
            component: RedPage
        },
        {
            path: '/blue',
            name: 'blue',
            component: BluePage
        }
    ]
})
全局样式文件配置
assets/css/global.css
html, body, h1, h2, ul, p {
    margin: 0;
    padding: 0;
}
ul {
    list-style: none;
}
a {
    color: black;
    text-decoration: none;
}
main.js中新增
// 配置全局样式
import '@/assets/css/global.css'
封装小组件 - Nav导航栏组件
components/Nav.vue
<template>
    <div class="nav">
        <!--采用vue-router完成页面跳转,不能采用a标签(会发生页面刷新,本质就是重新加载了一次项目界面)-->
        <ul>
            <li>
                <!--<a href="http://t.zoukankan.com/">主页</a>-->
                <router-link to="/">主页</router-link>
            </li>
            <li>
                <router-link to="/red">红页</router-link>
            </li>
            <li>
                <router-link to="/blue">蓝页</router-link>
            </li>
        </ul>
    </div>
</template>

<script>
    export default {
        name: "Nav",
    }
</script>

<style scoped>
    .nav {
        width: 100%;
        height: 60px;
        background-color: orange;
    }
    .nav li {
        float: left;
        font: normal 20px/60px '微软雅黑';
        padding: 0 30px;
    }
    .nav li:hover {
        cursor: pointer;
        background-color: aquamarine;
    }
    .nav li.active {
        cursor: pointer;
        background-color: aquamarine;
    }
</style>
views/HomePage.vue:RedPage.vue与BluePage都是添加下方三个步骤代码
<template>
    <div class="home">
        <!-- 3)使用Nav组件 -->
        <Nav></Nav>
    </div>
</template>

<script>
    // 1)导入Nav组件
    import Nav from '@/components/Nav'
    export default {
        // 2)注册Nav组件
        components: {
            Nav,
        }
    }
</script>
新增页面三步骤
1) 在views文件夹中创建视图组件
2) 在router.js文件中配置路由
3) 设置路由跳转,在指定路由下渲染该页面组件(替换根组件中router-view标签)
views/TanPage.vue
<template>
    <div class="tan-page">
        <Nav></Nav>
    </div>
</template>

<script>
    import Nav from '@/components/Nav'
    export default {
        name: "TanPage",
        components: {
            Nav
        }
    }
</script>

<style scoped>
    .tan-page {
        width: 100vw;
        height: 100vh;
        background-color: tan;
    }
</style>
router.js
import TanPage from "./views/TanPage";
export default new Router({
    mode: 'history',
    base: process.env.BASE_URL,
    routes: [
        // ...
        {
            path: '/tan',
            name: 'tan',
            component: TanPage
        }
    ]
})
components/Nav.vue
<li>
    <router-link to="/tan">土页</router-link>
</li>
组件生命周期钩子([官网API](https://cn.vuejs.org/v2/api/#beforeCreate))
1) 一个组件从创建到销毁的整个过程,就称之为组件的生命周期
2) 在组件创建到销毁的过程中,会出现众多关键的时间节点,如 组件要创建了、组件创建完毕了、组件数据渲染完毕了、组件要被销毁了、组件销毁完毕了 等等时间节点,每一个时间节点,vue都为其提供了一个回调函数(在该组件到达该时间节点时,就会触发对应的回调函数,在函数中就可以完成该节点需要完成的业务逻辑)
3) 生命周期钩子函数就是 vue实例 成员
任何一个组件:在vue组件的script的export default导出字典中直接写钩子函数
export default {
    // ...
    beforeCreate() {
        console.log('组件创建了,但数据和方法还未提供');
        // console.log(this.$data);
        // console.log(this.$options.methods);
        console.log(this.title);
        console.log(this.alterTitle);
    },
    // 该钩子需要掌握,一般该组件请求后台的数据,都是在该钩子中完成
    // 1)请求来的数据可以给页面变量进行赋值
    // 2)该节点还只停留在虚拟DOM范畴,如果数据还需要做二次修改再渲染到页面,
    //  可以在beforeMount、mounted钩子中添加逻辑处理
    created() {
        console.log('组件创建了,数据和方法已提供');
        // console.log(this.$data);
        // console.log(this.$options.methods);
        console.log(this.title);
        console.log(this.alterTitle);
        console.log(this.$options.name);
    },
    destroyed() {
        console.log('组件销毁完毕')
    }
}
根据请求路径高亮路由标签案例
1) router-link会被解析为a标签,用to完成指定路径跳转,但是不能添加系统事件(因为是组件标签)
2) 在js方法中可以用 this.$router.push('路径') 完成逻辑跳转
3) 在js方法中可以用 this.$route.path 拿到当前请求的页面路由
components/Nav.vue
<template>
    <div class="nav">
        <!--采用vue-router完成页面跳转,不能采用a标签(会发生页面刷新,本质就是重新加载了一次项目界面)-->
        <ul>
            <li @click="changePage('/')" :class="{active: currentPage === '/'}">
                <!--<a href="http://t.zoukankan.com/">主页</a>-->
                <!--<router-link to="/">主页</router-link>-->
                主页
            </li>
            <li @click="changePage('/red')" :class="{active: currentPage === '/red'}">
                <!--<router-link to="/red">红页</router-link>-->
                红页
            </li>
            <li @click="changePage('/blue')" :class="{active: currentPage === '/blue'}">
                <!--<router-link to="/blue">蓝页</router-link>-->
                蓝页
            </li>
            <li @click="changePage('/tan')" :class="{active: currentPage === '/tan'}">
                <!--<router-link to="/tan">土页</router-link>-->
                土页
            </li>
        </ul>
    </div>
</template>

<script>
    export default {
        name: "Nav",
        data() {
            return {
                // 每渲染一个页面,都会重新加载Nav组件,currentPage就会被重置,
                // 1)在点击跳转事件中,将跳转的页面用 数据库 保存,在钩子函数中对currentPage进行数据更新
                // currentPage: localStorage.currentPage ? localStorage.currentPage: ''
                // 2)直接在created钩子函数中,获取当前的url路径,根据路径更新currentPage
                currentPage: ''
            }
        },
        methods: {
            changePage(page) {
                // console.log(page);
                // 当Nav出现渲染,该语句就无意义,因为在data中将currentPage重置为空
                // this.currentPage = page;

                // 有bug,用户不通过点击,直接修改请求路径完成页面跳转,数据库就不会更新数据
                // localStorage.currentPage = page;

                // 任何一个标签的事件中,都可以通过router完成逻辑条件
                // console.log(this.$route);  // 管理路由数据
                // console.log(this.$router);  // 管理路由跳转
                this.$router.push(page);  // 路由的逻辑跳转
            }
        },
        // 当前组件加载成功,要根据当前实际所在的路径,判断单选激活标签
        created() {
            // console.log(this.$route.path);
            this.currentPage = this.$route.path;
        }
    }
</script>

<style scoped>
    .nav {
        width: 100%;
        height: 60px;
        background-color: orange;
    }
    .nav li {
        float: left;
        font: normal 20px/60px '微软雅黑';
        padding: 0 30px;
    }
    .nav li:hover {
        cursor: pointer;
        background-color: aquamarine;
    }
    .nav li.active {
        cursor: pointer;
        background-color: aquamarine;
    }
</style>