摘要:
在Spring配置中,当使用属性注入时,当创建IOC容器时,也会直接创建对象,并使用相应的setter方法Student.java1packagecom。执行范围;23publicclassStudent{4privateStringname;5privateStringnumber;6publicStringgetName(){7returnname;8}9publicvoidsetName
Spring配置中,采用属性注入时,当创建IOC容器时,也直接创建对象,并且执行相对应的setter方法
Student.java


 1 package com.scope;
 2
 3 public class Student {
 4     private String name;
 5     private String number;
 6     public String getName() {
 7         return name;
 8     }
 9     public void setName(String name) {
10         this.name = name;
11         System.out.println(name);
12     }
13     public String getNumber() {
14         return number;
15     }
16     public void setNumber(String number) {
17         this.number = number;
18     }
19     public Student() {
20         super();
21         System.out.println("hello Student!");
22
23     }
24
25
26 }
Main.java
 1 package com.scope;
 2
 3 import org.springframework.context.ApplicationContext;
 4 import org.springframework.context.support.ClassPathXmlApplicationContext;
 5
 6 public class Main {
 7     public static void main(String[] args) {
 8         ApplicationContext ctx = new ClassPathXmlApplicationContext("beans-scope.xml");
 9
10     }
11 }
beans-scope.xml
 1 <?xml version="1.0" encoding="UTF-8"?>
 2 <beans xmlns="http://www.springframework.org/schema/beans"
 3     xmlns:xsi="http://www.w3.org/2001/XMLSchema-instance"
 4     xsi:schemaLocation="http://www.springframework.org/schema/beans http://www.springframework.org/schema/beans/spring-beans.xsd">
 5
 6     <bean id="student1" class="com.scope.Student">
 7         <property name="name" value="Mary"></property>
 8         <property name="number" value="1120143231"></property>
 9     </bean>
10     <bean id="student2" class="com.scope.Student">
11         <property name="name" value="Curry"></property>
12         <property name="number" value="1120111413"></property>
13     </bean>
14
15 </beans>
执行结果
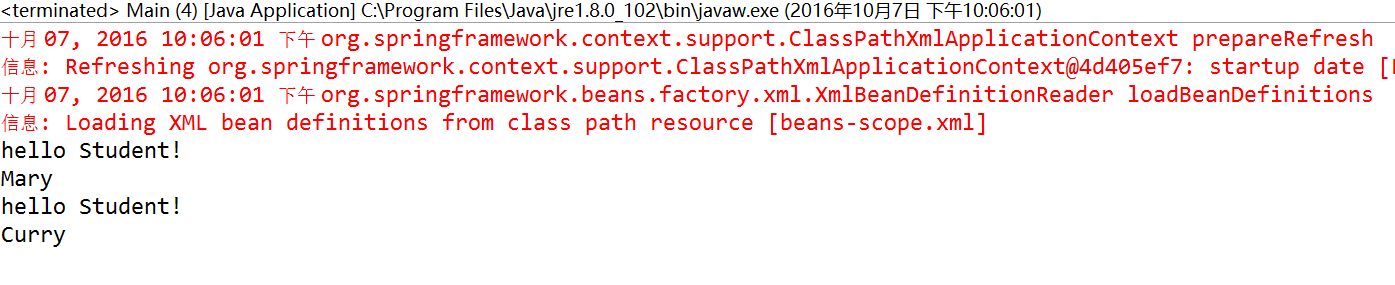
当创建IOC容器时,配置文件中有多少个bean就会创建多少个对象,并且执行相对应的setter函数。
我们对Main.java进行修改
 1 package com.scope;
 2
 3 import org.springframework.context.ApplicationContext;
 4 import org.springframework.context.support.ClassPathXmlApplicationContext;
 5
 6 public class Main {
 7     public static void main(String[] args) {
 8         ApplicationContext ctx = new ClassPathXmlApplicationContext("beans-scope.xml");
 9         Student student1 = (Student) ctx.getBean("student1");
10         Student student2 = (Student) ctx.getBean("student1");
11         System.out.println(student1 == student2);
12     }
13 }
执行结果:

当执行Student student1 = (Student) ctx.getBean("student1")时,并没有创建对象,只是创建了一个索引而已,Student1和Student2引用的是同一个对象。
以上就是单例模式,属性注入时,默认的就是单例模式,每个bean id只会创建一个对象,并且在创建IOC容器时,就创建对象和执行相对应的setter函数。
下面讲原型模式,即prototype模式。
Main.java
 1 package com.scope;
 2
 3 import org.springframework.context.ApplicationContext;
 4 import org.springframework.context.support.ClassPathXmlApplicationContext;
 5
 6 public class Main {
 7     public static void main(String[] args) {
 8         ApplicationContext ctx = new ClassPathXmlApplicationContext("beans-scope.xml");
 9 //        Student student1 = (Student) ctx.getBean("student1");
10 //        Student student2 = (Student) ctx.getBean("student1");
11 //        System.out.println(student1 == student2);
12     }
13 }
beans-scope.xml
 1 <?xml version="1.0" encoding="UTF-8"?>
 2 <beans xmlns="http://www.springframework.org/schema/beans"
 3     xmlns:xsi="http://www.w3.org/2001/XMLSchema-instance"
 4     xsi:schemaLocation="http://www.springframework.org/schema/beans http://www.springframework.org/schema/beans/spring-beans.xsd">
 5
 6     <bean id="student1" class="com.scope.Student" scope="prototype">
 7         <property name="name" value="Mary"></property>
 8         <property name="number" value="1120143231"></property>
 9     </bean>
10     <bean id="student2" class="com.scope.Student" scope="prototype">
11         <property name="name" value="Curry"></property>
12         <property name="number" value="1120111413"></property>
13     </bean>
14
15 </beans>
执行结果

采用prototype模式时,在创建IOC容器时,并没有创建相应的对象。我们继续对Main.java进行修改。
 1 package com.scope;
 2
 3 import org.springframework.context.ApplicationContext;
 4 import org.springframework.context.support.ClassPathXmlApplicationContext;
 5
 6 public class Main {
 7     public static void main(String[] args) {
 8         ApplicationContext ctx = new ClassPathXmlApplicationContext("beans-scope.xml");
 9         Student student1 = (Student) ctx.getBean("student1");
10         Student student2 = (Student) ctx.getBean("student1");
11         System.out.println(student1 == student2);
12     }
13 }
执行结果

在执行Student student1 = (Student) ctx.getBean("student1"); Student student2 = (Student) ctx.getBean("student1");创建了两个对象,所以输出了false。
采用prototype模式时,只有在获取bean时,才开始创建对象,获取多少次就创建多少个对象。