摘要:
DBus的默认软件取决于以下外部组件:建议版本:只有在解决版本兼容性问题后,才能使用HDP组件。更好的解决方案是基于HDP软件版本重新编译DBus。我们上面整理的DBus软件版本取决于与下面显示的HDP软件版本的比较,因此每个节点都应该记住安装Yoyum-yinstallzip II。要安装zookeeper服务,我们可以使用HDP附带的版本。
数据采集平台DBus-基础依赖软件安装
作者:尹正杰
版权声明:原创作品,谢绝转载!否则将追究法律责任。
一.准备工作
1>.DBus默认软件依赖
  DBus依赖如下外部组件:
    Cannal:
      依赖V1.0.22版本,DBus用于实时抽取binlog日志。具体配置可参考cannal相关支持说明,支持MySQL5.6,MySQL5.7。
    Zookeeper:
      依赖v3.4.6+,用于构建整个系统和提供配置通知等。推荐版本:v3,4,8。
    Kafka:
      依赖v0.10,用于存储相关数据和消息,提供订阅和发布的能力。
    Storm:
      依赖v1.0.2,用于提供DBus流式计算。
    Influxdb:
      依赖于v1.1.0,用于记录实时监控数据。创建好账号,后续配置需提供。
    Grafana:
      依赖于v4.2.0,用于展示监控西悉尼。
    MySQL:
      依赖于v5.6.x,用于创建数据库dbusmgr。创建好账号,后续配置需提供。
    Nginx:
      依赖于v1.9.3,用于存放讲台html,js文件及反向代理。
    Kafka-Manager:
      依赖于v1.3.3.4,用于边界的查看,管理kafka集群。
2>.版本兼容问题
在正式部署之前我们要先解决一个问题:DBus依赖的部分组件HDP正好有,但是版本依赖的版本不一致,只有先解决版本兼容性问题才能使用HDP组件,否则就只能单独安装。
一个比较好的解决方案是基于HDP自带软件版本重新编译DBus,特殊情况下还可能需要修改源代码。
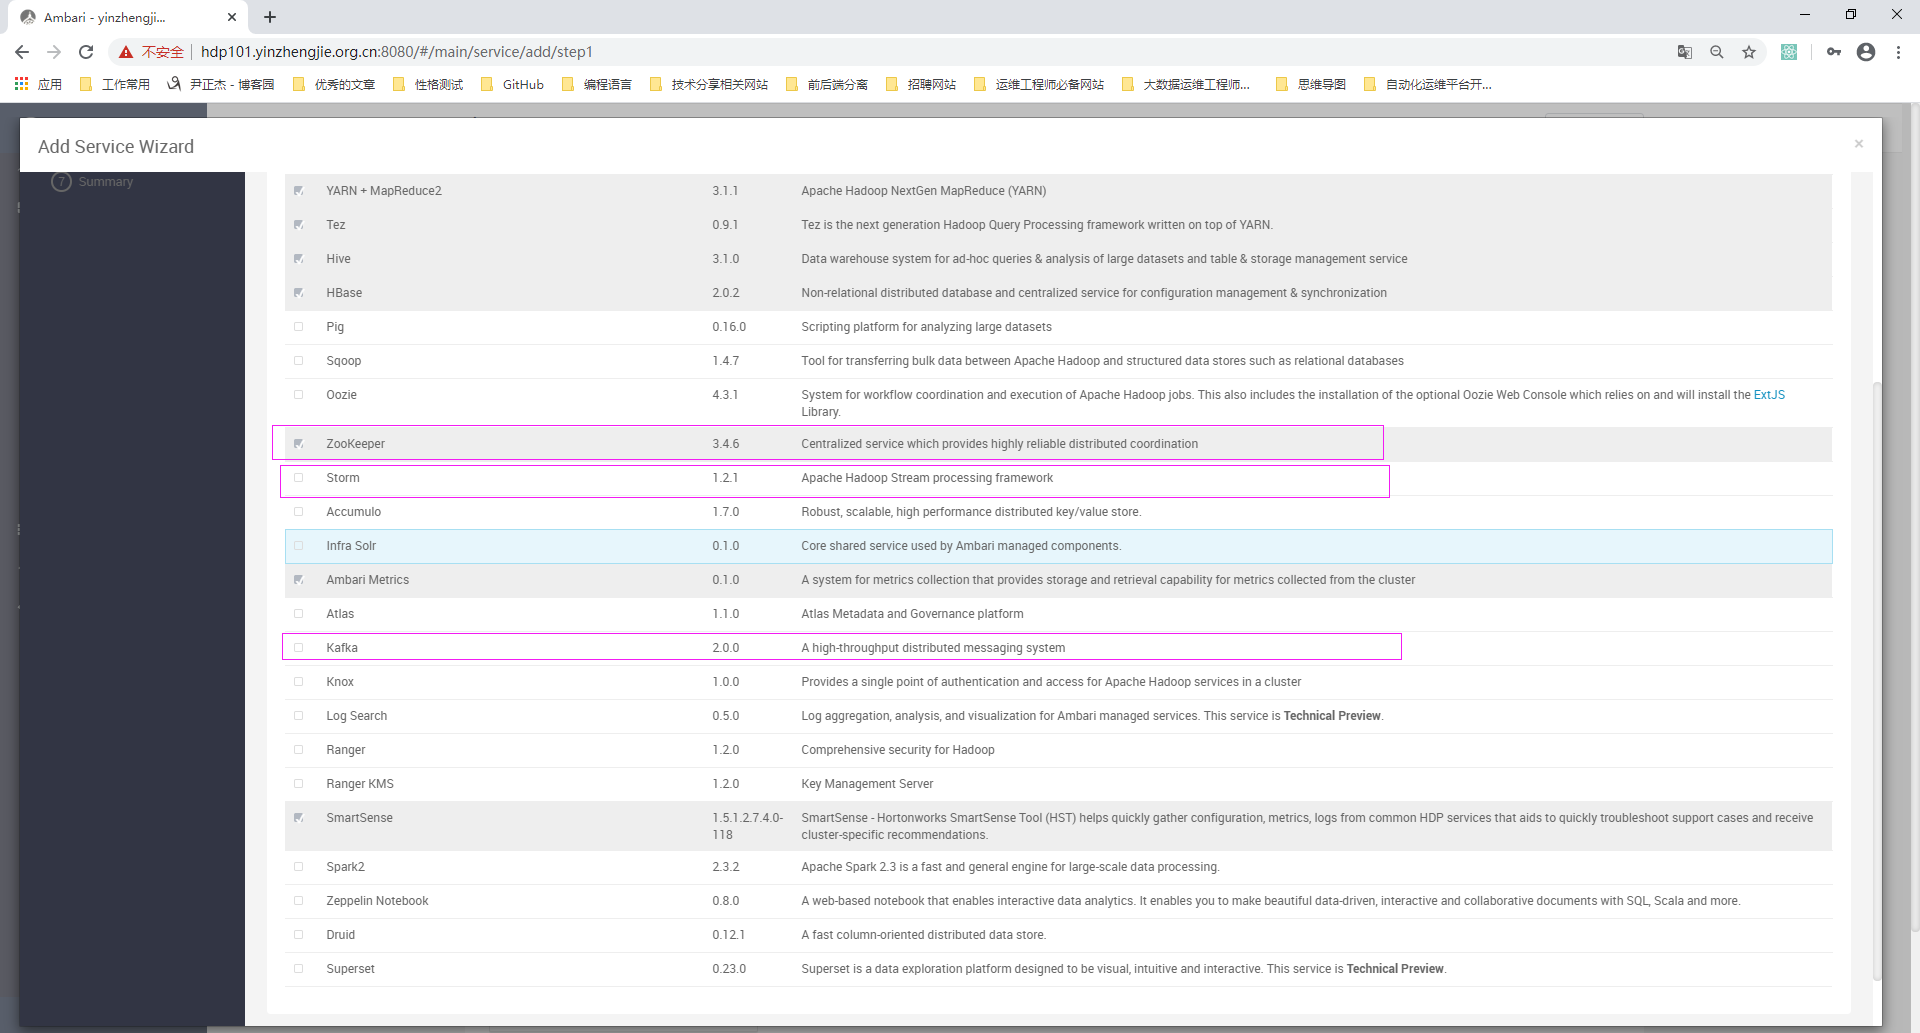
通过上面我们整理的DBus软件版本依赖和下图HDP自带的软件版本对比,明确知道DBus有两个依赖组件需要升级,即将kafka v0.10升级到Kafka v2.0.0,将Storm v1.0.2升级到Storm v1.2.1。
具体如何编译感兴趣的小伙伴可以自行参考官方文档,我这里就不罗嗦啦~
3>.DBus会用到zip命令,所以各节点记得安装哟
yum -y install zip
二.安装zookeeper服务
  zookeeper我们使用HDP的自带的版本即可,只不过需要自己部署一个HDP集群。

  博主推荐阅读:
    https://www.cnblogs.com/yinzhengjie2020/p/12227503.html
三.安装Kafka服务及kafka manager服务
  Kafka我们使用HDP的自带的版本即可,只不过需要自己部署一个HDP集群。

  博主推荐阅读:
    https://www.cnblogs.com/yinzhengjie2020/p/12285721.html
四.安装storm服务
  Storm我们使用HDP的自带的版本即可,只不过需要自己部署一个HDP集群。

  博主推荐阅读:
    https://www.cnblogs.com/yinzhengjie2020/p/12337590.html
五.安装InfluxDB
1>.下载Influxdb软件包
[root@hdp103.yinzhengjie.org.cn ~]# wget https://dl.influxdata.com/influxdb/releases/influxdb-1.1.0.x86_64.rpm
2>.安装Influxdb软件
[root@hdp103.yinzhengjie.org.cn ~]# yum -y localinstall influxdb-1.1.0.x86_64.rpm
3>.启动influxdb并设置为开启启动
[root@hdp103.yinzhengjie.org.cn ~]# systemctl start influxd.service
[root@hdp103.yinzhengjie.org.cn ~]#
[root@hdp103.yinzhengjie.org.cn ~]# systemctl enable influxd.service
[root@hdp103.yinzhengjie.org.cn ~]#
[root@hdp103.yinzhengjie.org.cn ~]# systemctl list-unit-files | grep influxd.service
influxd.service                               enabled
[root@hdp103.yinzhengjie.org.cn ~]#


[root@hdp103.yinzhengjie.org.cn ~]# systemctl status influxd.service
● influxdb.service - InfluxDB is an open-source, distributed, time series database
   Loaded: loaded (/usr/lib/systemd/system/influxdb.service; enabled; vendor preset: disabled)
   Active: active (running) since Fri 2020-03-06 20:07:49 CST; 20s ago
     Docs: https://docs.influxdata.com/influxdb/
 Main PID: 8655 (influxd)
   CGroup: /system.slice/influxdb.service
           └─8655 /usr/bin/influxd -config /etc/influxdb/influxdb.conf

Mar 06 20:07:49 hdp103.yinzhengjie.org.cn influxd[8655]: [snapshot] 2020/03/06 20:07:49 Starting snapshot service
Mar 06 20:07:49 hdp103.yinzhengjie.org.cn influxd[8655]: [continuous_querier] 2020/03/06 20:07:49 Starting continuous query service
Mar 06 20:07:49 hdp103.yinzhengjie.org.cn influxd[8655]: [httpd] 2020/03/06 20:07:49 Starting HTTP service
Mar 06 20:07:49 hdp103.yinzhengjie.org.cn influxd[8655]: [httpd] 2020/03/06 20:07:49 Authentication enabled: false
Mar 06 20:07:49 hdp103.yinzhengjie.org.cn influxd[8655]: [httpd] 2020/03/06 20:07:49 Listening on HTTP: [::]:8086
Mar 06 20:07:49 hdp103.yinzhengjie.org.cn influxd[8655]: [retention] 2020/03/06 20:07:49 Starting retention policy enforcement service with check interval of 30m0s
Mar 06 20:07:49 hdp103.yinzhengjie.org.cn influxd[8655]: [run] 2020/03/06 20:07:49 Listening for signals
Mar 06 20:07:49 hdp103.yinzhengjie.org.cn influxd[8655]: [monitor] 2020/03/06 20:07:49 Storing statistics in database '_internal' retention policy 'monitor', at interval 10s
Mar 06 20:07:49 hdp103.yinzhengjie.org.cn influxd[8655]: 2020/03/06 20:07:49 Sending usage statistics to usage.influxdata.com
Mar 06 20:08:00 hdp103.yinzhengjie.org.cn influxd[8655]: [shard] 2020/03/06 20:08:00 /var/lib/influxdb/data/_internal/monitor/1 database index loaded in 8.732µs
[root@hdp103.yinzhengjie.org.cn ~]#
[root@hdp103.yinzhengjie.org.cn ~]#
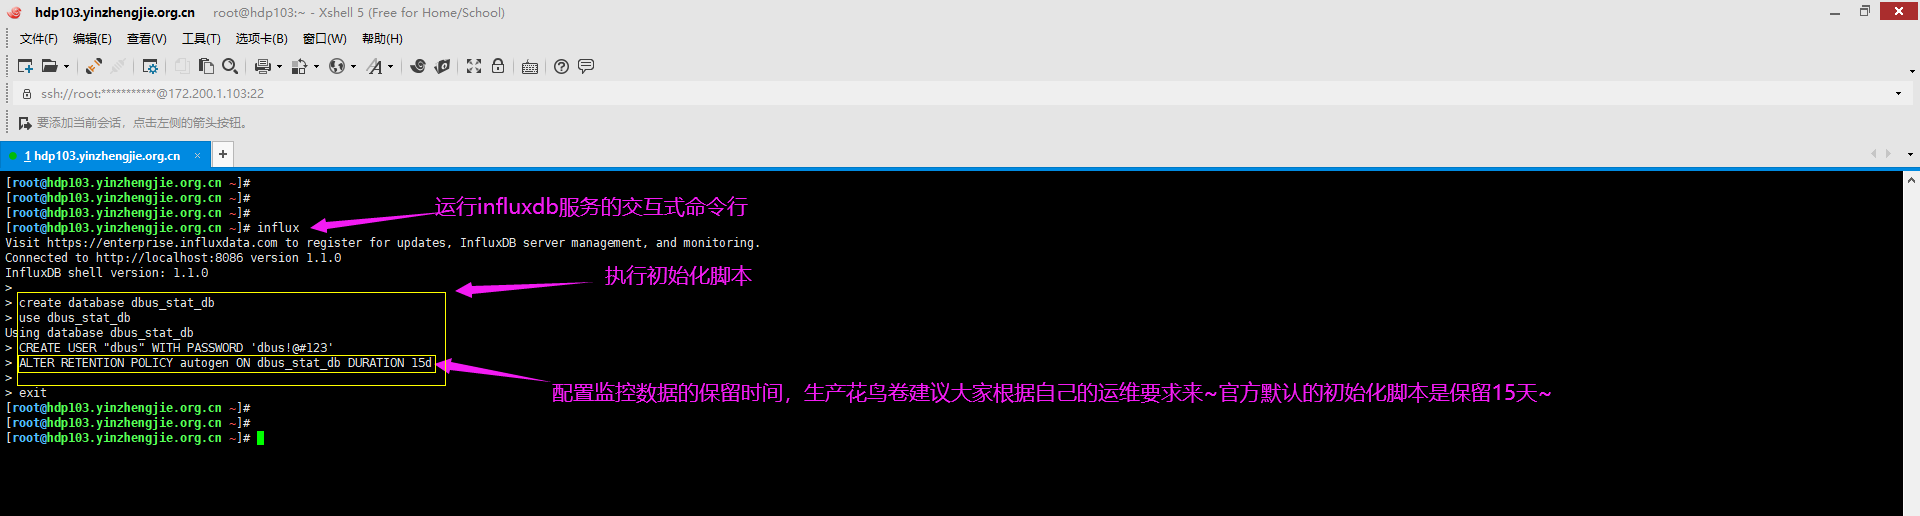
4>.初始化influxdb的配置
#登录influx
influx

#执行初始化脚本
create database dbus_stat_db
use dbus_stat_db
CREATE USER "dbus" WITH PASSWORD 'dbus!@#123'
ALTER RETENTION POLICY autogen ON dbus_stat_db DURATION 15d
六.安装Grafana
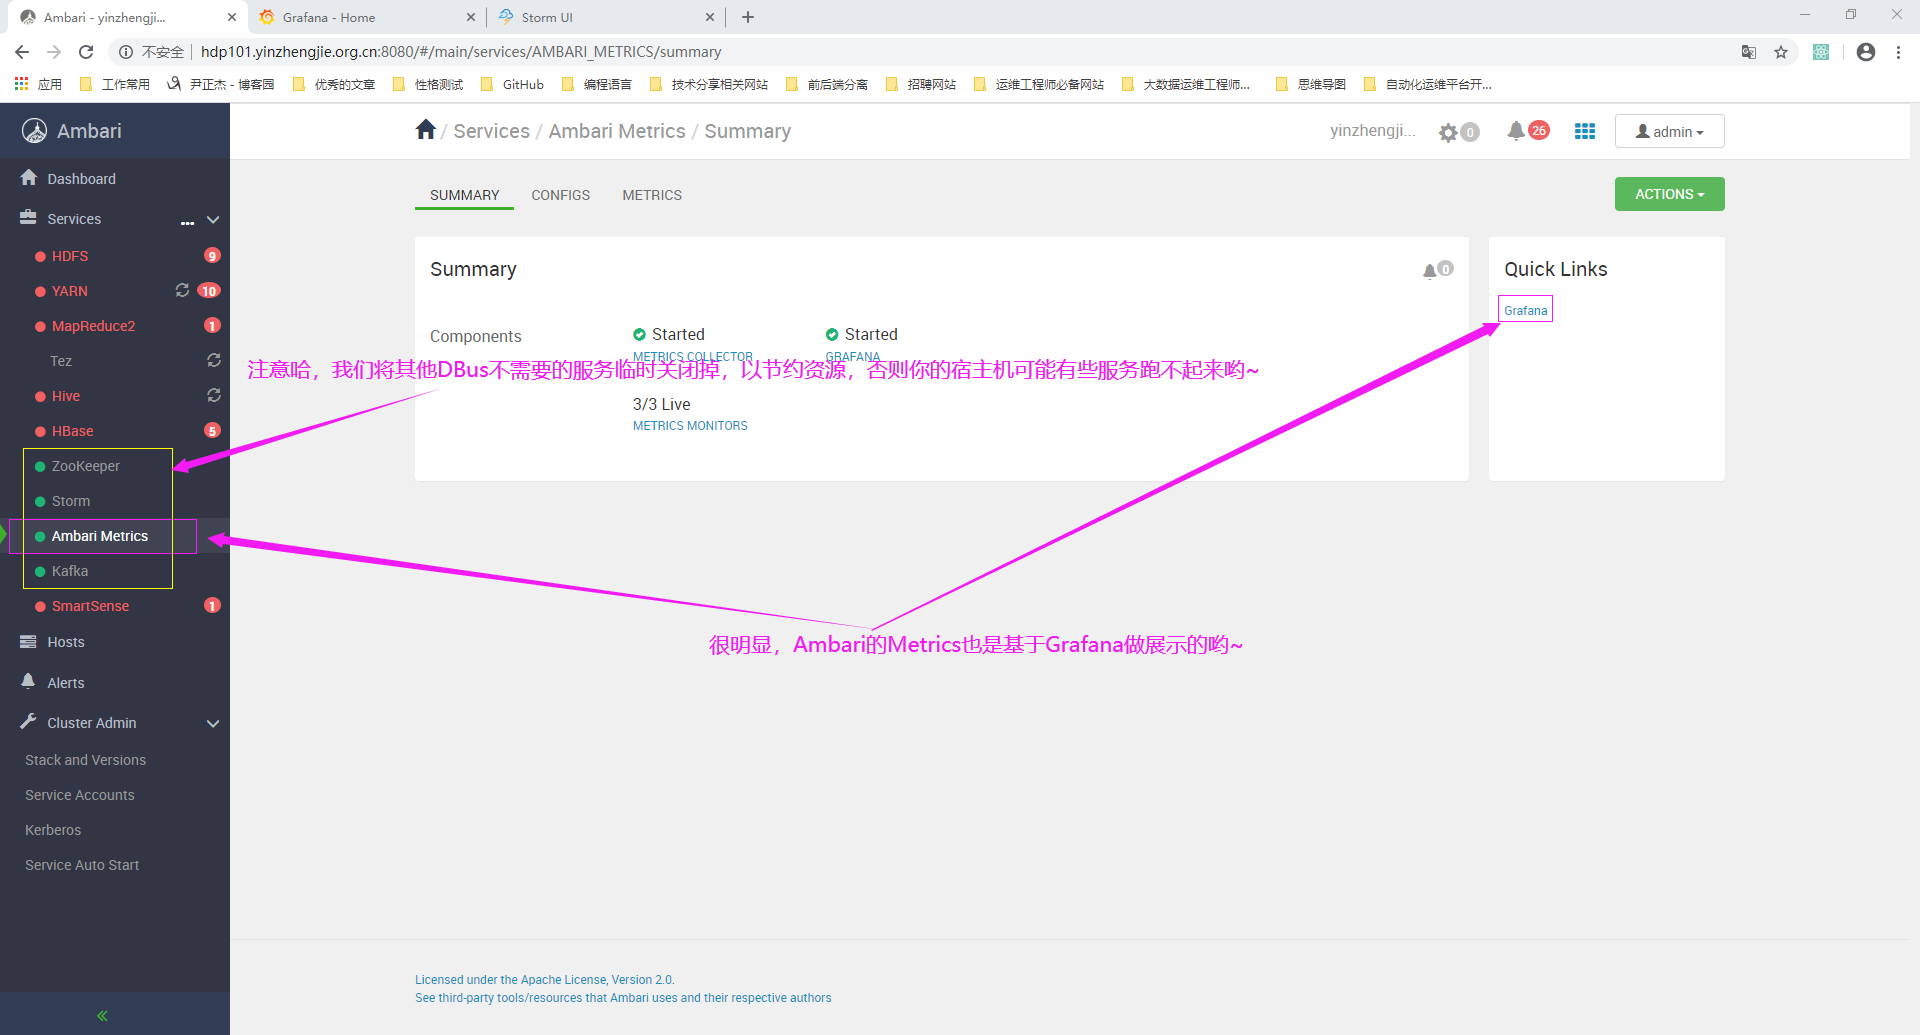
1>.Ambari Metrics也是依赖Grafana组件
  如下图所示,Ambari Metrics也是依赖Grafana组件,那我们还有必要安装Grafana组件吗?答案是肯定的,我们需要单独安装Granfana。

  Ambari使用的Grafana跟DBus一路来的版本不一致,需要单独安装以便于导入Dashboard。

  温馨提示:
    如果你愿意多花费点时间解决Grafana版本问题,及手工配置Dashboard,也可以选择复用Ambari使用的Grafana。本篇博客是选择单独安装Grafana的方案。
2>.下载grafana
[root@hdp103.yinzhengjie.org.cn ~]# wget https://s3-us-west-2.amazonaws.com/grafana-releases/release/grafana-4.2.0-1.x86_64.rpm
3>.安装grafana
[root@hdp103.yinzhengjie.org.cn ~]# yum -y localinstall grafana-4.2.0-1.x86_64.rpm
4>.启动grafana并设置为开机自启动
[root@hdp103.yinzhengjie.org.cn ~]# systemctl start grafana-server.service
[root@hdp103.yinzhengjie.org.cn ~]#
[root@hdp103.yinzhengjie.org.cn ~]# systemctl enable grafana-server.service
Created symlink from /etc/systemd/system/multi-user.target.wants/grafana-server.service to /usr/lib/systemd/system/grafana-server.service.
[root@hdp103.yinzhengjie.org.cn ~]#
[root@hdp103.yinzhengjie.org.cn ~]# systemctl list-unit-files | grep grafana-server.service
grafana-server.service                        enabled
[root@hdp103.yinzhengjie.org.cn ~]#
[root@hdp103.yinzhengjie.org.cn ~]# ss -ntl | grep 3000              #Grafana服务默认监听3000端口
LISTEN     0      20480       :::3000                    :::*
[root@hdp103.yinzhengjie.org.cn ~]#
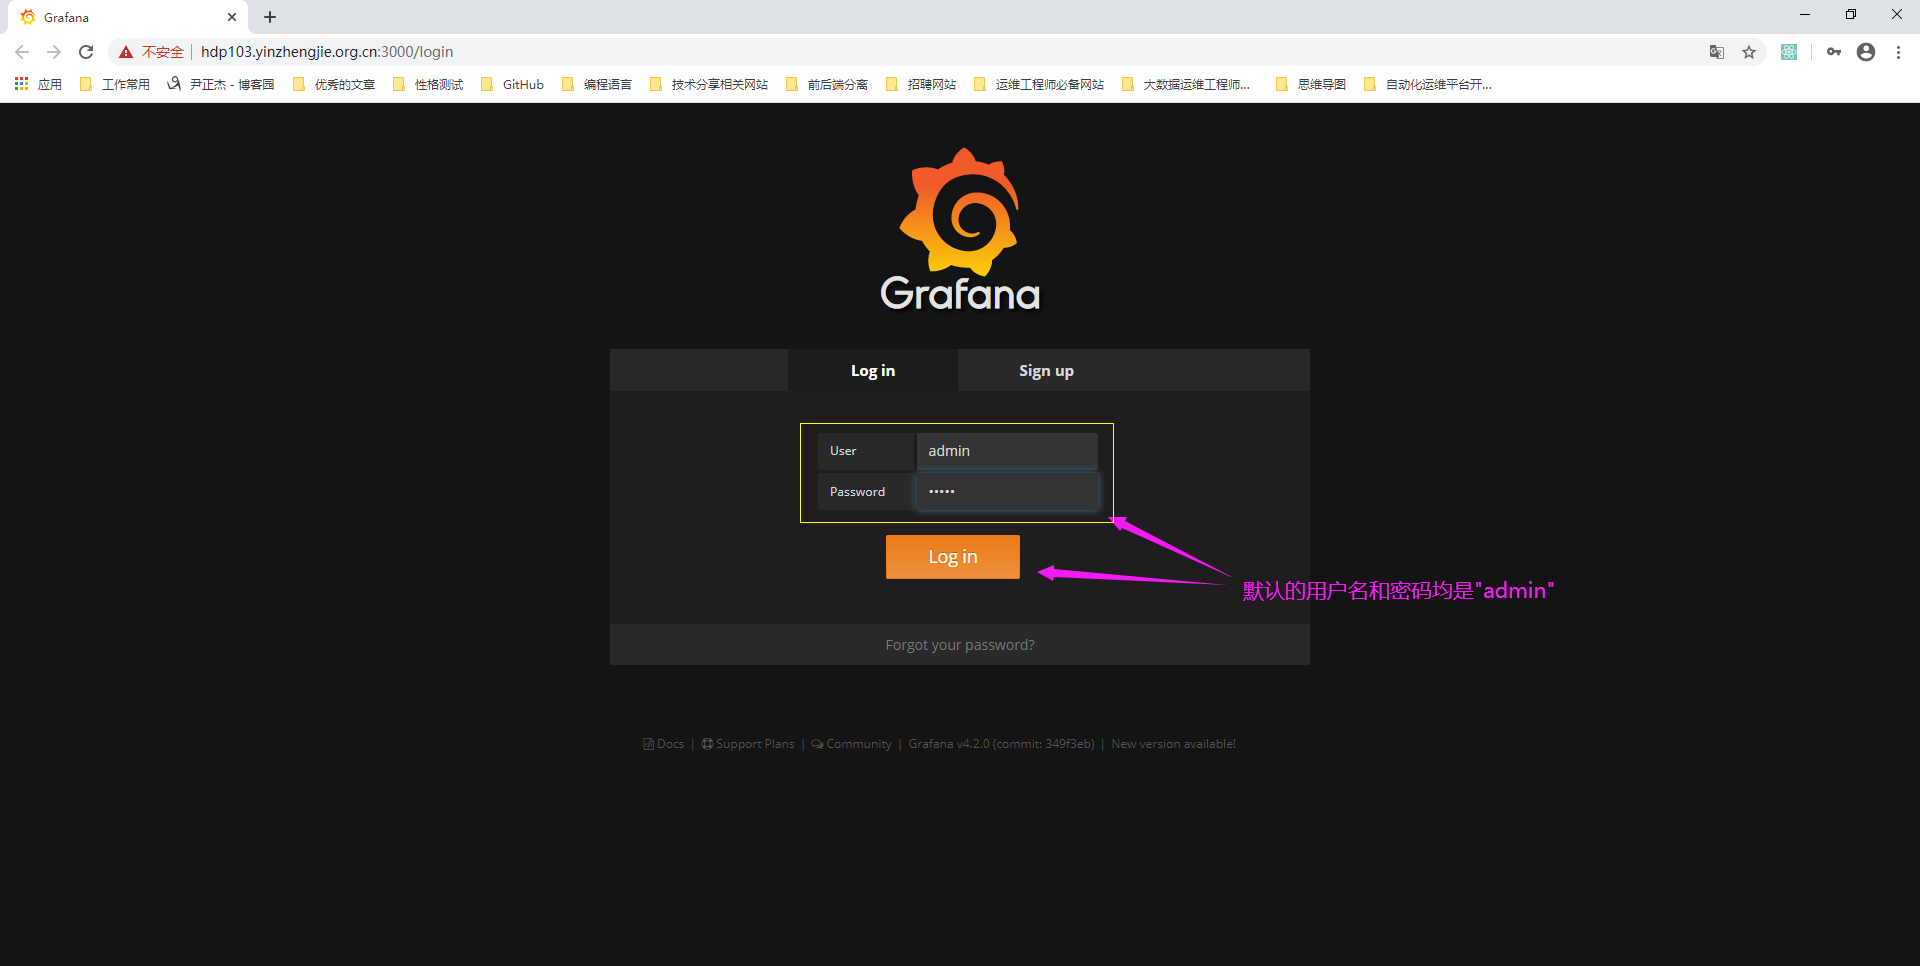
5>.登录Grafana
  打开浏览器访问部署的Grafana服务:
    http://hdp103.yinzhengjie.org.cn:3000/
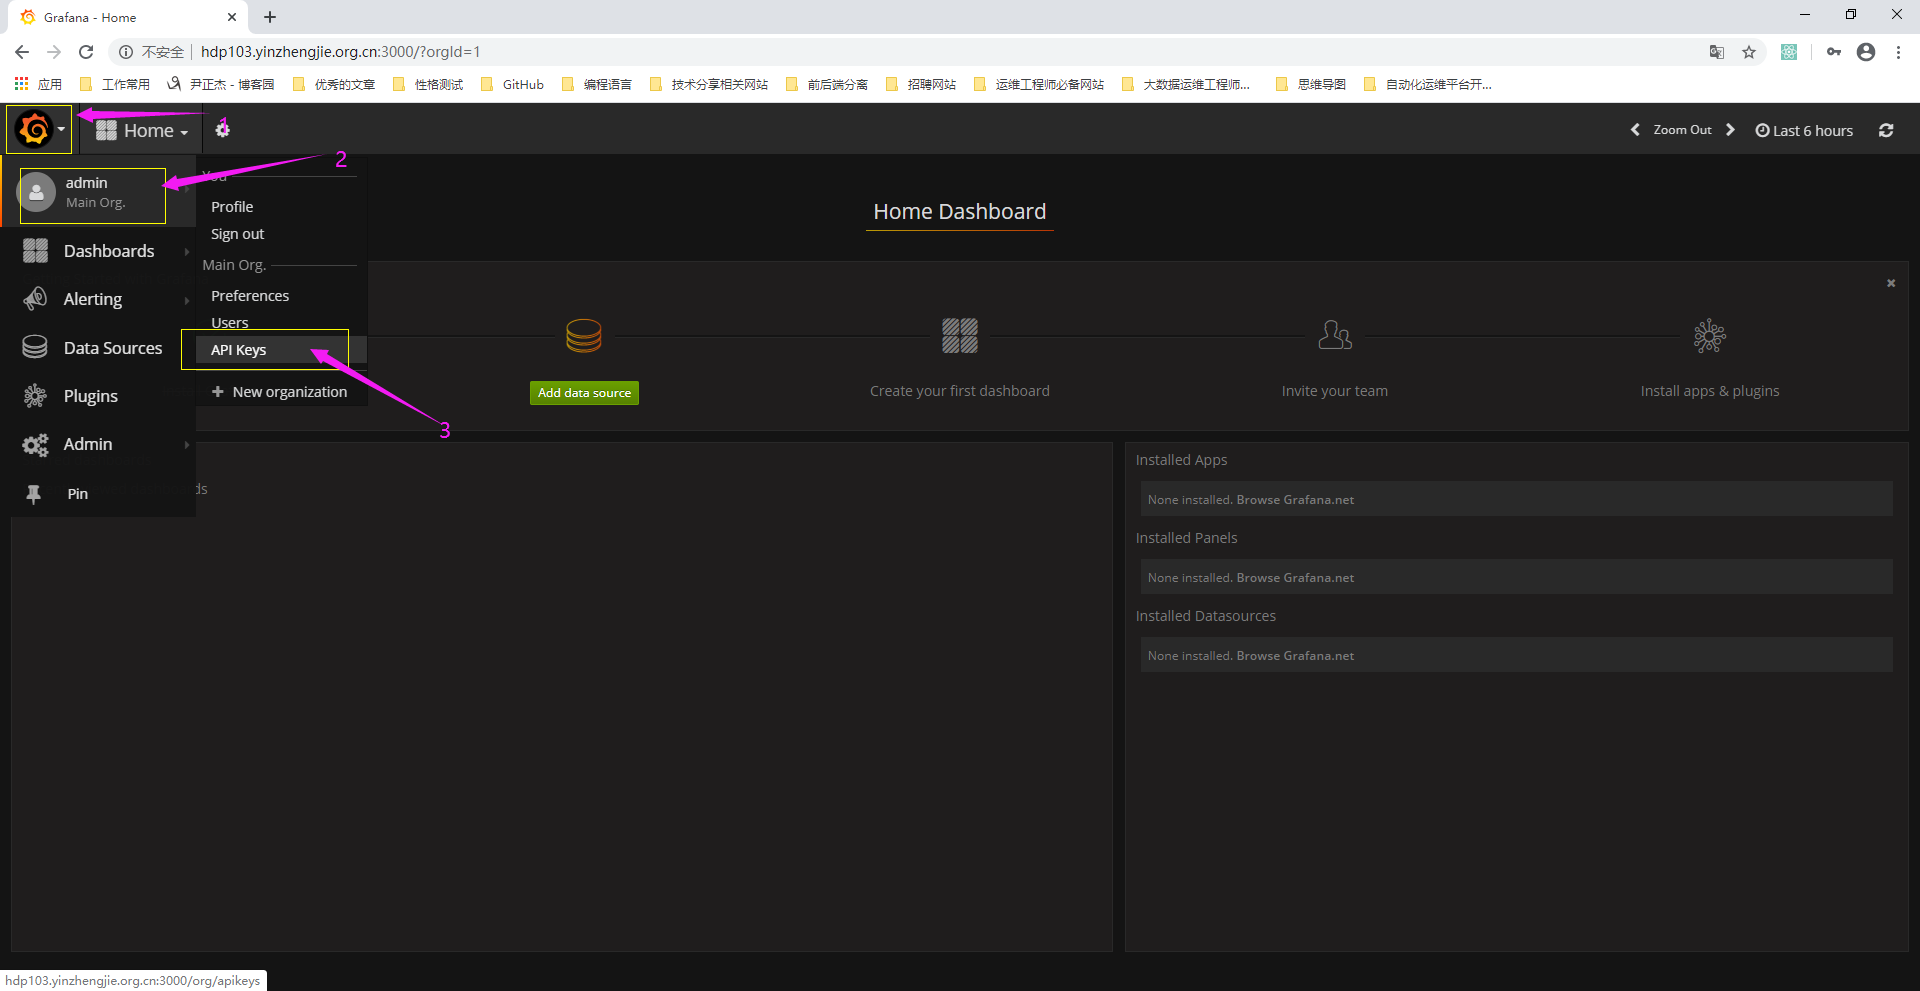
6>.Grafana的WebUI登录成功,点击打开"API Keys"的管理界面
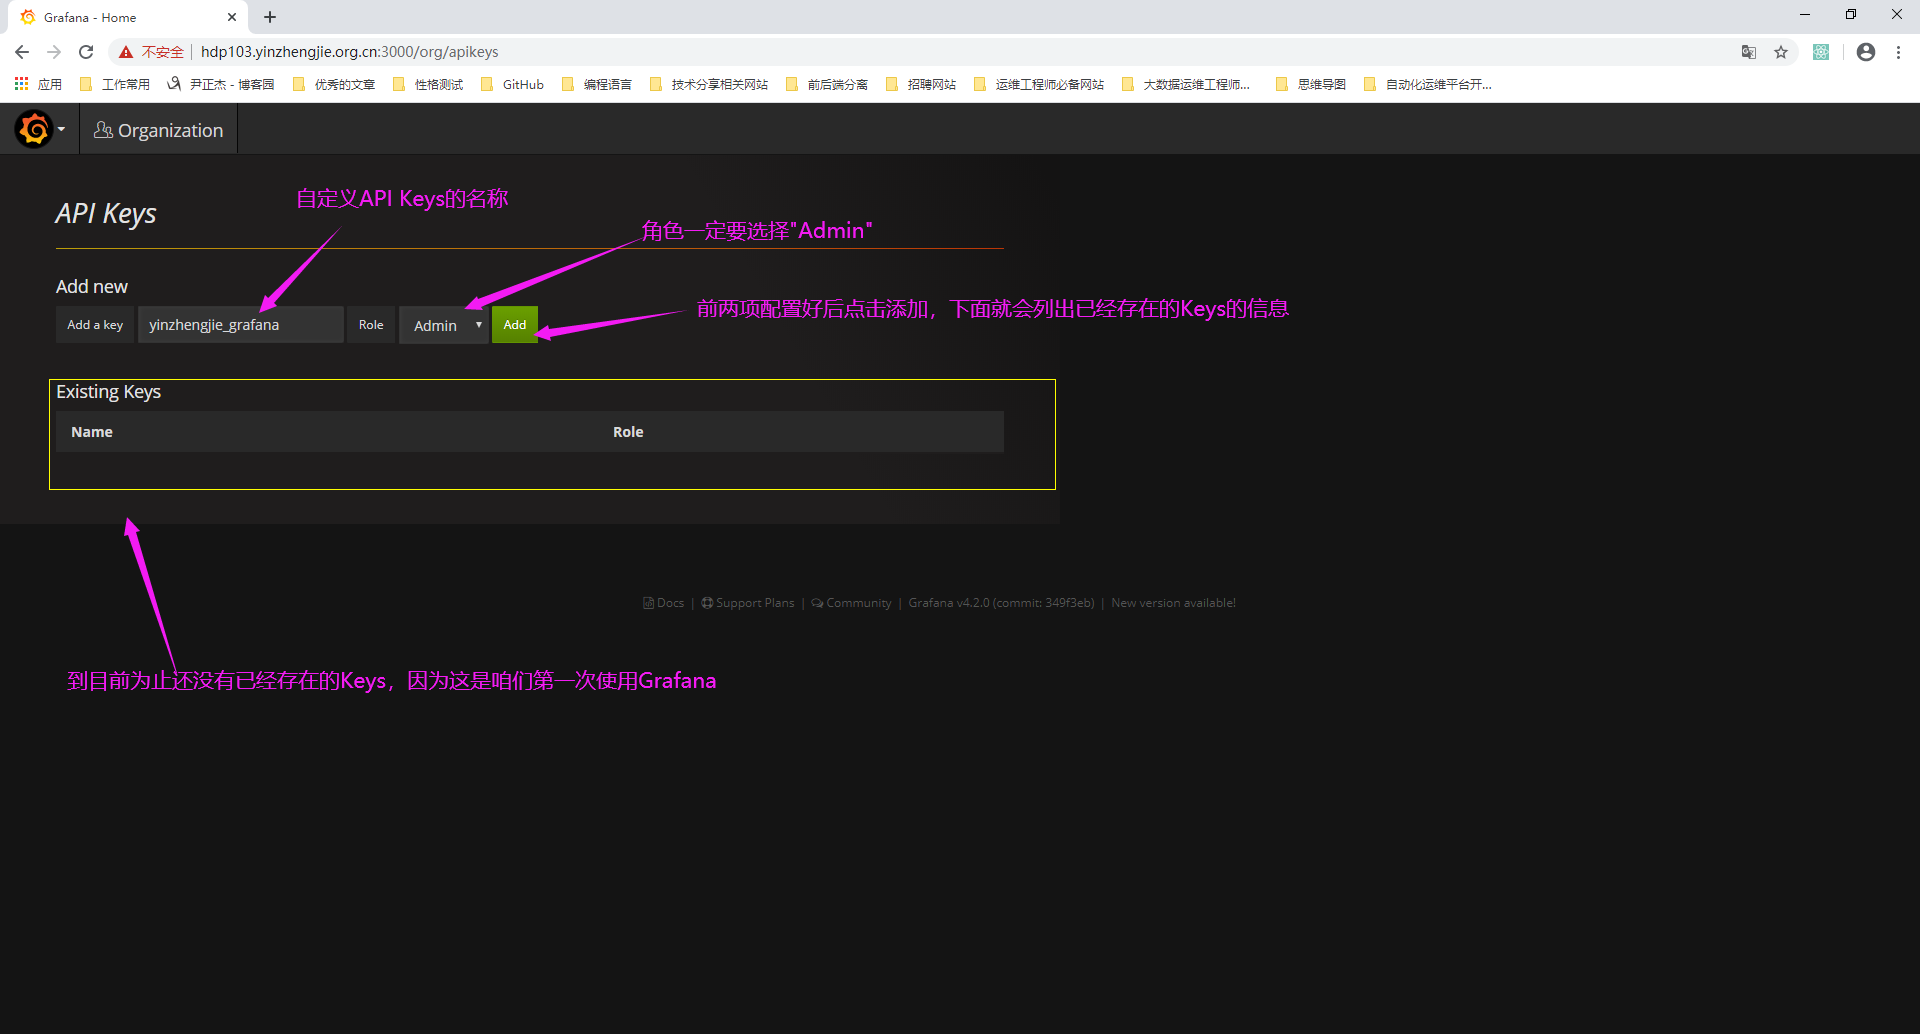
7>.如下图所示,我们需要自定义一个Key,角色选择Admin并点击“Add”按钮来添加一个API Keys
8>.将Key的值保存下来
  如下图所示,我的Key我自己保存下来了啦,你的也要记得保存下来哟,你的Key可能和我的不一样呢。我的Key值如下所示:
    eyJrIjoidEI2RG53eGxSYTJMY24ydExYV0RwM3gwdHgwc0JhajQiLCJuIjoieWluemhlbmdqaWVfZ3JhZmFuYSIsImlkIjoxfQ==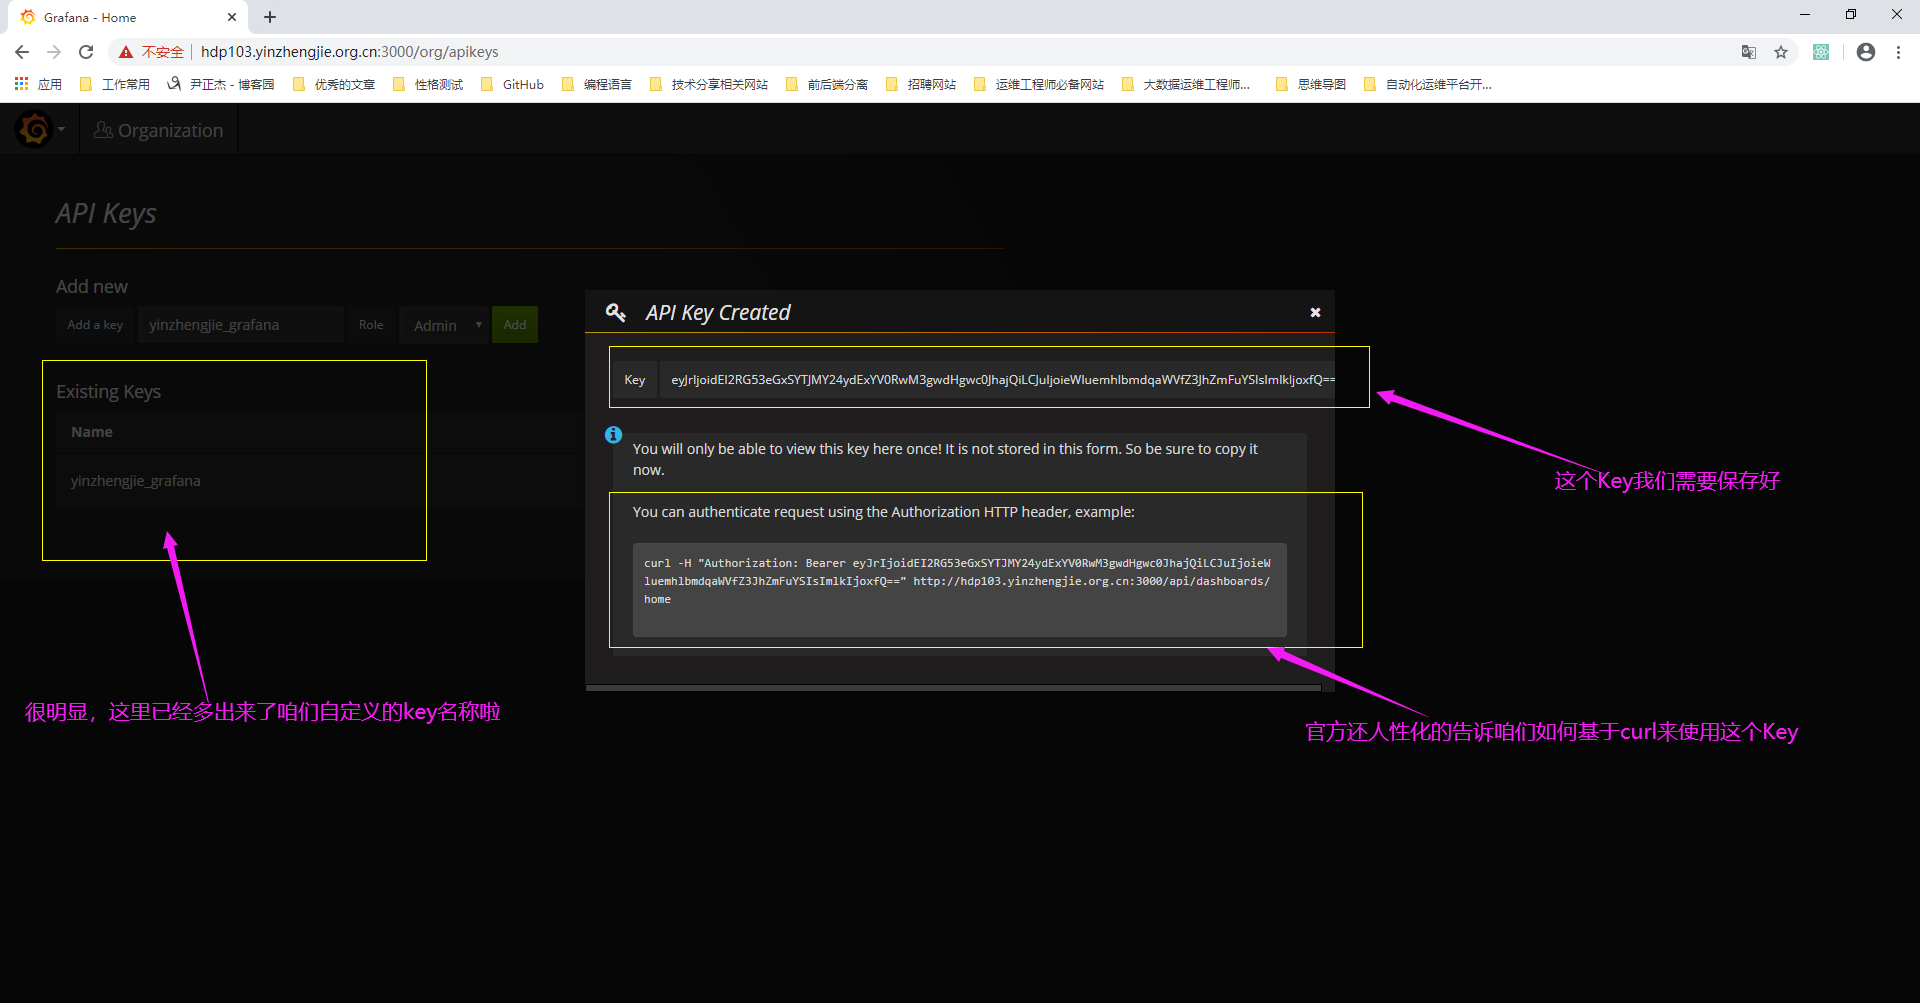
七.安装Nginx
1>. 下载Nginx的源
[root@hdp103.yinzhengjie.org.cn ~]# wget http://nginx.org/packages/centos/7/noarch/RPMS/nginx-release-centos-7-0.el7.ngx.noarch.rpm
2>.安装Nginx的软件源
[root@hdp103.yinzhengjie.org.cn ~]# yum -y localinstall nginx-release-centos-7-0.el7.ngx.noarch.rpm
3>.安装nginx
[root@hdp103.yinzhengjie.org.cn ~]# yum -y install nginx
4>.启动nginx并设置为开机自启动
[root@hdp103.yinzhengjie.org.cn ~]# systemctl start nginx.service
[root@hdp103.yinzhengjie.org.cn ~]#
[root@hdp103.yinzhengjie.org.cn ~]# systemctl enable nginx.service
Created symlink from /etc/systemd/system/multi-user.target.wants/nginx.service to /usr/lib/systemd/system/nginx.service.
[root@hdp103.yinzhengjie.org.cn ~]#
[root@hdp103.yinzhengjie.org.cn ~]#
[root@hdp103.yinzhengjie.org.cn ~]# systemctl list-unit-files | grep nginx.service
nginx.service                                 enabled
[root@hdp103.yinzhengjie.org.cn ~]#
[root@hdp103.yinzhengjie.org.cn ~]#
[root@hdp103.yinzhengjie.org.cn ~]# systemctl status nginx.service
● nginx.service - nginx - high performance web server
   Loaded: loaded (/usr/lib/systemd/system/nginx.service; enabled; vendor preset: disabled)
   Active: active (running) since Fri 2020-03-06 20:51:02 CST; 39s ago
     Docs: http://nginx.org/en/docs/
 Main PID: 22625 (nginx)
   CGroup: /system.slice/nginx.service
           ├─22625 nginx: master process /usr/sbin/nginx -c /etc/nginx/nginx.conf
           └─22626 nginx: worker process

Mar 06 20:51:02 hdp103.yinzhengjie.org.cn systemd[1]: Starting nginx - high performance web server...
Mar 06 20:51:02 hdp103.yinzhengjie.org.cn systemd[1]: Started nginx - high performance web server.
[root@hdp103.yinzhengjie.org.cn ~]#
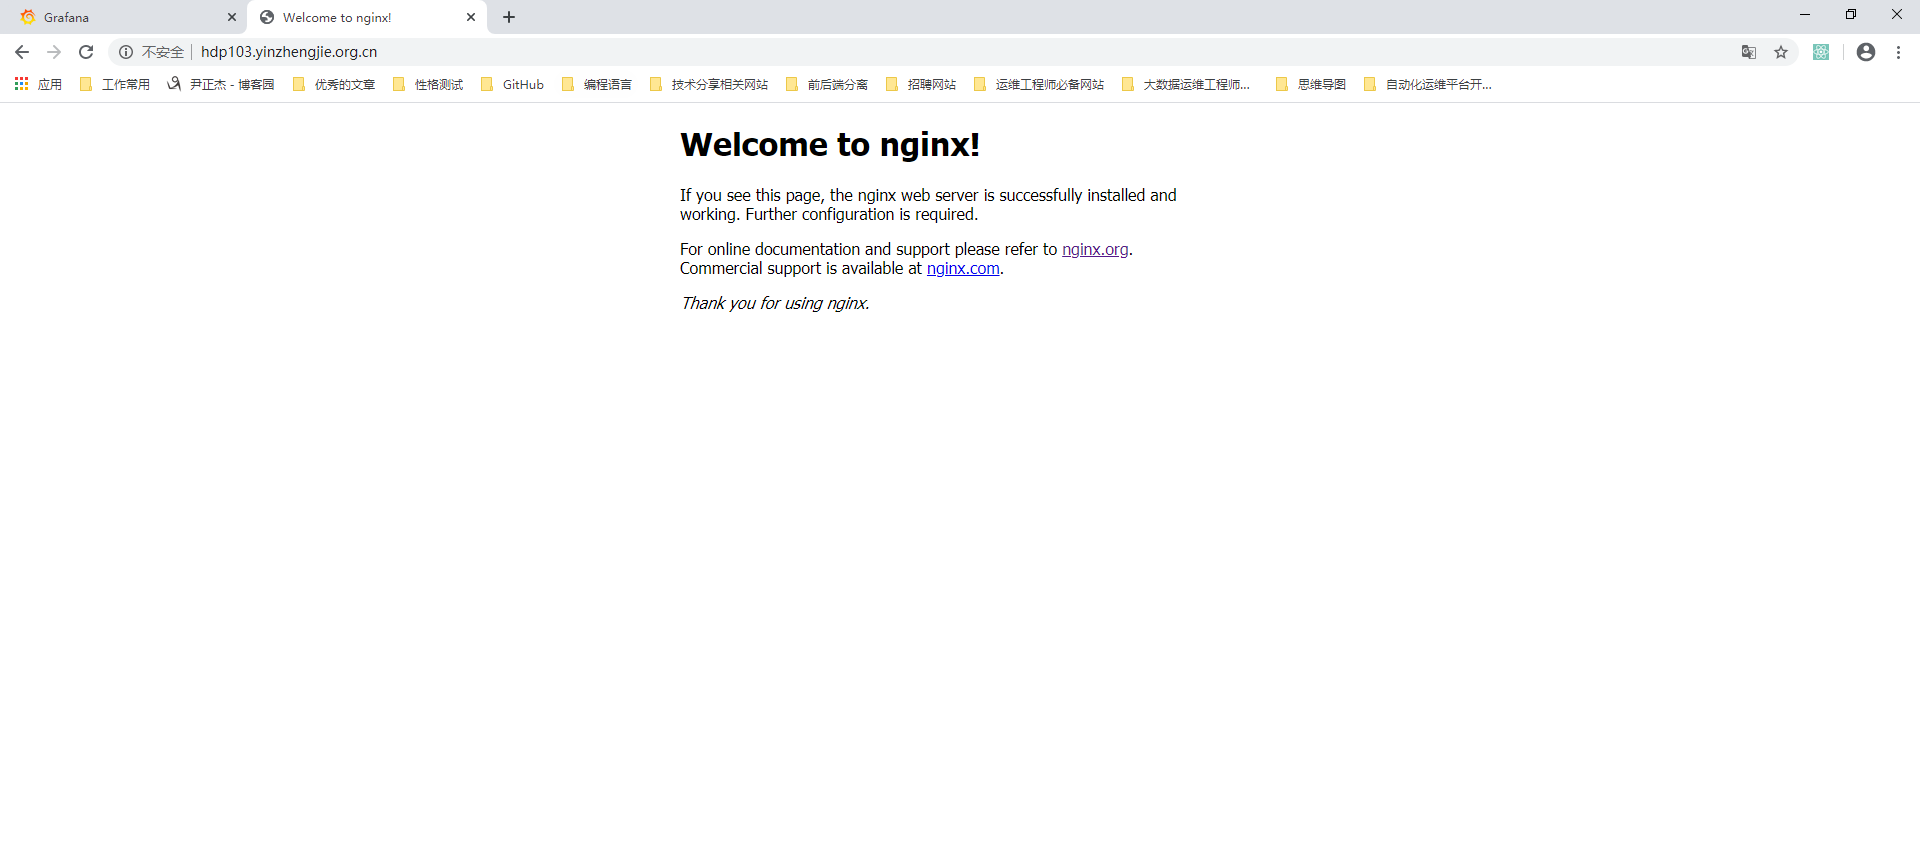
5>.访问Nginx
  打开浏览器访问部署Nginx的主机,地址如下所示:
    http://hdp103.yinzhengjie.org.cn/
6>.Nginx常用的配置文件说明
[root@hdp103.yinzhengjie.org.cn ~]# ll /etc/nginx/nginx.conf         #Nginx的主配置文件,也称为Nginx的全局配置文件
-rw-r--r-- 1 root root 643 Aug 13  2019 /etc/nginx/nginx.conf
[root@hdp103.yinzhengjie.org.cn ~]#
[root@hdp103.yinzhengjie.org.cn ~]# ll /etc/nginx/conf.d/          #默认的自定义Nginx站点配置文件存放路径,我们可以在Nginx的主配置文件使用Include关键字来修改自定义配置文件的路径哟~
total 4
-rw-r--r-- 1 root root 1093 Aug 13  2019 default.conf             #网站默认站点配置文件
[root@hdp103.yinzhengjie.org.cn ~]#
[root@hdp103.yinzhengjie.org.cn ~]# ll /usr/share/nginx/html/        #Yum方式安装的Nginx默认存放网站文件的路径,该路径也可以在Nginx的主配置文件进行修改哟~
total 8
-rw-r--r-- 1 root root 494 Aug 13  2019 50x.html
-rw-r--r-- 1 root root 612 Aug 13  2019 index.html
[root@hdp103.yinzhengjie.org.cn ~]#
[root@hdp103.yinzhengjie.org.cn ~]#