一、纹理缓存、帧缓存、动画缓存
缓存机制:存储设施有快慢之分,PC机上有硬盘与内存之分,计算机软件运行时候把资源加载到内存中运行;手机与PC也是类似的。当手机软件运行时候,把经常需要用到的资源预先加载到存取速度快的内存中,之后访问该资源将会节省大量时间。
Cocos2d-x为我们提供了三个实现缓存的接口,有纹理缓存、帧缓存、动画缓存,都是全局单例。
纹理缓存(CCTextureCache):
纹理缓存缓存加载到内存中的纹理资源,纹理是OpenGL中对图片的叫法,将纹理缓存起来方便之后的绘制工作。
每一个缓存的图像的大小,颜色和区域范围都是可以被修改的。这些信息都是存储在内存中的,不用在每一次绘制的时候都发送给GPU。
原理:对加入缓存的纹理资源进行一次引用,使其引用计数加一,保持不被清楚,从而使Cocos2d-x的渲染机制可以重复使用同一纹理多次渲染。
CCTextureCache的继承关系:class CC_DLL CCTextureCache : public CCObject。
CCTextureCache.h中部分代码如下:
class CC_DLL CCTextureCache : public CCObject
{
protected:
	CCDictionary* m_pTextures;
public:
	/** Returns the shared instance of the cache*/
	static CCTextureCache * sharedTextureCache();
	/** purges the cache. It releases the retained instance.*/
	static void purgeSharedTextureCache();
	/** Returns a Texture2D object given an file image
	* If the file image was not previously loaded, it will create a new CCTexture2D
	*  object and it will return it. It will use the filename as a key.
	* Otherwise it will return a reference of a previously loaded image.
	* Supported image extensions: .png, .bmp, .tiff, .jpeg, .pvr, .gif
	*/
	CCTexture2D* addImage(const char* fileimage);
	/** Reload texture from the image file
	* If the file image hasn't loaded before, load it.
	* Otherwise the texture will be reloaded from the file image.
	* The "filenName" parameter is the related/absolute path of the file image.
	* Return true if the reloading is succeed, otherwise return false.*/
	bool reloadTexture(const char* fileName);
	/** Purges the dictionary of loaded textures.
	* Call this method if you receive the "Memory Warning"
	* In the short term: it will free some resources preventing your app from being killed
	* In the medium term: it will allocate more resources
	* In the long term: it will be the same*/
	void removeAllTextures();
	/** Removes unused textures
	* Textures that have a retain count of 1 will be deleted
	* It is convenient to call this method after when starting a new Scene*/
	void removeUnusedTextures();
	/** Deletes a texture from the cache given a texture*/
	void removeTexture(CCTexture2D* texture);
	/** Deletes a texture from the cache given a its key name*/
	void removeTextureForKey(const char *textureKeyName);
	/** Reload all textures
	It's only useful when the value of CC_ENABLE_CACHE_TEXTURE_DATA is 1
	*/
	static void reloadAllTextures();
};
上面代码都有英文注释,简单易懂,下面解释一些常用的。
sharedTextureCache:得到CCTextureCache的单例对象。purgeSharedTextureCache:清空缓存,销毁CCTextureCache单例对象。
addImage:加载一个图片生成纹理,返回生成的纹理指针。
removeAllTextures:释放所有纹理。
removeUnusedTextures:清除未被外部使用的纹理。怎么知道未使用呢?这里只需要遍历下计数器值为1的纹理即未被外部使用的纹理进行释放即可。 新场景创建好后,使用此方法释放没有使用的纹理非常方便。
removeTexture:移除指定的纹理。
再来看看下面代码:
bool CCSprite::initWithFile(const char *pszFilename)
{
    CCAssert(pszFilename != NULL, "Invalid filename for sprite");

    CCTexture2D *pTexture = CCTextureCache::sharedTextureCache()->addImage(pszFilename);
    if (pTexture)
    {
        CCRect rect = CCRectZero;
        rect.size = pTexture->getContentSize();
        return initWithTexture(pTexture, rect);
    }

    // don't release here.
    // when load texture failed, it's better to get a "transparent" sprite than a crashed program
    // this->release();
    return false;
}
由此可知,当创建一个精灵时候,实际上是通过纹理缓存创建的。 精灵帧缓存(CCSpriteFrameCache):
CCSpriteFrameCache也是一个单例对象,使用xml格式文件(plist文件)。
我们可以加载很多的精灵帧到缓存中,之后就可以从这个缓存中创建精灵对象了。
精灵帧缓存主要用来缓存多张小图合并后的图片,一张图中包含多张小图,通过CCSpriteFrameCache缓存后通过CCSpriteFrame引用其中一个小图片。
继承关系:class CC_DLL CCSpriteFrameCache : public CCObject。
CCSpriteFrameCache.h部分代码如下:
class CC_DLL CCSpriteFrameCache : public CCObject
{
public:
	void addSpriteFramesWithFile(const char *pszPlist);
	void addSpriteFramesWithFile(const char* plist, const char* textureFileName);
	void addSpriteFramesWithFile(const char *pszPlist, CCTexture2D *pobTexture);
	void addSpriteFrame(CCSpriteFrame *pobFrame, const char *pszFrameName);
	void removeSpriteFrames(void);
	void removeUnusedSpriteFrames(void);
	void removeSpriteFrameByName(const char *pszName);
	void removeSpriteFramesFromFile(const char* plist);
}
void addSpriteFramesWithFile(const char *pszPlist):从一个.plist文件添加多个精灵帧。 一个纹理将被自动加载。纹理名称将把.plist后缀名替换为.png来组成。
void addSpriteFramesWithFile(const char* plist, const char* textureFileName):通过一个.plist文件添加多个精灵帧。纹理将与被创建的精灵帧结合。
void addSpriteFramesWithFile(const char *pszPlist, CCTexture2D *pobTexture):通过一个.plist文件添加多个精灵帧。纹理将与被创建的精灵帧结合。
void addSpriteFrame(CCSpriteFrame *pobFrame, const char *pszFrameName):通过给定的名称添加一个精灵帧。 如果名称已经存在,那么原来名称的内容将被新的所替代。
二、精灵的创建
精灵的创建:精灵是游戏中主要的元素,创建的方式有很多种,通过纹理创建,通过精灵帧创建等。
精灵的继承关系:class CC_DLL CCSprite : public CCNodeRGBA, public CCTextureProtocol
精灵的部分代码如下:
class CC_DLL CCSprite : public CCNodeRGBA, public CCTextureProtocol
{
public:
static CCSprite* create();
static CCSprite* create(const char *pszFileName);
static CCSprite* create(const char *pszFileName, const CCRect& rect);
static CCSprite* createWithTexture(CCTexture2D *pTexture);
static CCSprite* createWithTexture(CCTexture2D *pTexture, const CCRect& rect);
static CCSprite* createWithSpriteFrame(CCSpriteFrame *pSpriteFrame);
static CCSprite* createWithSpriteFrameName(const char *pszSpriteFrameName);
virtual bool initWithTexture(CCTexture2D *pTexture);
virtual bool initWithTexture(CCTexture2D *pTexture, const CCRect& rect);
virtual bool initWithTexture(CCTexture2D *pTexture, const CCRect& rect, bool rotated);
virtual bool initWithSpriteFrame(CCSpriteFrame *pSpriteFrame);
virtual bool initWithSpriteFrameName(const char *pszSpriteFrameName);
virtual bool initWithFile(const char *pszFilename);
virtual bool initWithFile(const char *pszFilename, const CCRect& rect);
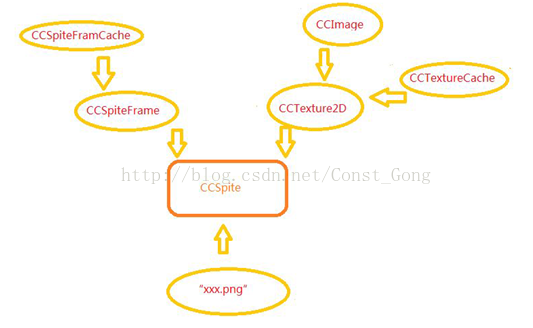
}光看上面代码就知道它们是创建和初始化精灵的函数。有许多种方法可以创建一个精灵。 创建精灵方式如下图所示:
提示:系统默认的图片路径是工程下面Resources,如果是其下有更深层次的目录。需要手动添加。
第一种:利用图片直接创建精灵
static CCSprite* create(const char *pszFileName);
static CCSprite* create(const char *pszFileName, const CCRect& rect);
通过这两个create函数可以从图片直接创建一个精灵出来,pszFileName为图片的名字,第二个参数可以指定图片截取大小,方向为从左上放到右下方截取。
1:	CCSprite* sprite1 = CCSprite::create("HelloWorld.png");
	addChild(sprite1);
上面实例仅使用一张图片创建精灵,精灵的默认锚点为(0.5,0.5),加到父节点上默认位置为(0,0)。 利用第二个函数创建精灵先来看看相关的宏:
#define CCPointMake(x, y) CCPoint((float)(x), (float)(y))
#define CCSizeMake(width, height) CCSize((float)(width), (float)(height))
#define CCRectMake(x, y, width, height) CCRect((float)(x), (float)(y), (float)(width), (float)(height))
CCRect::CCRect(void)
{
	setRect(0.0f, 0.0f, 0.0f, 0.0f);
}

CCRect::CCRect(float x, float y, float width, float height)
{
	setRect(x, y, width, height);
}
由上面代码可以知道我们可以用CCRectMake创建一个CCRect。 下面实例:
	CCSize winSize = CCDirector::sharedDirector()->getWinSize();
	CCSprite* sprite2 = CCSprite::create("HelloWorld.png",CCRect(0,0,240,100));
	sprite2->setPosition(ccp(winSize.width/2, winSize.height/2));
	addChild(sprite2);
实际上显示出HelloWorld.png图片,左上角截取的一部分图片。方向为从左上放到右下方截取。 第二种:利用纹理来创建精灵
	static CCSprite* createWithTexture(CCTexture2D *pTexture);
	static CCSprite* createWithTexture(CCTexture2D *pTexture, const CCRect& rect);
这两个函数参数pTexture是一个纹理对象指针,那么首先就要先创建这个纹理;第二个参数同样是截取大小所用,从左上到右下截取。
CCTexture2D类中没有create函数,只能用new创建一个CCTexture2D对象,之后通过initWithImage来添加纹理内容。
CCTexture2D中关于initWithImage函数的代码如下:
class CC_DLL CCTexture2D : public CCObject
{
public:
	bool initWithImage(CCImage * uiImage);
}
由此可知道想要创建一个CCTexture2D对象需要CCImage对象指针。 CCImage类:支持从JPG, PNG, TIFF以及数据流,字符串中创建供Cocos2d - x进行访问的图片数据对象。
看看CCImage中,只列出我们目前关心的内容:
class CC_DLL CCImage : public CCObject
{
public:
	bool initWithImageFile(const char * strPath, EImageFormat imageType = kFmtPng);
}第一个参数为图片文件路径与名字,第二个参数为类型,指明是从那种数据创建CCImage,使用时使用其默认值就好。实例一,通过直接创建纹理来创建精灵:
	CCSize winSize = CCDirector::sharedDirector()->getWinSize();
	CCImage* image = new CCImage();
	image->initWithImageFile("HelloWorld.png");

	CCTexture2D* texture = new CCTexture2D;
	texture->autorelease();
	texture->initWithImage(image);
	CCSprite* sprite = CCSprite::createWithTexture(texture);
	sprite->setPosition(ccp(winSize.width/2,winSize.height/2));
	addChild(sprite);
首先创建一个CCImage对象,用来创建CCTexture2D;
因为CCTexture2D没有添加到渲染树中,不会自动释放,所以用autorelease来延迟释放;
之后利用CCTexture2D来创建CCSprite。
CCTexture2D还有另一种获取的方法,就是之前介绍的从纹理缓存中获取,利用这种方法需要现在纹理缓存中添加图片。
实例二,通过纹理缓存获取纹理创建精灵:
	CCSize winSize = CCDirector::sharedDirector()->getWinSize();
	CCTexture2D* texture = CCTextureCache::sharedTextureCache()->addImage("HelloWorld.png");
	CCSprite* sprite = CCSprite::createWithTexture(texture);
	sprite->setPosition(ccp(winSize.width/2,winSize.height/2));
	addChild(sprite);
首先创建一个纹理缓存,然后把图片加载到纹理缓存中;
从纹理缓存中获取纹理;
之后利用纹理创建精灵。
第三种:利用精灵帧创建精灵
	static CCSprite* createWithSpriteFrame(CCSpriteFrame *pSpriteFrame);
	static CCSprite* createWithSpriteFrameName(const char *pszSpriteFrameName);
上面两行代码虽然相似,但是也有些区别,第一个函数需要精灵帧对象指针作为参数,第二个函数则需要精灵帧的名字做参数。
之前介绍了精灵帧缓存,现在再来看看精灵帧,部分代码如下:
class CC_DLL CCSpriteFrame : public CCObject
{
public:
	static CCSpriteFrame* create(const char* filename, const CCRect& rect);
	static CCSpriteFrame* create(const char* filename, const CCRect& rect, bool rotated, const CCPoint& offset, const CCSize& originalSize);
	static CCSpriteFrame* createWithTexture(CCTexture2D* pobTexture, const CCRect& rect);
	static CCSpriteFrame* createWithTexture(CCTexture2D* pobTexture, const CCRect& rect, bool rotated, const CCPoint& offset, const CCSize& originalSize);
}
由上面代码可以看出,创建精灵帧可以通过图片文件直接创建,也可以通过纹理创建精灵帧。精灵帧也可以有精灵帧缓存获得。 实例一,通过图片直接创建精灵帧创建精灵:
	CCSize winSize = CCDirector::sharedDirector()->getWinSize();
	CCSpriteFrame* spriteFrame = CCSpriteFrame::create("HelloWorld.png", CCRectMake(0, 0, 200, 200));
	CCSprite* sprite = CCSprite::createWithSpriteFrame(spriteFrame);
	sprite->setPosition(ccp(winSize.width/2, winSize.height/2));
	addChild(sprite);
这里首先通过图片创建了一个精灵帧; 利用这个精灵帧创建了一个精灵。
实例二,通过精灵帧缓冲取出精灵帧创建精灵:
	CCSpriteFrameCache::sharedSpriteFrameCache()->addSpriteFramesWithFile("sprite/zombie.plist");
	CCSpriteFrame* spriteFrame = CCSpriteFrameCache::sharedSpriteFrameCache()->spriteFrameByName("z_1_attack_01.png");
	CCSprite* sprite = CCSprite::createWithSpriteFrame(spriteFrame);
	sprite->setPosition(ccp(100, 100));
	addChild(sprite);
首先,把plist文件添加到精灵帧缓冲当中,精灵帧缓冲添加精灵帧的方法在之前介绍精灵帧缓冲时候介绍过; 然后,通过精灵帧缓冲取得我们需要用到的精灵帧,用到了CCSpriteFrameCache中spriteFrameByName函数,
此函数通过小图片的名字从小图片集合成的大图片创建的精灵帧缓冲中取出对应的精灵帧;
最后通过精灵帧创建精灵。
实例三,通过精灵帧缓冲中精灵帧的名字直接创建精灵:
	CCSpriteFrameCache::sharedSpriteFrameCache()->addSpriteFramesWithFile("sprite/zombie.plist");
	CCSprite* sprite = CCSprite::createWithSpriteFrameName("z_1_attack_01.png");
	sprite->setPosition(ccp(100,100));
	addChild(sprite);
首先创建了一个精灵帧缓冲; 创建精灵时候直接通过精灵帧缓冲中精灵帧名字创建。
三、zOrder
zOrder在Cocos2d-x中用来描述节点渲染的顺序,CCNode派生的类都有zOrder,默认值是0。
zOrder的值越大,绘制越靠后,以精灵为例子zOrder值大的精灵呈现在zOrder值小的精灵上面。
zOrder在CCNode中相关内容代码精简后如下:
class CC_DLL CCNode : public CCObject
{
protected:
	int m_nZOrder;  //< z-order value that affects the draw order
	CCNode *m_pParent;
public:
	CCNode::CCNode(void) :..., m_nZOrder(0)...
	{
	}
	void setZOrder(int z)
	{
		_setZOrder(z);
		if (m_pParent)
		{
			m_pParent->reorderChild(this, z);
		}
	}
	void reorderChild(CCNode *child, int zOrder)
	{
		child->_setZOrder(zOrder);
	}
	void _setZOrder(int z)
	{
		m_nZOrder = z;
	}
}
由上诉代码可以知道,如果zOrder没有人为指定,在构造函数中初始化为0; 我们可以通过setZOrder来修改zOrder的值。