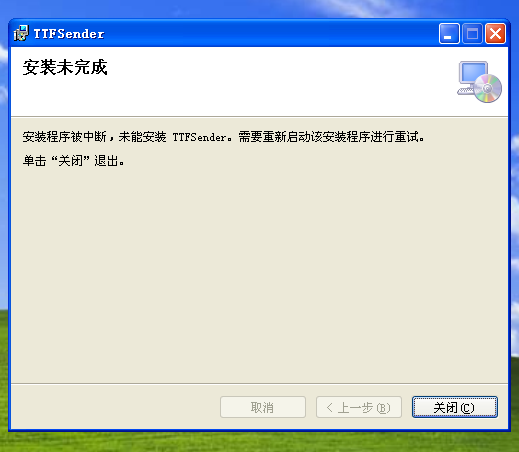
如图所示,我利用Visual Studio 2015制作了一个小程序。基于.Net 4.0。用VS的Install扩展,新建Install项目进行打包。打包为.msi文件。该安装文件在已经安装了 .Net Framework4.0的情况下仍然出现这个问题,百思不得其解。
查阅了Stack Overflow的相关资料,得到了追踪故障源的方法——命令行安装.msi程序,可以看到log日志。即 msiexec /i a.msi /l*v a.log 将会生成名为“a.log”的日志。在日志中发现如下代码
=== 记录开始: 2016-8-26  21:49:10 ===
MSI (c) (84:68) [21:49:10:453]: Note: 1: 2262 2: PatchPackage 3: -2147287038
MSI (c) (84:68) [21:49:10:453]: Machine policy value 'DisableRollback' is 0
MSI (c) (84:68) [21:49:10:453]: User policy value 'DisableRollback' is 0
MSI (c) (84:68) [21:49:10:453]: PROPERTY CHANGE: Adding UILevel property. Its value is '5'.
MSI (c) (84:68) [21:49:10:453]: PROPERTY CHANGE: Adding ACTION property. Its value is 'INSTALL'.
MSI (c) (84:68) [21:49:10:453]: Doing action: INSTALL
MSI (c) (84:68) [21:49:10:453]: Note: 1: 2262 2: ActionText 3: -2147287038
操作 21:49:10: INSTALL.
操作开始 21:49:10: INSTALL。
MSI (c) (84:68) [21:49:10:453]: UI Sequence table 'InstallUISequence' is present and populated.
MSI (c) (84:68) [21:49:10:453]: Running UISequence
MSI (c) (84:68) [21:49:10:453]: PROPERTY CHANGE: Adding EXECUTEACTION property. Its value is 'INSTALL'.
MSI (c) (84:68) [21:49:10:453]: Doing action: DIRCA_CheckFX
操作 21:49:10: DIRCA_CheckFX.
操作开始 21:49:10: DIRCA_CheckFX。
MSI (c) (84:4C) [21:49:10:453]: Invoking remote custom action. DLL: C:\DOCUME~1\ADMINI~1\LOCALS~1\Temp\MSI164.tmp, Entrypoint: CheckFX
MSI (c) (84:48) [21:49:10:453]: Cloaking enabled.
MSI (c) (84:48) [21:49:10:453]: Attempting to enable all disabled priveleges before calling Install on Server
MSI (c) (84:48) [21:49:10:453]: Connected to service for CA interface.
操作结束 21:49:10: DIRCA_CheckFX。返回值 3。
MSI (c) (84:68) [21:49:10:546]: Doing action: FatalErrorForm
操作 21:49:10: FatalErrorForm.
操作开始 21:49:10: FatalErrorForm。
MSI (c) (84:6C) [21:49:10:546]: Note: 1: 2262 2: Error 3: -2147287038
信息 2898。VSI_MS_Sans_Serif13.0_0_0, 宋体, 134
MSI (c) (84:6C) [21:49:10:546]: Note: 1: 2262 2: Error 3: -2147287038
信息 2898。VSI_MS_Sans_Serif16.0_1_0, 宋体, 134
MSI (c) (84:6C) [21:49:10:546]: Note: 1: 2262 2: Error 3: -2147287038
DEBUG: Error 2826:  Control Line2 on dialog FatalErrorForm extends beyond the boundaries of the dialog to the right by 3 pixels
安装程序在安装此软件包时遇到一个错误。这可能表示此软件包有错。错误码是 2826。参数是: FatalErrorForm, Line2, to the right
MSI (c) (84:6C) [21:49:10:546]: Note: 1: 2262 2: Error 3: -2147287038
DEBUG: Error 2826:  Control BannerBmp on dialog FatalErrorForm extends beyond the boundaries of the dialog to the right by 3 pixels
安装程序在安装此软件包时遇到一个错误。这可能表示此软件包有错。错误码是 2826。参数是: FatalErrorForm, BannerBmp, to the right
MSI (c) (84:6C) [21:49:10:546]: Note: 1: 2262 2: Error 3: -2147287038
信息 2898。VsdDefaultUIFont.524F4245_5254_5341_4C45_534153783400, 宋体, 134
MSI (c) (84:6C) [21:49:10:546]: Note: 1: 2262 2: Error 3: -2147287038
DEBUG: Error 2826:  Control Line1 on dialog FatalErrorForm extends beyond the boundaries of the dialog to the right by 3 pixels
安装程序在安装此软件包时遇到一个错误。这可能表示此软件包有错。错误码是 2826。参数是: FatalErrorForm, Line1, to the right
操作 21:49:10: FatalErrorForm. Dialog created
MSI (c) (84:6C) [21:49:10:625]: Note: 1: 2731 2: 0
操作结束 21:49:12: FatalErrorForm。返回值 1。
操作结束 21:49:12: INSTALL。返回值 3。
Aaron Stebner
Microsoft
MSFT
在帖子里指出“返回值 3”往往与程序安装失败回滚有密切联系。
Open the verbose log in a text editor such as notepad and search for the string “return value 3”. In nearly all cases, this takes me to the section in the verbose log that lists the action that failed that initially caused setup to rollback.
从我的a.log中可以看出DIRCA_CheckFX应该是问题的源头。在反复查看了目标机的安装环境(组策略、.net)之后,确定应该是安装包msi文件有问题。
查阅资料正好发现CsharpStyle兄的帖子【Setup Project】Windows XP 无法安装
里面提到
问题现象

使用 Visual Studio 2013 的 Setup Project 制作的 Windows Installer 在 Windows XP 上无法运行,通过以下方法获取日志:

  msiexec /i <msipath>setup.msi /l*v c:\temp\msi.log

通过查看日志的内容,发现以下错误:

  DIRCA_CHECKFX Return Value 3


问题原因

CHECKFX 的作用是检查 .NET Framework 版本,在 Setup Project 的设置中有两处:
1.Prerequisite
2.Launch Conditions

以上两处必须统一。

此外,更重要的问题是,Visual Studio 2013 生成的 Windows Installer 与 Windows XP 不兼容。


解决方法
1.Close Visual Studio 2013
2.Copy file with replace dpca.dll from C:\Program Files (x86)\Microsoft Visual Studio 10.0\Common7\Tools\Deployment to C:\Program Files (x86)\Microsoft Visual Studio 12.0\Common7\IDE\CommonExtensions\Microsoft\VSI\bin
3.Open Project
4.Rebuild
无奈再安装VS2010还是太费劲,况且未必能解决2015的问题,遂另寻其他可能途径。最终在Github上找到了便捷方法:
在Installation problem Windows XP帖子的讨论中,bh3605提到:
Find and download Orca. Use it to open up the msi file and look for two Actions. "DIRCA_CheckFx" and "VSDCA_VsdLaunchConditions". Delete them. You'll find them in tables InstallExecuteSequence and InstallUISequence. They're also in the CustomAction table, but I've found deleting them in just the execution sequence tables sufficed.

I don't know why it crashes on XP only, but I believe it's because XP doesn't have MSVBDPCA.dll. You can find more information on the Actions I mentioned here: http://stackoverflow.com/a/8613979

+1 for building something related to Pandora!
在网上查了好多帖子,都说msi安装包的DIRCA_CheckFX和VSDCA_VsdLaunchConditions这两个操作容易出问题。
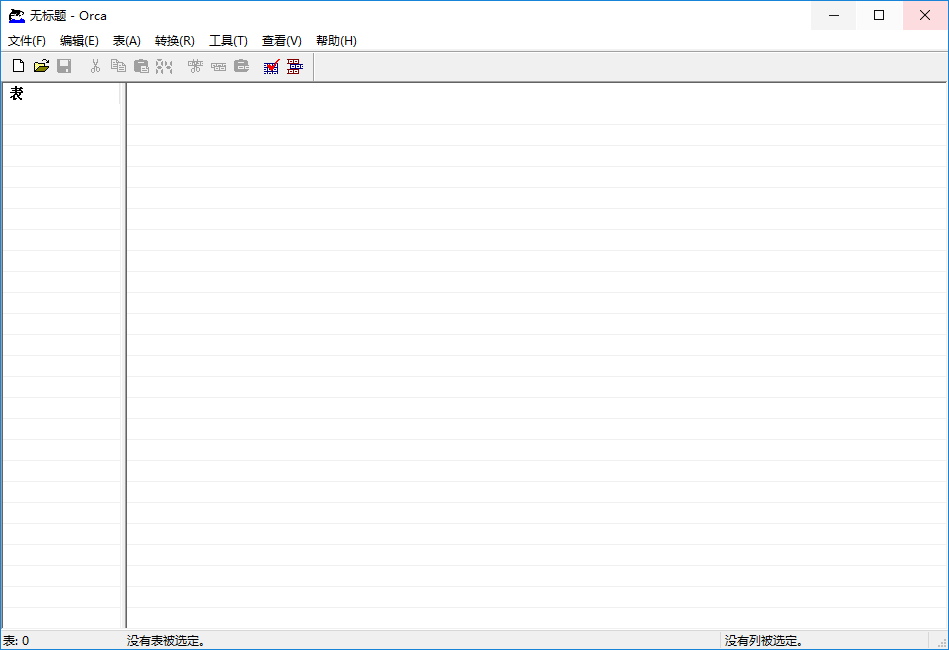
也就是说,下载Ocra工具,然后删除"DIRCA_CheckFx"和"VSDCA_VsdLaunchConditions"这两个Action即可。
第一步,下载并打开Ocra工具中的Ocra.exe,如图
第二步,打开生成的(需要更改的)msi文件,找到CustomAction表,从表中找到两个Action
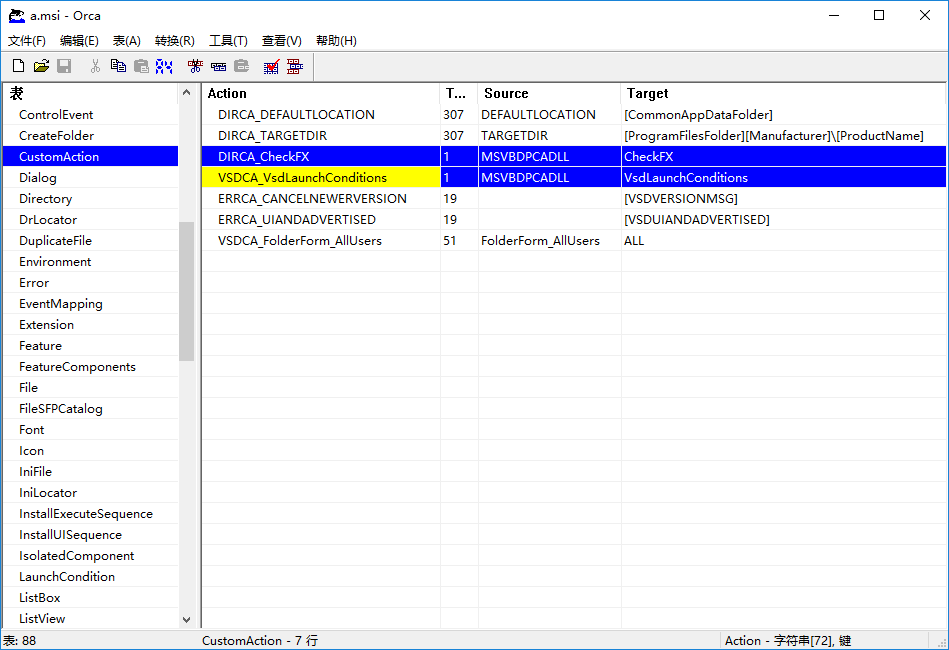
第三部,对这两个Action,分别右键,删除行,然后保存即可。安装就能成功安装了。
注意:修改完,打开记录追踪安装过程的话,还是存在有Error的问题。不过程序可以成功安装并正常运行。要想彻底解决还是要考虑替换dpca.dll文件或者等VSI小组更新(XP已经报废,这恐怕是痴心妄想)。替换dpca.dll不知道会不会有别的影响。
Stack Overflow的帖子DIRCA_CHECKFX Return Value 3 - VS 2013 Deployment Project中还有其他办法,比如
Here's what I did to workaround this issue for a 32-bit deployment project.

1.Build the setup project in VS2010 once. This package is not dogged by the issue but I didn't want to have to keep building in a different VS version.


2.Open the resulting msi with Orca, select the Binary table and export the content of MSVBDPCADLL to a file.


3.Now after you build it in VS2013 use Orca to import the exported data into Binary\MSVBDPCADLL to fix the package.


I have to do a similar thing with the 64-bit project but in this case it's to import the correct InstallUtil binary (being C:\Windows\Microsoft.NET\Framework64\v4.0.30319\InstallUtilLib.dll).
网友分析,安装包出问题的原因为
The preview of the .vdproj resurrection uses DLLs that don't support Windows XP or Server 2003. Microsoft posted an update that might have fixed that bug.
唉~
希望各个单位早点淘汰古董XP!!!