zabbix部署好,在使用一段时间后,出现了不少报错,在此简单做一记录。
1)Zabbix监控界面报错Lack of free swap space on Zabbix server”解决
公司线上部署的zabbix3.0的监控界面首页报错说无交换内存主机“Lack of free swap space on Zabbix server”
解决此问题的步骤如下:
选择Configuration->Templates(模板),在模板界面中选择Template OS Linux右侧的Triggers(触发器),在触发器页面中打开Lack of free swap space on {HOST.NAME}项目,在新打开的触发器编辑页面中修改Expression(表达式)的内容,由原先的
{Template OS Linux:system.swap.size[,pfree].last(0)}<50
修改为
{Template OS Linux:system.swap.size[,pfree].last(0)}<50 and {Template OS Linux:system.swap.size[,free].last(0)}<>0
此处修改增加了“ and {Template OS Linux:system.swap.size[,free].last(0)}<>0”判断系统有交换空间,当系统无交换空间即{Template OS Linux:system.swap.size[,free].last(0)}的值为0时将不会时表达式不成立就不会触发错误提示。保存之后在下一个更新周期内Zabbix之前报告的“Lack of free swap space”问题就会被自动标记为Resolved(已解决)。
2)zabbix监控界出现“Zabbix poller processes more than 75% busy ”报警
线上部署的zabbix监控环境运行一段时间后,突然出现了报警“Zabbix poller processes more than 75% busy“
其实,Zabbix的监控警报有很多种,比较常见的几个莫过于内存耗尽,网络不通,IO太慢还有这个“Zabbix poller processes more than 75% busy”了。一开始的时候因为这个即不影响使用也持续一会儿就自行解决就没有多在意。然后随着数据库的增大,Zabbix消耗的内存可是越来越多,Poller processes(轮询)开始天天Busy了.
最后,发现解决这个问题很简单!
可以增加Zabbix Server启动时初始化的进程数量,但这样做直接增加了轮询的负载量,内存配置充足的情况下完全可以这么做。
具体编辑Zabbix Server的配置文件/etc/zabbix/zabbix_server.conf,找到配置StartPollers的段落:
### Option: StartPollers
# Number of pre-forked instances of pollers.
#
# Mandatory: no
# Range: 0-1000
# Default:
# StartPollers=5
取消StartPollers前的#号注释,修改5为10或者更大【由于线上机器内存64G的,我此处修改成60或80】
修改后,重启zabbix_server
#pkill -9 zabbix_server
#/usr/local/zabbix/sbin/zabbix-server
过一会儿就发现触发器里已经没有类似的警告了
当然,我们也可以额定时写个脚本来重启zabbix_server来降低负载
下面是脚本/root/zabbix-restart.sh
#!/bin/bash
/usr/bin/pkill zabbix_server
/usr/local/zabbix/sbin/zabbix_server
然后crontab做计划任务
0 3 * * * /bin/bash -x /root/zabbix-restart.sh > /dev/null 2>&1
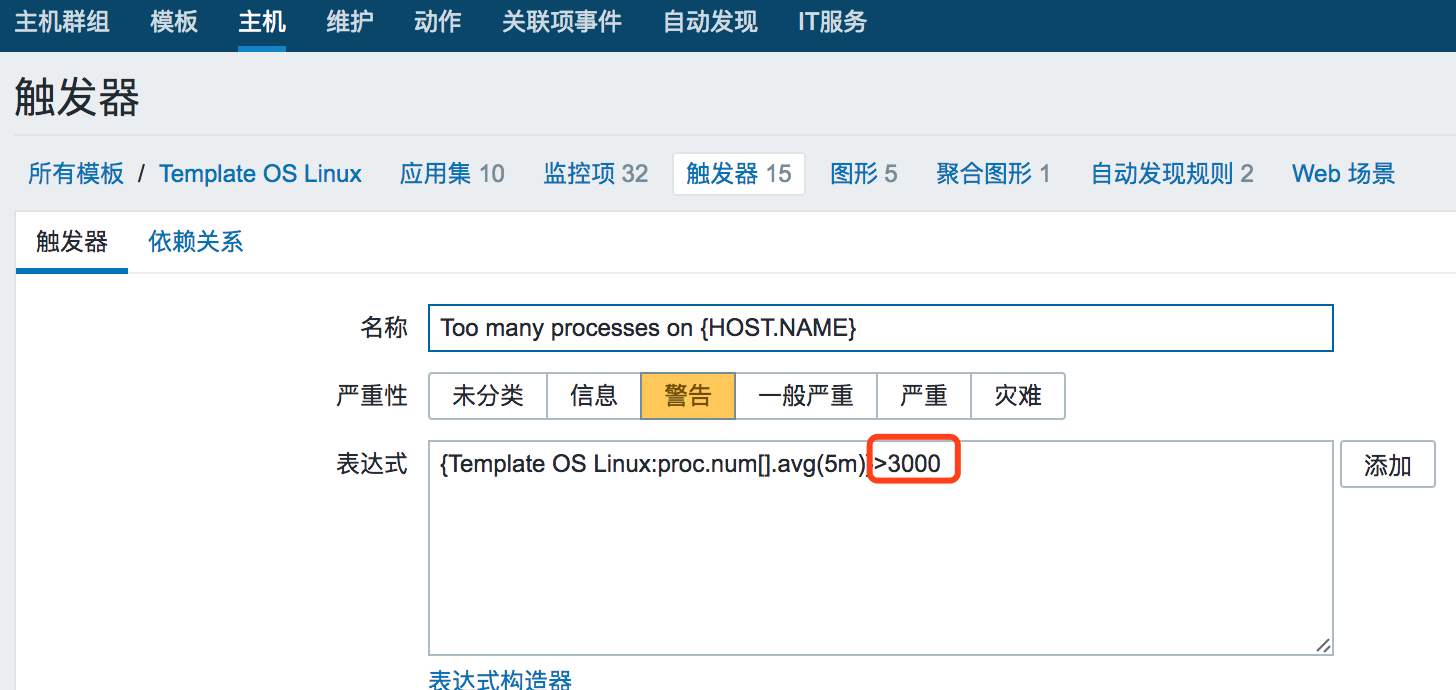
3)zabbix Too many processes on
解决办法:将对应的触发器的阀值设置大点(默认是300,可以改到3000)


直接点击下面两行,将它俩的阀值(300、30)分别都调大(比如调大到3000、300)
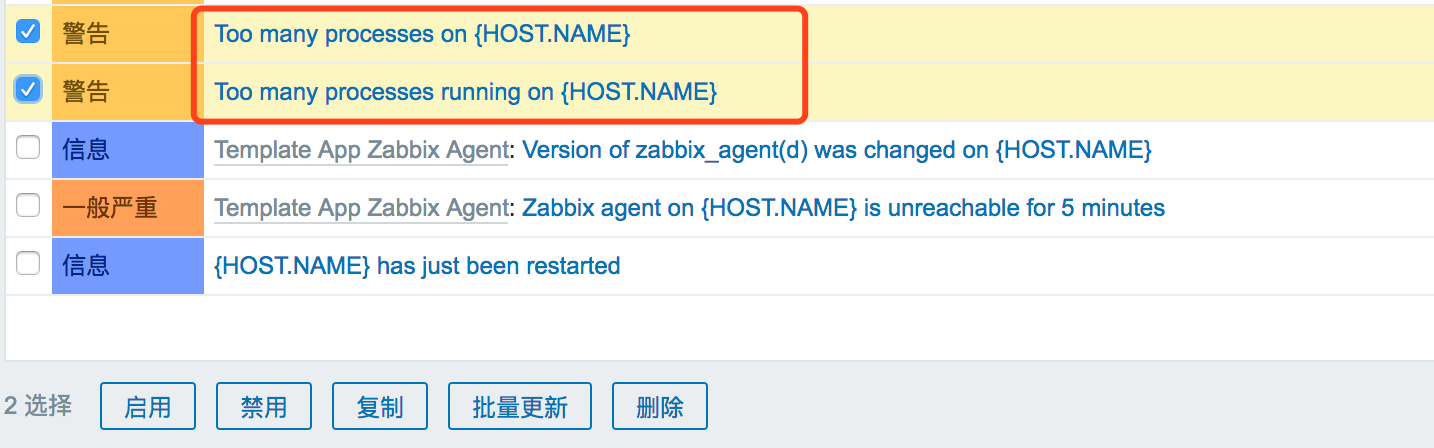
更新以上修改后,刷新,过段时间这个报错就会消失了。
4)监控图里获取不到数据
可以先在服务端的命令行礼通过命令:
# /usr/local/zabbix/bin/zabbix_get -s 192.168.1.10 -p 10050 -k "mysql.status[Uptime]"
其中:-s后面跟的是被监控机的ip地址;-k后面跟的是监控项的键值,这个可以在zabbix页面里对应监控项里查到。如果在服务端通过以上命令能获取到数据,那么在zabbix监控页面的图形里显示获取不到数据,可能就是web页面里的配置问题了。
5)内存溢出导致zabbix_server服务关闭
138401:20170630:172159.850 using configuration file: /data/zabbix/etc/zabbix_server.conf
138401:20170630:172159.854 current database version (mandatory/optional): 03020000/03020000
138401:20170630:172159.854 required mandatory version: 03020000
138401:20170630:172200.238 __mem_malloc: skipped 0 asked 48 skip_min 4294967295 skip_max 0
138401:20170630:172200.238 [file:strpool.c,line:53] zbx_mem_malloc(): out of memory (requested 42 bytes)
138401:20170630:172200.238 [file:strpool.c,line:53] zbx_mem_malloc(): please increase CacheSize configuration parameter
解决办法:
打开zabbix_server.conf 找到 Option: CacheSize
把原来的 # CacheSize=8M 前面的#注释去掉,将8M修改为1024,这个1024根据服务器性能修改。
# vim /data/zabbix/etc/zabbix_agentd.conf
......
CacheSize=1024M
然后重启zabbix_server即可
6)zabbix数据库连接数超额导致连接失败
mysql> show variables like 'max_connections';
+-----------------+-------+
| Variable_name   | Value |
+-----------------+-------+
| max_connections | 152   |
+-----------------+-------+
1 row in set (0.00 sec)

默认是152的连接数。修改方法如下:
1)临时性修改
mysql> set GLOBAL max_connections=1024;
mysql> show variables like 'max_connections';
+-----------------+-------+
| Variable_name   | Value |
+-----------------+-------+
| max_connections | 1024  |
+-----------------+-------+
1 row in set (0.00 sec)

2)永久性修改
在my.cnf文件中配置:
[mysqld]                     //新添加一行如下参数
max_connections=1000

重启mysql服务即可
7)zabbix的web界面中的cpu监控图中显示的负载是0.002-0.0014,这显然是不对的,跟服务器上uptime现实的cpu负载不一致!
解决办法:
修改模板(Template OS Linux)--监控项--Processor load (1 min average per core)--键值:
把 system.cpu.load[percpu,avg1] 改为 system.cpu.load[all,avg1]
8)zabbix_server.log里出现如下报错:
zabbix_server.log里出现如下报错:
95213:20180101:154323.271 cannot send list of active checks to "10.0.8.20": host [jumpserver01.kevin.cn] not found
95212:20180101:154323.549 cannot send list of active checks to "10.0.56.21": host [cx-app02.kevin.cn] not found
95216:20180101:154324.768 cannot send list of active checks to "10.0.54.21": host [bl2-app02.kevin.cn] not found
95212:20180101:154325.072 cannot send list of active checks to "10.0.52.22": host [nc-app02.kevin.cn] not found
原因分析:
zabbix_agentd.conf文件中配置的Hostname内容和zabbix的web界面"配置"->"主机"的主机名称配置不一致导致的,修改成一致内容即可!
9)zabbix_server.log里出现如下报错:
95219:20180101:162139.869 fping failed: /usr/local/sbin/fping: can't create raw socket (must run as root?) : Operation not permitted
95219:20180101:162140.871 fping failed: /usr/local/sbin/fping: can't create raw socket (must run as root?) : Operation not permitted
95219:20180101:162141.874 fping failed: /usr/local/sbin/fping: can't create raw socket (must run as root?) : Operation not permitte
解决办法:
1)确保zabbix的agent客户机的zabbix有sudo权限
[root@web01 ~]# chattr -i /etc/sudoers
[root@web01 ~]# chmod 640 /etc/sudoers
[root@web01 ~]# echo "zabbix  ALL=(ALL)      NOPASSWD: ALL" >> /etc/sudoers
[root@web01 ~]# chmod 440 /etc/sudoers
[root@web01 ~]# chattr +i /etc/sudoers

2)修改zabbix的server服务器端fping的权限 ,这一步很重要!!
[root@zabbix01 ~]# ll /usr/local/sbin/fping
-rwxr-xr-x 1 root root 67110 12月 11 17:18 /usr/local/sbin/fping
[root@zabbix01 ~]# chmod u+s /usr/local/sbin/fping

然后切换到zabbix用户下进行测试
[root@zabbix01 ~]# su - zabbix
[zabbix@zabbix01 ~]$ /usr/local/sbin/fping -s oa-mob01.kevin.cn
oa-mob01.kevin.cn is alive

       1 targets
       1 alive
       0 unreachable
       0 unknown addresses

       0 timeouts (waiting for response)
       1 ICMP Echos sent
       1 ICMP Echo Replies received
       0 other ICMP received

 0.58 ms (min round trip time)
 0.58 ms (avg round trip time)
 0.58 ms (max round trip time)
        0.001 sec (elapsed real time

如果返回 XX.XX.XX.XX is alive,那说明是OK的了!
10)问题说明:在一台zabbix被监控服务器上(64位centos6.8系统,64G内容)启动zabbix_agent,发现进程无法启动,10050端口没有起来!
启动zabbix_agent进程没有报错,但10050端口没有正常启动起来。
[root@ctl ~]# /usr/local/zabbix/sbin/zabbix_agentd
[root@ctl ~]# ps -ef|grep zabbix_agent
root 27506 27360 0 11:07 pts/5 00:00:00 grep --color zabbix
[root@ctl etc]# lsof -i:10050
查看/usr/local/zabbix/logs/zabbix_agentd.log日志,发现报错如下:
................
27667:20161027:111554.851 cannot allocate shared memory of size 657056: [28] No space left on device
27667:20161027:111554.851 cannot allocate shared memory for collector
..............
原因分析:
这是因为内核对share memory的限制造成的。
处理过程记录:
[root@ctl logs]# ipcs -l
------ Shared Memory Limits --------
max number of segments = 4096
max seg size (kbytes) = 1940588
max total shared memory (kbytes) = 8388608
min seg size (bytes) = 1
------ Semaphore Limits --------
max number of arrays = 128
max semaphores per array = 250
max semaphores system wide = 32000
max ops per semop call = 100
semaphore max value = 32767
------ Messages: Limits --------
max queues system wide = 32768
max size of message (bytes) = 65536
default max size of queue (bytes) = 65536
从上面命令结果可以看到:
max total shared memory设置的是2M,max seg size设置的是8M,这显然不够allocate(分配)zabbix_agent启动所使用的内存。
查看目前的共享内存设置,
[root@ctl logs]# sysctl -a|grep shm
kernel.shmmax = 1987162112
kernel.shmall = 2097152
kernel.shmmni = 4096
kernel.shm_rmid_forced = 0
vm.hugetlb_shm_group = 0
其中kernel.shmall代表总共能分配的共享内存,这里是2G,kernel.shmax代表单个段能allocate的内存(以字节为单位),这里是2M,所以肯定有问题!
然后查看/etc/sysctl.conf
[root@ctl logs]# cat /etc/sysctl.conf
........
kernel.shmall = 2097152
kernel.shmmax = 1987162112
显然在sysctl.conf文件里设置的kernel.shamll和kernel.shmmax参数的值小了。
--------------------------------------------------------------------------------------------------------------------------------------------------
本机是64位的centos 6.8系统,64G内存,查看其它同系统的被监控服务器发现:
[root@bastion-IDC ~]# cat /etc/sysctl.conf
........
kernel.shmmax = 68719476736
kernel.shmall = 4294967296
[root@ctl logs]# ipcs -l
------ Shared Memory Limits --------
max number of segments = 4096
max seg size (kbytes) = 67108864
max total shared memory (kbytes) = 17179869184
min seg size (bytes) = 1
------ Semaphore Limits --------
max number of arrays = 128
max semaphores per array = 250
max semaphores system wide = 32000
max ops per semop call = 100
semaphore max value = 32767
------ Messages: Limits --------
max queues system wide = 32768
max size of message (bytes) = 65536
default max size of queue (bytes) = 65536
即64位的centos6系统(64G)的上面两个参数的默认值是64G和4G,设置的都是系统能识别的最大内存。
---------------------------------------------------------------------------------------------------------------------------------------------------
现在只需要在本机调大这两个参数值即可解决问题!
[root@ctl logs]# cat /etc/sysctl.conf
........
kernel.shmmax = 68719476736
kernel.shmall = 4294967296
kernel.msgmnb = 65536
kernel.msgmax = 65536
执行sysctl -p生效
[root@ctl logs]# sysctl -p
再次查看发现已经修改成功了!
[root@ctl logs]# sysctl -a|grep shm
kernel.shmmax = 68719476736
kernel.shmall = 4294967296
kernel.shmmni = 4096
kernel.shm_rmid_forced = 0
vm.hugetlb_shm_group = 0
[root@ctl logs]# ipcs -l
------ Shared Memory Limits --------
max number of segments = 4096
max seg size (kbytes) = 67108864
max total shared memory (kbytes) = 17179869184
min seg size (bytes) = 1
------ Semaphore Limits --------
max number of arrays = 128
max semaphores per array = 250
max semaphores system wide = 32000
max ops per semop call = 100
semaphore max value = 32767
------ Messages: Limits --------
max queues system wide = 32768
max size of message (bytes) = 65536
default max size of queue (bytes) = 65536
最后重新启动zabbix,发现10050端口顺利启动了:
[root@ctl ~]# /usr/local/zabbix/sbin/zabbix_agentd
[root@ctl logs]# ps -ef|grep zabbix
zabbix 27776 1 0 11:22 ? 00:00:00 /usr/local/zabbix/sbin/zabbix_agentd
zabbix 27777 27776 0 11:22 ? 00:00:00 /usr/local/zabbix/sbin/zabbix_agentd: collector [idle 1 sec]
zabbix 27778 27776 0 11:22 ? 00:00:00 /usr/local/zabbix/sbin/zabbix_agentd: listener #1 [waiting for connection]
zabbix 27779 27776 0 11:22 ? 00:00:00 /usr/local/zabbix/sbin/zabbix_agentd: listener #2 [waiting for connection]
zabbix 27780 27776 0 11:22 ? 00:00:00 /usr/local/zabbix/sbin/zabbix_agentd: listener #3 [waiting for connection]
zabbix 27781 27776 0 11:22 ? 00:00:00 /usr/local/zabbix/sbin/zabbix_agentd: active checks #1 [idle 1 sec]
root 28188 27360 0 11:48 pts/5 00:00:00 grep --color zabbix
[root@ctl logs]# lsof -i:10050
COMMAND PID USER FD TYPE DEVICE SIZE/OFF NODE NAME
zabbix_ag 27776 zabbix 4u IPv4 112357384 0t0 TCP *:zabbix-agent (LISTEN)
zabbix_ag 27777 zabbix 4u IPv4 112357384 0t0 TCP *:zabbix-agent (LISTEN)
zabbix_ag 27778 zabbix 4u IPv4 112357384 0t0 TCP *:zabbix-agent (LISTEN)
zabbix_ag 27779 zabbix 4u IPv4 112357384 0t0 TCP *:zabbix-agent (LISTEN)
zabbix_ag 27780 zabbix 4u IPv4 112357384 0t0 TCP *:zabbix-agent (LISTEN)
zabbix_ag 27781 zabbix 4u IPv4 112357384 0t0 TCP *:zabbix-agent (LISTEN)
[root@ctl logs]#
总结:
其实不止是zabbix程序启动会碰到这个问题,很多程序出现此错误也能使用该方法解决,就是因为内核对资源的限制问题。
11)zabbix启动的时候报错:/usr/local/zabbix/sbin/zabbix_agentd: error while loading shared libraries: libpcre.so.0: cannot open shared object file: No such file or directory
[root@test ~]# /usr/local/zabbix/sbin/zabbix_agentd -c /usr/local/zabbix/etc/zabbix_agentd.conf
/usr/local/zabbix/sbin/zabbix_agentd: error while loading shared libraries: libpcre.so.0: cannot open shared object file: No such file or directory

解决办法:
[root@test ~]# find / -name libpcre.so*
/usr/lib64/libpcre.so.1.2.0
/usr/lib64/libpcre.so.1
/usr/lib/libpcre.so.1.2.0
/usr/lib/libpcre.so.1
[root@test ~]# ln -s /usr/lib64/libpcre.so.1 /usr/lib64/libpcre.so.0
[root@test ~]# cat /etc/ld.so.conf
include ld.so.conf.d/*.conf
/usr/lib64/libpcre.so.0
[root@test ~]# ldconfig
[root@test ~]# /usr/local/zabbix/sbin/zabbix_agentd -c /usr/local/zabbix/etc/zabbix_agentd.conf
[root@test ~]# lsof -i:10050
COMMAND     PID   USER   FD   TYPE DEVICE SIZE/OFF NODE NAME
zabbix_ag 21405 zabbix    4u  IPv4  83991      0t0  TCP *:zabbix-agent (LISTEN)
zabbix_ag 21406 zabbix    4u  IPv4  83991      0t0  TCP *:zabbix-agent (LISTEN)
zabbix_ag 21407 zabbix    4u  IPv4  83991      0t0  TCP *:zabbix-agent (LISTEN)
zabbix_ag 21408 zabbix    4u  IPv4  83991      0t0  TCP *:zabbix-agent (LISTEN)
zabbix_ag 21409 zabbix    4u  IPv4  83991      0t0  TCP *:zabbix-agent (LISTEN)
zabbix_ag 21410 zabbix    4u  IPv4  83991      0t0  TCP *:zabbix-agent (LISTEN)