摘要:
DOCTYPE html˃测试结果摘要。失败{颜色:红色;7em;文本对齐:居中;}成功{颜色:绿色;7emem;文本对齐:居中;}。详细信息列经过{7em;text align:center;}。详细信息col msg{7em;文本对齐:中心;背景颜色:#ccc;}TestStatistics案例名称˃执行结果{%forrinresults%}˂!
项目目录
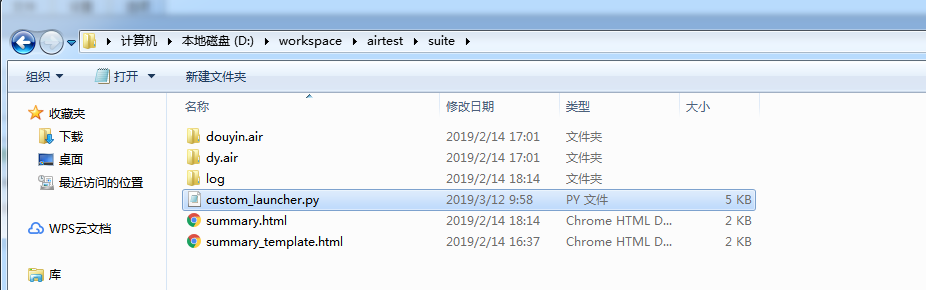
根目录:D:workspaceairtestsuite
脚本:douyin.air,dy.air
日志目录:log
日志目录由custom_launcher.py自动生成,custom_launcher.py目录:D:workspaceairtestsuitecustom_launcher.py,即在根目录下
summary.html:自动生成的
summary_template.html:复制进去即可
summary_template.html内容如下:
<!DOCTYPE html>
<html>
<head>
    <title>测试结果汇总</title>
    <style>
        .fail {
            color: red;
             7emem;
            text-align: center;
        }
        .success {
            color: green;
             7emem;
            text-align: center;
        }
        .details-col-elapsed {
             7em;
            text-align: center;
        }
        .details-col-msg {
             7em;
            text-align: center;
            background-color:#ccc;
        }

    </style>
</head>
<body>
<div>
<div><h2>Test Statistics</h2></div>

    <table width="800" border="thin" cellspacing="0" cellpadding="0">
        <tr  width="600">
            <th width="300" class='details-col-msg'>案例名称</th>
            <th class='details-col-msg'>执行结果</th>
        </tr>
        {% for r in results %}
        <tr width="600">
 <!-标黄色的需要自定义的内容->
            <td class='details-col-elapsed'><a href="file:///D:/workspace/airtest/suite/log/{{r.name}}/log.html" target="view_window">{{r.name}}</a></td>
            <td class="{{'success' if r.result else 'fail'}}">{{"成功" if r.result else "失败"}}</td>
        </tr>
        {% endfor %}
    </table>
</div>
</body>
</html>
custom_launcher.py目录:D:workspaceairtestsuitecustom_launcher.py,即在根目录下
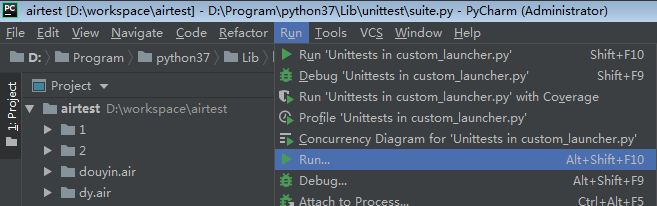
custom_launcher.py直接执行即可,如下
custom_launcher.py内容:
from airtest.cli.runner import AirtestCase, run_script
from argparse import *
import airtest.report.report as report
import jinja2
import shutil
import os
import io


class CustomAirtestCase(AirtestCase):
    def setUp(self):
        #执行脚本前的前置环境准备操作
        print("custom setup")
        # add var/function/class/.. to globals
        # self.scope["hunter"] = "i am hunter"
        # self.scope["add"] = lambda x: x+1
        # exec setup script
        # self.exec_other_script("setup.owl")
        for i in range(100):
             print("1===================================================================")
        super(CustomAirtestCase, self).setUp()


    def tearDown(self):
        #执行脚本后的后置环境恢复操作
        print("custom tearDown")
        # exec teardown script
        # self.exec_other_script("teardown.owl")
        for j in range(100):
            print("2222222222222222222222222222222222222222222222222222222222222222222222222222")
        super(CustomAirtestCase, self).setUp()

    #root_dir是项目根目录,device是默认连接设备,可以把常用的设备设置成默认的设备
    def run_air(self, root_dir='D:\workspace\airtest\suite', device=['android://127.0.0.1:5037/2476a88e']):
        # 聚合结果
        results = []
        # 获取所有用例集
        root_log = root_dir + '\' + 'log'
        if os.path.isdir(root_log):
            shutil.rmtree(root_log)
        else:
            os.makedirs(root_log)
            print(str(root_log) + 'is created')

        for f in os.listdir(root_dir):
            if f.endswith(".air"):
                # f为.air案例名称:douyin.air
                airName = f
                script = os.path.join(root_dir, f)
                # script为.air的全路径:D:workspaceairtestsuitedouyin.air
                print(script)
                # log为日志存放路径和名称:D:workspaceairtestsuitelogdouyin
                log = os.path.join(root_dir, 'log' + '\' + airName.replace('.air', ''))
                print(log)
                # 判断case日志在不在,在,则删除目录中的内容,否则,新建每个脚本log目录
                if os.path.isdir(log):
                    shutil.rmtree(log)
                else:
                    os.makedirs(log)
                    print(str(log) + 'is created')
                # 日志的输出文件log:D:workspaceairtestsuitelogdouyinlog.html
                output_file = log + '\' + 'log.html'
                # 命令行参数,解析获得后的数据格式Namespace(device=device, log=log, recording=None, script=script)
                # python -m airtest run D:workspaceairtestdy.air  --device Android://127.0.0.1:5037/B2T5T16C06000021  --log "D:workspaceairtestdouyin.air2"
                args = Namespace(device=device, log=log, recording=None, script=script)
                try:
                    run_script(args, AirtestCase)
                except:
                    pass
                finally:
                    rpt = report.LogToHtml(script, log)
                    # 结果模板渲染,"log_template.html"自带的模板,output_file日志存放路径
                    rpt.report("log_template.html", output_file=output_file)
                    # 结果保存在result对象中
                    result = {}
                    result["name"] = airName.replace('.air', '')
                    result["result"] = rpt.test_result
                    results.append(result)
        # 根据summary_template.html模板,生成聚合报告
        env = jinja2.Environment(
            loader=jinja2.FileSystemLoader(root_dir),
            extensions=(),
            autoescape=True
        )
        # summary_template.html相对路径
        template = env.get_template("summary_template.html", root_dir)
        html = template.render({"results": results})
        output_file = os.path.join(root_dir, "summary.html")
        with io.open(output_file, 'w', encoding="utf-8") as f:
            f.write(html)
        print(output_file)


if __name__ == '__main__':
    test = CustomAirtestCase()
    #连接的设备
    device = ['android://127.0.0.1:5037/2476a88e']
    #项目根目录
    test.run_air('D:\workspace\airtest\suite', device)
总结:
按照我的目录结构来就可以了, CMD 执行 python custom_launcher.py