https://coding.net/u/aminglinux/p/nginx/git/blob/master/proxy/z_proxy.md
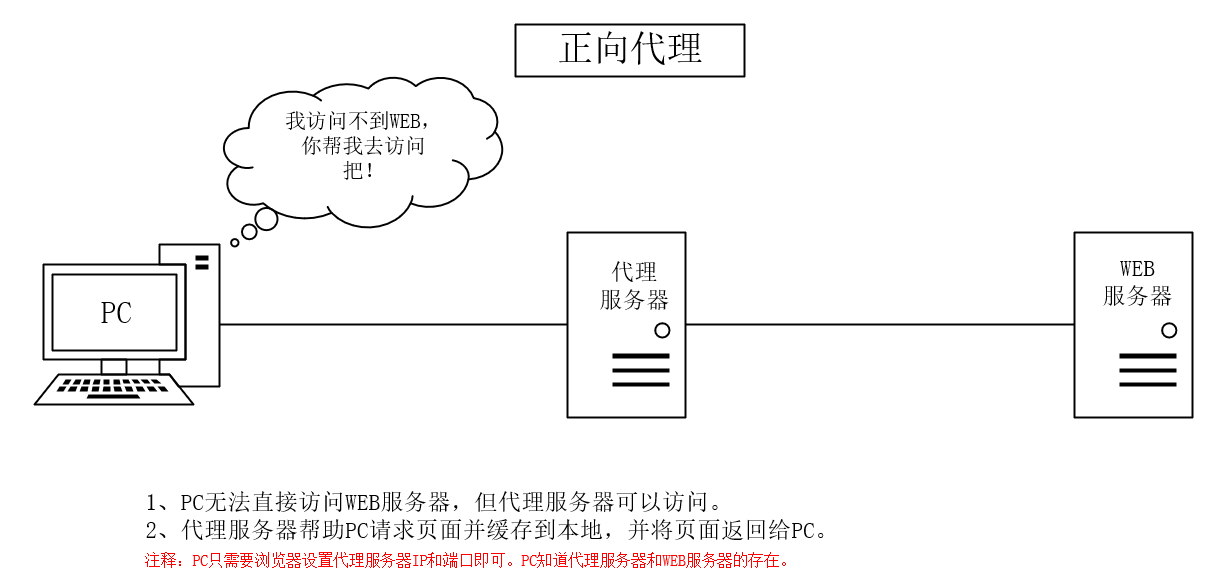


Nginx正向代理使用场景并不多见。 需求场景1: 如果在机房中,只有一台机器可以联网,其他机器只有内网,内网的机器想用使用yum安装软件包,在能能联网的机器上配置一个正向代理即可。
Nginx正向代理配置文件,我们直接访问百度可以访问,我们把百度域名绑定到本地也可以访问,这就是正向代理成功了
- resolver
- 语法:resolver address; address为DNS服务器的地址,国内通用的DNS 119.29.29.29为dnspod公司提供。 国际通用DNS 8.8.8.8或者8.8.4.4为google提供。 其他可以参考 http://dns.lisect.com/ 示例:resolver 119.29.29.29;
- default_server之所以要设置为默认虚拟主机,是因为这样就不用设置server_name了,任何域名解析过来都可以正常访问。
- proxy_pass该指令用来设置要代理的目标url,正向代理服务器设置就保持该固定值即可。关于该指令的详细解释在反向代理配置中。
[root@centos-03 vhost]# mv default.conf default.conf.bak
[root@centos-03 vhost]# vim zp.conf ^C
[root@centos-03 vhost]# cat zp.conf
server {
    listen 80 default_server;
    resolver 119.29.29.29; (DNS解析访问过来的域名)
    location /
    {
        proxy_pass http://$host$request_uri;
    }
}
[root@centos-03 vhost]# /usr/local/nginx/sbin/nginx -t
nginx: the configuration file /usr/local/nginx/conf/nginx.conf syntax is ok
nginx: configuration file /usr/local/nginx/conf/nginx.conf test is successful
[root@centos-03 vhost]# /usr/local/nginx/sbin/nginx -s reload
[root@centos-03 vhost]# curl www.baidu.com -I
HTTP/1.1 200 OK
Accept-Ranges: bytes
Cache-Control: private, no-cache, no-store, proxy-revalidate, no-transform
Connection: Keep-Alive
Content-Length: 277
Content-Type: text/html
Date: Fri, 27 Jul 2018 03:30:11 GMT
Etag: "575e1f5d-115"
Last-Modified: Mon, 13 Jun 2016 02:50:05 GMT
Pragma: no-cache
Server: bfe/1.0.8.18

[root@centos-03 vhost]# curl -x127.0.0.1:80 www.baidu.com -I
HTTP/1.1 200 OK
Server: nginx/1.14.0
Date: Fri, 27 Jul 2018 10:23:10 GMT
Content-Type: text/html
Content-Length: 277
Connection: keep-alive
Accept-Ranges: bytes
Cache-Control: private, no-cache, no-store, proxy-revalidate, no-transform
Etag: "575e1f5c-115"
Last-Modified: Mon, 13 Jun 2016 02:50:04 GMT
Pragma: no-cache

[root@centos-03 vhost]#
https://coding.net/u/aminglinux/p/nginx/git/blob/master/proxy/f_proxy.md
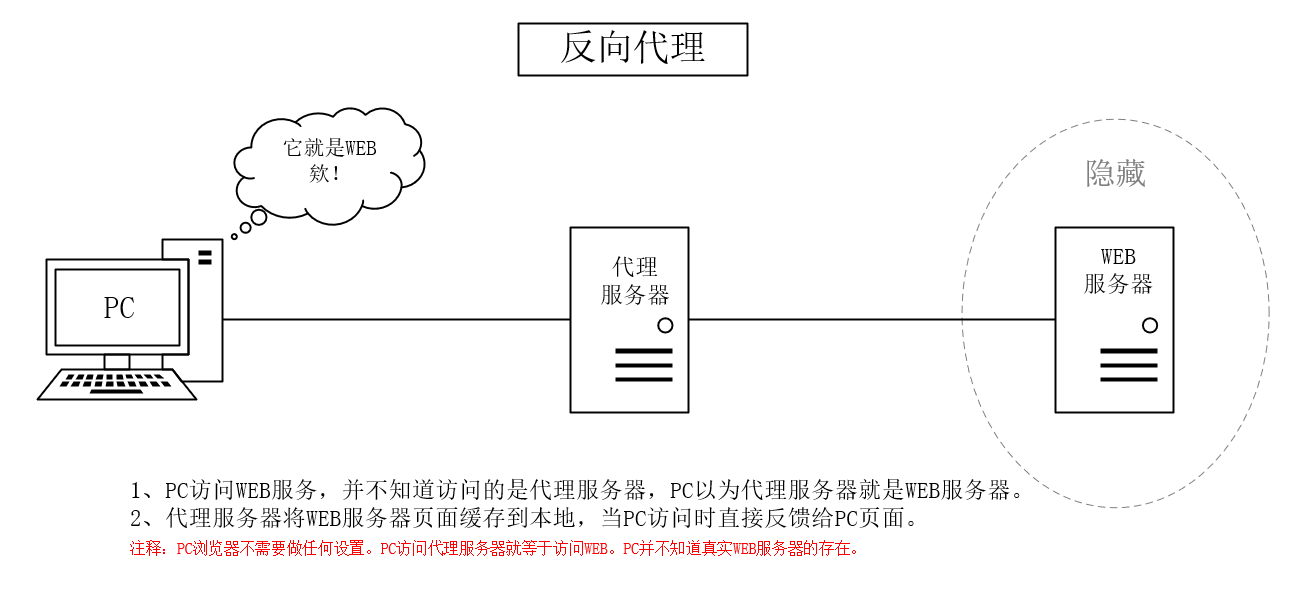
Nginx反向代理在生产环境中使用很多的,用的最多的负载均衡。
场景1: 域名没有备案,可以把域名解析到香港一台云主机上,在香港云主机做个代理,而网站数据是在大陆的服务器上。
1.创建反向代理配置文件并创建目录
[root@centos-03 vhost]# vim fp.conf ^C
[root@centos-03 vhost]# cat fp.conf
server
{
    listen 80;
    server_name www.test.com; (被代理的域名)

    location /
    {
        proxy_pass http://127.0.0.1:8080/; (被代理域名的ip)
        proxy_set_header Host   $host;
        proxy_set_header X-Real-IP      $remote_addr;
        proxy_set_header X-Forwarded-For $proxy_add_x_forwarded_for;
    }
}
[root@centos-03 vhost]# vim test.com.conf ^C
[root@centos-03 vhost]# cat test.com.conf
server
{
        listen 8080;
        server_name www.test.com;
        root /data/wwwroot/test.com;
        index index.html;

}
[root@centos-03 vhost]# mkdir /data/wwwroot/test.com
[root@centos-03 vhost]# echo "test.com_8080" > !$/index.html
echo "test.com_8080" > /data/wwwroot/test.com/index.html
[root@centos-03 vhost]#
2.我们再做一个default
[root@centos-03 vhost]# cp test.com.conf default_8080.conf^C
[root@centos-03 vhost]# vim default_8080.conf ^C
[root@centos-03 vhost]# cat default_8080.conf
server
{
        listen 8080 default_server;
        root /data/wwwroot/test.com;
        index index.html;
        location /
        {
                echo "8080 default";
        }
}
[root@centos-03 vhost]#
[root@centos-03 vhost]# /usr/local/nginx/sbin/nginx -t
nginx: the configuration file /usr/local/nginx/conf/nginx.conf syntax is ok
nginx: configuration file /usr/local/nginx/conf/nginx.conf test is successful
[root@centos-03 vhost]# /usr/local/nginx/sbin/nginx -s reload
[root@centos-03 vhost]#
[root@centos-03 vhost]# curl -x127.0.0.1:8080 www.test.com
test.com_8080
[root@centos-03 vhost]# curl 127.0.0.1:8080
8080 default
[root@centos-03 vhost]#
3.测试80端口已经代理到了8080下
[root@centos-03 vhost]# curl -x127.0.0.1:80 www.test.com
test.com_8080
[root@centos-03 vhost]#
4.我们将fp.conf的配置修改下,访问的结果变了
[root@centos-03 vhost]# vim fp.conf ^C
[root@centos-03 vhost]# cat fp.conf
server
{
    listen 80;
    server_name www.test.com;

    location /
    {
        proxy_pass http://127.0.0.1:8080/;
        #proxy_set_header Host   $host;
        #proxy_set_header X-Real-IP      $remote_addr;
        #proxy_set_header X-Forwarded-For $proxy_add_x_forwarded_for;
    }
}
[root@centos-03 vhost]# /usr/local/nginx/sbin/nginx -s reload
[root@centos-03 vhost]# curl -x127.0.0.1:80 www.test.com (访问的是curl 127.0.0.1:8080)
8080 default
[root@centos-03 vhost]#
结论:在没有设置proxy_set_header Host的情况下访问的是proxy_pass的值,加了proxy_set_header Host访问的就是fp.conf配置中的www.test.com指定的ip地址就是127.0.0.1:8080(相当于curl -x127.0.0.1:80 www.test.com)
nginx反向代理-proxy_pass在正向代理中,已经使用过该指令。
格式很简单: proxy_pass URL;
其中URL包含:传输协议(http://, https://等)、主机名(域名或者IP:PORT)、uri。
示例如下:
proxy_pass http://www.aminglinux.com/;
proxy_pass http://192.168.200.101:8080/uri;
proxy_pass unix:/tmp/www.sock;
对于proxy_pass的配置有几种情况需要注意。
示例2:
location /aming/
{
proxy_pass http://192.168.1.10;
...
}
示例3:
location /aming/
{
proxy_pass http://192.168.1.10/;
...
}
示例4:
location /aming/
{
proxy_pass http://192.168.1.10/linux/;
...
}
示例5:
location /aming/
{
proxy_pass http://192.168.1.10/linux;
...
}
假设server_name为www.aminglinux.com
当请求http://www.aminglinux.com/aming/a.html的时候,以上示例2-5分别访问的结果是
示例2:http://192.168.1.10/aming/a.html
示例3:http://192.168.1.10/a.html
示例4:http://192.168.1.10/linux/a.html
示例5:http://192.168.1.10/linuxa.html
proxy_set_header用来设定被代理服务器接收到的header信息。

语法:proxy_set_header field value;
field为要更改的项目,也可以理解为变量的名字,比如host
value为变量的值

如果不设置proxy_set_header,则默认host的值为proxy_pass后面跟的那个域名或者IP(一般写IP),
比如示例4,请求到后端的服务器上时,完整请求uri为:http://192.168.1.10/linux/a.html

如果设置proxy_set_header,如 proxy_set_header host $host;
比如示例4,请求到后端的服务器完整uri为:http://www.aminglinux.com/linux/a.html

proxy_set_header X-Real-IP $remote_addr;和proxy_set_header X-Forwarded-For $proxy_add_x_forwarded_for;
用来设置被代理端接收到的远程客户端IP,如果不设置,则header信息中并不会透传远程真实客户端的IP地址。
可以用如下示例来测试:

示例6(被代理端)
server{
	listen 8080;
	server_name www.aminglinux.com;
	root /tmp/123.com_8080;
	index index.html;
        location /linux/ {
	    echo "$host";
	    echo $remote_addr;
	    echo $proxy_add_x_forwarded_for;
	}
}

示例7(代理服务器上)
server {
    listen 80;
    server_name www.aminglinux.com;

    location /aming/
    {
	proxy_pass http://192.168.1.10:8080/linux/;
	proxy_set_header host $host;
	proxy_set_header X-Real-IP      $remote_addr;
    proxy_set_header X-Forwarded-For $proxy_add_x_forwarded_for;
    }
}
1.A->B-C A是客户端,B反向代理服务器,C真正的server,C日志中记录的remoteaddr是B的ip地址,我们想要A的地址需要用$proxy_add_x_forwarded_for
[root@centos-03 vhost]# vim test.com.conf ^C
[root@centos-03 vhost]# cat test.com.conf
server
{
        listen 8080;
        server_name www.test.com;
        root /data/wwwroot/test.com;
        index index.html;
        location /
        {
                echo $remote_addr;
                echo $proxy_add_x_forwarded_for;
        }
}
[root@centos-03 vhost]#
[root@centos-03 vhost]# vim fp.conf ^C
[root@centos-03 vhost]# cat fp.conf
server
{
    listen 80;
    server_name www.test.com;

    location /
    {
        proxy_pass http://127.0.0.1:8080/;
        proxy_set_header Host   $host;
        #proxy_set_header X-Real-IP      $remote_addr; (先注释掉)
        #proxy_set_header X-Forwarded-For $proxy_add_x_forwarded_for;(先注释掉)
} } [root@centos-03 vhost]#
2.测试,只是记录了127.0.0.1
[root@centos-03 vhost]# /usr/local/nginx/sbin/nginx -s reload
[root@centos-03 vhost]# curl -x127.0.0.1:80 www.test.com
127.0.0.1
127.0.0.1
[root@centos-03 vhost]#
[root@centos-03 vhost]# curl -x192.168.242.133:80 www.test.com
127.0.0.1
127.0.0.1
[root@centos-03 vhost]#
3.我们把注释掉的打开再测试,远程ip也记录到了
[root@centos-03 vhost]# vim fp.conf ^C
[root@centos-03 vhost]# cat fp.conf
server
{
    listen 80;
    server_name www.test.com;

    location /
    {
        proxy_pass http://127.0.0.1:8080/;
        proxy_set_header Host   $host;
        proxy_set_header X-Real-IP      $remote_addr;
        proxy_set_header X-Forwarded-For $proxy_add_x_forwarded_for;
    }
}
[root@centos-03 vhost]# /usr/local/nginx/sbin/nginx -s reload
[root@centos-03 vhost]# curl -x192.168.242.133:80 www.test.com
127.0.0.1
192.168.242.133, 127.0.0.1
[root@centos-03 vhost]#
该指令用来修改被代理服务器返回的响应头中的Location头域和“refresh”头域。
语法结构为:
proxy_redirect redirect replacement;
proxy_redirect default;
proxy_redirect off;

示例8:
server {
    listen 80;
    server_name www.aminglinux.com;
    index  index.html;

    location /
    {
	proxy_pass http://127.0.0.1:8080;
	proxy_set_header host $host;
	proxy_set_header X-Real-IP      $remote_addr;
    proxy_set_header X-Forwarded-For $proxy_add_x_forwarded_for;
    }
}

当请求的链接为 http://www.aminglinux.com/aming
结果会返回301,定向到了 http://www.aminglinux.com:8080/aming/

注意:返回301有几个先决条件
1. location后面必须是/;
2. proxy_pass后面的URL不能加uri,只能是IP或者IP:port结尾,并不能以/结尾;
3. 访问的uri必须是一个真实存在的目录,如,这里的aming必须是存在的
4. 访问的时候,不能以/结尾,只能是 www.aminglinux.com/aming

虽然,这4个条件挺苛刻,但确实会遇到类似的请求。解决方法是,加一行proxy_redirect http://$host:8080/ /;

示例9:
server {
    listen 80;
    server_name www.aminglinux.com;
    index  index.html;

    location /
    {
	proxy_pass http://127.0.0.1:8080;
	proxy_set_header host $host;
	proxy_redirect http://$host:8080/ /;
	proxy_set_header X-Real-IP      $remote_addr;
    proxy_set_header X-Forwarded-For $proxy_add_x_forwarded_for;
    }
}
1.修改fp.conf
[root@centos-03 vhost]# vim fp.conf ^C
[root@centos-03 vhost]# cat fp.conf
server
{
    listen 80;
    server_name www.test.com;

    location /
    {
        proxy_pass http://127.0.0.1:8080;
        proxy_set_header Host   $host;
        proxy_set_header X-Real-IP      $remote_addr;
        proxy_set_header X-Forwarded-For $proxy_add_x_forwarded_for;
    }
}
[root@centos-03 vhost]# mkdir /data/wwwroot/test.com/test
[root@centos-03 vhost]# echo "test.com_test_8080_index" > /data/wwwroot/test.com/test/index.html
[root@centos-03 vhost]#
2.测试发现接口调整到了带8080端口的地址,这样我们就访问不到了
[root@centos-03 vhost]# vim test.com.conf ^C
[root@centos-03 vhost]# cat test.com.conf
server
{
        listen 8080;
        server_name www.test.com;
        root /data/wwwroot/test.com;
        index index.html;
}
[root@centos-03 vhost]# /usr/local/nginx/sbin/nginx -t
nginx: the configuration file /usr/local/nginx/conf/nginx.conf syntax is ok
nginx: configuration file /usr/local/nginx/conf/nginx.conf test is successful
[root@centos-03 vhost]# /usr/local/nginx/sbin/nginx -s reload
[root@centos-03 vhost]# curl -x192.168.242.133:80 www.test.com/test -I
HTTP/1.1 301 Moved Permanently
Server: nginx/1.14.0
Date: Fri, 27 Jul 2018 15:55:14 GMT
Content-Type: text/html
Content-Length: 185
Connection: keep-alive
Location: http://www.test.com:8080/test/

[root@centos-03 vhost]#
3.我们从日志中看下
[root@centos-03 vhost]# vim test.com.conf ^C
[root@centos-03 vhost]# cat test.com.conf
server
{
        listen 8080;
        server_name www.test.com;
        root /data/wwwroot/test.com;
        index index.html;
        access_log /tmp/456.log main;
}
[root@centos-03 vhost]# vim ../nginx.conf
[root@centos-03 vhost]#
    log_format  main  '$remote_addr - $remote_user [$time_local] "$request" '
                      '$status $body_bytes_sent "$http_referer" '
                      '"$http_user_agent" "$http_x_forwarded_for" $host $server_port';
[root@centos-03 vhost]# vim fp.conf ^C
[root@centos-03 vhost]# cat fp.conf
server
{
    listen 80;
    server_name www.test.com;
    access_log /tmp/proxy.log main;
    location /
    {
        proxy_pass http://127.0.0.1:8080;
        proxy_set_header Host   $host;
        proxy_set_header X-Real-IP      $remote_addr;
        proxy_set_header X-Forwarded-For $proxy_add_x_forwarded_for;
    }
}
[root@centos-03 vhost]#
[root@centos-03 vhost]# /etc/init.d/nginx restart
Restarting nginx (via systemctl):                          [  确定  ]
[root@centos-03 vhost]# curl -x192.168.242.133:80 www.test.com/test/
test.com_test_8080_index
[root@centos-03 vhost]# tail /tmp/456.log
127.0.0.1 - - [28/Jul/2018:00:17:59 +0800] "GET /test HTTP/1.0" 301 185 "-" "curl/7.29.0" "192.168.242.133" www.test.com 8080  (访问链接test后面不带/)
127.0.0.1 - - [28/Jul/2018:00:18:03 +0800] "GET /test/ HTTP/1.0" 200 25 "-" "curl/7.29.0" "192.168.242.133" www.test.com 8080   (访问链接test后面带/)
[root@centos-03 vhost]# tail /tmp/proxy.log
192.168.242.133 - - [28/Jul/2018:00:09:56 +0800] "HEAD HTTP://www.test.com/test HTTP/1.1" 301 0 "-" "curl/7.29.0" "-" www.test.com 80 (访问链接test后面不带/)
192.168.242.133 - - [28/Jul/2018:00:12:59 +0800] "GET HTTP://www.test.com/test/ HTTP/1.1" 200 25 "-" "curl/7.29.0" "-" www.test.com 80 (访问链接test后面带/)
[root@centos-03 vhost]#
4.这种问题怎么解决呢?添加redirect选项,这样调整的链接就没有8080了
[root@centos-03 vhost]# vim fp.conf ^C
[root@centos-03 vhost]# cat fp.conf
server
{
    listen 80;
    server_name www.test.com;
    access_log /tmp/proxy.log main;
    location /
    {
        proxy_pass http://127.0.0.1:8080;
        proxy_set_header Host   $host;
        proxy_set_header X-Real-IP      $remote_addr;
        proxy_set_header X-Forwarded-For $proxy_add_x_forwarded_for;
        proxy_redirect http://$host:8080/ /;
    }
}
[root@centos-03 vhost]# /usr/local/nginx/sbin/nginx -s reload
[root@centos-03 vhost]# curl -x192.168.242.133:80 www.test.com/test -I
HTTP/1.1 301 Moved Permanently
Server: nginx/1.14.0
Date: Fri, 27 Jul 2018 16:24:53 GMT
Content-Type: text/html
Content-Length: 185
Location: http://www.test.com/test/
Connection: keep-alive

[root@centos-03 vhost]#
https://coding.net/u/aminglinux/p/nginx/git/blob/master/proxy/bu_ca.md
nginx的proxy_buffering和proxy_cache
两个都是nginx代理中内存设置相关的参数。
proxy_buffering设置
proxy_buffering主要是实现被代理服务器的数据和客户端的请求异步。 为了方便理解,我们定义三个角色,A为客户端,B为代理服务器,C为被代理服务器。 当proxy_buffering开启,A发起请求到B,B再到C,C反馈的数据先到B的buffer上, 然后B会根据proxy_busy_buffer_size来决定什么时候开始把数据传输给A。在此过程中,如果所有的buffer被写满, 数据将会写入到temp_file中。 相反,如果proxy_buffering关闭,C反馈的数据实时地通过B传输给A。
以下配置,都是针对每一个http请求的。
1. proxy_buffering  on;
该参数设置是否开启proxy的buffer功能,参数的值为on或者off。
如果这个设置为off,那么proxy_buffers和proxy_busy_buffers_size这两个指令将会失效。
但是无论proxy_buffering是否开启,proxy_buffer_size都是生效的

2. proxy_buffer_size  4k;
该参数用来设置一个特殊的buffer大小的。
从被代理服务器(C)上获取到的第一部分响应数据内容到代理服务器(B)上,通常是header,就存到了这个buffer中。
如果该参数设置太小,会出现502错误码,这是因为这部分buffer不够存储header信息。建议设置为4k。

3. proxy_buffers  8  4k;
这个参数设置存储被代理服务器上的数据所占用的buffer的个数和每个buffer的大小。
所有buffer的大小为这两个数字的乘积。

4. proxy_busy_buffer_size 16k;
在所有的buffer里,我们需要规定一部分buffer把自己存的数据传给A,这部分buffer就叫做busy_buffer。
proxy_busy_buffer_size参数用来设置处于busy状态的buffer有多大。

对于B上buffer里的数据何时传输给A,我个人的理解是这样的:
1)如果完整数据大小小于busy_buffer大小,当数据传输完成后,马上传给A;
2)如果完整数据大小不少于busy_buffer大小,则装满busy_buffer后,马上传给A;

5. proxy_temp_path
语法:proxy_temp_path  path [level1 level2 level3]
定义proxy的临时文件存在目录以及目录的层级。

例:proxy_temp_path /usr/local/nginx/proxy_temp 1 2;
其中/usr/local/nginx/proxy_temp为临时文件所在目录,1表示层级1的目录名为一个数字(0-9),2表示层级2目录名为2个数字(00-99)

6. proxy_max_temp_file_size
设置临时文件的总大小,例如 proxy_max_temp_file_size 100M;

7. proxy_temp_file_wirte_size
设置同时写入临时文件的数据量的总大小。通常设置为8k或者16k。
[root@centos-03 vhost]# vim fp.conf ^C
[root@centos-03 vhost]# cat fp.conf
server
{
    listen 80;
    server_name www.test.com;
    access_log /tmp/proxy.log main;

    proxy_buffering on;
    proxy_buffer_size 4k;
    proxy_buffers 2 4k;
    proxy_busy_buffers_size 4k;
    proxy_temp_path /tmp/nginx_proxy_tmp 1 2;
    proxy_max_temp_file_size 20M;
    proxy_temp_file_write_size 8k;

    location /
    {
        proxy_pass http://127.0.0.1:8080;
        proxy_set_header Host   $host;
        proxy_set_header X-Real-IP      $remote_addr;
        proxy_set_header X-Forwarded-For $proxy_add_x_forwarded_for;
        proxy_redirect http://$host:8080/ /;
    }
}
[root@centos-03 vhost]# /usr/local/nginx/sbin/nginx -t
nginx: the configuration file /usr/local/nginx/conf/nginx.conf syntax is ok
nginx: configuration file /usr/local/nginx/conf/nginx.conf test is successful
[root@centos-03 vhost]# /usr/local/nginx/sbin/nginx -s reload
[root@centos-03 vhost]#
proxy_cache设置
proxy_cache将从C上获取到的数据根据预设规则存放到B上(内存+磁盘)留着备用,
A请求B时,B会把缓存的这些数据直接给A,而不需要再去向C去获取。

proxy_cache相关功能生效的前提是,需要设置proxy_buffering on;
proxy_cache主要参数
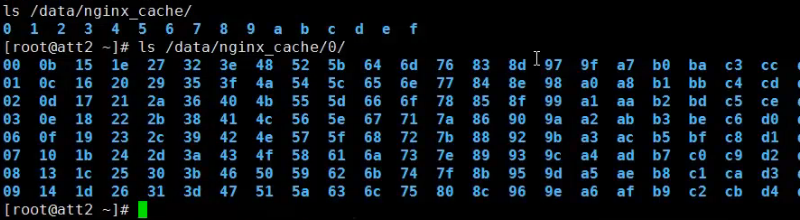
1. proxy_cache
语法:proxy_cache zone|off

默认为off,即关闭proxy_cache功能,zone为用于存放缓存的内存区域名称。
例:proxy_cache my_zone;

从nginx 0.7.66版本开始,proxy_cache机制开启后会检测被代理端的HTTP响应头中的"Cache-Control"、"Expire"头域。
如,Cache-Control为no-cache时,是不会缓存数据的。

2. proxy_cache_bypass
语法:proxy_cache_bypass string;

该参数设定,什么情况下的请求不读取cache而是直接从后端的服务器上获取资源。
这里的string通常为nginx的一些变量。

例:proxy_cahce_bypass $cookie_nocache $arg_nocache$arg_comment;
意思是,如果$cookie_nocache $arg_nocache$arg_comment这些变量的值只要任何一个不为0或者不为空时,
则响应数据不从cache中获取,而是直接从后端的服务器上获取。

3. proxy_no_cache
语法:proxy_no_cache string;

该参数和proxy_cache_bypass类似,用来设定什么情况下不缓存。

例:proxy_no_cache $cookie_nocache $arg_nocache $arg_comment;
表示,如果$cookie_nocache $arg_nocache $arg_comment的值只要有一项不为0或者不为空时,不缓存数据。

4. proxy_cache_key
语法:proxy_cache_key string;

定义cache key,如: proxy_cache_key $scheme$proxy_host$uri$is_args$args; (该值为默认值,一般不用设置)

5. proxy_cache_path
语法:proxy_cache_path path [levels=levels] keys_zone=name:size  [inactive=time] [max_size=size]

path设置缓存数据存放的路径;

levels设置目录层级,如levels=1:2,表示有两级子目录,第一个目录名取md5值的倒数第一个值,第二个目录名取md5值的第2和3个值。如下图:
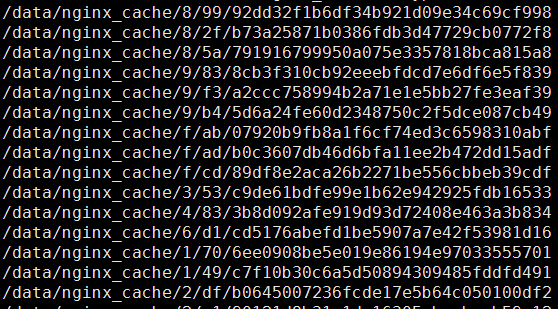
keys_zone设置内存zone的名字和大小,如keys_zone=my_zone:10m inactive设置缓存多长时间就失效,当硬盘上的缓存数据在该时间段内没有被访问过,就会失效了,该数据就会被删除,默认为10s。 max_size设置硬盘中最多可以缓存多少数据,当到达该数值时,nginx会删除最少访问的数据。 例:proxy_cache_path /data/nginx_cache/ levels=1:2 keys_zone=my_zone:10m inactive=300s max_size=5g
proxy_cache示例
http
{
    ...;

    proxy_cache_path /data/nginx_cache/ levels=1:2 keys_zone=my_zone:10m inactive=300s max_size=5g;

    ...;

    server
    {
        listen 80;
        server_name www.aminglinux.com;
        proxy_buffering on;
    	proxy_buffer_size 4k;
        proxy_buffers 2 4k;
        proxy_busy_buffers_size 4k;
        proxy_temp_path /tmp/nginx_proxy_tmp 1 2;
    	proxy_max_temp_file_size 20M;
    	proxy_temp_file_write_size 8k;


	    location /
	    {
	        proxy_cache my_zone;
	        proxy_pass      http://192.168.10.110:8080/;
            proxy_set_header Host   $host;
            proxy_set_header X-Real-IP      $remote_addr;
            proxy_set_header X-Forwarded-For $proxy_add_x_forwarded_for;

	    }

    }
}

说明:核心配置为proxy_cache_path那一行。
实验:
1.添加代理配置
[root@centos-03 vhost]# cd /usr/local/nginx/conf/vhost/
http {
    include       mime.types;
    default_type  application/octet-stream;

    log_format  main  '$remote_addr - $remote_user [$time_local] "$request" '
                      '$status $body_bytes_sent "$http_referer" '
                      '"$http_user_agent" "$http_x_forwarded_for" $host $server_port';

    #access_log  logs/access.log  main;

    sendfile        on;
    #tcp_nopush     on;

    #keepalive_timeout  0;
    keepalive_timeout  65;
    proxy_cache_path /data/nginx_cache/ levels=1:2 keys_zone=my_zone:10m inactive=300s max_size=5g;
    #gzip  on;
2.创建data/nginx_cache目录
[root@centos-03 vhost]# mkdir /data/nginx_cache/
[root@centos-03 vhost]#
3.编辑fp.conf添加proxy_cache
[root@centos-03 vhost]# vi fp.conf
location /
    {
        proxy_cache my_zone;
        proxy_pass http://127.0.0.1:8080;
        proxy_set_header Host   $host;
        proxy_set_header X-Real-IP      $remote_addr;
        proxy_set_header X-Forwarded-For $proxy_add_x_forwarded_for;
        proxy_redirect http://$host:8080/ /;
    }
4.因为我们的nginx是以nobody用户运行的,可能不能创建目录,所以我们需要给nobody一个有在/data/nginx_cache目录创建目录的权限
[root@centos-03 vhost]# /usr/local/nginx/sbin/nginx -t
nginx: the configuration file /usr/local/nginx/conf/nginx.conf syntax is ok
nginx: configuration file /usr/local/nginx/conf/nginx.conf test is successful
[root@centos-03 vhost]# /usr/local/nginx/sbin/nginx -s reload
[root@centos-03 vhost]# ls -l /data/nginx_cache/
总用量 0
[root@centos-03 vhost]# ps aux|grep nginx
root      16424  0.0  0.1  31584  1580 ?        Ss   00:12   0:00 nginx: master process /usr/local/nginx/sbin/nginx -c /usr/local/nginx/conf/nginx.conf
nobody    16499  0.0  0.1  31584  1460 ?        S    01:54   0:00 nginx: worker process
nobody    16500  0.0  0.1  31584  1216 ?        S    01:54   0:00 nginx: cache manager process
root      16504  0.0  0.0 112724   976 pts/0    R+   01:57   0:00 grep --color=auto nginx
[root@centos-03 vhost]# chown -R nobody:nobody /data/nginx_cache/
[root@centos-03 vhost]#
5.访问服务器,访问量小的情况不能生成缓存文件,我们这里只是展示下效果图
[root@centos-03 vhost]# curl -x127.0.0.1:80 www.test.com
test.com_8080
[root@centos-03 vhost]# ls /data/nginx_cache/
[root@centos-03 vhost]#