摘要:
换句话说,系统调用onDraw来实现自定义视图的渲染。OnMeasure:系统调用此方法,告诉您如何设置自定义视图的宽度和高度。以上三个是自定义视图的关键步骤---------------------------------------------其他方面:1.使用Paint对象和画布需要绘制自定义视图。首先,您应该确定图形的最终样式。2)然后,在自定义视图类中声明setter方法,如下所示:根据用户传递的属性重新绘制自定义view。
1.继承View组件,比如,LabelView继承了View
2.重写两个构造方法,比如,对于自定义View LabelView
LabelView(Context context),如果该自定义View是通过代码来实例化的,那么,就需要该构造方法;
LabelView(Context context, AttributeSet attrs),通过布局文件XML来使用该自定义View,那么,就需要该构造方法。
/**
* Constructor. This version is only needed if you will be instantiating
* the object manually (not from a layout XML file).
* @param context
*/
public LabelView(Context context) {
super(context);
initLabelView();
}
/**
* Construct object, initializing with any attributes we understand from a
* layout file. These attributes are defined in
* SDK/assets/res/any/classes.xml.
*
* @see android.view.View#View(android.content.Context, android.util.AttributeSet)
*/
public LabelView(Context context, AttributeSet attrs) {
super(context, attrs);
....
}
3.重写onDraw(Canvas canvas)和onMeasure(int measureWidth, int measureHeight)
onDraw(Canvas canvas),在实现自定义View的时候,你自己要创建一个Paint对象,用来设置自定义View的外观,尺寸,颜色。
然后,再在onDraw方法中,将图形绘制在系统传递过来的画布对象Canvas。
也就是说,系统回调onDraw来实现自定义View的渲染。
onMeasure(int measureWidth, int measureHeight),系统回调该方法,告诉你现在自定义View的宽度和高度是怎样设置的。
通过MeasureSpec.getMode(measureWidth),MeasureSpec.getSize(measureWidth)可以得到当前宽度的模式和大小。通过模式,可以知道用户设置的是wrap,match_parent,还是设置一个具体值,还说没有任何限制;通过大小,可以知道,当前系统检测到的当前View组件的宽度。
在得到这些信息后,你可以自己自定义,设置你想要的View组件的宽度和高度。
上面三个,就是自定义View的关键步骤。
-----------------------------------------------------------
其它方面:
1.Paint对象和Canvas的使用
要绘制一个自定义View,首先,你自己要确定出,图形的最终样式。按照最终样式,使用Paint对象,绘制出最终样式。Canvas对象的使用也需要关注。所以,在绘制图形的时候,要知道怎么使用Paint对象和Canvas绘制出最终的图形。
这方面的知识,需要补充。
2.属性设置
用户在使用你实现的自定义View的时候,它想自己定义View的属性,它想通过View提供的属性控制View的外观,尺寸,颜色等特征。那么,你实现的自定义View,就要提供给用户设置属性,并且要接收到用户传递过来的属性值,根据这些属性值构造出Paint对象。
这个的实现步骤:
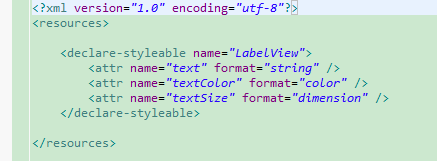
1).在res目录下的values目录,创建一个attrs.xml,然后,在里面添加属性描述。如下:声明了三个属性。

2).然后,在自定义View的类中,声明setter方法,如下:
根据用户传递过来的属性,重新绘制自定义VIew。requestLayout()的调用,会触发系统回调onMeasure(int measureWidth, int measureHeight)方法;invalidate()的调用,会触发系统回调onDraw()方法。
/**
* Sets the text to display in this label
*
* @param text
* The text to display. This will be drawn as one line.
*/
public void setText(String text) {
mText = text;
requestLayout();
invalidate();
}
3).在使用该自定义View的布局文件中,要声明该自定义View的命名空间,如下:
声明了一个命名空间
xmlns:app = "http://schemas.android.com/apk/res/com.example.customview"
红色部分,是该自定义View所在的包。
然后,你就可以使用app:text,这样命名空间加属性名的方式来设置属性。属性名,与attrs.xml中声明名字一样。
< RelativeLayout xmlns:android ="http://schemas.android.com/apk/res/android"
xmlns:tools= "http://schemas.android.com/tools"
xmlns:app= "http://schemas.android.com/apk/res/com.example.customview"
android:layout_width= "match_parent"
android:layout_height= "match_parent" >
<com.example.customview.LabelView
android:id ="@+id/oneLabelView"
android:layout_width ="wrap_content"
android:layout_height ="wrap_content"
app:text= "Somethine"
app:textColor ="#00868B"
app:textSize ="34sp" />
</ RelativeLayout>
---------------下面是实现例子--------------------------
import android.content.Context;
import android.content.res.TypedArray;
import android.graphics.Canvas;
import android.graphics.Paint;
import android.util.AttributeSet;
import android.view.View;

/**
* Example of how to write a custom subclass of View. LabelView is used to draw
* simple text views. Note that it does not handle styled text or right-to-left
* writing systems.
*
*/
public class LabelView extends View {
     private Paint mTextPaint;
     private String mText;
     private int mAscent;

     /**
     * Constructor. This version is only needed if you will be instantiating the
     * object manually (not from a layout XML file).
     *
     * @param context
     */
     public LabelView(Context context) {
          super(context);
          initLabelView();
     }

     /**
     * Construct object, initializing with any attributes we understand from a
     * layout file. These attributes are defined in
     * SDK/assets/res/any/classes.xml.
     *
     * @see android.view.View#View(android.content.Context,
     *      android.util.AttributeSet)
     */
     public LabelView(Context context, AttributeSet attrs) {
          super(context, attrs);
          initLabelView();

          TypedArray a = context.obtainStyledAttributes(attrs,
                    R.styleable.LabelView);

          CharSequence s = a.getString(R.styleable.LabelView_text);
          if (s != null) {
               setText(s.toString());
          }

          // Retrieve the color(s) to be used for this view and apply them.
          // Note, if you only care about supporting a single color, that you
          // can instead call a.getColor() and pass that to setTextColor().
          setTextColor(a.getColor(R.styleable.LabelView_textColor, 0xFF000000));

          int textSize = a.getDimensionPixelOffset(
                    R.styleable.LabelView_textSize, 0);
          if (textSize > 0) {
               setTextSize(textSize);
          }

          a.recycle();
     }

     private final void initLabelView() {
          mTextPaint = new Paint();
          mTextPaint.setAntiAlias(true);
          // Must manually scale the desired text size to match screen density
          mTextPaint.setTextSize(16 * getResources().getDisplayMetrics().density);
          mTextPaint.setColor(0xFF000000);
          setPadding(3, 3, 3, 3);
     }

     /**
     * Sets the text to display in this label
     *
     * @param text
     *            The text to display. This will be drawn as one line.
     */
     public void setText(String text) {
          mText = text;
          requestLayout();
          invalidate();
     }

     /**
     * Sets the text size for this label
     *
     * @param size
     *            Font size
     */
     public void setTextSize(int size) {
          // This text size has been pre-scaled by the getDimensionPixelOffset
          // method
          mTextPaint.setTextSize(size);
          requestLayout();
          invalidate();
     }

     /**
     * Sets the text color for this label.
     *
     * @param color
     *            ARGB value for the text
     */
     public void setTextColor(int color) {
          mTextPaint.setColor(color);
          invalidate();
     }

     /**
     * @see android.view.View#measure(int, int)
     */
     @Override
     protected void onMeasure(int widthMeasureSpec, int heightMeasureSpec) {
          setMeasuredDimension(measureWidth(widthMeasureSpec),
                    measureHeight(heightMeasureSpec));
     }

     /**
     * Determines the width of this view
     *
     * @param measureSpec
     *            A measureSpec packed into an int
     * @return The width of the view, honoring constraints from measureSpec
     */
     private int measureWidth(int measureSpec) {
          int result = 0;
          int specMode = MeasureSpec.getMode(measureSpec);
          int specSize = MeasureSpec.getSize(measureSpec);

          if (specMode == MeasureSpec.EXACTLY) {
               // We were told how big to be
               result = specSize;
          } else {
               // Measure the text
               result = (int) mTextPaint.measureText(mText) + getPaddingLeft()
                         + getPaddingRight();
               if (specMode == MeasureSpec.AT_MOST) {
                    // Respect AT_MOST value if that was what is called for by
                    // measureSpec
                    result = Math.min(result, specSize);
               }
          }

          return result;
     }

     /**
     * Determines the height of this view
     *
     * @param measureSpec
     *            A measureSpec packed into an int
     * @return The height of the view, honoring constraints from measureSpec
     */
     private int measureHeight(int measureSpec) {
          int result = 0;
          int specMode = MeasureSpec.getMode(measureSpec);
          int specSize = MeasureSpec.getSize(measureSpec);

          mAscent = (int) mTextPaint.ascent();
          if (specMode == MeasureSpec.EXACTLY) {
               // We were told how big to be
               result = specSize;
          } else {
               // Measure the text (beware: ascent is a negative number)
               result = (int) (-mAscent + mTextPaint.descent()) + getPaddingTop()
                         + getPaddingBottom();
               if (specMode == MeasureSpec.AT_MOST) {
                    // Respect AT_MOST value if that was what is called for by
                    // measureSpec
                    result = Math.min(result, specSize);
               }
          }
          return result;
     }

     /**
     * Render the text
     *
     * @see android.view.View#onDraw(android.graphics.Canvas)
     */
     @Override
     protected void onDraw(Canvas canvas) {
          super.onDraw(canvas);
          canvas.drawText(mText, getPaddingLeft(), getPaddingTop() - mAscent,
                    mTextPaint);
     }
}