在Windows下使用Linux常见的软件存在许多困难。选择之一是使用VMWare和VirtualBox之类的虚拟机软件,另一种选择是使用类UNIX模拟环境,如Cygwin,GNUWin32和MSYS2。
GNUWin32软件比较少。Cygwin软件还算比较多,但是使用体验糟糕。MSYS2使用体验较好,软件数目中等。而本文将介绍的WSL(windows下的Linux子系统)则是另一种选择。
由于WSL默认环境是Ubuntu,软件比较旧,所以建议通过alwsl脚本将其替换为ArchLinux环境。注意:WSL Arch Linux 已在 Microsoft Store 上可用,ArchLinux安装可以跳过以下步骤。
2.Alwsl安装ArchLinux环境2.1准备工作
* 先决条件:Windows10
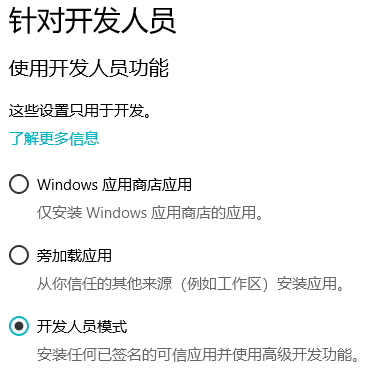
* 设置-->更新和安全-->针对开发人员-->启用“开发人员模式”
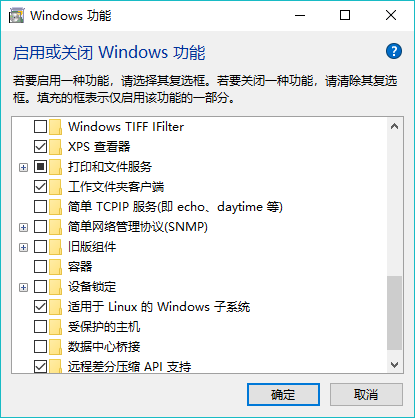
* 控制面板-->程序和功能-->启用或关闭Windows功能-->勾选“适用于Linux的Windows子系统”-->确认后重启
2.2 安装ArchLinux
* 获取alwsl脚本: git clone https://github.com/alwsl/alwsl
* 执行alwsl脚本:
E:alwsl>alwsl.bat install
alwsl (info): Cleaning old files.
alwsl (info): Installing base lxss fs from xenial server image. This will take A WHILE.
警告: lxrun.exe 仅用于配置适用于 Linux 的 Windows 子系统的旧分发版。
可以通过访问 Windows 应用商店来安装分发版:
https://aka.ms/wslstore

这将在 Windows 上安装由 Canonical 分发的 Ubuntu,其授权所遵循的条款请参见此链接:
https://aka.ms/uowterms

正在从 Windows 应用商店下载... 69%
* 耐心等待安装完成。注:脚本中 lxrun /install /y 这一步下载速度较慢,可能需要一个小时。
* 下载完成后开始安装。注:脚本中的waitforexit的会等待,可以删除 %HOMEPATH%AppDataLocallxss 目录下的 temp 目录。
* 安装完成,输入Y确认。
正在从 Windows 应用商店下载... 100%
正在提取文件系统,这将需要几分钟的时间...
安装成功!
文档在以下网址提供: https://aka.ms/wsldocs
alwsl (info): Downloading alwsl rootfs (this might take a while)...
alwsl (info): Copying rootfs to temporary extraction destination.
alwsl (info): Unsquashing rootfs.
Parallel unsquashfs: Using 4 processors
32080 inodes (29982 blocks) to write

[==============================================================================- ] 29889/29982  99%

created 24621 files
created 2004 directories
created 5668 symlinks
created 11 devices
created 0 fifos
alwsl (info): Transforming...
移动了         1 个目录。
移动了         1 个目录。
移动了         1 个目录。
alwsl (info): Checking installation success...
alwsl (info): Renaming shortcut.
alwsl (info): All done. Have fun
Do you want to start bash now? [Y,N]?
* 确认后的界面。
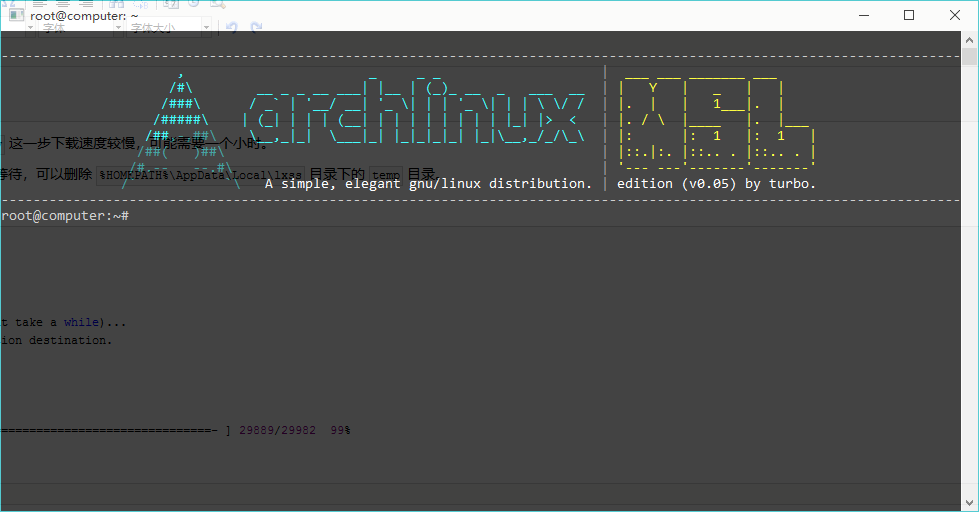
Do you want to start bash now? [Y,N]?Y

------------------------------------------------------------------------------------------------------------------------
                      ,                       _     _ _                    |  ___ ___ _______ ___
                     /#        __ _ _ __ ___| |__ | (_)_ __  _   ___  __  | |   Y   |   _   |   |
                    /###      / _` | '__/ __| '_ | | | '_ | | |  / /  | |.  |   |   1___|.  |
                   /#####    | (_| | | | (__| | | | | | | | | |_| |>  <   | |. /   |____   |.  |___
                  /##,-,##    \__,_|_|  \___|_| |_|_|_|_| |_|\__,_/_/\_  | |:      |:  1   |:  1   |
                 /##(   )##                                               | |::.|:. |::.. . |::.. . |
                /#.--   --.#                                              | '--- ---'-------'-------'
               /`           `   A simple, elegant gnu/linux distribution. | edition (v0.05) by turbo.
------------------------------------------------------------------------------------------------------------------------
root@computer:/mnt/e/alwsl#
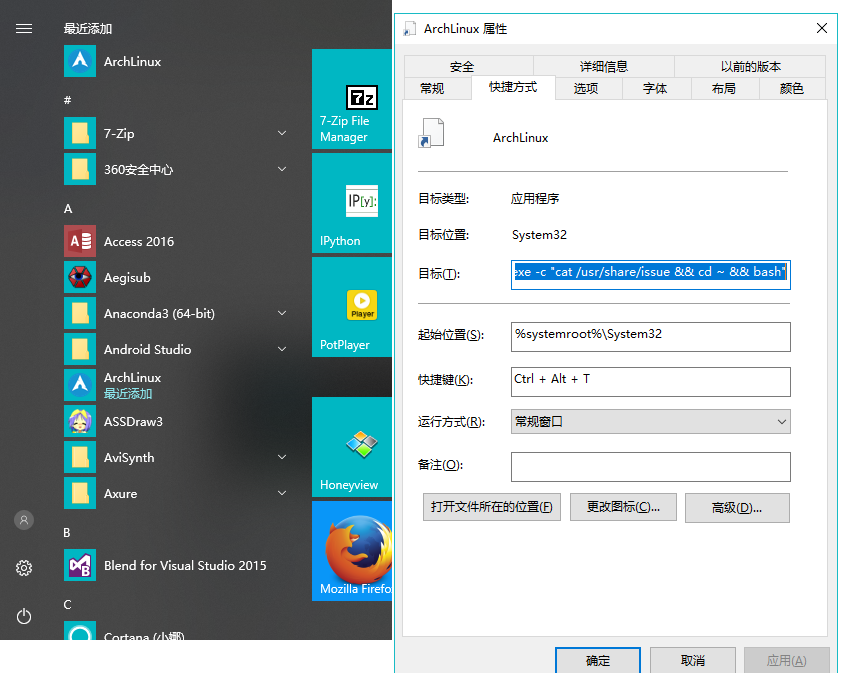
* 开始菜单ArchLinux快捷方式修改。右键->更多->打开文件位置。右键->属性->快捷方式->目标 内容修改为: %systemroot%System32ash.exe -c "cat /usr/share/issue && cd ~ && bash"
* 然后就可以开始愉快的玩耍了。
2.3 设置环境和更新软件
* 进入 %HOMEPATH%AppDataLocallxss ootfsetc
* 修改pacman.conf:SigLevel改为Never,加入[archlinuxcn]。
#
# /etc/pacman.conf
#
# See the pacman.conf(5) manpage for option and repository directives
#
# WSL: Try not to fuck around in here.

[options]
HoldPkg      = pacman glibc
Architecture = auto
IgnorePkg    = pacman fakeroot makepgk
Color
CheckSpace
SigLevel     = Never
LocalFileSigLevel = Optional

[core]
Include = /etc/pacman.d/mirrorlist

[extra]
Include = /etc/pacman.d/mirrorlist

#[community-testing]
#Include = /etc/pacman.d/mirrorlist

[community]
Include = /etc/pacman.d/mirrorlist

#[multilib]
#Include = /etc/pacman.d/mirrorlist

[archlinuxcn]
Server = https://mirrors.tuna.tsinghua.edu.cn/archlinuxcn/$arch
* 修改pacan.d/mirrorlist为:
Server = https://mirrors.tuna.tsinghua.edu.cn/archlinux/$repo/os/$arch
#Server = https://mirrors.kernel.org/archlinux/$repo/os/$arch
#Server = http://mirror.f4st.host/archlinux/$repo/os/$arch
* 更新软件 pacman -Syyu 。
3.安装X Server,测试图形环境* 为了使用简单的图形界面,需要安装X Server软件,如VcXsrv、X-Win32、XMing、MobaXterm。有些不支持OpenGL,有些比较大,个人推荐安装XMing。
* XMing安装好后启动,会自动隐藏任务栏,如图所示:

* 安装mesa-demos: pacman -S mesa-demos ,测试teapot:
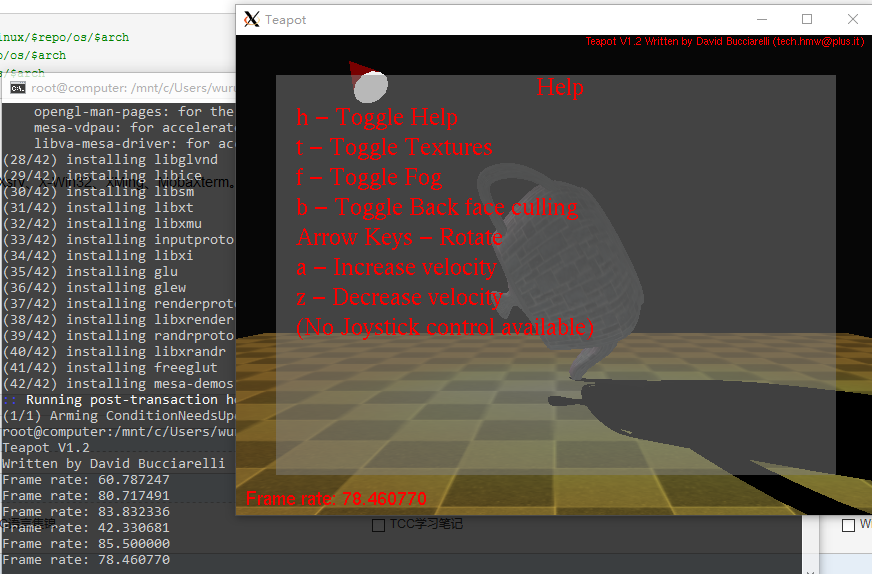
注意:XMing 6.9不支持GLX1.3,还是用MobaXterm吧。
4.安装Root/Cling以及常见软件ROOT是欧洲核子研究中心CERN开发的基于C++,可与Fortran、Python等多种语言交互的数据处理软件。本文主要介绍root/cling作为C++的解释器和REPL来使用。
4.1安装Root/Cling
* 输入 yaourt -S root ,一路点确定,需要编辑的地方一律跳过。在 ~/.bashrc 文件后面追加 export LD_LIBRARY_PATH=$LD_LIBRARY_PATH:/usr/lib/root :
* 安装完成后先启动Xming,再输入 root ,如图所示:
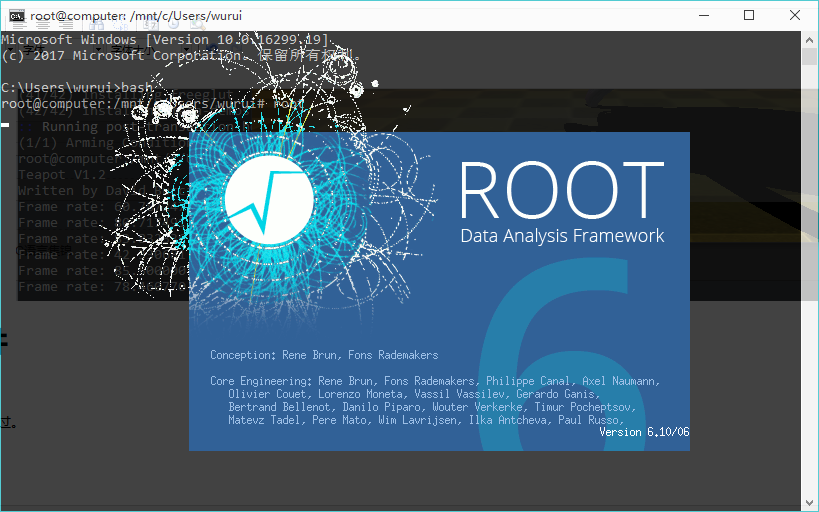
* 在启动界面之后,进入交互环境:
root@computer:/mnt/c/Users/wurui# root
   ------------------------------------------------------------
  | Welcome to ROOT 6.10/06                http://root.cern.ch |
  |                               (c) 1995-2017, The ROOT Team |
  | Built for linuxx8664gcc                                    |
  | From tag v6-10-06, 19 September 2017                       |
  | Try '.help', '.demo', '.license', '.credits', '.quit'/'.q' |
   ------------------------------------------------------------

root [0]
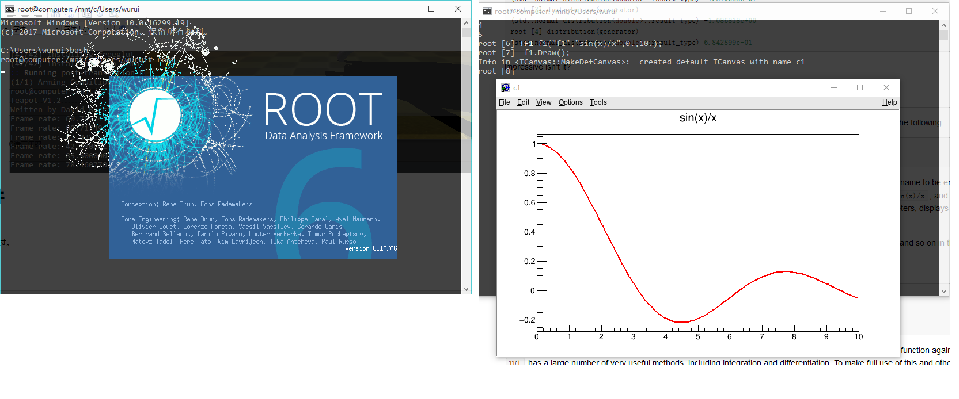
* 输入官网Root Primer的例子,包括简单的绘图:
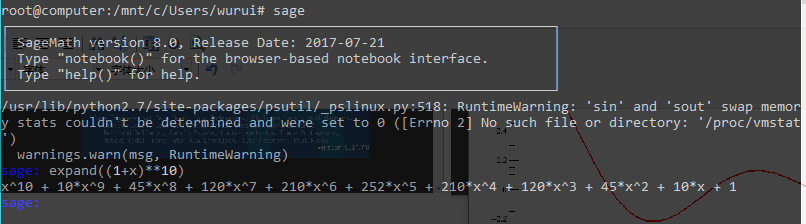
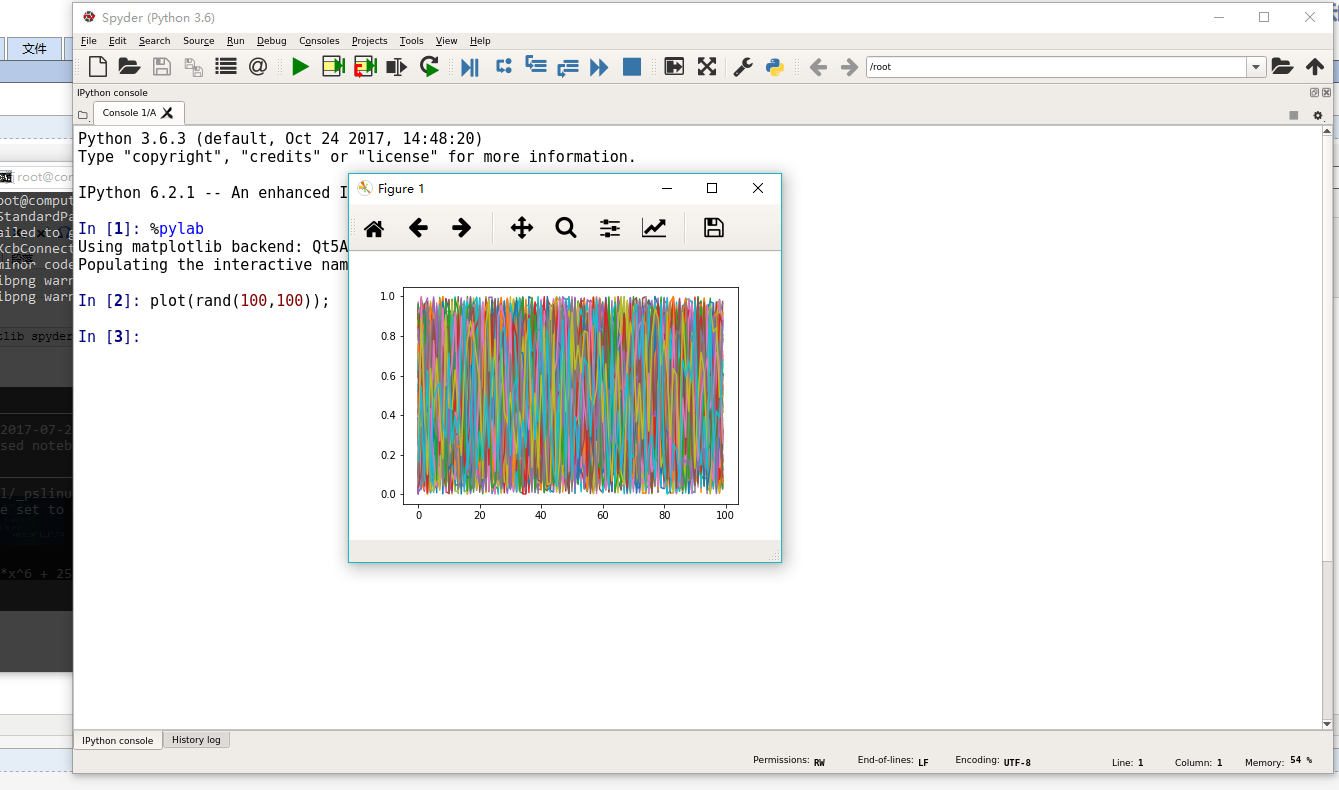
4.2安装SageMath和Spyder
* 输入命令: pacman -S sagemath python-matplotlib spyder3
* Sage测试:
* Spyder3测试:
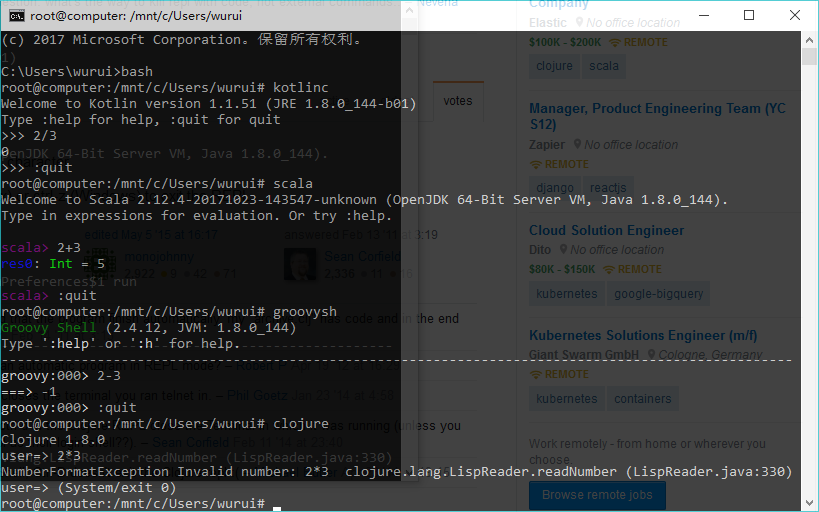
4.3安装Java和JVM语言
* 输入: pacman -S kotlin scala groovy clojure java-openjfx intellij-idea-community-edition ,选择默认的 jdk8-openjdk 。完成后,在文件后追加: export PATH=$PATH:/usr/lib/jvm/java-8-openjdk/bin ,然后重新打开bash。
JVM语言测试:
* 输入 idea.sh 启动IDEA,测试JavaFX的例子,将 /usr/lib/jvm/java-8-openjdk/jre/lib/ext/jfxrt.jar 加入工程依赖的库中:
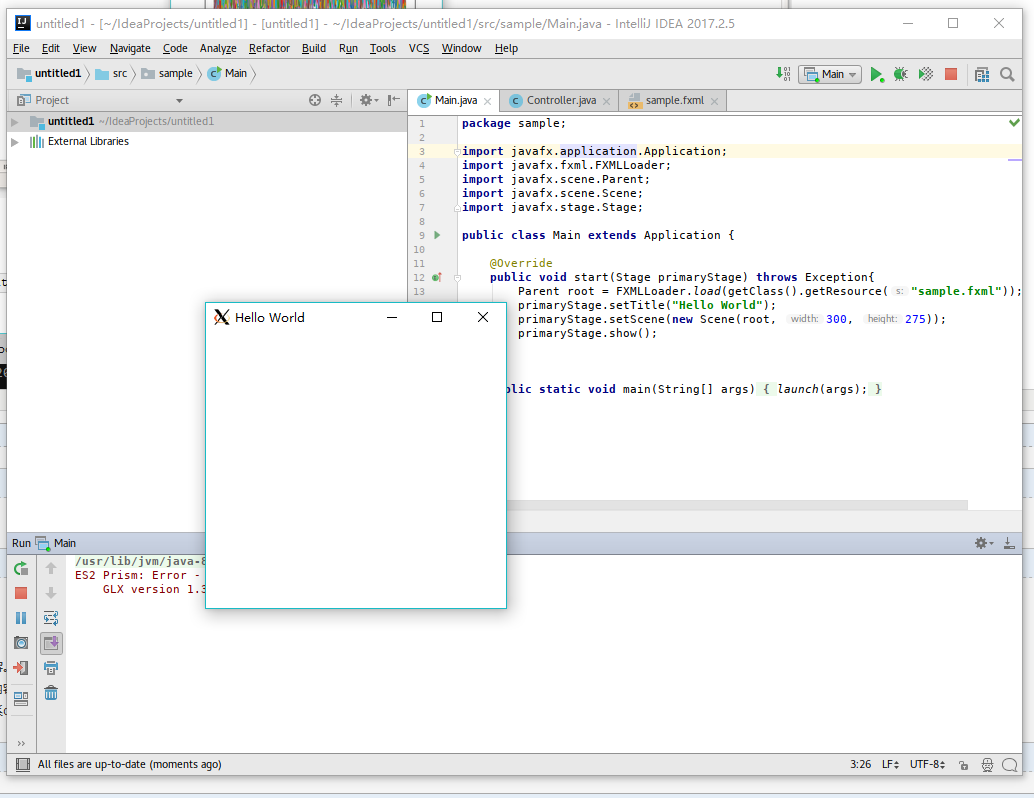
注:安装Eclipse后启动失败了,所以例子改成了IDEA。
5.Root/Cling作为C++解析器和REPL5.1Root/Cling作为C++ REPL使用
* Root是以为Cling基础的,预先加载了一些库,使用起来更加友好一些。Cling没有过多的预加载项,作为C++ REPL更纯粹一些。
* Cling的例子,输入 .help 可以看到一些指令解释,其中: .files 表示列举加载的文件, .class 表示列举已经加载的类。
root@computer:~# cling

****************** CLING ******************
* Type C++ code and press enter to run it *
*             Type .q to exit             *
*******************************************
[cling]$ /*C Example*/
[cling]$ #include <stdio.h>
[cling]$ #include <string.h>
[cling]$ #include <stdlib.h>
[cling]$ char str[] = "hello"
(char [6]) "hello"
[cling]$ strlen(str)
(unsigned long) 5
[cling]$ puts(str)
hello
(int) 6
[cling]$ //C++ Example
[cling]$ #include <iostream>
[cling]$ #include <string>
[cling]$ #include <vector>
[cling]$ auto s = "hello"
(const char *) "hello"
[cling]$ #include <cstring>
[cling]$ using namespace std;
[cling]$ strlen(s)
(unsigned long) 5
[cling]$ string(s).size()
(unsigned long) 5
[cling]$ vector<string> ss{"hello","world"}
(std::vector<std::string> &) { "hello", "world" }
[cling]$ ss.size()
(unsigned long) 2
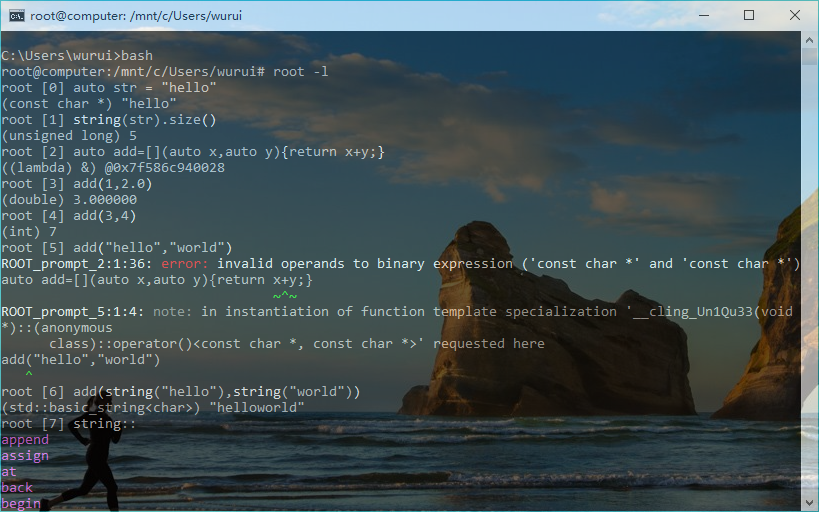
* Root的例子,输入 root -l ,其中 -l 表示不显示logo。与Cling相比,Root更强大一点,有一定的语法高亮和自动补全。这可能是由于Root已经预先加载了一些库,并且使用了 using namespace std; 。
5.2Root/Cling作为C++解析器,以脚本形式运行C++
* 以SDL和OpenGL作为一个例子:


 1 // OpenGL headers
 2 // #define GLEW_STATIC
 3 #include <GL/glew.h>
 4 #include <GL/glu.h>
 5 #include <GL/gl.h>
 6
 7 // SDL headers
 8 #include <SDL2/SDL_main.h>
 9 #include <SDL2/SDL.h>
10 #include <SDL2/SDL_opengl.h>
11
12 #ifdef __TINYC__
13 typedef int bool;
14 #define false 0
15 #define true 1
16 #endif
17
18 bool quit;
19
20 SDL_Window* window;
21 SDL_GLContext glContext;
22 SDL_Event sdlEvent;
23
24 int main(int argc, char *argv[])
25 {
26     quit = false;
27
28     //Use OpenGL 3.1 core
29     SDL_GL_SetAttribute(SDL_GL_CONTEXT_MAJOR_VERSION, 3);
30     SDL_GL_SetAttribute(SDL_GL_CONTEXT_MINOR_VERSION, 1);
31     SDL_GL_SetAttribute(SDL_GL_CONTEXT_PROFILE_MASK, SDL_GL_CONTEXT_PROFILE_CORE);
32
33     // Initialize video subsystem
34     if(SDL_Init(SDL_INIT_VIDEO) < 0)
35     {
36         // Display error message
37         printf("SDL could not initialize! SDL_Error: %s
", SDL_GetError());
38         return false;
39     }
40     else
41     {
42         // Create window
43         window = SDL_CreateWindow("Hello World!", SDL_WINDOWPOS_CENTERED, SDL_WINDOWPOS_CENTERED, 800, 600, SDL_WINDOW_OPENGL | SDL_WINDOW_SHOWN );
44         if( window == NULL )
45         {
46             // Display error message
47             printf( "Window could not be created! SDL_Error: %s
", SDL_GetError() );
48             return false;
49         }
50         else
51         {
52             // Create OpenGL context
53             glContext = SDL_GL_CreateContext(window);
54
55             if( glContext == NULL )
56             {
57                 // Display error message
58                 printf( "OpenGL context could not be created! SDL Error: %s
", SDL_GetError() );
59                 return false;
60             }
61             else
62             {
63                 // Initialize glew
64                 glewInit();
65             }
66         }
67     }
68
69     // Game loop
70     while (!quit)
71     {
72         while(SDL_PollEvent(&sdlEvent) != 0)
73         {
74             // Esc button is pressed
75             if(sdlEvent.type == SDL_QUIT)
76             {
77                 quit = true;
78             }
79         }
80
81         // Set background color as cornflower blue
82         glClearColor(0.39f, 0.58f, 0.93f, 1.f);
83         // Clear color buffer
84         glClear(GL_COLOR_BUFFER_BIT | GL_DEPTH_BUFFER_BIT);
85         // Update window with OpenGL rendering
86         SDL_GL_SwapWindow(window);
87     }
88
89     //Destroy window
90     SDL_DestroyWindow(window);
91     window = NULL;
92
93     //Quit SDL subsystems
94     SDL_Quit();
95
96     return 0;
97 }
* Root运行这个例子的命令行:
root -e '.L /usr/lib/libSDL2.so' -e '.L /usr/lib/libGL.so' -e '.L /usr/lib/libGLEW.so' -e 'int argc=0;char **argv=NULL' -e '.x main.c(argc,argv)' -q -l -b
* Cling运行OpenGL会有问题,所以给了一个Qt的例子cling_qt.cpp:
1 #include <QtCore/QtCore>
2 #include <iostream>
3 using namespace std;
4 void cling_qt()
5 {
6     QString s = "hello";
7     qDebug()<<s.size();
8     cout<<s.toStdString()<<endl;
9 }
* Cling运行这个例子的命令行:
cling -I/usr/include/qt -lQt5Core -fPIC cling_qt.cpp注:所以的例子都可以在我的GitHub上找到。
5.3Root/Cling和Jupyter Notebook (Python)
* 检查cling-jupyter是否安装好了:
[wurui@computer wurui]$ pacman -Qs cling-jupyter
local/cling-jupyter-git r4078.00a59858-1
    Interactive C++ interpreter built on the top of LLVM and Clang libraries.
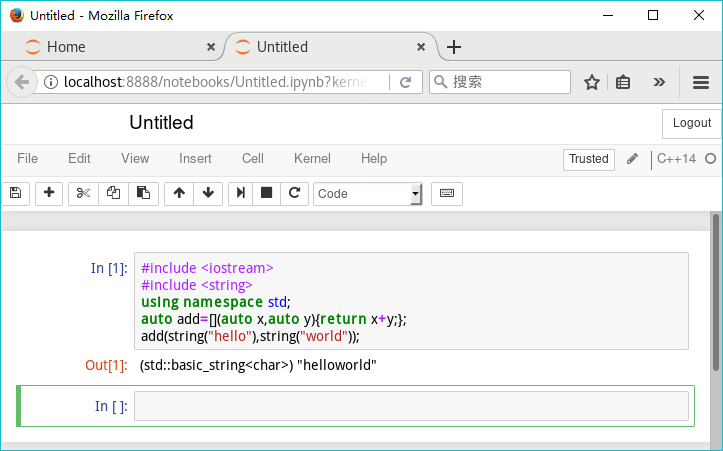
* 输入 jupyter-notebook 打开notebook,可以看到C++的选择。
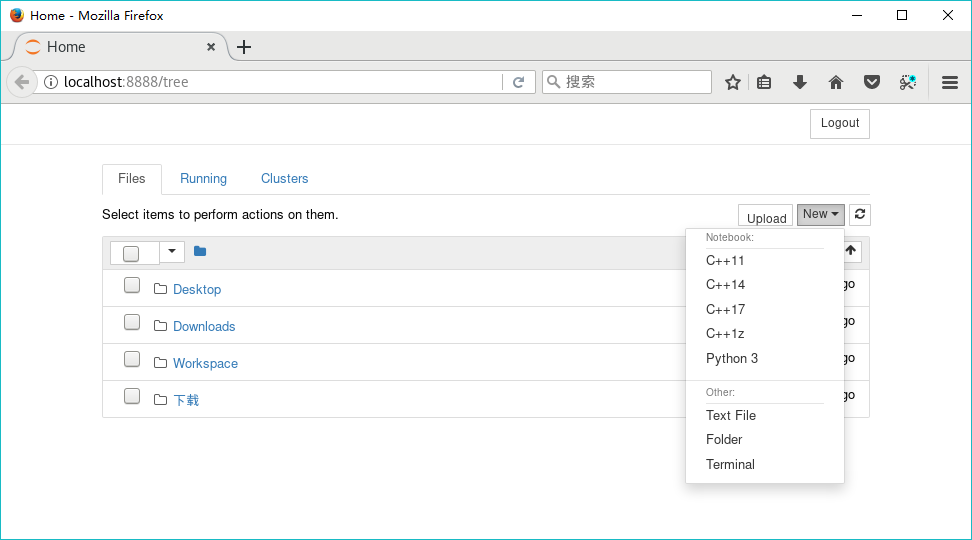
* 选择C++14,输入代码进行测试:
* Root可以输入 root --notebook 开启notebook,或者从Python Jupyter Notebook中导入【注:可以参考官网的例子】。
6.结束语一直对C和C++的解释器比较感兴趣,C语言的解释器一直用的是TCC,C++的解释器偶有所闻,却未尝试。最近在Manjaro下成功运行了Root/Cling,觉得使用体验还算可以。
可惜,Root/Cling在Windows没有可用的二进制版本。准确来说:Root5有一个Windows版本,比较旧了。Cling也可以用VS编译成功,还有Anaconda的版本,但是兼容性问题比较严重,基本不能用。
此外,一直有听到WSL的消息,以前一直觉得WSL不成熟,所以并未尝试。最近,尝试在WSL下安装了Root/Cling,发现居然可以用。特整理成文,记录于此,作为一份备忘录。