Vert X优势:
1. 与基于阻塞 I/O 的传统堆栈和框架相比,以更少的资源处理更多的请求。Vert.x 非常适合各种执行环境,包括虚拟机和容器等受限环境。
2. Vert.x 是一个工具包,不是一个框架,所以它自然是非常可组合和可嵌入的(不同语言都可以)。
Vert.x运行在Java虚拟机上,支持多种编程语言,Vert.x是高度模块化的,同一个应用,你可以选择多种编程语言同时开发。在Vert.x 2版本,也就是基于JDK7,还没有lambda的时 候,一般来讲,使用JavaScript作为开发语言相对较多,到Vert.x3的时代,因为JDK8的出现,Java已经作为Vert.x主流的开发语言,而Vert.x也被更多的开发者所接受。
3. 异步编程对你来说太难了?Vert.x 编程成为一种平易近人的体验,同时又不牺牲正确性和性能。
Vert.x异步也带来了编码上的复杂性,想要编写优美的异步代码,就需要对lambda表达式、函数式编程、Reactive等技术非常熟悉才行,否则很容易导致你的代码一团糟,完全没 有可读性。另外,异步模型的性能调优、异常处理与同步模型有很大差异,网络中相关资料较少,使用中遇到问题排查困难,这也是目前国内架构师不愿意选择Vert.x的原因。
4. 相对完善的生态
请查询官网支持: https://vertx.io/
5. 我们可以在同一个端口部署HTTP Server代码两次,并且对于每个实例都不期望出现由于TCP端口已经被占用而导致的任何错误。对于许多Web框架,我们需要选择不同的TCP端口,并且有一个前端HTTP代理来执行端口之间的负载平衡。Vert.x则不需要这么做,多个Verticle可以共享相同的TCP端口号。传入的连接只是简单的通过接收线程以轮转的方式分发。
额外:如果懂python的人,可以理解为:在python语言中,vertx 类似于 tornado
下面的所有操作以Java为例(以maven为例, pom依赖可参考官网):
1. 启动一个web服务器,监听8080端口:
HttpServer server = vertx.createHttpServer();
  server.requestHandler(request -> {

      // This handler gets called for each request that arrives on the server
      HttpServerResponse response = request.response();
//      response.putHeader("content-type", "text/plain");

      // Write to the response and end it
      response.end("Hello World!");
    });

    server.listen(8080);
2. POST请求body获取需要路由注册
HttpServer server = vertx.createHttpServer();
      Router router = Router.router(vertx);
      // post body
      router.route().handler(BodyHandler.create()
3. Api映射及请求方式
// 简化版路由
router.route("/some/111").handler(routingContext -> {

        throw new RuntimeException("something happened!");
//        HttpServerResponse response = routingContext.response();
//        // 写入响应并结束处理
//        response.end("Hello World from Vert.x-Web!!!!!");


      });

//指定get请求
router.route(HttpMethod.GET,"/some/path/").handler(routingContext -> {
        HttpServerResponse response = routingContext.response();
        response.end("Hello World from Vert.x-Web!!!!!");
      });

// 简化方式指定
 router.get("/get").handler(routingContext -> {
        HttpServerResponse response = routingContext.response();
        response.end("返回值");
      });
4. 多次写入返回数据需要设置多次写入集块:setChunked(true)
router.get("/get").handler(routingContext -> {
        HttpServerResponse response = routingContext.response();
        response.setChunked(true);
        response.write("11111111111111111111111\n");
        response.end("22");

      })
5. 通配符指定报错路由
Router exceptionRouter = Router.router(vertx);
     exceptionRouter.route("/some/*").failureHandler(failureRoutingContext -> {
        int statusCode = failureRoutingContext.statusCode();

        // 对于 RuntimeException 状态码会是 500,否则是 403
        HttpServerResponse response = failureRoutingContext.response();
        response.setStatusCode(statusCode).end("Sorry! Not today");
//        HttpServerResponse response = routingContext.response();
      });
6. 指定子路由
Router subRouter = Router.router(vertx);
      subRouter.get("/put").handler(routingContext -> {
        HttpServerResponse response = routingContext.response();
        response.end("is end");
      });

      router.mountSubRouter("/sub", subRouter);
7. vertx 支持session,并注册到路由
SessionStore store = LocalSessionStore.create(vertx);
      // 通过指定的 Map 名称创建了一个本地会话存储
      // 这适用于您在同一个 Vert.x 实例中有多个应用,并且希望不同的应用使用不同的 Map 的情况
      SessionStore store1 = LocalSessionStore.create(vertx, "myapp3.sessionmap");
      // 通过指定的 Map 名称创建了一个本地会话存储
      // 设置了检查过期 Session 的周期为 10 秒
      SessionStore store3 = LocalSessionStore.create(vertx, "myapp3.sessionmap", 10000);
      // // 创建了一个默认的集群会话存储
      SessionStore store4 = ClusteredSessionStore.create(vertx);

      // 通过指定的 Map 名称创建了一个集群会话存储
      // 这适用于您在集群中有多个应用,并且希望不同的应用使用不同的 Map 的情况
      SessionStore store2 = ClusteredSessionStore.create(vertx, "myclusteredapp3.sessionmap");

      // 确保所有请求都会经过 session 处理器
      SessionHandler sessionHandler = SessionHandler.create(store);
      router.route().handler(sessionHandler);

router.route("/111").handler(routingContext -> {
        Session session = routingContext.session();
        session.put("name", "hz");
        session.get("name");
        JsonObject jsonObject = session.remove("name");

        session.destroy();
//        session.setAccessed();

      });
8. vertx cookie支持
// cookie
      router.route().handler(CookieHandler.create());
9. 相同路由情况下,可延迟调用下一个相同的路由, 这点和前端很相似
 // 5 秒后调用下一个处理器
        routingContext.vertx().setTimer(5000, tid ->  routingContext.next());
10. 指定jwt验证
// Add the JWT authenticator as the next handler to all routes.

router.route("/api*").handler(this.authenticator::authenticate);
// Add handler to echo the user attributes back to the caller.
router.get("/api/hello").handler(this::sayHello);
验证逻辑, 其余创建等在jwt util中生成,走其他路由即可
// Handler methods
  public void authenticate(RoutingContext routingContext) {
    var authorizeHeader = routingContext.request().getHeader("Authorization");
    LOGGER.debug("Authenticating request with Authorization = {}", authorizeHeader);

    if (authorizeHeader != null) {
      // We can only handle bearer tokens; let's make certain that's what we have.
      String[] components = authorizeHeader.split(" ");
      if (components.length > 1 && components[0].equalsIgnoreCase("bearer")) {
          var jwt = components[1];
          LOGGER.debug("Will authenticate using JWT {}",jwt);

          this.authenticator.authenticate(new JsonObject().put("jwt",jwt), result -> {
              if( result.succeeded()){
                  LOGGER.debug("Successfully authenticated request.");

                  // Add the user to the routing context and pass control to the
                  // next handler.
                  User user = result.result();
                  LOGGER.debug("User pricipal = {}", user.principal().toString());

                  routingContext.setUser(user);
                  routingContext.next();
              } else {
                  // Unable to authenticate; request is forbidden.
                  LOGGER.warn("Unable to authenticate request.",result.cause());
                  routingContext.response().setStatusCode(403).end();
              }
          });
      } else {
        routingContext.response().setStatusCode(400).end();
      }
    } else {
      LOGGER.info("Request does not contain Authorization header; returning HTTP status code 401.");
      routingContext.response().setStatusCode(401).end();
    }
  }
11. event bus
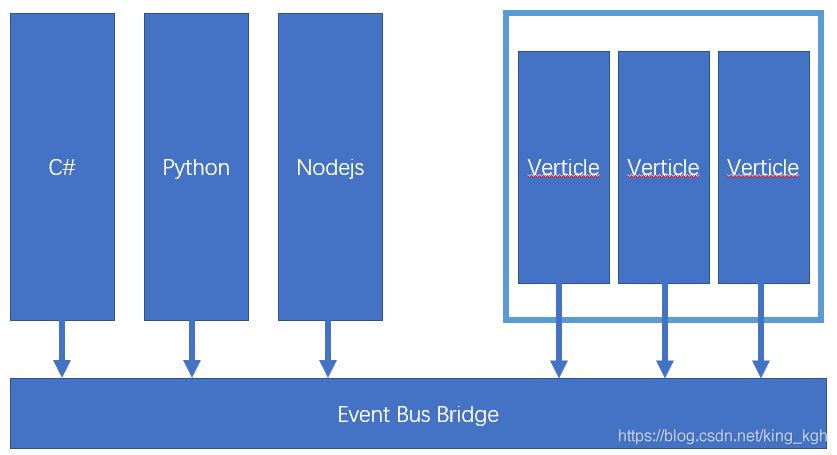
如果想要通过其他的开发语言或者在其他应用中调用Vert.x实例模块,可以通过发起TCP请求,连接到EventBus,Event Bus使用的通信协议如下,但一定不要忘记,需要创建Event Bus Bride。
<Length: uInt32><{

  type: String,

  address: String,

  (replyAddress: String)?,

  headers: JsonObject,

  body: JsonObject

}: JsonObject>
服务提供者: 发布Service到总线上
@Override
public void start() throws Exception {
    Service service = Service.create(vertx);
    new ServiceBinder(vertx).setAddress(address).register(Service.class, service);
}
服务调用者:
@Override
public void start() throws Exception {
    HttpServer httpServer = vertx.createHttpServer();

    httpServer.requestHandler(request -> {

        // 获取到response对象
        HttpServerResponse response = request.response();

        // 设置响应头
        response.putHeader("Content-type", "text/html;charset=utf-8");

        // 通过配置action参数,指定要走哪一个方法
        DeliveryOptions options = new DeliveryOptions();
        options.addHeader("action", "sayHello");

        // 这个是给方法传入的参数
        JsonObject config = new JsonObject();
        config.put("name", "xiaozhang");

        // 通过eventBus调用方法
        vertx.eventBus().<JsonObject>send("service.demo.firstverticle", config, options, res -> {
            // 响应数据
            response.end(res.result().body().getString("msg"));
        });

    });

    httpServer.listen(1234);
}
12. 配置事件总线:事件总线中如何使用SSL连接代替普通TCP连接
事件总线是可配置的。在事件总线被集群时,这特别有用。在事件总下之下使用TCP连接发送和接收消息时,使用EventBusOptions让你可以配置TCP连接的所有方面。因为事件总线扮演了一个服务器与客户端的角色。配置与NetClientOptions和NetServerOptions类似。
VertxOptionsoptions = new VertxOptions()

    .setEventBusOptions(new EventBusOptions()

        .setSsl(true)

        .setKeyStoreOptions(newJksOptions().setPath("keystore.jks").setPassword("wibble"))

        .setTrustStoreOptions(newJksOptions().setPath("keystore.jks").setPassword("wibble"))

        .setClientAuth(ClientAuth.REQUIRED)

    );


Vertx.clusteredVertx(options,res -> {undefined

  if (res.succeeded()) {undefined

    Vertx vertx = res.result();

    EventBus eventBus = vertx.eventBus();

    System.out.println("We now have aclustered event bus: " + eventBus);

  } else {undefined

    System.out.println("Failed: " +res.cause());

  }

});
警示:为了集群模式中的安全,必须配置集群管理器使用加密和强制安全。可以能看集群管理器文档获取更多信息。事件总线的配置需要在所有的集群的节点上一至。EventBusOptions也让你设置事件总线是否被集群。通过setClustered,getClusterHost,getClusterPort方法可以配置主机和端口。
13. 配置事件总线:容器中使用,配置公共的主机和端口
VertxOptionsoptions = new VertxOptions()

    .setEventBusOptions(new EventBusOptions()

       .setClusterPublicHost("whatever")

        .setClusterPublicPort(1234)

    );


Vertx.clusteredVertx(options,res -> {undefined

  if (res.succeeded()) {undefined

    Vertx vertx = res.result();

    EventBus eventBus = vertx.eventBus();

    System.out.println("We now have aclustered event bus: " + eventBus);

  } else {undefined

    System.out.println("Failed: " +res.cause());

  }

});
14. CORS支持
router.route()
  .handler(
    CorsHandler.create("vertx\\.io")
      .allowedMethod(HttpMethod.GET));
15. 注解使用
1. 将服务编写为 Java 接口并使用注释对其进行@ProxyGen注释
@ProxyGen
public interface SomeDatabaseService {

 // A couple of factory methods to create an instance and a proxy
 static SomeDatabaseService create(Vertx vertx) {
   return new SomeDatabaseServiceImpl(vertx);
 }

 static SomeDatabaseService createProxy(Vertx vertx,
   String address) {
   return new SomeDatabaseServiceVertxEBProxy(vertx, address);
 }

// Actual service operations here...
void save(String collection, JsonObject document,
  Handler<AsyncResult<Void>> resultHandler);
}
2. 还需要package-info.java在定义接口的包中(或上方)某个位置的文件。需要对该包进行注释,@ModuleGen以便 Vert.x CodeGen 可以识别您的接口并生成适当的 EventBus 代 理代码。 (给定接口,Vert.x 将生成通过事件总线访问您的服务所需的所有样板代码,它还将为您的服务生成一个客户端代理,因此您的客户端可以为您的服务使用丰富的惯用 API,而不是必须手动制作要发送的事件总线消息。无论您的服务在事件总线上的实际位置如何(可能在不同的机器上),客户端代理都将工作。)
@io.vertx.codegen.annotations.ModuleGen(groupPackage = "io.vertx.example", name = "services", useFutures = true)
package io.vertx.example;
3、参数类型需要是字符串、Java原始数据类型、JSON对象或者数组、任何枚举类型或者前面类型的java.util集合(List/Set/Map)。支持任意Java类的唯一方法是使用@DataObject注解,使它们作为Vert.x数据对象。传递其它类型的最后机会是服务引用类型。
4. Fluent注解是可选的,但是允许fluent接口,操作可以通过返回服务实例被链式调用(chained)。这对于代码生成器非常有用,当服务将被其它JVM语言消费时。
16. 部署verticle :
standard verticle
Verticle myVerticle = new MyVerticle();
vertx.deployVerticle(myVerticle);
worker verticle
DeploymentOptions options = new DeploymentOptions().setWorker(true);
vertx.deployVerticle(new MyVerticle(), options);
multi thread worker verticle
和普通的Worker verticles相比,唯一的区别在于,Multi-threaded worker verticles会在同一个时间点,有多个线程同时执行一个Worker Verticle实例
17.
拆分成分布式应用,创建一个HttpApp.java,在里面发布HttpVerticle。
package com.javafm.vertx;

import io.vertx.core.Vertx;

public class HttpApp {
    public static void main(String[] args) {
        Vertx.vertx().deployVerticle(new HttpVerticle());
    }
}
接着再编写DatabaseApp.java,在里面发布DatabaseVerticle。
package com.javafm.vertx;

import io.vertx.core.Vertx;

public class DatabaseApp {
    public static void main(String[] args) {
        Vertx.vertx().deployVerticle(new DatabaseVerticle());
    }
}
现在我们分别启动HttpApp.java和DatabaseApp.java,在访问http://localhost:8080/user/1接口。这个时候会发现接口出现错误了,没有达到预期的效果。控制台出现这个错误(NO_HANDLERS,-1) No handlers for address com.javafm.vertx.database。 那是因为将两个Verticle拆分成独立运行的进程时,也就是说分布式运行了,但两个Verticle中的vertx无法通信,导致发布者与订阅者没有任何关联关系。
那么为了解决这个问题,需要在pom.xml中引入一个组件,也就是说要做集群部署,要组网了。
<dependency>
    <groupId>io.vertx</groupId>
    <artifactId>vertx-hazelcast</artifactId>
    <version>3.8.5</version>
</dependency>
接着修改HttpApp.java代码,加入集群功能。
package com.javafm.vertx;

import io.vertx.core.Vertx;
import io.vertx.core.VertxOptions;

public class HttpApp {
    public static void main(String[] args) {
        VertxOptions options = new VertxOptions();
        Vertx.clusteredVertx(options, res -> {
            if (res.succeeded()) {
                res.result().deployVerticle(new HttpVerticle());
            }
        });
    }
}
再修改DatabaseApp.java加入集群功能。
package com.javafm.vertx;

import io.vertx.core.Vertx;
import io.vertx.core.VertxOptions;

public class DatabaseApp {
    public static void main(String[] args) {
        VertxOptions options = new VertxOptions();
        Vertx.clusteredVertx(options, res -> {
            if (res.succeeded()) {
                res.result().deployVerticle(new DatabaseVerticle());
            }
        });
    }
}
再分别启动两个主方法类,会发现控制台输入的日志跟之前不一样了,变多了。而且输出了集群组网信息。大概像这样:
3月 29, 2020 5:04:35 下午 com.hazelcast.internal.cluster.ClusterService
信息: [192.168.124.2]:5701 [dev] [3.12.2]

Members {size:1, ver:1} [
	Member [192.168.124.2]:5701 - 7171dc38-7f0f-4f10-bb6a-409082deca8f this
]
这个时候再访问之前的接口,发现有数据返回了。
在集群组网并没有特殊配置,采用的是默认配置。如果你的分布式应用部署在不同的服务器和不同的网络环境中,那么默认配置无法满足需求,只要在resource目录下添加hazelcast.xml文件进行网络配置就可以了。hazelcast.xml文件的模板在hazelcast的jar包中有。
这里列出常用的两种集群模式:
1、广播multicast模式
<multicast enabled="true">
    <multicast-group>224.2.2.3</multicast-group>
    <multicast-port>54327</multicast-port>
</multicast>
如果为true,同一个网段内的vertx实例会自动发现,并集群。默认使用的也就是这种方式。
2、ip地址tcp-ip模式
<tcp-ip enabled="false">
    <interface>127.0.0.1</interface>
    <member-list>
        <member>127.0.0.1</member>
    </member-list>
</tcp-ip>
将enabled改为true,然后把集群的ip地址列在这里就可以了。配置完成后将应用打包部署在不同的服务器中就可以正常使用了。
18 vertx集群代码展示
启动类
package org.example;

import com.hazelcast.config.Config;
import com.hazelcast.config.FileSystemXmlConfig;
import io.vertx.core.Vertx;
import io.vertx.core.VertxOptions;
import io.vertx.core.eventbus.EventBusOptions;
import io.vertx.spi.cluster.hazelcast.HazelcastClusterManager;

import java.net.InetAddress;
import java.net.UnknownHostException;

/**
 * @Author: Administrator
 * @Description:
 * @Date: 2020/7/16 10:42
 * @Version: 1.0
 */
public class AppCluster {

    public static void main(String[] args) throws  UnknownHostException {
        final VertxOptions vertxOptions = new VertxOptions();
        EventBusOptions eventBusOptions = new EventBusOptions();
        // 本机局域网Ip
        String hostAddress = InetAddress.getLocalHost().getHostAddress();
        //集群方式启动时监听端口,用于接收数据
        vertxOptions.setEventBusOptions(eventBusOptions).getEventBusOptions().setHost(hostAddress);

      //集群方式启动
        HazelcastClusterManager clusterManager = new HazelcastClusterManager();

        vertxOptions.setClusterManager(clusterManager);
        Vertx.clusteredVertx(vertxOptions, res -> {
            Vertx result = res.result();
            result.deployVerticle(new MainClusterVerticle(), r -> {
                if (r.succeeded()) {
                    System.out.println(MainClusterVerticle.class.getName() + " --> 部署成功");
                } else {
                    r.cause().printStackTrace();
                    System.err.println(MainClusterVerticle.class.getName() + " --> 部署失败, " + r.cause().getMessage());
                }
            });
        });
    }
}
Verticle类
package org.example;

import io.vertx.core.AbstractVerticle;
import io.vertx.core.json.JsonObject;

public class MainClusterVerticle extends AbstractVerticle {

  public void start()  {
//to do something

  }
}
cluster.xml
<?xml version="1.0" encoding="UTF-8"?>
<!--
  ~ Copyright (c) 2008-2019, Hazelcast, Inc. All Rights Reserved.
  ~
  ~ Licensed under the Apache License, Version 2.0 (the "License");
  ~ you may not use this file except in compliance with the License.
  ~ You may obtain a copy of the License at
  ~
  ~ http://www.apache.org/licenses/LICENSE-2.0
  ~
  ~ Unless required by applicable law or agreed to in writing, software
  ~ distributed under the License is distributed on an "AS IS" BASIS,
  ~ WITHOUT WARRANTIES OR CONDITIONS OF ANY KIND, either express or implied.
  ~ See the License for the specific language governing permissions and
  ~ limitations under the License.
  -->

<!--
  The default Hazelcast configuration.

  This XML file is used when no cluster.xml is present.

  To learn how to configure Hazelcast, please see the schema at
  https://hazelcast.com/schema/config/hazelcast-config-3.12.xsd
  or the Reference Manual at https://hazelcast.org/documentation/
-->

<!--suppress XmlDefaultAttributeValue -->
<hazelcast xmlns="http://www.hazelcast.com/schema/config"
           xmlns:xsi="http://www.w3.org/2001/XMLSchema-instance"
           xsi:schemaLocation="http://www.hazelcast.com/schema/config
           http://www.hazelcast.com/schema/config/hazelcast-config-3.12.xsd">

    <group>
        <name>dev</name>
    </group>
    //监控中心地址
    <management-center enabled="true">http://192.168.2.112:7070/mancenter</management-center>
    <network>
    //TCP监听端口5700,如果占用会使用下一个端口,一直到5800
        <port auto-increment="true" port-count="100">5700</port>
        <outbound-ports>
            <!--
            Allowed port range when connecting to other nodes.
            0 or * means use system provided port.
            -->
            <ports>0</ports>
        </outbound-ports>
        <join>
        //采用组播方式集群
            <multicast enabled="true">
                <multicast-group>224.2.2.3</multicast-group>
                <multicast-port>54327</multicast-port>
            </multicast>
            <tcp-ip enabled="false">
                <interface>192.168.2.112</interface>
                <member-list>
                    <member>192.168.2.121</member>
                </member-list>
            </tcp-ip>
            <aws enabled="false">
                <access-key>my-access-key</access-key>
                <secret-key>my-secret-key</secret-key>
                <!--optional, default is us-east-1 -->
                <region>us-west-1</region>
                <!--optional, default is ec2.amazonaws.com. If set, region shouldn't be set as it will override this property -->
                <host-header>ec2.amazonaws.com</host-header>
                <!-- optional, only instances belonging to this group will be discovered, default will try all running instances -->
                <security-group-name>hazelcast-sg</security-group-name>
                <tag-key>type</tag-key>
                <tag-value>hz-nodes</tag-value>
            </aws>
            <gcp enabled="false">
                <zones>us-east1-b,us-east1-c</zones>
            </gcp>
            <azure enabled="false">
                <client-id>CLIENT_ID</client-id>
                <client-secret>CLIENT_SECRET</client-secret>
                <tenant-id>TENANT_ID</tenant-id>
                <subscription-id>SUB_ID</subscription-id>
                <cluster-id>HZLCAST001</cluster-id>
                <group-name>GROUP-NAME</group-name>
            </azure>
            <kubernetes enabled="false">
                <namespace>MY-KUBERNETES-NAMESPACE</namespace>
                <service-name>MY-SERVICE-NAME</service-name>
                <service-label-name>MY-SERVICE-LABEL-NAME</service-label-name>
                <service-label-value>MY-SERVICE-LABEL-VALUE</service-label-value>
            </kubernetes>
            <eureka enabled="false">
                <self-registration>true</self-registration>
                <namespace>hazelcast</namespace>
            </eureka>
            <discovery-strategies>
            </discovery-strategies>
        </join>
        <interfaces enabled="false">
            <interface>10.10.1.*</interface>
        </interfaces>
        <ssl enabled="false"/>
        <socket-interceptor enabled="false"/>
        <symmetric-encryption enabled="false">
            <!--
               encryption algorithm such as
               DES/ECB/PKCS5Padding,
               PBEWithMD5AndDES,
               AES/CBC/PKCS5Padding,
               Blowfish,
               DESede
            -->
            <algorithm>PBEWithMD5AndDES</algorithm>
            <!-- salt value to use when generating the secret key -->
            <salt>thesalt</salt>
            <!-- pass phrase to use when generating the secret key -->
            <password>thepass</password>
            <!-- iteration count to use when generating the secret key -->
            <iteration-count>19</iteration-count>
        </symmetric-encryption>
        <failure-detector>
            <icmp enabled="false"/>
        </failure-detector>
    </network>
    <partition-group enabled="false"/>
    <executor-service name="default">
        <pool-size>16</pool-size>
        <!--Queue capacity. 0 means Integer.MAX_VALUE.-->
        <queue-capacity>0</queue-capacity>
    </executor-service>
    <security>
        <client-block-unmapped-actions>true</client-block-unmapped-actions>
    </security>
    <queue name="default">
        <!--
            Maximum size of the queue. When a JVM's local queue size reaches the maximum,
            all put/offer operations will get blocked until the queue size
            of the JVM goes down below the maximum.
            Any integer between 0 and Integer.MAX_VALUE. 0 means
            Integer.MAX_VALUE. Default is 0.
        -->
        <max-size>0</max-size>
        <!--
            Number of backups. If 1 is set as the backup-count for example,
            then all entries of the map will be copied to another JVM for
            fail-safety. 0 means no backup.
        -->
        <backup-count>1</backup-count>

        <!--
            Number of async backups. 0 means no backup.
        -->
        <async-backup-count>0</async-backup-count>

        <empty-queue-ttl>-1</empty-queue-ttl>

        <merge-policy batch-size="100">com.hazelcast.spi.merge.PutIfAbsentMergePolicy</merge-policy>
    </queue>
    <map name="default">
        <!--
           Data type that will be used for storing recordMap.
           Possible values:
           BINARY (default): keys and values will be stored as binary data
           OBJECT : values will be stored in their object forms
           NATIVE : values will be stored in non-heap region of JVM
        -->
        <in-memory-format>BINARY</in-memory-format>

        <!--
            Metadata creation policy for this map. Hazelcast may process objects of supported types ahead of time to
            create additional metadata about them. This metadata then is used to make querying and indexing faster.
            Metadata creation may decrease put throughput.
            Valid values are:
            CREATE_ON_UPDATE (default): Objects of supported types are pre-processed when they are created and updated.
            OFF: No metadata is created.
        -->
        <metadata-policy>CREATE_ON_UPDATE</metadata-policy>

        <!--
            Number of backups. If 1 is set as the backup-count for example,
            then all entries of the map will be copied to another JVM for
            fail-safety. 0 means no backup.
        -->
        <backup-count>1</backup-count>
        <!--
            Number of async backups. 0 means no backup.
        -->
        <async-backup-count>0</async-backup-count>
        <!--
            Maximum number of seconds for each entry to stay in the map. Entries that are
            older than <time-to-live-seconds> and not updated for <time-to-live-seconds>
            will get automatically evicted from the map.
            Any integer between 0 and Integer.MAX_VALUE. 0 means infinite. Default is 0
        -->
        <time-to-live-seconds>0</time-to-live-seconds>
        <!--
            Maximum number of seconds for each entry to stay idle in the map. Entries that are
            idle(not touched) for more than <max-idle-seconds> will get
            automatically evicted from the map. Entry is touched if get, put or containsKey is called.
            Any integer between 0 and Integer.MAX_VALUE. 0 means infinite. Default is 0.
        -->
        <max-idle-seconds>0</max-idle-seconds>
        <!--
            Valid values are:
            NONE (no eviction),
            LRU (Least Recently Used),
            LFU (Least Frequently Used).
            NONE is the default.
        -->
        <eviction-policy>NONE</eviction-policy>
        <!--
            Maximum size of the map. When max size is reached,
            map is evicted based on the policy defined.
            Any integer between 0 and Integer.MAX_VALUE. 0 means
            Integer.MAX_VALUE. Default is 0.
        -->
        <max-size policy="PER_NODE">0</max-size>
        <!--
            `eviction-percentage` property is deprecated and will be ignored when it is set.

            As of version 3.7, eviction mechanism changed.
            It uses a probabilistic algorithm based on sampling. Please see documentation for further details
        -->
        <eviction-percentage>25</eviction-percentage>
        <!--
            `min-eviction-check-millis` property is deprecated  and will be ignored when it is set.

            As of version 3.7, eviction mechanism changed.
            It uses a probabilistic algorithm based on sampling. Please see documentation for further details
        -->
        <min-eviction-check-millis>100</min-eviction-check-millis>
        <!--
            While recovering from split-brain (network partitioning),
            map entries in the small cluster will merge into the bigger cluster
            based on the policy set here. When an entry merge into the
            cluster, there might an existing entry with the same key already.
            Values of these entries might be different for that same key.
            Which value should be set for the key? Conflict is resolved by
            the policy set here. Default policy is PutIfAbsentMapMergePolicy

            There are built-in merge policies such as
            com.hazelcast.map.merge.PassThroughMergePolicy; entry will be overwritten if merging entry exists for the key.
            com.hazelcast.map.merge.PutIfAbsentMapMergePolicy ; entry will be added if the merging entry doesn't exist in the cluster.
            com.hazelcast.map.merge.HigherHitsMapMergePolicy ; entry with the higher hits wins.
            com.hazelcast.map.merge.LatestUpdateMapMergePolicy ; entry with the latest update wins.
        -->
        <merge-policy batch-size="100">com.hazelcast.spi.merge.PutIfAbsentMergePolicy</merge-policy>

        <!--
           Control caching of de-serialized values. Caching makes query evaluation faster, but it cost memory.
           Possible Values:
                        NEVER: Never cache deserialized object
                        INDEX-ONLY: Caches values only when they are inserted into an index.
                        ALWAYS: Always cache deserialized values.
        -->
        <cache-deserialized-values>INDEX-ONLY</cache-deserialized-values>

    </map>

    <!--
           Configuration for an event journal. The event journal keeps events related
           to a specific partition and data structure. For instance, it could keep
           map add, update, remove, merge events along with the key, old value, new value and so on.
        -->
    <event-journal enabled="false">
        <mapName>mapName</mapName>
        <capacity>10000</capacity>
        <time-to-live-seconds>0</time-to-live-seconds>
    </event-journal>

    <event-journal enabled="false">
        <cacheName>cacheName</cacheName>
        <capacity>10000</capacity>
        <time-to-live-seconds>0</time-to-live-seconds>
    </event-journal>

    <!--
       Configuration for a merkle tree.
       The merkle tree is a data structure used for efficient comparison of the
       difference in the contents of large data structures. The precision of
       such a comparison mechanism is defined by the depth of the merkle tree.
    -->
    <merkle-tree enabled="false">
        <mapName>mapName</mapName>
        <depth>10</depth>
    </merkle-tree>

    <multimap name="default">
        <backup-count>1</backup-count>
        <value-collection-type>SET</value-collection-type>
        <merge-policy batch-size="100">com.hazelcast.spi.merge.PutIfAbsentMergePolicy</merge-policy>
    </multimap>

    <replicatedmap name="default">
        <in-memory-format>OBJECT</in-memory-format>
        <async-fillup>true</async-fillup>
        <statistics-enabled>true</statistics-enabled>
        <merge-policy batch-size="100">com.hazelcast.spi.merge.PutIfAbsentMergePolicy</merge-policy>
    </replicatedmap>

    <list name="default">
        <backup-count>1</backup-count>
        <merge-policy batch-size="100">com.hazelcast.spi.merge.PutIfAbsentMergePolicy</merge-policy>
    </list>

    <set name="default">
        <backup-count>1</backup-count>
        <merge-policy batch-size="100">com.hazelcast.spi.merge.PutIfAbsentMergePolicy</merge-policy>
    </set>

    <jobtracker name="default">
        <max-thread-size>0</max-thread-size>
        <!-- Queue size 0 means number of partitions * 2 -->
        <queue-size>0</queue-size>
        <retry-count>0</retry-count>
        <chunk-size>1000</chunk-size>
        <communicate-stats>true</communicate-stats>
        <topology-changed-strategy>CANCEL_RUNNING_OPERATION</topology-changed-strategy>
    </jobtracker>

    <semaphore name="default">
        <initial-permits>0</initial-permits>
        <backup-count>1</backup-count>
        <async-backup-count>0</async-backup-count>
    </semaphore>

    <reliable-topic name="default">
        <read-batch-size>10</read-batch-size>
        <topic-overload-policy>BLOCK</topic-overload-policy>
        <statistics-enabled>true</statistics-enabled>
    </reliable-topic>

    <ringbuffer name="default">
        <capacity>10000</capacity>
        <backup-count>1</backup-count>
        <async-backup-count>0</async-backup-count>
        <time-to-live-seconds>0</time-to-live-seconds>
        <in-memory-format>BINARY</in-memory-format>
        <merge-policy batch-size="100">com.hazelcast.spi.merge.PutIfAbsentMergePolicy</merge-policy>
    </ringbuffer>

    <flake-id-generator name="default">
        <prefetch-count>100</prefetch-count>
        <prefetch-validity-millis>600000</prefetch-validity-millis>
        <id-offset>0</id-offset>
        <node-id-offset>0</node-id-offset>
        <statistics-enabled>true</statistics-enabled>
    </flake-id-generator>

    <atomic-long name="default">
        <merge-policy batch-size="100">com.hazelcast.spi.merge.PutIfAbsentMergePolicy</merge-policy>
    </atomic-long>

    <atomic-reference name="default">
        <merge-policy batch-size="100">com.hazelcast.spi.merge.PutIfAbsentMergePolicy</merge-policy>
    </atomic-reference>

    <count-down-latch name="default"/>

    <serialization>
        <portable-version>0</portable-version>
    </serialization>

    <services enable-defaults="true"/>

    <lite-member enabled="false"/>

    <cardinality-estimator name="default">
        <backup-count>1</backup-count>
        <async-backup-count>0</async-backup-count>
        <merge-policy batch-size="100">HyperLogLogMergePolicy</merge-policy>
    </cardinality-estimator>

    <scheduled-executor-service name="default">
        <capacity>100</capacity>
        <durability>1</durability>
        <pool-size>16</pool-size>
        <merge-policy batch-size="100">com.hazelcast.spi.merge.PutIfAbsentMergePolicy</merge-policy>
    </scheduled-executor-service>

    <crdt-replication>
        <replication-period-millis>1000</replication-period-millis>
        <max-concurrent-replication-targets>1</max-concurrent-replication-targets>
    </crdt-replication>

    <pn-counter name="default">
        <replica-count>2147483647</replica-count>
        <statistics-enabled>true</statistics-enabled>
    </pn-counter>

    <cp-subsystem>
        <cp-member-count>0</cp-member-count>
        <group-size>0</group-size>
        <session-time-to-live-seconds>300</session-time-to-live-seconds>
        <session-heartbeat-interval-seconds>5</session-heartbeat-interval-seconds>
        <missing-cp-member-auto-removal-seconds>14400</missing-cp-member-auto-removal-seconds>
        <fail-on-indeterminate-operation-state>false</fail-on-indeterminate-operation-state>
        <raft-algorithm>
            <leader-election-timeout-in-millis>2000</leader-election-timeout-in-millis>
            <leader-heartbeat-period-in-millis>5000</leader-heartbeat-period-in-millis>
            <max-missed-leader-heartbeat-count>5</max-missed-leader-heartbeat-count>
            <append-request-max-entry-count>100</append-request-max-entry-count>
            <commit-index-advance-count-to-snapshot>10000</commit-index-advance-count-to-snapshot>
            <uncommitted-entry-count-to-reject-new-appends>100</uncommitted-entry-count-to-reject-new-appends>
            <append-request-backoff-timeout-in-millis>100</append-request-backoff-timeout-in-millis>
        </raft-algorithm>
    </cp-subsystem>
</hazelcast>
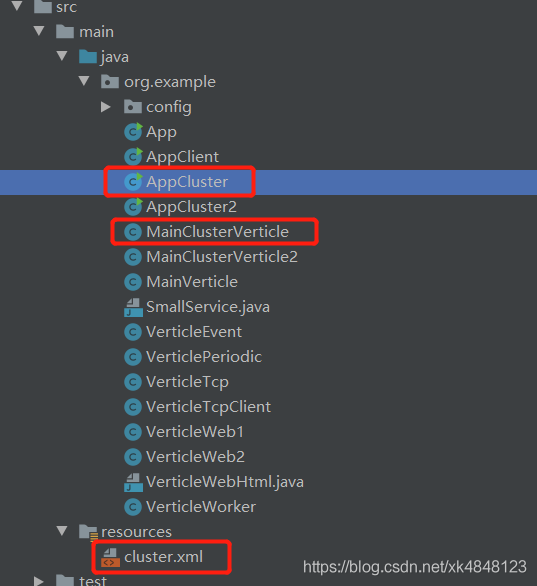
项目目录结构
集群启动及原理分析

该进程三个重要的TCP端口。
58327端口连接192.168.2.112:7070用于发送该vertx服务jvm数据。
58331端口用于集群中别的vertx服务通过eventbus向它发数据。
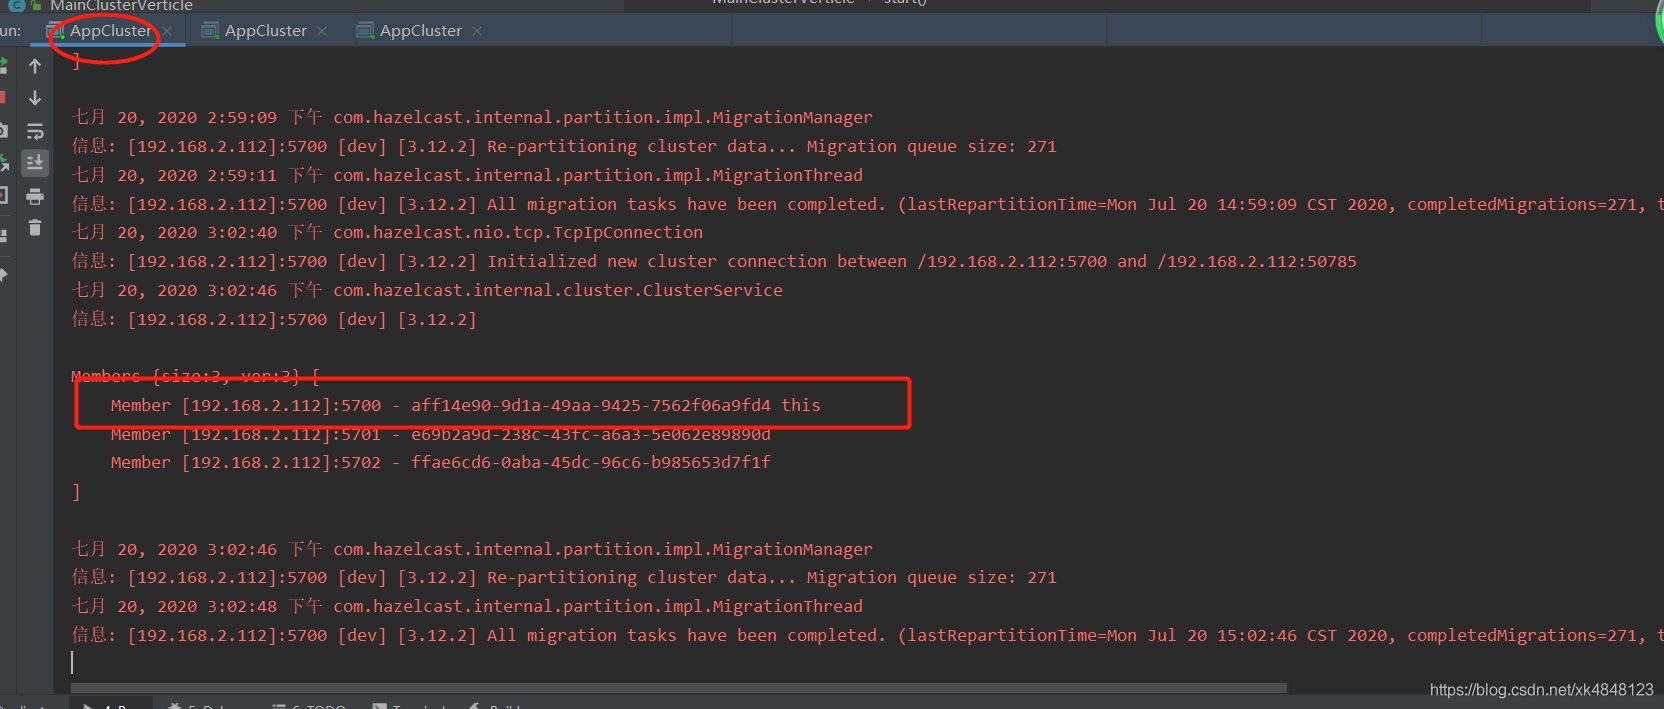
5700端口,实验中观察发现集群中启动n个服务,每个服务都会与其他n-1个服务建立连接,并且通过心跳保持连接,这样就可以在一个服务挂掉以后,别的服务会有断开连接提示进而知道集群中某节点挂掉。
该进程一个重要UDP端口,组播端口,用于互相告知连接端口,如果上面的5700,进而建立连接形成集群。
第一个vertx服务启动界面
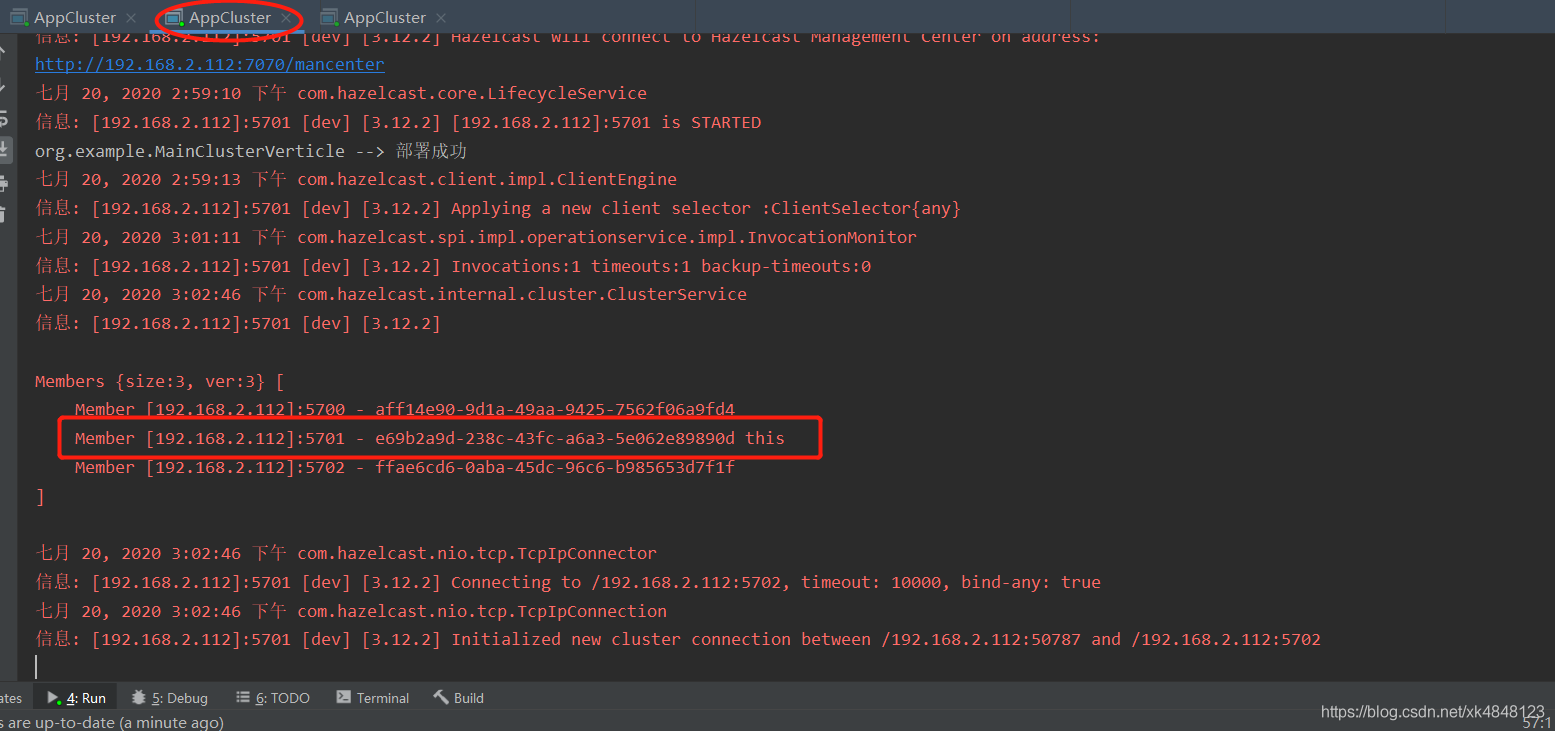
第二个vertx服务启动界面
第三个vertx服务启动界面
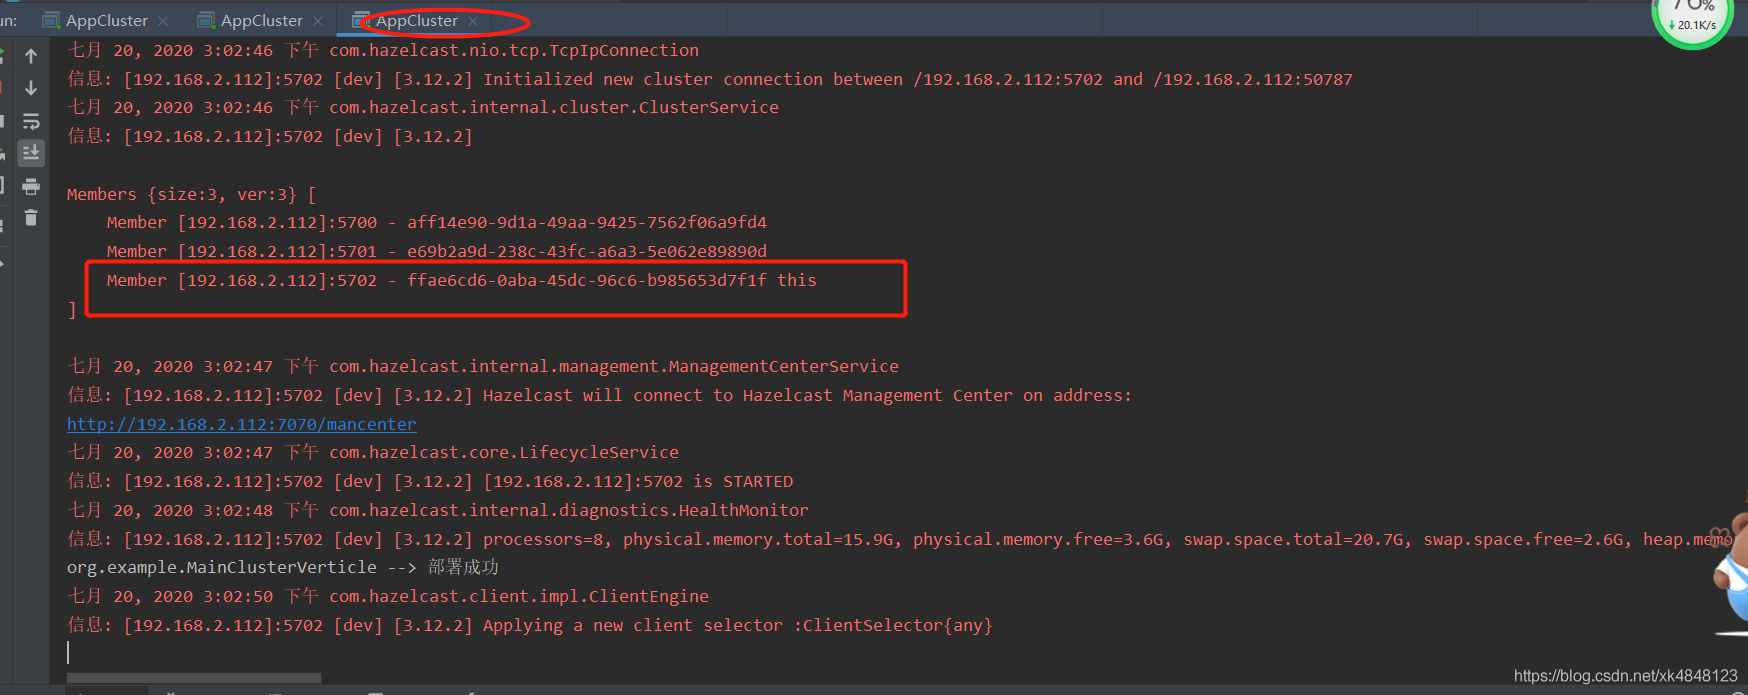
可以看出每个服务都保存一份集群节点
从第一个进程(4980)的套接字看

可以看出第一个进程通过它的集群端口(5700端口)和其他两个集群中的服务保持了TCP连接从而建立集群
从第二个进程的套接字看(3376)
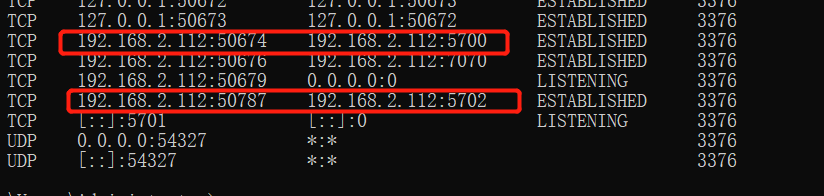
可以看出第二个进程通过50674端口和第一个进程集群端口(5700端口)保持TCP连接建立集群,通过50787端口连接第三个进程的集群端口(5702端口)保持TCP连接建立集群
看图可能会直观一点
资料来自:如下评论 及 https://blog.csdn.net/elinespace/category_7675648.html, https://blog.csdn.net/xk4848123/article/details/107462242