vim 手册
vimtutor 精简版本
help user-manual 详细手册
一些vim自带设置
直接在~/.vimrc文件上写上如下配置即可
set nu "显示行号
set cursorline "高亮显示当前行
set cursorcolumn "高亮显示当前列
set hlsearch "高亮显示搜索结果

" 自适应不同语言的智能缩进
filetype indent on
" 将制表符扩展为空格
set expandtab
" 设置编辑时制表符占用空格数
set tabstop=4
" 设置格式化时制表符占用空格数
set shiftwidth=4
" 让 vim 把连续数量的空格视为一个制表符
set softtabstop=4
Manjaro下让vim支持clipboard
使用命令vim --version | grep "clipboard"来查看是否支持clipboard,如若看到-clipboard就是不支持,如果看到+clipboard就是支持。
如果是不支持那就使用sudo pacman -S gvim安装gui版本的vim。
复制到系统剪切板的命令是:"+y注意那个加号是真的要输入的+, 粘贴系统剪贴板的命令是shift insert或者ctrl shift v。
Windows下让vim支持clipboard
我是使用MSYS2安装的vim:pacman -S vim,安装后vim --version | grep "clipboard"发现直接能看到+clipboard。
MSYS2的使用参考另外的文章:https://www.cnblogs.com/feipeng8848/p/10038421.html
Ubuntu
sudo apt install vim-gtk
插件管理 vim-plugin
下载下面的文件:
https://raw.githubusercontent.com/junegunn/vim-plug/master/plug.vim
并将文件放在 windows 中的 ~/vimfiles/autoload 或 unix 中的 ~/.vim/autoload 文件夹内
https://www.v2ex.com/t/532549
安装插件
安装插件,只需要将插件写在 .vimrc 内,然后在 vim 中使用 :PlugInstall 命令即可:
call plug#begin('~/.vim/plugged')
Plug 'vim-airline/vim-airline'
call plug#end()
确保插件要放在 begin 和 end 之间
重新打开 vim 使用命令 :PlugInstall
Finishing ... Done! 表示安装完成
plug-vim的github页面有很多插件的例子可以参考
删除插件
删除插件,只需要将写在 .vimrc 配置文件内的插件删除,重启 vim 并执行命令 :PlugClean 即可:
call plug#begin('~/.vim/plugged')
call plug#end()
保存在 vim 中使用 :PlugClean:
设置代码高亮
打开~/.vimrc文件追加一行syntax on 这是默认的vim代码高亮设置,插件的后面再说。
nerdtree插件
用于列出目录树,效果如下图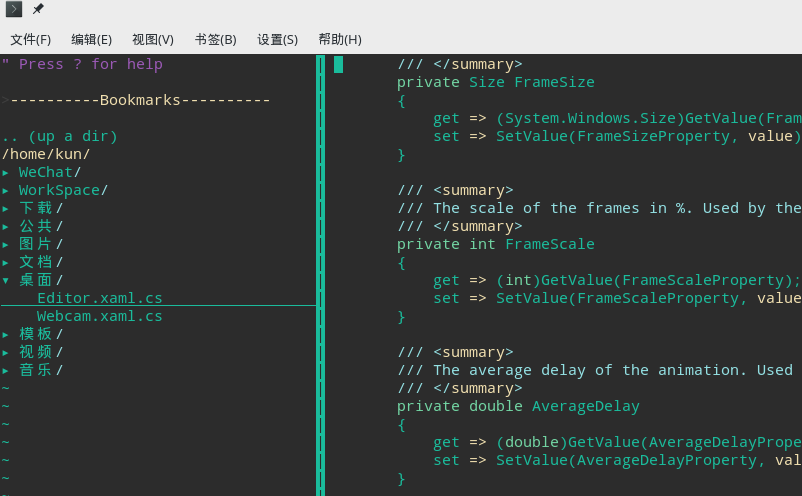
github 链接:https://github.com/scrooloose/nerdtree
安装:打开~/.vimrc 添加如下命令
call plug#begin('~/.vim/plugged')
Plug 'scrooloose/nerdtree', { 'on': 'NERDTreeToggle' }
call plug#end()
然后打开vim输入PluginInstall
配置nerdtree
以下翻译自github帮助文档,直接在~/.vimrc文件中写入配置就行
1、在vim启动时自动打开NERDTree
autocmd vimenter * NERDTree
2、如果没有指定文件,如何在vim启动时自动打开NERDTree?
autocmd StdinReadPre * let s:std_in=1
autocmd VimEnter * if argc() == 0 && !exists("s:std_in") | NERDTree | endif
3、如何映射特定键或快捷方式以打开NERDTree?
下面的配置使用control n切换是否打开nerdtree
map <C-n> :NERDTreeToggle<CR>
更多配置可参考github DOC目录下的教程
另外一些常用快捷键
ctrl + w + h 光标 focus 左侧树形目录
ctrl + w + l 光标 focus 右侧文件显示窗口
ctrl + w + w 光标自动在左右侧窗口切换
ctrl + w + r 移动当前窗口的布局位置
我的配置
" NERD tree
let NERDChristmasTree=0
let NERDTreeWinSize=35
let NERDTreeChDirMode=2
let NERDTreeIgnore=['~$', '.pyc$', '.swp$']
let NERDTreeShowBookmarks=1
let NERDTreeWinPos="left"
" 打开vim自动打开nerdtree
autocmd vimenter * NERDTree
" Automatically open a NERDTree if no files where specified
autocmd vimenter * if !argc() | NERDTree | endif
" 自动关闭nerdtree
autocmd bufenter * if (winnr("$") == 1 && exists("b:NERDTree") && b:NERDTree.isTabTree()) | q | endif
"open NERDTree automatically when vim starts up on opening a directory
autocmd StdinReadPre * let s:std_in=1
autocmd VimEnter * if argc() == 1 && isdirectory(argv()[0]) && !exists("s:std_in") | exe 'NERDTree' argv()[0] | wincmd p | ene | exe 'cd '.argv()[0] | endif
" Open a NERDTree
map <C-n> :NERDTreeToggle<CR>
Molokai 配色方案
下载文件https://github.com/tomasr/molokai,colors放置到.vim文件夹下
.vimrc文件添加:
Plugin 'tomasr/molokai'
编辑.vimrc文件,增加以下配置
"molokai配色方案
colorscheme molokai
let g:molokai_original = 1
set t_Co=256
set background=dark
Vim Powerline
一个显示vim状态栏插件,它能够显示vim模式、操作环境、编码格式、行数/列数等信息。
https://github.com/powerline/powerline
Plugin 'Lokaltog/vim-powerline'
代码缩进树
https://github.com/nathanaelkane/vim-indent-guides
Plugin 'nathanaelkane/vim-indent-guides'
然后进vim PluginInstall
在.vimrc中做一些设置
" 随 vim 自启动
let g:indent_guides_enable_on_vim_startup=1
" 从第二层开始可视化显示缩进
let g:indent_guides_start_level=2
" 色块宽度
let g:indent_guides_guide_size=1
" 快捷键 i 开/关缩进可视化
:nmap <silent> <Leader>i <Plug>IndentGuidesToggle
代码补全
https://github.com/ycm-core/YouCompleteMe
Plug 'ycm-core/YouCompleteMe', { 'do': './install.py' }
在plug-vim中安装之后,插件会出现在 ~/.vim/plugged目录下
编译需要
sudo apt install build-essential cmake python3-dev
然后去编译即可
cd ~/.vim/plugged/YouCompleteMe
python3 install.py --clang-completer
YCM还提供以下附加语言支持选项:(机翻自github 的 readme.md)
C#支持:安装Mono( https://www.mono-project.com/download/stable/#download-lin )并在调用install.py的时候添加--cs-completer 。
去支持:安装Go并--go-completer在调用时 添加install.py。
JavaScript和TypeScript支持:安装Node.js和npm并--ts-completer在调用时添加install.py。
Rust支持:--rust-completer在调用时添加install.py。
如果你的Python解释器比2.7.9老,您还需要 rustup你PATH。
Java支持:安装JDK8(需要版本8)并--java-completer在调用时添加 install.py。
要简单地编译启用的所有内容,就会有一个--all标志。请注意,这个标志也没有安装clangd。您需要通过添加手动指定它--clangd-completer。
因此,安装了所有的语言特性,保证 xbuild,go,tsserver,node,npm和安装工具和你PATH,然后只需运行:
cd ~/.vim/bundle/YouCompleteMe
python3 install.py --all
编译过程中遇到了一些问题找不到文件等。后发现那个目录缺少文件,删除那个目录然后重新执行git submodule update --init --recursive 后解决
错误信息
CMake Error: The source directory "/home/kun/.vim/bundle/YouCompleteMe/third_party/ycmd/third_party/cregex" does not appear to contain CMakeLists.txt.
Specify --help for usage, or press the help button on the CMake GUI.
ERROR: the build failed.                                                                                                                                        NOTE: it is *highly* unlikely that this is a bug but rather
that this is a problem with the configuration of your system or a missing dependency. Please carefully read CONTRIBUTING.md
and if you're sure that it is a bug, please raise an issue on the issue tracker, including the entire output of this script
and the invocation line used to run it.
解决: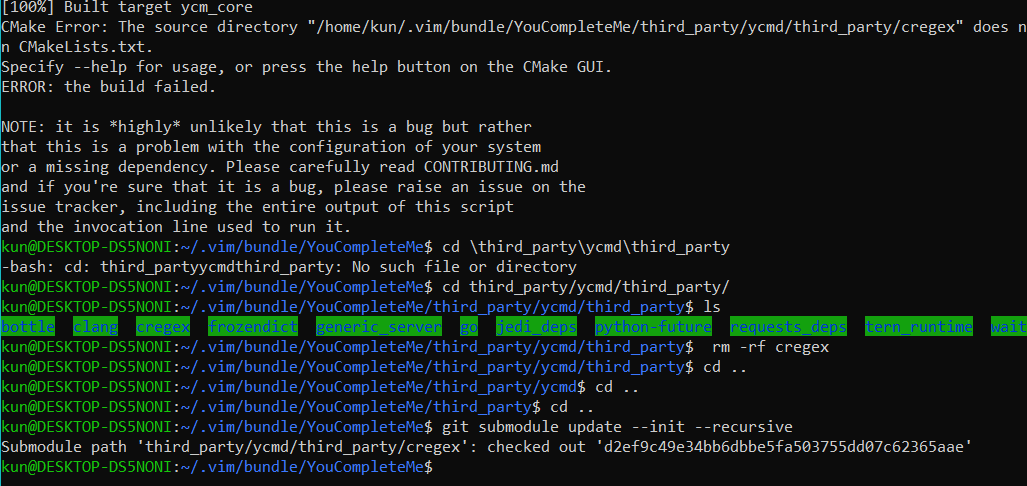
然后再执行python3 install.py --all编译就好了
此时,YCM应该是可以做一些简单的代码补全了,但是,还没有那么好用,比如我装的C#,system.之后没有任何提示。
接下来就是配置了,配置完才好用。
对于c家族语言
用ycm自带的.ycm_extra_conf.py文件.
cp third_party/ycmd/examples/.ycm_extra_conf.py ~/
配置.vimrc文件
let g:ycm_global_ycm_extra_conf='~/.ycm_extra_conf.py'
其他
https://github.com/Lokaltog/vim-powerline 已经不再维护,有新版本,但是需要安装很多东西,Python啥的。
这里用老版本就是上面的链接,在 .vimrc中添加Plugin 'Lokaltog/vim-powerline'后在vim中执行PluginInstall就可以了
vim使用系统的粘贴板
https://www.cnblogs.com/jpfss/p/9040561.html
参考
https://github.com/yangyangwithgnu/use_vim_as_ide
https://saul-mirone.github.io/2017/06/20/vim-config/
http://yuez.me/cong-ling-da-jian-he-pei-zhi-osxkai-fa-huan-jing/
http://yuez.me/jiang-ni-de-vim-da-zao-cheng-qing-qiao-qiang-da-de-ide/
https://blog.csdn.net/zhangpower1993/article/details/52184581
http://www.wklken.me/posts/2015/06/07/vim-plugin-tagbar.html
YouCompleteMe https://vimjc.com/vim-youcompleteme-install.html
YouCompleteMe https://www.jianshu.com/p/d908ce81017a?nomobile=yes
关于vundle : https://zhuanlan.zhihu.com/p/54078065