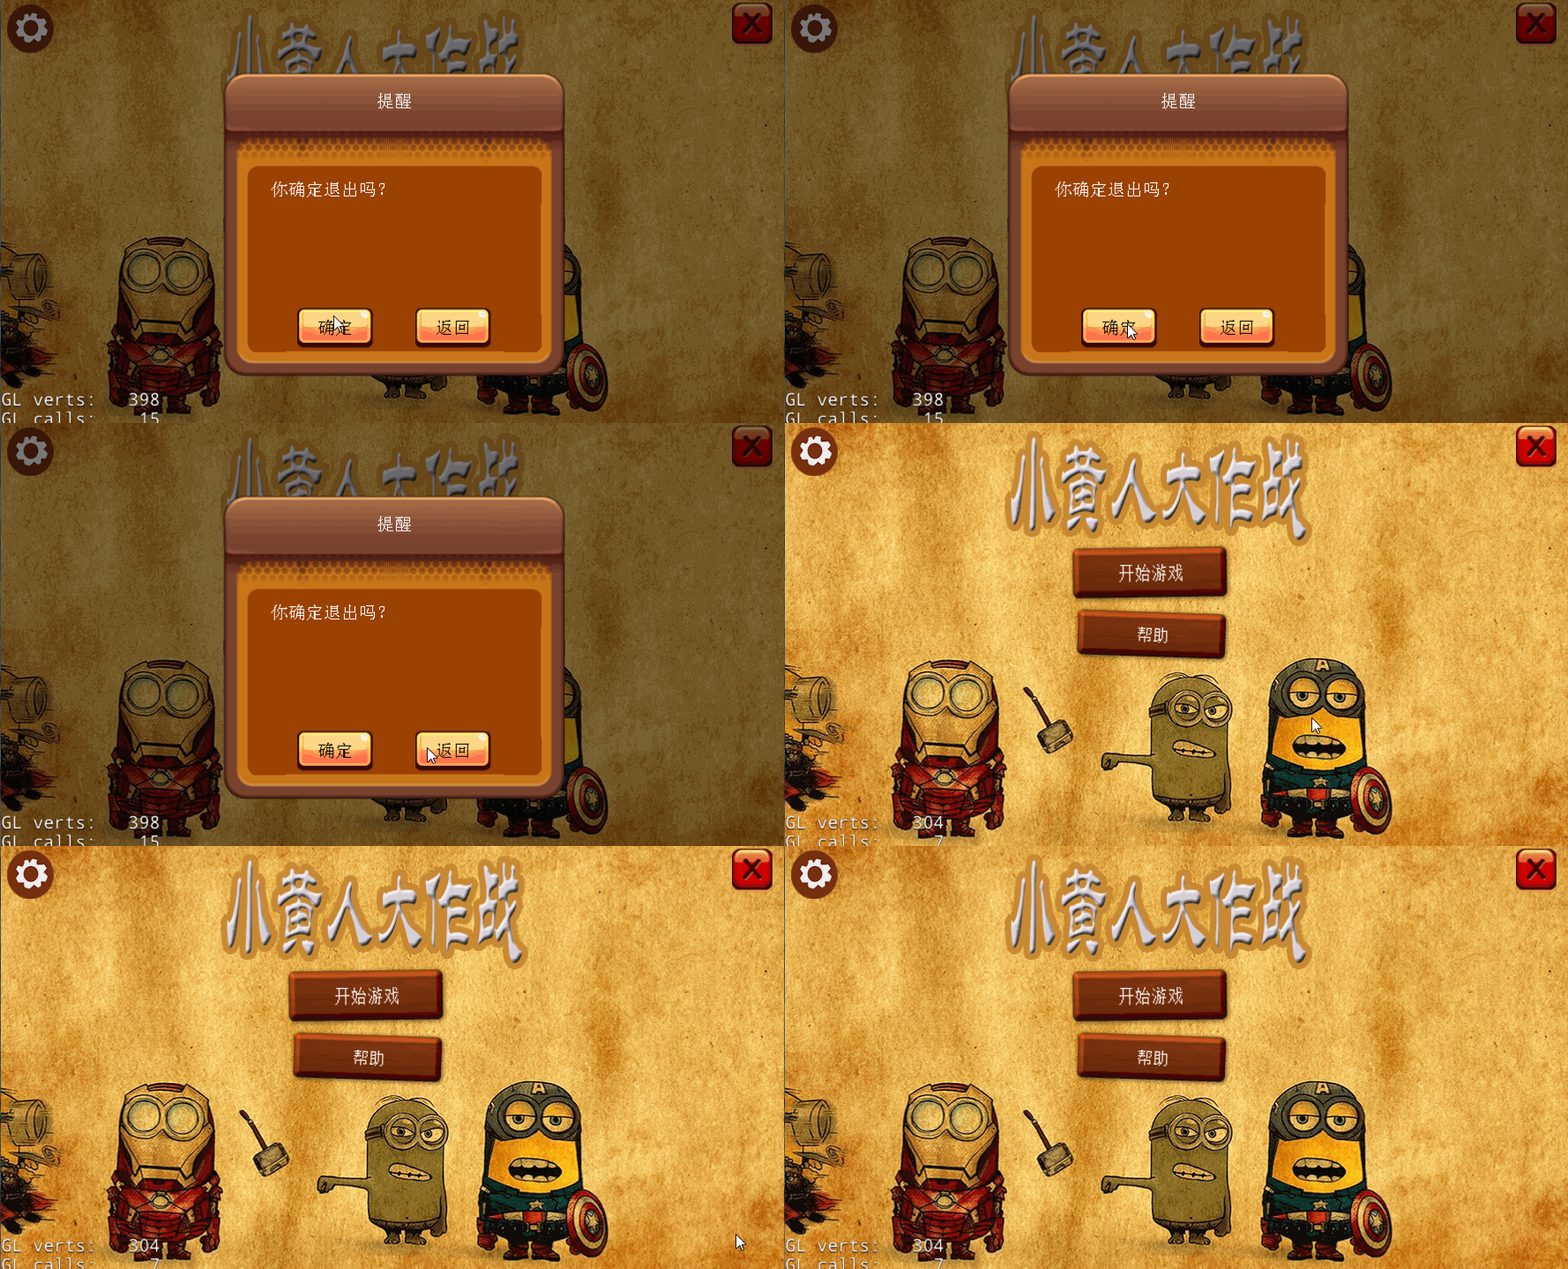
心情不好,恩,不扯淡了。直接讲。
==================================
在泰然看了一篇实现模态对话框的文章,写的还不错,然后在其基础上加了我简单加了一层灰色透明背景。这样子界面效果看起来会更友好一点,好吧。原谅我的无耻,原创转载什么的也不在意了,原文在这里,今天感觉有点累,恩。主要是大神不能带我飞了,非常是失落,好吧,不说废话了。
在游戏中,我们经常须要实现弹出一个模态对话框,比方说游戏暂停,退出提示对话框等
对话框特点例如以下:
1.可定制的,比方说背景图,标题,文本,按钮等,依据须要加入和设置
2.须要屏蔽对话框下层的触摸
3.为了友好的效果显示。把不可触摸的部分变为灰色
先来看一张效果图:
为了完毕这样一个效果,思路例如以下:
1.设计一个弹出对话框的类PopupLayer,继承于LayerColor。这样子我们就能够设置背景版透明,看起来好像把对话框下层的变灰暗了
        setColor(ccc3(0,0,0));
setOpacity(128); 2.加入触摸事件。屏蔽下层触摸。也就是在Layer中设置不向下传递
        //add layer touch event
	auto listener = EventListenerTouchOneByOne::create();
	listener->setSwallowTouches(true);//不向下传递触摸
	listener->onTouchBegan = CC_CALLBACK_2(PopupLayer::onTouchBegan, this);
	listener->onTouchMoved = CC_CALLBACK_2(PopupLayer::onTouchMoved, this);
	listener->onTouchEnded = CC_CALLBACK_2(PopupLayer::onTouchEnded, this);
	auto dispatcher = Director::getInstance()->getEventDispatcher();
	dispatcher->addEventListenerWithSceneGraphPriority(listener, this);
3.PopupLayer类 实现 可定制对话框标题,按钮,文本,背景图片等
    //标题
    void setTitle(const char* title, int fontsize = 20);
    //文本
    void setContentText(const char* text, int fontsize = 20, int padding = 50, int paddintTop = 100);
    //设置button回调事件
    void setCallbackFunc(Ref* target, SEL_CallFuncN callfun);
     //加入button
bool addButton(const char* normalImage, const char* selectedImage, const char* title, int tag = 0);4.按钮回调函数实现也比較简单,首先设置外部的回调对象和回调函数
    Ref* m_callbackListener;    //回调对象
    SEL_CallFuncN m_callback;   //回调函数

    //设置按钮的回调函数
    void PopupLayer::setCallbackFunc(Ref* target, SEL_CallFuncN callfun){
    m_callbackListener = target;
    m_callback = callfun;
    }
然后在PopupLayer类中比方说我们加入一个菜单按钮
 // 创建图片菜单按钮
    auto item = MenuItemImage::create(
        normalImage,
        selectedImage,
        CC_CALLBACK_1(PopupLayer::buttonCallBack,this));
item->setTag(tag);设置button回调函数。然后由这个回调函数去调用外部的button监听函数。然后关闭对话框
//button回调函数
    void PopupLayer::buttonCallBack(Ref* pSender){
    Node* node = dynamic_cast<Node*>(pSender);
    CCLog("【====PopupLayer::buttonCallBack====】touch tag: %d", node->getTag());
    if (m_callback && m_callbackListener){
        (m_callbackListener->*m_callback)(node);
    }
this->removeFromParent();}5.然后使用方法也比較简单。假设须要对话框内容显示中文,能够參考:cocos2d-x 3.0 使用Sax解析xml文档(解决中文显示问题)这篇文章
    //弹出对话框
    pl = PopupLayer::create("BackGround.png",Size(400,350));
    pl->setTitle("title");
    pl->setContentText("Are you sure exit?", 20, 60, 250);
    pl->setCallbackFunc(this, callfuncN_selector(WelcomeScene::popButtonCallback));//设置按钮回调
    pl->addButton("pop_button.png", "pop_button.png", "yes", 0);
    pl->addButton("pop_button.png", "pop_button.png", "no", 1);
    this->addChild(pl);
外部回调函数实现,依据tag推断点了什么按钮
void WelcomeScene::popButtonCallback(Node *pNode){
    CCLog("【=====WelcomeScene::popButtonCallback======】button call back. tag: %d", pNode->getTag());
    //exit
    if(pNode->getTag() == 0){
        Director::getInstance()->end();
    }
}
恩,思路大概这样子,完整的对话框类例如以下。亲们能够复制直接使用
#pragma once

#include "cocos2d.h"
#include "cocos-ext.h"

using namespace cocos2d;
using namespace cocos2d::extension;

class PopupLayer : public LayerColor{
public:
	PopupLayer();
	~PopupLayer();

	virtual bool init();
	CREATE_FUNC(PopupLayer);
	static PopupLayer* create(const char* backgroundImage,Size dialogSize);

	//touch事件监听 屏蔽向下触摸
	bool onTouchBegan(Touch *touch, Event *event);
	void onTouchMoved(Touch *touch, Event *event);
	void onTouchEnded(Touch* touch, Event* event);

	//标题
	void setTitle(const char* title, int fontsize = 20);
	//文本
	void setContentText(const char* text, int fontsize = 20, int padding = 50, int paddintTop = 100);
	//设置button回调事件
	void setCallbackFunc(Ref* target, SEL_CallFuncN callfun);
	//加入button
	bool addButton(const char* normalImage, const char* selectedImage, const char* title, int tag = 0);

	virtual void onEnter();
	virtual void onExit();

	void backgroundFinish();

private:

	void buttonCallBack(Ref* pSender);

	// 文字内容两边的空白区
	int m_contentPadding;
	int m_contentPaddingTop;

	Size m_dialogContentSize;

	Ref* m_callbackListener;
	SEL_CallFuncN m_callback;

	//set and get
	CC_SYNTHESIZE_RETAIN(Menu*, m__pMenu, MenuButton);
	CC_SYNTHESIZE_RETAIN(Sprite*, m__sfBackGround, SpriteBackGround);
	CC_SYNTHESIZE_RETAIN(Scale9Sprite*, m__s9BackGround, Sprite9BackGround);
	CC_SYNTHESIZE_RETAIN(LabelTTF*, m__ltTitle, LabelTitle);
	CC_SYNTHESIZE_RETAIN(LabelTTF*, m__ltContentText, LabelContentText);
};
cpp文件实现例如以下:
#include "PopupLayer.h"

PopupLayer::PopupLayer():
	m__pMenu(NULL)
	, m_contentPadding(0)
	, m_contentPaddingTop(0)
	, m_callbackListener(NULL)
	, m_callback(NULL)
	, m__sfBackGround(NULL)
	, m__s9BackGround(NULL)
	, m__ltContentText(NULL)
	, m__ltTitle(NULL)
{

}

PopupLayer::~PopupLayer(){
	CC_SAFE_RELEASE(m__pMenu);
	CC_SAFE_RELEASE(m__sfBackGround);
	CC_SAFE_RELEASE(m__ltContentText);
	CC_SAFE_RELEASE(m__ltTitle);
	CC_SAFE_RELEASE(m__s9BackGround);
}

bool PopupLayer::init(){
	if(!LayerColor::init()){
		return false;
	}
	// 初始化须要的 Menu
	Menu* menu = Menu::create();
	menu->setPosition(CCPointZero);
	setMenuButton(menu);

	//add layer touch event
	auto listener = EventListenerTouchOneByOne::create();
	listener->setSwallowTouches(true);
	listener->onTouchBegan = CC_CALLBACK_2(PopupLayer::onTouchBegan, this);
	listener->onTouchMoved = CC_CALLBACK_2(PopupLayer::onTouchMoved, this);
	listener->onTouchEnded = CC_CALLBACK_2(PopupLayer::onTouchEnded, this);
	auto dispatcher = Director::getInstance()->getEventDispatcher();
	dispatcher->addEventListenerWithSceneGraphPriority(listener, this);

	setColor(ccc3(0,0,0));
	setOpacity(128);

	return true;
}

bool PopupLayer::onTouchBegan(Touch *touch, Event *event){
	return true;
}

void PopupLayer::onTouchMoved(Touch *touch, Event *event){

}

void PopupLayer::onTouchEnded(Touch* touch, Event* event){

}

PopupLayer* PopupLayer::create(const char* backgroundImage, Size dialogSize){

	PopupLayer* layer = PopupLayer::create();

//	layer->setSpriteBackGround(Sprite::create(backgroundImage));
	layer->setSprite9BackGround(Scale9Sprite::create(backgroundImage));

	layer->m_dialogContentSize = dialogSize;

	return layer;
}

void PopupLayer::setTitle(const char* title, int fontsize /* = 20 */){
	LabelTTF* label = LabelTTF::create(title,"",fontsize);
	setLabelTitle(label);
}

void PopupLayer::setContentText(const char *text, int fontsize, int padding, int paddingTop){
	LabelTTF* ltf = LabelTTF::create(text, "", fontsize);
	setLabelContentText(ltf);
	m_contentPadding = padding;
	m_contentPaddingTop = paddingTop;
}

void PopupLayer::setCallbackFunc(Ref* target, SEL_CallFuncN callfun){
	m_callbackListener = target;
	m_callback = callfun;
}

bool PopupLayer::addButton(const char* normalImage, const char* selectedImage, const char* title, int tag /* = 0 */){

	auto size = Director::getInstance()->getWinSize();
	auto center = Point(size.width / 2, size.height / 2);

	// 创建图片菜单按钮
	auto item = MenuItemImage::create(
		normalImage,
		selectedImage,
		CC_CALLBACK_1(PopupLayer::buttonCallBack,this));
	item->setTag(tag);
	item->setPosition(center);

	// 加入文字说明并设置位置
	Size itemSize = item->getContentSize();
	LabelTTF* ttf = LabelTTF::create(title, "", 20);
	ttf->setColor(Color3B(0, 0, 0));
	ttf->setPosition(Point(itemSize.width / 2, itemSize.height / 2));
	item->addChild(ttf);

	getMenuButton()->addChild(item);

	return true;
}

void PopupLayer::buttonCallBack(Ref* pSender){
	Node* node = dynamic_cast<Node*>(pSender);
	CCLog("【====PopupLayer::buttonCallBack====】touch tag: %d", node->getTag());
	if (m_callback && m_callbackListener){
		(m_callbackListener->*m_callback)(node);
	}
	this->removeFromParent();
}

void PopupLayer::onEnter(){
	LayerColor::onEnter();

	Size winSize = CCDirector::getInstance()->getWinSize();
	Point pCenter = Point(winSize.width / 2, winSize.height / 2);

//	Size contentSize ;
	// 设定好參数。在执行时载入
	//假设没有设置 ContentSize 。那么採取的方案是,窗体大小与传入图片一样大
// 	if (getContentSize().equals(this->getParent()->getContentSize())) {
// 		getSpriteBackGround()->setPosition(ccp(winSize.width / 2, winSize.height / 2));
// 		this->addChild(getSpriteBackGround(), 0, 0);
// 		contentSize = getSpriteBackGround()->getTexture()->getContentSize();
// 	} else {
// 		Scale9Sprite *background = getSprite9BackGround();
// 		background->setContentSize(getContentSize());
// 		background->setPosition(ccp(winSize.width / 2, winSize.height / 2));
// 		this->addChild(background, 0, 0);
// 		contentSize = getContentSize();
// 	}
	//加入背景图片
	Scale9Sprite *background = getSprite9BackGround();
	background->setContentSize(m_dialogContentSize);
	background->setPosition(Point(winSize.width / 2, winSize.height / 2));
	this->addChild(background,0,0);

	// 弹出效果
	Action* popupLayer = Sequence::create(
		ScaleTo::create(0.0, 0.0),
		ScaleTo::create(0.2, 1.05),
		ScaleTo::create(0.2, 0.95),
		ScaleTo::create(0.1, 1.0),
		CallFunc::create(CC_CALLBACK_0(PopupLayer::backgroundFinish,this)),
		NULL
		);
	background->runAction(popupLayer);


}

void PopupLayer::backgroundFinish(){

	Size winSize = CCDirector::getInstance()->getWinSize();
	Point pCenter = Point(winSize.width / 2, winSize.height / 2);

	// 加入按钮,并设置其位置
	this->addChild(getMenuButton());
	float btnWidth = m_dialogContentSize.width / (getMenuButton()->getChildrenCount() + 1);

	Vector<Node*> vector = getMenuButton()->getChildren();
	Ref* pObj = NULL;
	int i = 0;
	for(Node* pObj : vector){
		Node* node = dynamic_cast<Node*>(pObj);
		node->setPosition(Point( winSize.width / 2 - m_dialogContentSize.width / 2 + btnWidth * (i + 1), winSize.height / 2 - m_dialogContentSize.height / 3));
		i++;
	}

	// 显示对话框标题
	if (getLabelTitle()){
		getLabelTitle()->setPosition(ccpAdd(pCenter, ccp(0, m_dialogContentSize.height / 2 - 35.0f)));
		this->addChild(getLabelTitle());
	}

	// 显示文本内容
	if (getLabelContentText()){
		CCLabelTTF* ltf = getLabelContentText();
		ltf->setPosition(ccp(winSize.width / 2, winSize.height / 2));
		ltf->setDimensions(CCSizeMake(m_dialogContentSize.width - m_contentPadding * 2, m_dialogContentSize.height - m_contentPaddingTop));
		ltf->setHorizontalAlignment(kCCTextAlignmentLeft);
		this->addChild(ltf);
	}
}


void PopupLayer::onExit(){

	CCLog("popup on exit.");
	CCLayerColor::onExit();
}
