http://nginx.org/
https://coding.net/u/aminglinux/p/nginx/git/blob/master/2z/nginx.repo
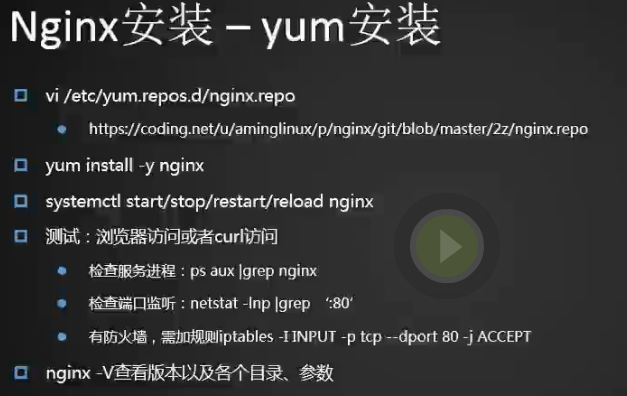
1.安装最新稳定版本,可以安装epel-release扩展源,但是用epel安装的这个版本比较老,我们这里用yum nignx源安装,创建一个nginx yum源
[root@centos-03 ~]# vim /etc/yum.repos.d/nginx.repo^C
[root@centos-03 ~]# cat /etc/yum.repos.d/nginx.repo
[nginx]
name=nginx repo
baseurl=http://nginx.org/packages/centos/$releasever/$basearch/
gpgcheck=0
enabled=1
[root@centos-03 ~]#
2.用yum list命令查看下nginx的版本,如果有epel的源,为了避免产生冲突我们将epel源先关掉
[root@centos-03 ~]# mv /etc/yum.repos.d/epel.repo epel.repo.bak
3.我们之前安装过nginx包先卸载掉
[root@centos-03 ~]# yum remove nginx-filesystem
[root@centos-03 ~]# yum list | grep nginx
nginx.x86_64                                1:1.14.0-1.el7_4.ngx       nginx
nginx-debug.x86_64                          1:1.8.0-1.el7.ngx          nginx
nginx-debuginfo.x86_64                      1:1.14.0-1.el7_4.ngx       nginx
nginx-module-geoip.x86_64                   1:1.14.0-1.el7_4.ngx       nginx
nginx-module-geoip-debuginfo.x86_64         1:1.14.0-1.el7_4.ngx       nginx
nginx-module-image-filter.x86_64            1:1.14.0-1.el7_4.ngx       nginx
nginx-module-image-filter-debuginfo.x86_64  1:1.14.0-1.el7_4.ngx       nginx
nginx-module-njs.x86_64                     1:1.14.0.0.2.2-1.el7_4.ngx nginx
nginx-module-njs-debuginfo.x86_64           1:1.14.0.0.2.2-1.el7_4.ngx nginx
nginx-module-perl.x86_64                    1:1.14.0-1.el7_4.ngx       nginx
nginx-module-perl-debuginfo.x86_64          1:1.14.0-1.el7_4.ngx       nginx
nginx-module-xslt.x86_64                    1:1.14.0-1.el7_4.ngx       nginx
nginx-module-xslt-debuginfo.x86_64          1:1.14.0-1.el7_4.ngx       nginx
nginx-nr-agent.noarch                       2.0.0-12.el7.ngx           nginx
pcp-pmda-nginx.x86_64                       3.12.2-5.el7               base
[root@centos-03 ~]#
4.开始yum安装nginx
[root@centos-03 ~]# yum install -y nginx
5.启动nginx
[root@centos-03 ~]# systemctl start nginx
[root@centos-03 ~]# ps aux|grep nginx
root       2702  0.0  0.0  48524   972 ?        Ss   23:46   0:00 nginx: master process /usr/sbin/nginx -c /etc/nginx/nginx.conf
nginx      2703  0.0  0.1  48928  1924 ?        S    23:46   0:00 nginx: worker process
root       2705  0.0  0.0 112660   964 pts/0    R+   23:46   0:00 grep --color=auto nginx
[root@centos-03 ~]# netstat -lntp
Active Internet connections (only servers)
Proto Recv-Q Send-Q Local Address           Foreign Address         State       PID/Program name
tcp        0      0 0.0.0.0:80              0.0.0.0:*               LISTEN      2702/nginx: master
tcp        0      0 0.0.0.0:22              0.0.0.0:*               LISTEN      1419/sshd
tcp        0      0 127.0.0.1:25            0.0.0.0:*               LISTEN      2521/master
tcp6       0      0 :::22                   :::*                    LISTEN      1419/sshd
tcp6       0      0 ::1:25                  :::*                    LISTEN      2521/master
[root@centos-03 ~]#
6.curl访问nginx
[root@centos-03 ~]# curl 192.168.242.133
<!DOCTYPE html>
<html>
<head>
<title>Welcome to nginx!</title>
<style>
    body {
         35em;
        margin: 0 auto;
        font-family: Tahoma, Verdana, Arial, sans-serif;
    }
</style>
</head>
<body>
<h1>Welcome to nginx!</h1>
<p>If you see this page, the nginx web server is successfully installed and
working. Further configuration is required.</p>

<p>For online documentation and support please refer to
<a href="http://nginx.org/">nginx.org</a>.<br/>
Commercial support is available at
<a href="http://nginx.com/">nginx.com</a>.</p>

<p><em>Thank you for using nginx.</em></p>
</body>
</html>
[root@centos-03 ~]#
7.浏览器访问失败原因是服务器开启了iptables规则,关掉防火墙或者放行80端口
[root@centos-03 ~]# iptables -nvL
[root@centos-03 ~]# systemctl stop firewalld
[root@centos-03 ~]# iptables -nvL
Chain INPUT (policy ACCEPT 0 packets, 0 bytes)
 pkts bytes target     prot opt in     out     source               destination

Chain FORWARD (policy ACCEPT 0 packets, 0 bytes)
 pkts bytes target     prot opt in     out     source               destination

Chain OUTPUT (policy ACCEPT 0 packets, 0 bytes)
 pkts bytes target     prot opt in     out     source               destination
[root@centos-03 ~]#
[root@centos-03 ~]# systemctl stop iptables
[root@centos-03 ~]# iptables -I INPUT -p tcp --dport 80 -j ACCEPT
[root@centos-03 ~]#
8.查看nginx版本
[root@centos-03 ~]# nginx -V
nginx version: nginx/1.14.0
built by gcc 4.8.5 20150623 (Red Hat 4.8.5-16) (GCC)
built with OpenSSL 1.0.2k-fips  26 Jan 2017
TLS SNI support enabled
configure arguments: --prefix=/etc/nginx --sbin-path=/usr/sbin/nginx --modules-path=/usr/lib64/nginx/modules --conf-path=/etc/nginx/nginx.conf --error-log-path=/var/log/nginx/error.log --http-
log-path=/var/log/nginx/access.log --pid-path=/var/run/nginx.pid --lock-path=/var/run/nginx.lock --http-client-body-temp-path=/var/cache/nginx/client_temp --http-proxy-temp-path=/var/cache/
nginx/proxy_temp --http-fastcgi-temp-path=/var/cache/nginx/fastcgi_temp --http-uwsgi-temp-path=/var/cache/nginx/uwsgi_temp --http-scgi-temp-path=/var/cache/nginx/scgi_temp --user=nginx
--group=nginx --with-compat --with-file-aio --with-threads --with-http_addition_module --with-http_auth_request_module --with-http_dav_module --with-http_flv_module --with-http_gunzip_
module --with-http_gzip_static_module --with-http_mp4_module --with-http_random_index_module --with-http_realip_module --with-http_secure_link_module --with-http_slice_module
--with-http_ssl_module --with-http_stub_status_module --with-http_sub_module --with-http_v2_module --with-mail --with-mail_ssl_module --with-stream --with-stream_realip_module
--with-stream_ssl_module --with-stream_ssl_preread_module --with-cc-opt='-O2 -g -pipe -Wall -Wp,-D_FORTIFY_SOURCE=2 -fexceptions -fstack-protector-strong --param=ssp-buffer-size=4
-grecord-gcc-switches -m64 -mtune=generic -fPIC' --with-ld-opt='-Wl,-z,relro -Wl,-z,now -pie'
[root@centos-03 ~]#
总结:首先配置一个nginx yum源,yum install安装,启动
nginx安装(源码)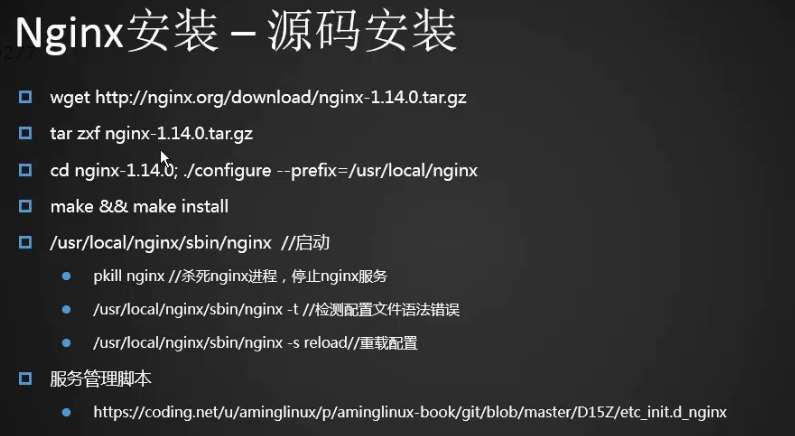
http://nginx.org/en/download.html
1.下载源码包
[root@centos-03 ~]# cd /usr/local/src/
[root@centos-03 src]# wget http://nginx.org/download/nginx-1.14.0.tar.gz
--2018-07-25 00:04:17--  http://nginx.org/download/nginx-1.14.0.tar.gz
正在解析主机 nginx.org (nginx.org)... 95.211.80.227, 206.251.255.63, 2001:1af8:4060:a004:21::e3, ...
正在连接 nginx.org (nginx.org)|95.211.80.227|:80... 已连接。
已发出 HTTP 请求,正在等待回应... 200 OK
长度:1016272 (992K) [application/octet-stream]
正在保存至: “nginx-1.14.0.tar.gz”

100%[======================================================================================>] 1,016,272    244KB/s 用时 4.1s

2018-07-25 00:04:22 (244 KB/s) - 已保存 “nginx-1.14.0.tar.gz” [1016272/1016272])

[root@centos-03 src]# ls
filebeat-6.3.1-x86_64.rpm  nginx-1.14.0.tar.gz
[root@centos-03 src]#
[root@centos-03 src]# du -sh nginx-1.14.0.tar.gz
996K    nginx-1.14.0.tar.gz
[root@centos-03 src]#
2.解压tar包
[root@centos-03 src]# tar zxvf nginx-1.14.0.tar.gz
3.编译安装可以查看配置参数
[root@centos-03 src]# ls
filebeat-6.3.1-x86_64.rpm  nginx-1.14.0  nginx-1.14.0.tar.gz
[root@centos-03 src]# cd nginx-1.14.0
[root@centos-03 nginx-1.14.0]# ./configure --help

  --help                             print this message

  --prefix=PATH                      set installation prefix
  --sbin-path=PATH                   set nginx binary pathname
  --modules-path=PATH                set modules path
  --conf-path=PATH                   set nginx.conf pathname
  --error-log-path=PATH              set error log pathname
  --pid-path=PATH                    set nginx.pid pathname
  --lock-path=PATH                   set nginx.lock pathname

  --user=USER                        set non-privileged user for
                                     worker processes
  --group=GROUP                      set non-privileged group for
                                     worker processes

  --build=NAME                       set build name
  --builddir=DIR                     set build directory

  --with-select_module               enable select module
  --without-select_module            disable select module
  --with-poll_module                 enable poll module
  --without-poll_module              disable poll module

  --with-threads                     enable thread pool support

  --with-file-aio                    enable file AIO support

  --with-http_ssl_module             enable ngx_http_ssl_module
  --with-http_v2_module              enable ngx_http_v2_module
  --with-http_realip_module          enable ngx_http_realip_module
  --with-http_addition_module        enable ngx_http_addition_module
  --with-http_xslt_module            enable ngx_http_xslt_module
  --with-http_xslt_module=dynamic    enable dynamic ngx_http_xslt_module
  --with-http_image_filter_module    enable ngx_http_image_filter_module
  --with-http_image_filter_module=dynamic
                                     enable dynamic ngx_http_image_filter_module
  --with-http_geoip_module           enable ngx_http_geoip_module
  --with-http_geoip_module=dynamic   enable dynamic ngx_http_geoip_module
  --with-http_sub_module             enable ngx_http_sub_module
  --with-http_dav_module             enable ngx_http_dav_module
  --with-http_flv_module             enable ngx_http_flv_module
  --with-http_mp4_module             enable ngx_http_mp4_module
  --with-http_gunzip_module          enable ngx_http_gunzip_module
  --with-http_gzip_static_module     enable ngx_http_gzip_static_module
  --with-http_auth_request_module    enable ngx_http_auth_request_module
  --with-http_random_index_module    enable ngx_http_random_index_module
  --with-http_secure_link_module     enable ngx_http_secure_link_module
  --with-http_degradation_module     enable ngx_http_degradation_module
  --with-http_slice_module           enable ngx_http_slice_module
  --with-http_stub_status_module     enable ngx_http_stub_status_module

  --without-http_charset_module      disable ngx_http_charset_module
  --without-http_gzip_module         disable ngx_http_gzip_module
  --without-http_ssi_module          disable ngx_http_ssi_module
  --without-http_userid_module       disable ngx_http_userid_module
  --without-http_access_module       disable ngx_http_access_module
  --without-http_auth_basic_module   disable ngx_http_auth_basic_module
  --without-http_mirror_module       disable ngx_http_mirror_module
  --without-http_autoindex_module    disable ngx_http_autoindex_module
  --without-http_geo_module          disable ngx_http_geo_module
  --without-http_map_module          disable ngx_http_map_module
  --without-http_split_clients_module disable ngx_http_split_clients_module
  --without-http_referer_module      disable ngx_http_referer_module
  --without-http_rewrite_module      disable ngx_http_rewrite_module
  --without-http_proxy_module        disable ngx_http_proxy_module
  --without-http_fastcgi_module      disable ngx_http_fastcgi_module
  --without-http_uwsgi_module        disable ngx_http_uwsgi_module
  --without-http_scgi_module         disable ngx_http_scgi_module
  --without-http_grpc_module         disable ngx_http_grpc_module
  --without-http_memcached_module    disable ngx_http_memcached_module
  --without-http_limit_conn_module   disable ngx_http_limit_conn_module
  --without-http_limit_req_module    disable ngx_http_limit_req_module
  --without-http_empty_gif_module    disable ngx_http_empty_gif_module
  --without-http_browser_module      disable ngx_http_browser_module
  --without-http_upstream_hash_module
                                     disable ngx_http_upstream_hash_module
  --without-http_upstream_ip_hash_module
                                     disable ngx_http_upstream_ip_hash_module
  --without-http_upstream_least_conn_module
                                     disable ngx_http_upstream_least_conn_module
  --without-http_upstream_keepalive_module
                                     disable ngx_http_upstream_keepalive_module
  --without-http_upstream_zone_module
                                     disable ngx_http_upstream_zone_module

  --with-http_perl_module            enable ngx_http_perl_module
  --with-http_perl_module=dynamic    enable dynamic ngx_http_perl_module
  --with-perl_modules_path=PATH      set Perl modules path
  --with-perl=PATH                   set perl binary pathname

  --http-log-path=PATH               set http access log pathname
  --http-client-body-temp-path=PATH  set path to store
                                     http client request body temporary files
  --http-proxy-temp-path=PATH        set path to store
                                     http proxy temporary files
  --http-fastcgi-temp-path=PATH      set path to store
                                     http fastcgi temporary files
  --http-uwsgi-temp-path=PATH        set path to store
                                     http uwsgi temporary files
  --http-scgi-temp-path=PATH         set path to store
                                     http scgi temporary files

  --without-http                     disable HTTP server
  --without-http-cache               disable HTTP cache

  --with-mail                        enable POP3/IMAP4/SMTP proxy module
  --with-mail=dynamic                enable dynamic POP3/IMAP4/SMTP proxy module
  --with-mail_ssl_module             enable ngx_mail_ssl_module
  --without-mail_pop3_module         disable ngx_mail_pop3_module
  --without-mail_imap_module         disable ngx_mail_imap_module
  --without-mail_smtp_module         disable ngx_mail_smtp_module

  --with-stream                      enable TCP/UDP proxy module
  --with-stream=dynamic              enable dynamic TCP/UDP proxy module
  --with-stream_ssl_module           enable ngx_stream_ssl_module
  --with-stream_realip_module        enable ngx_stream_realip_module
  --with-stream_geoip_module         enable ngx_stream_geoip_module
  --with-stream_geoip_module=dynamic enable dynamic ngx_stream_geoip_module
  --with-stream_ssl_preread_module   enable ngx_stream_ssl_preread_module
  --without-stream_limit_conn_module disable ngx_stream_limit_conn_module
  --without-stream_access_module     disable ngx_stream_access_module
  --without-stream_geo_module        disable ngx_stream_geo_module
  --without-stream_map_module        disable ngx_stream_map_module
  --without-stream_split_clients_module
                                     disable ngx_stream_split_clients_module
  --without-stream_return_module     disable ngx_stream_return_module
  --without-stream_upstream_hash_module
                                     disable ngx_stream_upstream_hash_module
  --without-stream_upstream_least_conn_module
                                     disable ngx_stream_upstream_least_conn_module
  --without-stream_upstream_zone_module
                                     disable ngx_stream_upstream_zone_module

  --with-google_perftools_module     enable ngx_google_perftools_module
  --with-cpp_test_module             enable ngx_cpp_test_module

  --add-module=PATH                  enable external module
  --add-dynamic-module=PATH          enable dynamic external module

  --with-compat                      dynamic modules compatibility

  --with-cc=PATH                     set C compiler pathname
  --with-cpp=PATH                    set C preprocessor pathname
  --with-cc-opt=OPTIONS              set additional C compiler options
  --with-ld-opt=OPTIONS              set additional linker options
  --with-cpu-opt=CPU                 build for the specified CPU, valid values:
                                     pentium, pentiumpro, pentium3, pentium4,
                                     athlon, opteron, sparc32, sparc64, ppc64

  --without-pcre                     disable PCRE library usage
  --with-pcre                        force PCRE library usage
  --with-pcre=DIR                    set path to PCRE library sources
  --with-pcre-opt=OPTIONS            set additional build options for PCRE
  --with-pcre-jit                    build PCRE with JIT compilation support

  --with-zlib=DIR                    set path to zlib library sources
  --with-zlib-opt=OPTIONS            set additional build options for zlib
  --with-zlib-asm=CPU                use zlib assembler sources optimized
                                     for the specified CPU, valid values:
                                     pentium, pentiumpro

  --with-libatomic                   force libatomic_ops library usage
  --with-libatomic=DIR               set path to libatomic_ops library sources

  --with-openssl=DIR                 set path to OpenSSL library sources
  --with-openssl-opt=OPTIONS         set additional build options for OpenSSL

  --with-debug                       enable debug logging

[root@centos-03 nginx-1.14.0]#
4.src下面为nginx的核心源码文件
[root@centos-03 nginx-1.14.0]# cd src/
[root@centos-03 src]# ls
core  event  http  mail  misc  os  stream
[root@centos-03 src]#
[root@centos-03 src]# ls core/
nginx.c           ngx_core.h     ngx_hash.c    ngx_module.h           ngx_parse_time.h      ngx_resolver.c  ngx_string.c
nginx.h           ngx_cpuinfo.c  ngx_hash.h    ngx_murmurhash.c       ngx_proxy_protocol.c  ngx_resolver.h  ngx_string.h
ngx_array.c       ngx_crc32.c    ngx_inet.c    ngx_murmurhash.h       ngx_proxy_protocol.h  ngx_rwlock.c    ngx_syslog.c
ngx_array.h       ngx_crc32.h    ngx_inet.h    ngx_open_file_cache.c  ngx_queue.c           ngx_rwlock.h    ngx_syslog.h
ngx_buf.c         ngx_crc.h      ngx_list.c    ngx_open_file_cache.h  ngx_queue.h           ngx_sha1.c      ngx_thread_pool.c
ngx_buf.h         ngx_crypt.c    ngx_list.h    ngx_output_chain.c     ngx_radix_tree.c      ngx_sha1.h      ngx_thread_pool.h
ngx_conf_file.c   ngx_crypt.h    ngx_log.c     ngx_palloc.c           ngx_radix_tree.h      ngx_shmtx.c     ngx_times.c
ngx_conf_file.h   ngx_cycle.c    ngx_log.h     ngx_palloc.h           ngx_rbtree.c          ngx_shmtx.h     ngx_times.h
ngx_config.h      ngx_cycle.h    ngx_md5.c     ngx_parse.c            ngx_rbtree.h          ngx_slab.c
ngx_connection.c  ngx_file.c     ngx_md5.h     ngx_parse.h            ngx_regex.c           ngx_slab.h
ngx_connection.h  ngx_file.h     ngx_module.c  ngx_parse_time.c       ngx_regex.h           ngx_spinlock.c
[root@centos-03 src]#
5.编译安装,我们只需要指定安装目录就可以了,到用到什么模块时我们再编译安装对应的模块就可以了
[root@centos-03 nginx-1.14.0]# ./configure --prefix=/usr/local/nginx
[root@centos-03 nginx-1.14.0]# yum install -y gcc
[root@centos-03 nginx-1.14.0]# yum install -y pcre-devel
[root@centos-03 nginx-1.14.0]# yum -y install zlib-devel
6.make
[root@centos-03 nginx-1.14.0]# make
7.make install
[root@centos-03 nginx-1.14.0]# make install
[root@centos-03 nginx-1.14.0]# ls /usr/local/nginx/
conf  html  logs  sbin
[root@centos-03 nginx-1.14.0]#
8.查看版本
[root@centos-03 nginx-1.14.0]# /usr/local/nginx/sbin/nginx -V
nginx version: nginx/1.14.0
built by gcc 4.8.5 20150623 (Red Hat 4.8.5-28) (GCC)
configure arguments: --prefix=/usr/local/nginx
[root@centos-03 nginx-1.14.0]#
9.启动的时候我们需要将yum安装的nginx停掉
[root@centos-03 nginx-1.14.0]# /usr/local/nginx/sbin/nginx
nginx: [emerg] bind() to 0.0.0.0:80 failed (98: Address already in use)
nginx: [emerg] bind() to 0.0.0.0:80 failed (98: Address already in use)
nginx: [emerg] bind() to 0.0.0.0:80 failed (98: Address already in use)
nginx: [emerg] bind() to 0.0.0.0:80 failed (98: Address already in use)
nginx: [emerg] bind() to 0.0.0.0:80 failed (98: Address already in use)
^C
[root@centos-03 nginx-1.14.0]# systemctl stop nginx
[root@centos-03 nginx-1.14.0]# /usr/local/nginx/sbin/nginx
[root@centos-03 nginx-1.14.0]# ps aux|grep nginx
root       9203  0.0  0.0  20548   612 ?        Ss   00:32   0:00 nginx: master process /usr/local/nginx/sbin/nginx
nobody     9204  0.0  0.1  20992  1076 ?        S    00:32   0:00 nginx: worker process
root       9206  0.0  0.0 112724   976 pts/0    R+   00:33   0:00 grep --color=auto nginx
[root@centos-03 nginx-1.14.0]#
10.查看下端口
[root@centos-03 nginx-1.14.0]# !net
netstat -lntp
Active Internet connections (only servers)
Proto Recv-Q Send-Q Local Address           Foreign Address         State       PID/Program name
tcp        0      0 0.0.0.0:80              0.0.0.0:*               LISTEN      9203/nginx: master
tcp        0      0 0.0.0.0:22              0.0.0.0:*               LISTEN      1419/sshd
tcp        0      0 127.0.0.1:25            0.0.0.0:*               LISTEN      2521/master
tcp6       0      0 :::22                   :::*                    LISTEN      1419/sshd
tcp6       0      0 ::1:25                  :::*                    LISTEN      2521/master
[root@centos-03 nginx-1.14.0]#
11.访问下
[root@centos-03 nginx-1.14.0]# !curl
curl 192.168.242.133
<!DOCTYPE html>
<html>
<head>
<title>Welcome to nginx!</title>
<style>
    body {
         35em;
        margin: 0 auto;
        font-family: Tahoma, Verdana, Arial, sans-serif;
    }
</style>
</head>
<body>
<h1>Welcome to nginx!</h1>
<p>If you see this page, the nginx web server is successfully installed and
working. Further configuration is required.</p>

<p>For online documentation and support please refer to
<a href="http://nginx.org/">nginx.org</a>.<br/>
Commercial support is available at
<a href="http://nginx.com/">nginx.com</a>.</p>

<p><em>Thank you for using nginx.</em></p>
</body>
</html>
[root@centos-03 nginx-1.14.0]#
12.结束进程可以用killall nginx(或pkill),如果没有killall命令用rpm命令查找需要安装的包
[root@centos-03 nginx-1.14.0]# rpm -qf `which killall`
[root@centos-03 nginx-1.14.0]# yum install -y psmisc
[root@centos-03 nginx-1.14.0]# /usr/local/nginx/sbin/nginx
[root@centos-03 nginx-1.14.0]# /usr/local/nginx/sbin/nginx -t
nginx: the configuration file /usr/local/nginx/conf/nginx.conf syntax is ok
nginx: configuration file /usr/local/nginx/conf/nginx.conf test is successful
[root@centos-03 nginx-1.14.0]# /usr/local/nginx/sbin/nginx -s reload
[root@centos-03 nginx-1.14.0]#
13.nginx服务管理脚本
https://coding.net/u/aminglinux/p/aminglinux-book/git/blob/master/D15Z/etc_init.d_nginx
[root@centos-03 nginx-1.14.0]# vim /etc/init.d/nginx^C
[root@centos-03 nginx-1.14.0]# cat /etc/init.d/nginx
#!/bin/bash
# chkconfig: - 30 21
# description: http service.
# Source Function Library
. /etc/init.d/functions
# Nginx Settings

NGINX_SBIN="/usr/local/nginx/sbin/nginx"
NGINX_CONF="/usr/local/nginx/conf/nginx.conf"
NGINX_PID="/usr/local/nginx/logs/nginx.pid"
RETVAL=0
prog="Nginx"

start()
{
    echo -n $"Starting $prog: "
    mkdir -p /dev/shm/nginx_temp
    daemon $NGINX_SBIN -c $NGINX_CONF
    RETVAL=$?
    echo
    return $RETVAL
}

stop()
{
    echo -n $"Stopping $prog: "
    killproc -p $NGINX_PID $NGINX_SBIN -TERM
    rm -rf /dev/shm/nginx_temp
    RETVAL=$?
    echo
    return $RETVAL
}

reload()
{
    echo -n $"Reloading $prog: "
    killproc -p $NGINX_PID $NGINX_SBIN -HUP
    RETVAL=$?
    echo
    return $RETVAL
}

restart()
{
    stop
    start
}

configtest()
{
    $NGINX_SBIN -c $NGINX_CONF -t
    return 0
}

case "$1" in
  start)
        start
        ;;
  stop)
        stop
        ;;
  reload)
        reload
        ;;
  restart)
        restart
        ;;
  configtest)
        configtest
        ;;
  *)
        echo $"Usage: $0 {start|stop|reload|restart|configtest}"
        RETVAL=1
esac

exit $RETVAL

[root@centos-03 nginx-1.14.0]#
14.我们先关掉nginx,然后用脚本启动,发现有冲突启动的是yum安装的那个nginx,我们先把yum安装的卸载掉
[root@centos-03 nginx-1.14.0]# killall nginx
nginx: no process found
[root@centos-03 nginx-1.14.0]# chmod 755 /etc/init.d/nginx
[root@centos-03 nginx-1.14.0]# /etc/init.d/nginx start
Starting nginx (via systemctl):                            [  确定  ]
[root@centos-03 nginx-1.14.0]# !ps
ps aux|grep nginx
root       9292  0.0  0.0  48580   968 ?        Ss   01:08   0:00 nginx: master process /usr/sbin/nginx -c /etc/nginx/nginx.conf
nginx      9293  0.0  0.1  48984  1672 ?        S    01:08   0:00 nginx: worker process
root       9295  0.0  0.0 112724   976 pts/0    R+   01:08   0:00 grep --color=auto nginx
[root@centos-03 nginx-1.14.0]#
[root@centos-03 nginx-1.14.0]# yum remove -y nginx
15.再次成功启动了我们编译安装的nginx
[root@centos-03 nginx-1.14.0]# ps aux|grep nginx
root       9320  0.0  0.0 112724   976 pts/0    S+   01:10   0:00 grep --color=auto nginx
[root@centos-03 nginx-1.14.0]# /etc/init.d/nginx start
Starting nginx (via systemctl):                            [  确定  ]
[root@centos-03 nginx-1.14.0]# ps aux|grep nginx
root       9338  0.0  0.0  20548   604 ?        Ss   01:10   0:00 nginx: master process /usr/local/nginx/sbin/nginx -c /usr/local/nginx/conf/nginx.conf
nobody     9339  0.0  0.1  20988  1068 ?        S    01:10   0:00 nginx: worker process
root       9341  0.0  0.0 112724   976 pts/0    R+   01:10   0:00 grep --color=auto nginx
[root@centos-03 nginx-1.14.0]#
16.停止stop
[root@centos-03 nginx-1.14.0]# /etc/init.d/nginx stop
Stopping nginx (via systemctl):                            [  确定  ]
[root@centos-03 nginx-1.14.0]# ps aux|grep nginx
root       9359  0.0  0.0 112724   976 pts/0    R+   01:12   0:00 grep --color=auto nginx
[root@centos-03 nginx-1.14.0]#
17.开机启动nginx
[root@centos-03 nginx-1.14.0]# chkconfig --list

注:该输出结果只显示 SysV 服务,并不包含
原生 systemd 服务。SysV 配置数据
可能被原生 systemd 配置覆盖。

      要列出 systemd 服务,请执行 'systemctl list-unit-files'。
      查看在具体 target 启用的服务请执行
      'systemctl list-dependencies [target]'。

netconsole      0:关    1:关    2:关    3:关    4:关    5:关    6:关
network         0:关    1:关    2:开    3:开    4:开    5:开    6:关
[root@centos-03 nginx-1.14.0]# chkconfig --add nginx
[root@centos-03 nginx-1.14.0]# chkconfig --list

注:该输出结果只显示 SysV 服务,并不包含
原生 systemd 服务。SysV 配置数据
可能被原生 systemd 配置覆盖。

      要列出 systemd 服务,请执行 'systemctl list-unit-files'。
      查看在具体 target 启用的服务请执行
      'systemctl list-dependencies [target]'。

netconsole      0:关    1:关    2:关    3:关    4:关    5:关    6:关
network         0:关    1:关    2:开    3:开    4:开    5:开    6:关
nginx           0:关    1:关    2:关    3:关    4:关    5:关    6:关
[root@centos-03 nginx-1.14.0]# chkconfig nginx on
[root@centos-03 nginx-1.14.0]# chkconfig --list

注:该输出结果只显示 SysV 服务,并不包含
原生 systemd 服务。SysV 配置数据
可能被原生 systemd 配置覆盖。

      要列出 systemd 服务,请执行 'systemctl list-unit-files'。
      查看在具体 target 启用的服务请执行
      'systemctl list-dependencies [target]'。

netconsole      0:关    1:关    2:关    3:关    4:关    5:关    6:关
network         0:关    1:关    2:开    3:开    4:开    5:开    6:关
nginx           0:关    1:关    2:开    3:开    4:开    5:开    6:关
[root@centos-03 nginx-1.14.0]#
https://coding.net/u/aminglinux/p/nginx/git/tree/master/3z
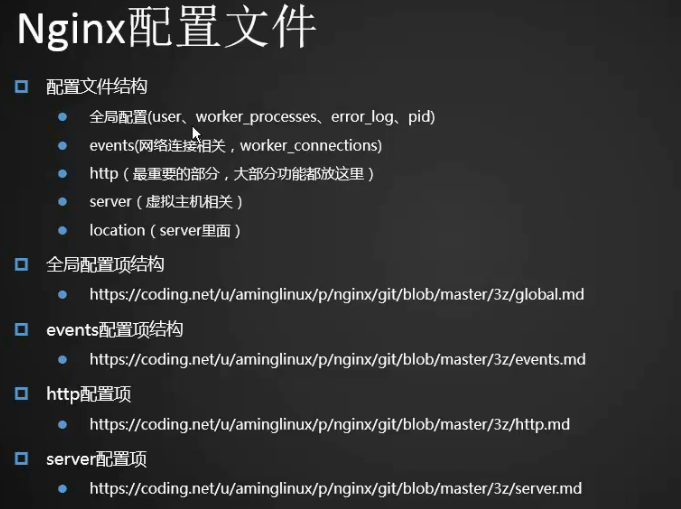
1.编译安装的配置文件路径
[root@centos-03 nginx-1.14.0]# ls /usr/local/nginx/conf/nginx.conf
/usr/local/nginx/conf/nginx.conf
[root@centos-03 nginx-1.14.0]#
2.yum安装配置文件路径
[root@centos-03 nginx-1.14.0]# ls /etc/nginx/
3.nginx配置文件说明
  oot@centos-03 nginx-1.14.0]# cd /usr/local/nginx/conf/
▽root@centos-03 conf]# ls
fastcgi.conf          fastcgi_params.default  mime.types          nginx.conf.default   uwsgi_params
fastcgi.conf.default  koi-utf                 mime.types.default  scgi_params          uwsgi_params.default
fastcgi_params        koi-win                 nginx.conf          scgi_params.default  win-utf
[root@centos-03 conf]# vim nginx.conf
[root@centos-03 conf]# cat nginx.conf

#user  nobody;     (以哪个用户运行worker进程,定义运行nginx服务的用户,还可以加上组,如 user nobody nobody;)
worker_processes  1; (定义worker进程有几个,这个数对应cpu个数,定义nginx子进程数量,即提供服务的进程数量,该数值建议和服务cpu核数保持一致。 除了可以定义数字外,还可以定义为auto,表示让系统自动调整。)

#error_log  logs/error.log; (定义错误日志的路径,可以是相对路径(相对prefix路径的),也可以是绝对路径。 该配置可以在此处定义,也可以定义到http、server、location里)
#error_log  logs/error.log  notice;(定义错误日志路径以及日志级别. 错误日志级别:常见的错误日志级别有[debug|info|notice|warn|error|crit|alert|emerg],级别越高记录的信息越少。 如果不定义默认是error)
#error_log  logs/error.log  info;

#pid        logs/nginx.pid; (定义nginx进程pid文件所在路径,可以是相对路径,也可以是绝对路径。)


events {
    worker_connections  1024; (定义每个work_process同时开启的最大连接数,即允许最多只能有这么多连接)
worker_rlimit_nofile 100000; (定义nginx最多打开文件数限制。如果没设置的话,这个值为操作系统(ulimit -n)的限制保持一致。 把这个值设高,nginx就不会有“too many open files”问题了。)
accept_mutex on;(当某一个时刻只有一个网络连接请求服务器时,服务器上有多个睡眠的进程会被同时叫醒,这样会损耗一定的服务器性能。 Nginx中的accept_mutex设置为on,将会对多个Nginx进程(worker processer)接收连接时进行序列化,防止多个进程争抢资源。 默认就是on。)
multi_accept on;(nginx worker processer可以做到同时接收多个新到达的网络连接,前提是把该参数设置为on。 默认为off,即每个worker process一次只能接收一个新到达的网络连接。)
use epoll;(Nginx服务器提供了多个事件驱动器模型来处理网络消息。 其支持的类型有:select、poll、kqueue、epoll、rtsing、/dev/poll以及eventport。 * select:只能在Windows下使用,这个事件模型不建议在高负载的系统使用 * poll:Nginx默认首选,但不是在所有系统下都可用 * kqueue:这种方式在FreeBSD 4.1+, OpenBSD2.9+, NetBSD 2.0, 和 MacOS X系统中是最高效的 * epoll: 这种方式是在Linux 2.6+内核中最高效的方式 * rtsig:实时信号,可用在Linux 2.2.19的内核中,但不适用在高流量的系统中 * /dev/poll: Solaris 7 11/99+,HP/UX 11.22+, IRIX 6.5.15+, and Tru64 UNIX 5.1A+操作系统最高效的方式 * eventport: Solaris 10最高效的方式)
}
http {
    include       mime.types; (include mime.types; //cat conf/mime.types 定义nginx能识别的网络资源媒体类型(如,文本、html、js、css、流媒体等) default_type application/octet-stream; 定义默认的type,
如果不定义改行,默认为text/plain.)
    default_type  application/octet-stream;

    #log_format  main  '$remote_addr - $remote_user [$time_local] "$request" '  (log_format main '$remote_addr - $remote_user [$time_local] "$request" ' '$status $body_bytes_sent

"$http_referer" ' '"$http_user_agent" "$http_x_forwarded_for"'; 其中main为日志格式的名字,后面的为nginx的内部变量组成的一串字符串。)
    #                  '$status $body_bytes_sent "$http_referer" '
    #                  '"$http_user_agent" "$http_x_forwarded_for"';

    #access_log  logs/access.log  main; (定义日志的路径以及采用的日志格式,该参数可以在server配置块中定义。)

    sendfile        on; (是否调用sendfile函数传输文件,默认为off,使用sendfile函数传输,可以减少user mode和kernel mode的切换,从而提升服务器性能。 对于普通应用设为 on,如果用来进行下载等应用磁盘IO重负载应用,
可设置为off,以平衡磁盘与网络I/O处理速度,降低系统的负载。)
sendfile_max_chunk 128k;(该参数限定Nginx worker process每次调用sendfile()函数传输数据的最大值,默认值为0,如果设置为0则无限制)
    #tcp_nopush     on; (当tcp_nopush设置为on时,会调用tcp_cork方法进行数据传输。 使用该方法会产生这样的效果:当应用程序产生数据时,内核不会立马封装包,而是当数据量积累到一定量时才会封装,然后传输。这样有助于解决网络
堵塞问题。 默认值为on。举例:快递员收快递、发快递,包裹累积到一定量才会发,节省运输成本。)

    #keepalive_timeout  0;
    keepalive_timeout  65; (该参数有两个值,第一个值设置nginx服务器与客户端会话结束后仍旧保持连接的最长时间,单位是秒,默认为75s。 第二个值可以省略,它是针对客户端的浏览器来设置的,可以通过curl -I看到header信息中有一项
Keep-Alive: timeout=60,如果不设置就没有这一项。 第二个数值设置后,浏览器就会根据这个数值决定何时主动关闭连接,Nginx服务器就不操心了。但有的浏览器并不认可该参数。)
send_timeout(这个超时时间是发送响应的超时时间,即Nginx服务器向客户端发送了数据包,但客户端一直没有去接收这个数据包。 如果某个连接超过send_timeout定义的超时时间,那么Nginx将会关闭这个连接。)
client_max_body_size 10m;(浏览器在发送含有较大HTTP包体的请求时,其头部会有一个Content-Length字段,client_max_body_size是用来限制Content-Length所示值的大小的。 这个限制包体的配置不用等Nginx接收完所有的HTTP包体,就可以告诉用户请求过大不被接受。会返回413状态码。 例如,用户试图上传一个1GB的文件,Nginx在收完包头后,发现Content-Length超过client_max_body_size定义的值, 就直接发送413(Request Entity Too Large)响应给客户端。)
    #gzip  on; (是否开启gzip压缩。)

    server {
        listen       80; (//监听端口为80,可以自定义其他端口,也可以加上IP地址,如,listen 127.0.0.1:8080;)
        server_name  localhost; ( //定义网站域名,可以写多个,用空格分隔。)

        #charset koi8-r; (//定义网站的字符集,一般不设置,而是在网页代码中设置。)

        #access_log  logs/host.access.log  main; (//定义访问日志,可以针对每一个server(即每一个站点)设置它们自己的访问日志。)

        location / {
            root   html; (//定义网站根目录,目录可以是相对路径也可以是绝对路径。)
            index  index.html index.htm; (//定义站点的默认页。)
        }

        #error_page  404              /404.html; (//定义404页面 )

        # redirect server error pages to the static page /50x.html
        #
        error_page   500 502 503 504  /50x.html; (//当状态码为500、502、503、504时,则访问50x.html)
        location = /50x.html {
            root   html; (/定义50x.html所在路径)
        }

        # proxy the PHP scripts to Apache listening on 127.0.0.1:80
        #
        #location ~ .php$ { (定义访问php脚本时,将会执行本location{}部分指令)
        #    proxy_pass   http://127.0.0.1; (//proxy_pass后面指定要访问的url链接,用proxy_pass实现代理)
        #}

        # pass the PHP scripts to FastCGI server listening on 127.0.0.1:9000
        #
        #location ~ .php$ {
        #    root           html;
        #    fastcgi_pass   127.0.0.1:9000; (//定义FastCGI服务器监听端口与地址,支持两种形式,1 IP:Port, 2 unix:/path/to/sockt)
        #    fastcgi_index  index.php;
        #    fastcgi_param  SCRIPT_FILENAME  /scripts$fastcgi_script_name; (//定义SCRIPT_FILENAME变量,后面的路径/scripts为上面的root指定的目录)
        #    include        fastcgi_params; (//引用prefix/conf/fastcgi_params文件,该文件定义了fastcgi相关的变量)
        #}

        # deny access to .htaccess files, if Apache's document root
        # concurs with nginx's one
        #
        #location ~ /.ht {
        #    deny  all; (//访问的url中,以/.ht开头的,如,www.example.com/.htaccess,会被拒绝,返回403状态码。)
        #}
    }


    # another virtual host using mix of IP-, name-, and port-based configuration
    #
    #server {
    #    listen       8000; (//监听8000端口)
    #    listen       somename:8080; (//指定ip:port)
    #    server_name  somename  alias  another.alias; (//指定多个server_name)

    #    location / {
    #        root   html;
    #        index  index.html index.htm;
    #    }
    #}


    # HTTPS server
    #
    #server {
    #    listen       443 ssl; (//监听443端口,即ssl)
    #    server_name  localhost;

    #    ssl_certificate      cert.pem; (//指定pem文件路径)
    #    ssl_certificate_key  cert.key; (//指定key文件路径)

    #    ssl_session_cache    shared:SSL:1m; (//指定session cache大小)
    #    ssl_session_timeout  5m; (/指定session超时时间)

    #    ssl_ciphers  HIGH:!aNULL:!MD5; (/指定ssl算法)
    #    ssl_prefer_server_ciphers  on;

    #    location / {
    #        root   html;
    #        index  index.html index.htm;
    #    }
    #}

}
[root@centos-03 conf]#