摘要:
{{item.name}}<;。Wxss文件。约会日期div{display:margin-top:}。柔性项{显示:文本对齐:中心;光标:指针;}。data_name{font-size:行高度:}。活动标记。flex项{background:{“data_name”:
在微信小程序里面没有DOM对象, 不能操作DOM. 所有的操作通过数据来实现,下面主要实现了给循环列表点击添加类的操作
一、单项
目标需求:实现下图,给点击的view增加类,每次只能选择一个。
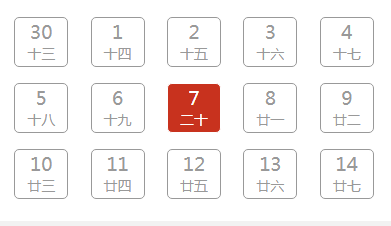
主要思路:给点击的view增加类,依靠点击的index对state进行赋值。如果相同时,给该view增加类。
实现代码:
.wxml文件
<view>
   <view class='appointent-date'>
     <view  class="appointent-date-div {{state==index?'active-tag':''}}" bindtap="select_date"  wx:for="{{dates}}" data-key='{{index}}'>
       <view class="flex-item" >
         <rich-text class='data_name'>{{item.data_name}}</rich-text>
         <rich-text>{{item.name}}</rich-text>
       </view>
     </view>
   </view>
</view>
.wxss文件
.appointent-date-div{
   display:inline-block;
   width:20%;
   text-align: center;
   margin-top: 30rpx;
 }
 .flex-item{
   display: inline-block;
   width:96rpx;
   height: 88rpx;
   font-size: 26rpx;
   border:2rpx solid #999;
   text-align: center;
   border-radius: 10rpx;
   color: #999;
   cursor: pointer;
   line-height: 30rpx;
 }
 .data_name{
   font-size: 36rpx;
   line-height: 52rpx;

 }
 .active-tag .flex-item{
   background: #c8321e;
   color:#fff;
   border:1rpx solid #fff;
 }
.js文件
Page({

   /**
    * 页面的初始数据
    */
   data: {
     dates: [
       { "data_name": "30", "name": "十三"},
       { "data_name": "1", "name": "十四"},
       { "data_name": "2", "name": "十五"},
       { "data_name": "3", "name": "十六"},
       { "data_name": "4", "name": "十七"},
       { "data_name": "5", "name": "十八"},
       { "data_name": "6", "name": "十九"},
       { "data_name": "7", "name": "二十"},
       { "data_name": "8", "name": "廿一"},
       { "data_name": "9", "name": "廿二"},
       { "data_name": "10", "name": "廿三"},
       { "data_name": "11", "name": "廿四"},
       { "data_name": "12", "name": "廿五"},
       { "data_name": "13", "name": "廿六"},
       { "data_name": "14", "name": "廿七"}
     ],
     state:''
   },
   //选择日期后加样式
  select_date: function (e) {
     this.setData({
       state: e.currentTarget.dataset.key,
     });
   },
 })
二,多项
目标需求:实现下图,给点击的view增加类,再次点击时取消,可以多项选择。
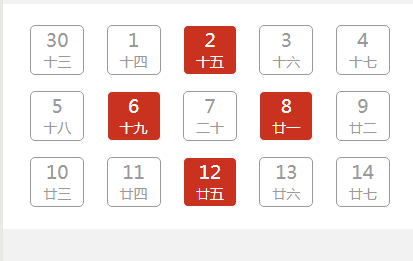
主要思路:
给dates数组增加一个属性state, 1表示状态选中,0表示未选中,每次点击时修改active的值。
实现代码:
.wxml文件
 <view class='appointent-date'>
     <view  class="appointent-date-div {{item.state==1?'active-tag':''}}" bindtap="select_date"  wx:for="{{dates}}" data-key='{{index}}'>
       <view class="flex-item" >
         <rich-text class='data_name'>{{item.data_name}}</rich-text>
         <rich-text>{{item.name}}</rich-text>
       </view>
     </view>
   </view>
.wxss文件
.appointent-date{
   padding:10rpx 30rpx 40rpx 30rpx;
   background: #fff;
   box-sizing: border-box;
 }
 .appointent-date-div{
   display:inline-block;
   width:20%;
   text-align: center;
   margin-top: 30rpx;
 }
 .flex-item{
   display: inline-block;
   width:96rpx;
   height: 88rpx;
   font-size: 26rpx;
   border:2rpx solid #999;
   text-align: center;
   border-radius: 10rpx;
   color: #999;
   cursor: pointer;
   line-height: 30rpx;
 }
 .data_name{
   font-size: 36rpx;
   line-height: 52rpx;

 }
 .active-tag .flex-item{
   background: #c8321e;
   color:#fff;
   border:1rpx solid #fff;
 }
.js文件
Page({

   /**
    * 页面的初始数据
    */
   data: {
     dates: [
       { "data_name": "30", "name": "十三", "state": 0 },
       { "data_name": "1", "name": "十四", "state": 0 },
       { "data_name": "2", "name": "十五", "state": 0 },
       { "data_name": "3", "name": "十六", "state": 0 },
       { "data_name": "4", "name": "十七", "state": 0 },
       { "data_name": "5", "name": "十八", "state": 0 },
       { "data_name": "6", "name": "十九", "state": 0 },
       { "data_name": "7", "name": "二十", "state": 0 },
       { "data_name": "8", "name": "廿一", "state": 0 },
       { "data_name": "9", "name": "廿二", "state": 0 },
       { "data_name": "10", "name": "廿三", "state": 0 },
       { "data_name": "11", "name": "廿四", "state": 0 },
       { "data_name": "12", "name": "廿五", "state": 0 },
       { "data_name": "13", "name": "廿六", "state": 0 },
       { "data_name": "14", "name": "廿七", "state": 0 }
     ]
   },
   //选择日期后加样式
   select_date: function (e) {
     var index = e.currentTarget.dataset.key;
     if (this.data.dates[index].state == 1) {
       this.data.dates[index].state = 0;
     } else if (this.data.dates[index].state == 0) {
       this.data.dates[index].state = 1;
     }
     this.setData({
       dates: this.data.dates,
     });
   },
 })
应用:

点击图片选中老师,每点击一次改变t_num的值
wxml:
  <view class='pteach_b'>
    <block wx:for="{{teach_object}}" wx:key="item.id">
      <view class='teacher_img' data-num="{{index}}" bindtap='count_num'>
        <image src='{{item.imgSrc}}'></image>
        <view class='teacher_name'>{{item.teachName}}</view>
        <view class="{{item.state==1?'teacher_bg_n':'teacher_bg_w'}}" >
          <view class='teacher_bg'>
            <view></view>
            <text>{{item.thankT}}</text>
          </view>
        </view>
      </view>
    </block>
  </view>
  <view class='pteach_foot'>
    <view class='foot_white'>已选择{{t_num}}位老师</view>
    <view class='foot_black'>投票</view>
  </view>
wxss:
.teacher_bg_w{
  display: none;
}
.teacher_bg_n{
  display: block;
}
js:
Page({
  data: {
    t_num:'0',
    teach_object:[
      {
        id:"1",
        imgSrc:"../../images/teacher1.png",
        teachName:"Jazz-胡闹闹",
        thankT:"感谢您的认可",
        state:0
      },
      {
        id: "2",
        imgSrc: "../../images/teacher2.png",
        teachName: "Popping-胡闹闹",
        thankT: "感谢您的认可",
        state: 0
      },
      {
        id: "3",
        imgSrc: "../../images/teacher3.png",
        teachName: "Jazz-胡闹闹",
        thankT: "感谢您的认可",
        state: 0
      },
      {
        id: "4",
        imgSrc: "../../images/teacher1.png",
        teachName: "Popping-胡闹闹",
        thankT: "感谢您的认可",
        state: 0
      },
      {
        id: "5",
        imgSrc: "../../images/teacher2.png",
        teachName: "Jazz-胡闹闹",
        thankT: "感谢您的认可",
        state: 0
      },
      {
        id: "6",
        imgSrc: "../../images/teacher3.png",
        teachName: "Jazz-胡闹闹",
        thankT: "感谢您的认可",
        state: 0
      }
    ]
  },
  count_num:function(e){
    var index=e.currentTarget.dataset.num;
    if (this.data.teach_object[index].state==1){
      this.data.teach_object[index].state=0;
    } else if (this.data.teach_object[index].state==0){
      this.data.teach_object[index].state=1;
    }

    var array=this.data.teach_object;
    var m = 0;
    for(var i=0;i<array.length;i++){
      var nn=this.data.teach_object[i].state;
      if(nn==1){
        m=m+1
      }
    }
    this.setData({
      teach_object: this.data.teach_object,
      t_num:m
    })
  }
})
转自: http://www.wxapp-union.com/portal.php?mod=view&aid=3358